Just like desktop computers, a laptop keyboard can fail. Keys can also stick, fall out or break. Even a simple attempt to clean the keyboard can lead to loss of keys, not to mention spilled tea, coffee or other liquids. If there are pets or small children living at home, this adds two more reasons for the keyboard to malfunction. Below we will consider a method for removing the keys for cleaning, as well as returning the keys to their place and several ways to fix a minor breakdown.
How to remove a key from a laptop
Types of fastenings
Let's look at the types of key mounts in a laptop keyboard
- membrane - the cheapest and most common;
- switches are a more stable, reliable, and at the same time expensive type of key. Much less common than membrane;
- capacitive - transmit a signal by closing contacts. The second most common type after membrane. Not the most reliable type of keyboard;
- touch is the most expensive type. In addition, to repair it, you will need to remove the entire touch panel, and this is impossible to do at home.
Why you need to clean
The user is in constant contact with the keyboard while working at the laptop. But many people don't think about the fact that it needs to be cleaned. After all, the garbage is almost invisible from the outside. With active use, you can wipe the device after 10–15 days, then it will look like new. But after a year it is necessary to carry out a general cleaning. Over this period of time, not only dust, but also hair and crumbs accumulate under the buttons. And along with them are microbes harmful to health.
Tea, coffee and other drinks spilled on the keyboard are dangerous for the entire laptop. If now the computer works normally without cleaning, then after some time, for example, a couple of months, it can be thrown away. Why? The liquid penetrates through the keyboard into the case, ending up on the motherboard and contacts, which become shorted or oxidized. As a result, not only the board will suffer, but also the hard drive, processor and other components. The accumulation of dust on conductive elements also leads to a short circuit. Excess dirt and sugary drinks cause the keys to stick.
Installing regular keys
Important! Record the order in which the keys were located. Otherwise, they will have to be rearranged again.
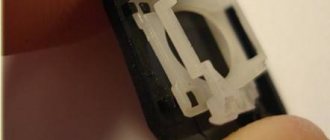
- Install the “swing” on the membrane. First, place the antennae under the larger part, then - by applying slight pressure - they will go in on their own.
We place the antennae under the larger part and press a little so that they go in further on their own.
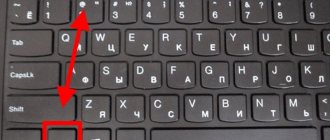
- Raise the “swing” using a fairly thin object (a paperclip, a thin knife, a screwdriver or a ruler).
- Place the button and press until it clicks.
We put a button
Find out detailed instructions on how to clean your laptop keyboard, as well as the best cleaning methods, in our new article.
How to remove the keyboard from an Asus laptop
If necessary, you can completely remove the keyboard. On each laptop it is secured with latches that need to be pushed in using a tool. It's better to start from the top left. Then slightly lift the side of the keyboard (you can use a needle, paper clip, or a sharp metal nail file).
Then you move to the other latch and move it away. Once all the latches are removed, you can lift up the keyboard. It is attached to the laptop body using a cable. You turn the black frame up and the cable comes out.
You need to assemble the keyboard from an Asus laptop in the same order: first, connect it with a cable to the device, and then put the keyboard in place and snap the fastening mechanism into the grooves.
Keyboard repair
Let's look at ways to repair keys on a laptop keyboard
There are two ways.
First way
If any fastening is broken, you can try to restore it using a needle from an insulin syringe:
- the needle is applied to the damaged part. It is better if it extends two to three millimeters beyond the edge of the breakage;
- Use a soldering iron to heat the needle and carefully fuse it into the plastic;
- Carefully bite off the excess plastic using side cutters.
Second way
If you don't have any tools, you can use superglue:
- heat the needle with a lighter;
- make a groove using lint from a comb or similar objects. The main thing is that the size of the groove allows the lint to enter;
- fix the lint with superglue;
On a note! The result can be checked in about an hour. Typically, the process takes about forty minutes to an hour.
Video - How to repair and insert laptop keyboard buttons
How to disassemble a Lenovo IdeaPad B570 laptop (Lenovo IdeaPad B570 disassembly)
This video shows the disassembly process. Lenovo laptop
IdeaPad B570 Additional materials: video on how.
Next in line. Speakers for notebook. Take the speaker wire and twist it to the sides and pull it out of the connector.
Next, turn off the laptop using the On/Off button. Also, using careful movements, tear off the wire and remove it from the connector.
Next, find the Lenovo logo sticker, under which there is another mounting bolt.
It should also be unscrewed from the housing. That's it, now we need to close the laptop lid and move on to the next steps.
Open the laptop case
After we have disconnected all the parts that were attached to the case and closed the top cover, we break down the case's mounting bolts.
Turn the laptop upside down and unscrew all the bolts one by one. There should be 7 pieces.
Also at the corners of the bottom you can see two more mounting bolts. They hold the laptop matrix, and they also need to be unscrewed.
After unscrewing the bolts, carefully check that all parts of the housing are secured with screws.
Otherwise, opening the cover may damage the housing.
After a thorough check, we need to return the laptop to its normal position and open it.
At this stage we will open the top panel, reinforced with special latches. You can use a plastic card to remove all the latches.
Do not insert the plastic card deep into the corner of the top panel and do not start to move the latches.
Carefully unhook all the fasteners around the perimeter of the panel so as not to break anything. At the same time, remove the card reader cover so that it does not interfere with your work.
Once you have unscrewed all the fasteners, you can move on to the next part of our guide, in which we will begin removing the motherboard and continue with the rest of the work.
Video instructions for completely disassembling and wiping the Lenovo G580 G480 G485 G585 G780 laptop.
Opening the case, complete disassembly, replacing the keyboard in a Lenovo laptop, Bratsk, Energy.
Video about unlocking keyboards on laptops
READ Xiaomi Redmi Note 7 Update
Warning
- A malfunction resulting from the ingress of liquid requires high coordination, accuracy and attentiveness from self-repair. Too much force or the wrong cleaning agent can completely destroy the conductive path. If you are not confident in your abilities, it is better to entrust this work to a specialist.
- Removing and installing keys does not cost much (around 500 rubles), independent removal requires great skill, care and accuracy. Excessively sudden and careless movements can damage the fastenings. Carry out the procedures only if you have the necessary skills and are unable to take the laptop to a service center
- The fastenings in small keys are also small. If you are not confident in your vision and the necessary dexterity, it is better to entrust the work to a service center
- Working with a soldering iron requires not only care, but also knowledge, skills and experience. Careless movement can lead to damage to the entire device.
- Superglue can get on the conductive path, rendering it inoperative. Work very carefully.
The easiest and fastest way to unlock the keyboard on Lenovo laptops
A laptop performs all the same functions as a desktop PC, but its advantage over a computer is that it is an extremely compact device. You can use your laptop everywhere: at work, at home, in transport, outdoors. If people are not using a laptop at work, such as at home or elsewhere, they may need to lock it, although this may be the case everywhere. As practice shows, most often this device is locked to prevent its use by small children, which, due to their curiosity, can cause harm (even deletion) to some valuable files or intruders.
A situation often arises when a person has locked the keyboard of his laptop, but cannot unlock it back. As a rule, in such cases, they turn to service center specialists to repair the keyboard on Lenovo laptops. If you want to try to solve this problem yourself, we will share with you information that will help you resolve the situation quickly and effectively.
Most often, you can unlock the keyboard on any Lenovo laptop model using a combination of two keys, the first of which. Win, and the choice of the second depends on the specific laptop model. To know exactly which key combination will help unlock your laptop, look at this information in its instructions if you do not have access to the instructions, and then try to download the gadget manual from the manufacturer’s electronic resource. To do this, you will need to register there and enter the serial number of your device.
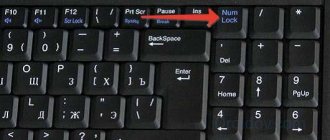
To remove the device from your Lenovo laptop keyboard, you can take a different route. Simultaneously press the two NumLock Fn keys (located to the right of the keyboard) on the device's keyboard. This will turn on the digital keypad.
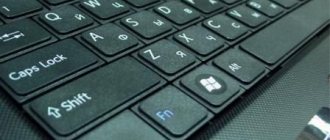
If even this method failed to unlock the keyboard, you need to go the third way. Find the button on the first line of your device's keyboard (F1. F12) that shows the lock, which simply symbolizes the block. When you find the appropriate key, press it at the same time as the Fn soft key.
Even if this method cannot solve your problem, your gadget may be attacked by a virus and hence will not be able to cope with the task. In this case, you should contact a Lenovo service center for qualified technical assistance.
As with desktop computers, laptop keyboards can fail. Keys can also bulge, fall out, or break. Even just trying to clean your keyboard can result in lost keys, not to mention spilled tea, coffee or other liquids. If pets or small children live at home, this adds two more reasons for keyboard failure. Below we will look at a method for removing keys for cleaning, as well as returning the keys to their place and some ways to fix minor damage.
How to clean your computer keyboard yourself?
In this article we will look at how to clean your keyboard.
, both external from a desktop PC and a laptop keyboard. But first things first.
Clean the keyboard only when the computer is turned off!
How to clean your desktop keyboard?
First, let's determine exactly how it got dirty. If it's just dust, wipe it with a damp cloth, trying to wipe the space between the keys with the corners of the cloth. Also, a special can of compressed air can help in removing dust between the keys of the keyboard. It looks like a deodorant, but inside there is only pressurized air. This can is sold in many stores specialized in computer equipment. All you have to do is search. The spray bottle should come with a nozzle in the form of an oblong tube 10-15 cm. We place the end of this tube between the keys, and after pressing the valve, we move along the key, during which a large amount of dust and small debris is blown out with compressed air. A regular vacuum cleaner can serve as a good alternative to such a cylinder. Remove all attachments from the vacuum cleaner, leaving only the tip of the tube. After that, use it to clean the keyboard in the same way as using a spray can.
If the cause of the blockage is crumbs or some hard objects stuck behind the keys, it is recommended to remove them. Before removing the keys from the keyboard, take several pictures of the location of the keys on your phone, so that in the event of a mass removal of the keys, you do not confuse their places.
Removing a key is not as difficult and dangerous as it might seem. For ease of removal, you will need a nail file or knife; we will use one of these items to pick out the keys on the keyboard. Carefully insert the tip of the knife/file under the key until it stops and either begin to slowly lift it, or rotate the knife/file to place the last one on the edge. Cover the key with your palm - it can quickly fly around the house. When you remove one key, you will then understand how best to act and continue filming on your own. In order to insert the key into place, get into the special groove and press the key, with an accompanying click, it should snap into place.
If it so happens that you actually spilled coffee or a similar drink on the keyboard, then here you need to:
1. Remove all the keys of your coffee-stained keyboard and soak them in a container of water to remove any coffee residue stuck to them. Then thoroughly wipe away the coffee from the place where the button was located. You can remove only part of the buttons and soak them in water only if you are sure that only this part of the buttons was flooded and that coffee did not spill inside the keyboard. Speaking of the insides... If you are sure that there is no coffee inside (NOT UNDER THE KEYS) of the keyboard, you can put the buttons back and your cleaning is complete. If the buttons still stick, proceed to step 2 of cleaning.
2. It's time to disassemble the keyboard piece by piece. This is perhaps a little more difficult than the previous stage, but just as doable. Turn the keyboard over with the buttons facing down, you should see screws, look at what kind of screwdriver you need (Flat or raised) and prepare it. It is advisable to start disassembling the keyboard on an empty table so that nothing gets lost. Unscrew the screws one by one, and in order not to confuse which is which, place them on the table so that they eventually outline the places where they are screwed in on the keyboard. Naturally, this needs to be done if the screws are different, but if they are the same, collect them in a menu so that you don’t get lost. Once you have removed all the screws from the keyboard, carefully separate the 2 parts of the keyboard - the bottom and the top. The keys should remain on the top with nothing else attached to it. Wipe the bottom of the top with a damp cloth. There should be a transparent film or board on the remaining bottom of the keyboard, depending on the type and age of the keyboard. This film/board should have rubber buttons that act as an intermediary between the button and the contact on the board. Remember or photograph how they were and remove them by pouring them into a container of water. Use a damp cloth to wipe the film/board from any coffee residues, rinse the rubber bands that were previously filled with water and leave them to dry on a towel. After the film/board and rubber bands have dried, put everything back in the position it was in before, which I hope is shown in the photograph you took. The main thing is to place the rubber bands strictly in their places, otherwise you will not be able to properly put on the upper part (which contains the keys) of the keyboard. After everything is installed on its bridge, place the upper part, then after it “sits” in its place, squeezing both sides, turn the keyboard down with the keys and begin tightening the screws. Your keyboard is now cleaned.