Features of turning on the power supply
The times when computers were turned on and off with an ordinary switch are long gone. Modern cars have become “smarter” and are able to independently control the inclusion of their power supply. And the user today starts the machine by pressing a regular, non-locking button. What happens to the PC during this time and how does it manage power?
Almost every modern power supply is equipped with a special unit that generates a standby voltage of +5 V, which is present even when the computer is turned off, but its power plug is inserted into the socket. This voltage is supplied to the motherboard, constantly powering some of its components. Among them is the switching unit.
When we press the power button, the motherboard sends a “Turn on” signal to the power supply. The power supply turns on, sets the required voltage on all buses and, if it is normal, reports to the computer that everything is in order, you can start.
Shutting down occurs in a similar way: we press the power button or tell the PC to shut down programmatically. It closes all tasks, saves data and removes the “Turn on” signal from the power supply unit. The power supply turns off.
Important! As has already been verified, after turning off the PC, standby power on the motherboard is maintained as long as the power cord is connected to the outlet.
Connecting the power supply
For convenience, we have also divided the process of connecting a new power supply into several stages.
Please note that the power supply must provide adequate power to your computer. If you connect a low-power unit, the computer may run very slowly or refuse to start at all. If you have not yet chosen a power supply, our website has already described how you need to make the right choice by calculating the correct power.
Step 1: opening the system case
If the system unit case is closed, you will need to gain access to its insides by removing the side wall. Once this task is completed, place the system unit on the unit - this will make it much easier to install the power supply.
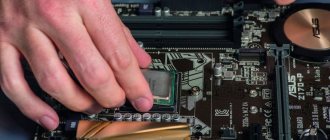
Step 2: Removing the Cooler and CPU
Often, in order to install a power supply, you need to free up enough space by temporarily removing some devices. As a rule, in most cases, users need to remove the cooler and processor, but since the internal structure of the system unit may be completely different, this procedure may not be necessary.
Step 3: Install a new power supply
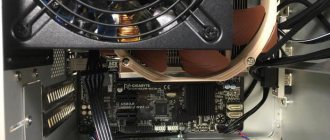
Insert the power supply into the system unit case. For convenience, many cases have special slides built into them, with the help of which the power supply can conveniently “move” into its socket.
Before screwing the power supply to the case, be sure to make sure that access to the fan is not blocked by anything, and that the power supply itself is clearly aligned with all the screws on the case. Screw it on with screws from the outer and inner parts of the case.
Step 4: Connecting the Connectors
Now that the power supply is installed in the computer, you can connect the power cables to the motherboard. If you took a photo as suggested above, use it to know which cable goes where.
Typically, cable connections are made in the following order:
After connecting all the cables, be sure to check that they do not interfere with other devices on the computer, for example, the cable does not touch the cooler. It is recommended to secure all unused cables with a tie and carefully put them aside so that they do not dangle throughout the case.
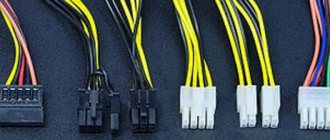
Pinout of main power supply connectors
Before we figure out how to start a computer power supply, let's look at the main connectors of this unit. There are not many of them, but you need to know the pinout of these connectors.
Main connector
It has 24 contacts (pin), and 4 of them are removable. This allows the power supply to be used in older PC models with 20 pins. Through this connector, almost all voltages generated by the power supply are supplied to the motherboard, including the service “All voltages are normal” and “Turn on power supply”.
Appearance and pinout of the main connector
Video card connector
There are two types of such connectors - eight- and six-pin. Depending on the power and video performance, either one or the other or both are used. This bus supplies +12 V.
CPU connector
This connector is also connected to the motherboard and is responsible for power supply to the processor. Depending on the performance and power of the CPU, one or two such connectors can be connected. Motherboards without such a socket are practically no longer produced. They have four contacts through which +12 V is supplied, two of the four contacts (pins) are common.
SATA device connector
These are mainly relatively modern hard drives (including solid-state drives) and SD drives, but there may also be other peripherals. The connector is five-pin; +3.3, +5 and +12 V are supplied to the device via its buses.
IDE Device Connector
A relatively old Molex connector, but still widely used. It is designed to power devices (hard drives, SD drives) operating via the IDE interface. Additionally, the connector can be used to power additional fans (via appropriate adapters). On its buses you can find +5 and +12 V.
Expert opinion
Alexey Bartosh
Specialist in repair and maintenance of electrical equipment and industrial electronics.
Ask a Question
Healthy! There is another type of connector for connecting so-called floppy drives (floppy disk drives). May be absent in modern power supplies. In this case, Molex/Floppy adapters are used, which are included in the kit or purchased separately. They also contain +5 and +12 V.
Removing the old power supply
Before we get to the meat of the matter, we need to take some time to remove the old power supply. This process is carried out in several obvious and simple steps.
Step 1: Unplug all cables powering the computer
Before proceeding, be sure to completely turn off the power to the computer. Some power supplies have a special switch that completely turns off the entire system unit; if you have one, it must be switched to the inactive position.
Step 2: Removing the side panel of the system unit case
When the first stage has been successfully completed, you can proceed directly to the process itself, which begins, of course, with gaining access to the insides of the system unit.
Modern cases are designed in different ways: in some it is enough to snap off the side wall, in others you need to remove the cover after first unscrewing the fastening screws. Accordingly, your task is to remove one of the walls of the block to gain direct access to the old power supply.
Step 3: Photograph the Wiring
To avoid confusion when connecting a new power supply about how the power supply cables are connected and to which devices, we recommend taking a few pictures, which will subsequently make your life much easier.
Step 4: Disconnecting Cables Leading to the Motherboard
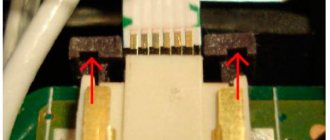
First of all, the power supply powers the motherboard, so this is where you will need to disconnect the power supply cables first. Please note that 20- or 24-pin connectors are most often secured with a key, so before removing the cable, you will need to remove the key, otherwise there is a high risk of breakage.
Step 5: Disconnect cables connected to other devices
The order is not important here - the main thing is to turn off everything that powers the power supply.
Step 6: Removing the Power Supply
After making sure that all cables of the power supply have been successfully disconnected, you will need to carefully remove it from the system unit case - to do this, you need to unscrew the screws that secure it to the case with a Phillips screwdriver. In most cases, the power supply is secured with four screws, but modern manufacturers may use fewer.
Try to remove the power supply slowly, because if any of the power cables have not been disconnected, there is a risk of breaking some devices. If all cables have been disconnected, the power supply will easily leave the case.
Actually, this completes the process of turning off the power supply. All that's left to do is connect a new power supply.
How to connect a power supply without a computer (without a motherboard)
Now it’s time to figure out how to start a computer’s power supply without the computer itself. To do this, you need to simulate the signal that the motherboard sends when you press the “Start” button. This is not difficult to do. To start the power supply, it is enough to apply a low level to its special input, called “PS-ON”. That is, short-circuit it to the body. After that, plug the power cord into the outlet and turn on the mechanical switch on the “back” of the power supply (if there is one). Few people know, but in most modern power supplies this switch is located on the power supply itself, on the back of the computer.
Switch located on the ATX power supply
Which contacts need to be closed?
We have sorted out what signal to send to the power supply. But where to submit it? Let's take a look at the pinout of the main power connector of the motherboard (see above). One of the wires on it is green and goes to pin 16 of the plug. It is to this that you need to apply a low level, that is, close it with the general one, the color of which is black. There are many black wires on the block, you can choose any one. For example, going to pin 15 or 17. This is the most convenient option. We take a piece of wire, strip the ends and insert it into the block, shorting the green and black. At worst, you can use a straightened paper clip.
Important! It is better to supply power to the power supply only after installing a jumper on the block. This will save us from problems if the jumper cannot be installed immediately and reliably and in the process of manipulating wires and paper clips the power supply will start and turn off repeatedly. This can easily disable it.
If we did everything correctly, then after power is applied the power supply should start. This will be heard by the characteristic noise of the cooling fan.
Application of BP
In fact, power supplies used in computers are quite universal solutions, which are essentially voltage converters. Turning on a power supply without a motherboard makes it possible to obtain various electric current voltages at its outputs, applicable for providing power to a wide variety of instruments and devices. The PC component in question is a fairly reliable and powerful switching power supply, providing stabilized voltages at its output and, importantly, equipped with short circuit protection. Before moving on to instructions on how to start a power supply without a motherboard, let's look at specific examples of why this procedure might be needed.
What to do if the power supply does not turn on
We found out how to turn on the power supply from a computer without the computer itself, and if it turns on, then everything is fine. You can proceed to measuring output voltages and other diagnostics. But what to do if the power supply never came to life?
There are few options here, since we initially ruled out damage to the button and motherboard by starting the computer's power supply directly. First of all, check for voltage in the outlet. As trivial as it may be, very often we forget to do this and rack our brains over a problem that is not a problem. We turn on the multimeter to measure alternating voltage with a limit of at least 400 V and simply install the probes into the outlet.
Next you need to check the power cable. It rarely breaks down, but it does happen. We inspect it, pull it out of the PC, plug it into a power outlet and, using the same multimeter, measure the voltage at the two outer contacts (the middle one is ground).
Let's check if we forgot to turn on the power switch on the power supply and if we made a mistake with the jumper. Is everything in place and correct? Let's try to disassemble the device and look for a problem.
Warning
Before starting a power supply without a motherboard, the user must ensure that there is a load on it. That is, some device must be connected to the power supply (red and black wires). Turning on the unit “idle” is extremely undesirable and can lead to failure of the power supply. The load can be represented by a regular light bulb with a power of about 10 W, a resistor, a regular PC case fan, etc.
In this simple way you can breathe life into a seemingly unnecessary and inapplicable device. The launch method itself, as we see, is not at all complicated; the main thing is to set the ultimate goal and do everything carefully and carefully.
Methods for checking and repairing power supply
To work, we need a small Phillips screwdriver and a multimeter (tester). Open the housing cover by unscrewing the 4 screws securing it.
Important! Before starting work, disconnect the power supply, including from the outlet, so as not to come under high voltage, which will be present on some elements of the device, even if it is faulty.
Screws securing the power supply cover
We carefully inspect all the elements on the board, looking for suspicious ones - darkened or even exploded. We unscrew the board, turn it over and examine all the soldering. It is advisable to do this with a magnifying glass. Everything should be soldered everywhere, the board should have a uniform color without darkened areas.
Checking input nodes
Now we arm ourselves with a tester turned on in diode testing mode and check the input circuits. First of all, the fuse. If it is in a glass case, then you can assess its serviceability visually, but this is not always possible to do with sufficient accuracy. Moreover, if a heat-shrinkable protective tube is put on it, as shown in the photo below on the left.
You can ring the fuse without removing it from the board. If it burns out, we replace it with a device of the same rating, but do not turn on the power supply yet, since failure of the fuse is most often a consequence, not the cause of the malfunction. We carefully inspect the varistor and thermistor. They are similar in appearance, but have different markings. In the photo below, a varistor is on the left, a thermistor is on the right.
Varistor (left) and thermistor
Let's call. A working thermistor has a low resistance (a few ohms), while a varistor has a very high resistance. In this case, the thermistor does not need to be desoldered; the varistor will have to be desoldered. Now the diode bridge. These are 4 diodes located next to each other. They are located in close proximity to the listed nodes.
High voltage rectifier bridge
We call each diode. When a multimeter is connected in one polarity, it will show a relatively small resistance (several hundred Ohms), while in the other it will show a very large one. Diodes for continuity do not need to be soldered.
Checking for swelling of capacitors
Electrolytic capacitors especially do not like overvoltage, so we inspect them very carefully, paying special attention to high-voltage ones. They are located next to the diode bridge. The main sign of their failure is swelling of the top cover, and often its rupture.
At the slightest suspicion of swelling, the capacitor will need to be replaced with a device of the same capacity and the same operating voltage. If the protective top cover does not cope with the release of gases, the capacitor may even rupture.
There's nothing left of the capacitor except the insides.
Expert opinion
Alexey Bartosh
Specialist in repair and maintenance of electrical equipment and industrial electronics.
Ask a Question
Important! To replace, you can use capacitors with a higher operating voltage and approximately the same (better more than less) electrical capacity. The use of devices with lower operating voltage is unacceptable. Such a capacitor will immediately explode.
After replacing the faulty parts, we try to turn on the power supply through a 220 V 150 W incandescent lamp. If the lamp glows at full intensity and the power supply fan starts, then the repair can be considered successful. If the lamp burns at full intensity, but the power supply still does not work, then it is better to contact a professional - more in-depth diagnostics and repairs will require special knowledge.
Other ways to check the power supply
There are also a number of alternative ways to check the performance of the power supply.
Output voltage measurement
To check the performance of the power supply, we can measure its output voltage using a voltmeter. To do this, it is recommended to turn on the power supply as indicated above (if it turns on). And measure the indicators of a number of wires of the black and pink wires of the main 24-pin connector. In the case of black and pink wires, the indicator should be 3.3, black and yellow - 12, and black and red - 5 V. The permissible deviation should not exceed 5% in the lower or upper direction.
Measure the output voltage
Checking for swelling of capacitors
The second way is to check the hardware of your power supply for the presence of swollen capacitors on the board. To do this, you need to disconnect the power supply from the PC, remove the cover from it and visually inspect all existing capacitors.
Swollen and normal capacitors
If you notice swollen capacitors, then there is a high probability that they have already exhausted their service life and need to be replaced. You need to unsolder them from your power supply and replace them with new ones of the same value.
How to start a computer power supply without a computer
Breakdowns and malfunctions in the operation of a computer are an integral part of the process of operating the device. Failures (damage) can be software or hardware. Software problems are related directly to the software, while hardware problems imply a breakdown of the physical components of the computer system. Both groups of breakdowns require immediate and competent intervention from a specialist.
A computer power supply (or Power Supply) is a minor element of a computer system that is necessary to fill the computer components with a direct current energy flow. Explained in simple terms, Power Supply is the source of electrical power for a computer.
The need to connect PS without auxiliary elements arises in such cases:
- The need to diagnose the operation of the device.
- In the process of renovation.
- When using multiple power supplies in one computer case.
- Diagnostics of the performance of new circuits.
Strange computer power problems: PC stops turning on
First, let's check the presence of a primary power supply of ~220V at the input of the power supply.
Among the reasons for the absence are a malfunction of the surge protector, socket, plug, or cable break. The problem may also lie in the uninterruptible power supply. There is a power switch on the back of many units - this may also be faulty or turned off. When primary power is supplied, even if the computer is turned off, there is a voltage of +5V at the power supply output (if everything is working properly). This can be checked by testing the contacts of the power supply connector with a tester. We are interested in pin 9, which has a purple wire (+5VSB).
Often the motherboard has an LED indicating standby voltage. If it is active, both standby and primary nutrition are present.
If the computer still does not turn on, we look for other sources of the problem. We will look at the most common reasons below.
1. Open circuit in the power button. To check this, use tweezers to close the contacts responsible for turning on the power supply on your motherboard, or start the power supply outside the system unit (we described in detail above how to turn on the power supply without a computer).
2. Short circuit that occurs at the output of the power supply. Try disconnecting all devices from power and temporarily removing all adapters from their slots. In addition, you should disconnect all USB devices. You can also deactivate the 4-8-pin power connector for the processor Power Connector +12V.
3. Malfunction of the motherboard or power supply. If only the motherboard is connected to the power supply, but it does not turn on, it is likely that the unit itself is faulty. As for the malfunction of the motherboard, which makes it impossible to turn on the computer's power supply, we note that this is theoretically possible, but in practice it is extremely rare. To check this, turn on the power supply without connecting the connector to your motherboard. If the power supply turns on, it is the motherboard that is faulty.
It was easier in the old days
Interestingly, older units that are AT standard could be run directly.
With the ATX standard, everything is much more complicated. However, the solution to a huge problem comes down to a small wire that needs to be connected in a certain way. We have already described how to turn on the power supply without a computer, but we ask you to disconnect all the wires going to the motherboard, hard drives, drives and other components. Better yet, remove the element we need from the system unit and work away from it. Another important point that should not be overlooked: do not let the power supply run idle. This way you can shorten his life. You definitely need to give it a workout. For this purpose, you can connect an old hard drive or fan. As already noted, you will need black and green contacts to start. However, remember that some manufacturers, for unknown reasons, refuse to follow the established color coding. In this case, it is advisable to first carefully study the pinout. If your knowledge allows, you can make a special button to turn on the power supply.