How to recover deleted files on Android if you don’t have a computer at hand – every smartphone or tablet user asks the search engine when faced with accidentally erased data.
If files are lost on a PC, information can be recovered quite easily using programs that scan a hard drive or flash drive.
Usually at least part of the information is restored in this way.
We have already written how to recover deleted files on Android if you have a regular desktop PC.
If the computer is inaccessible for some reason, many consider Android data to be lost forever.
This is not true - accidentally deleted files can be saved from a mobile device.
Recovery using a computer
Let us remind you that the easiest way to recover information on Android is by using a computer and scanning the system.
In this case, we can assume that the hard drives of a smartphone or tablet are checked in the same way as a regular flash drive or USB drive.
You can learn how to make the connection from our material
How to connect your phone to your computer.
In case of data loss from internal non-removable memory, you should:
- Using a special cable, which usually comes with the gadget, connect to the PC;
- Wait until the system automatically installs the necessary drivers (if this did not happen earlier during previous connections to the computer);
- Select “Connect to USB storage” on your smartphone (tablet):
Selecting to connect a mobile device to a PC
- Download, install and run the appropriate file recovery program.
Recuva program
One of the best options for system recovery on a PC is Recuva, a free program that works when you connect your smartphone to your computer.
You can download it on the official website: www.piriform.com/recuva.
It works as follows:
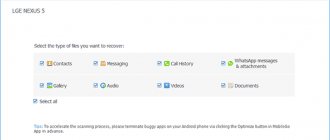
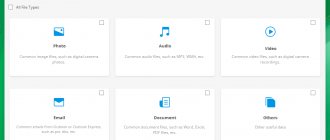
- After launch, a window opens with the types of files that require recovery;
- By selecting the data that the program will look for during scanning, you can enable additional in-depth analysis. In this case, Recuva will recover more information, although it will require several hours of searching;
- After the scan is completed, a list of files that can be recovered appears on the PC screen. After making sure that the information you need can be returned (it will be marked in green), mark it and continue the program;
- Transfer the recovered files back to your mobile device.
7-Data Android Recovery Program
A popular application that recovers lost and deleted files from smartphones and tablets is 7-Data Android Recovery.
The purpose of the program is to work specifically with devices running Android OS.
In its functionality it resembles Recuva, but is capable of working with any type of internal memory.
This means that you can recover information not only from an external or internal storage device, but even from the device’s RAM.
Download link: 7datarecovery.com/android-data-recovery.
Recovering deleted information using 7-Data Android Recovery
After installing the program, a scan of the gadget starts, after which you will see the same list of recoverable files.
At the same time, you can even see deleted photos in “preview” mode, returning only those that you really need.
After the program finishes, the data is returned to the device.
Connecting an Android phone or tablet for the recovery procedure
After starting the program, you will see its main window, which schematically displays the necessary actions to get started:
- Enable USB debugging on the device
- Connect Android to computer using USB cable
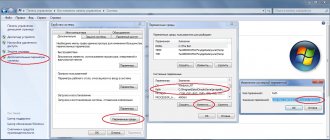
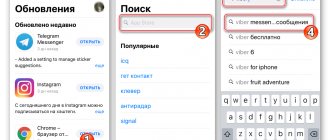
To enable USB debugging on Android 4.2 and 4.3, go to “Options” - “About phone” (or “About tablet”), then click on the “Build number” field several times until you see the message “You have become developer." After that, return to the main settings page, go to the “For Developers” option and enable USB debugging.
In order to enable USB debugging on Android 4.0 - 4.1, go to the settings of your Android device, where at the end of the list of settings you will find the “Developer Options” item. Go to this point and oh.
For Android 2.3 and earlier, go to Settings - Applications - Development and enable the desired option there.
After that, connect your Android device to the computer running Android Recovery. For some devices, you will need to click the "Enable USB Storage" button on the screen.
Recovering files from a mobile device
Sometimes there is no way to connect a gadget, and the files need to be restored, or at least an attempt to do so very urgently.
In this case, it is worth downloading special applications that work from your phone.
True, some of them will require “superuser rights” or root access to start and restore - however, it is worth knowing that this automatically removes the factory warranty from your smartphone or tablet.
Basket
A simple way to get back deleted information on a smartphone is to use the “recycle bin”. Its operating principle is similar to a similar program for PC:
The program works without root and quite simply returns the files to their place. It is convenient to use, however, if the data has already disappeared, installing the “Recycle Bin” will not return it.
To prevent information loss, you should download the Dumpster – Recycle Bin application in advance and run it on your smartphone (tablet).
Recycle Bin Program
After installing the program, any file that is in the “recycle bin”, but has not yet been deleted from it, can be restored by simply going into the application and selecting the necessary data.
But after deletion, you will have to restore it using other methods.
GT Recovery
Another program that works on gadgets of any brands that install Android on their products (that is, on almost any smartphone except Apple and Nokia) is GT Recovery.
It is provided free of charge by the manufacturer, and you can find the application in the Google Play store.
Using the program, files of any type are recovered - photos, videos or texts.
Reviews about it indicate a high recovery rate, especially if little time has passed since removal or loss.
Some disadvantages include the need for root access, however:
- If you have instructions for your gadget or a small free program, it is quite possible to obtain superuser rights (for example, for Samsung you should use the Odin application);
- There are versions for which root is not required (GT Recovery no Root)
GT Recovery no Root program interface
Undeleter
Another reliable option for recovering files directly from your phone or tablet is the Undeleter application.
It is downloaded from Google Play and exists in 2 versions: paid and free.
The free version allows you to recover deleted images, the paid version allows you to recover any data from both a flash card and internal memory.
Managing recovery is quite simple:
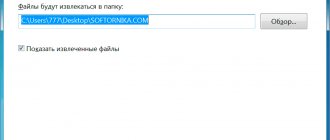
- After selecting the desired folder, a scan is carried out and a list of files to be recovered is displayed;
- Having selected the necessary data, it is restored to the same place where it was before deletion.
Working with Undeleter on Android
The disadvantage of the program is that it requires root access to operate Undeleter.
But you can install it, like the previous application, after the files have been deleted.
Titanium Backup
There is another way to solve the situation if the user has lost data and even deleted system files.
To do this, download the free Titanium backup application.
It works in almost the same mode as the Recycle Bin, but has greater functionality, restoring:
- Photo and video;
- Programs (in 2 modes: only the files themselves, or a full return of all settings, including game saves);
- Contacts and SMS messages. However, to return phone numbers to your smartphone, you will have to write them down to the memory card in advance.
List of applications on Android in the Titanium Backup program
The recovery information is saved on the memory card in the TitaniumBackup folder.
Some of these “backups” can even be returned to a new phone - except for the operating system settings, as this can lead to software failures.
When viewing the list of applications and files, it will be indicated whether it is backed up or not.
Despite all the advantages of the program over the Recycle Bin, it, like most other data recovery applications, requires “superuser” rights.
And when compared with programs like GT Recovery and even with returning information from a computer, it is worth noting that it is impossible to get your files back if Titanium backup is not installed on the device in advance.
In addition, system recovery files take up a lot of memory space.
CWM Recovery download for Android
In general, the buyer of any Android device receives out of the box a device designed for the “average user.” Manufacturers understand that it will still not be possible to satisfy the needs of absolutely everyone. Of course, not every consumer is ready to put up with this state of affairs. This reality has led to the emergence of modified, custom firmware and simply various improved system components. To install such firmware and add-ons, as well as manipulate them, a special Android recovery environment is required - a modified recovery. One of the first solutions of this kind that became available to a wide range of users is ClockworkMod Recovery (CWM).
CWM Recovery is an Android recovery environment modified by third-party developers, designed to perform many non-standard operations from the point of view of device manufacturers. The CWM recovery is being developed by the ClockworkMod team, but their brainchild is a fairly adaptable solution, so many users bring their own changes and, in turn, adapt the recovery to their devices and their own tasks.
Interface and management of CWM Recovery
The CWM interface is nothing special - these are ordinary menu items, the name of each of which corresponds to the title of the list of commands. Very similar to the standard factory recovery of most Android devices, only there are more items and the expandable lists of applicable commands are wider.
Control is carried out using the physical buttons of the device – “ Volume+ ”, “ Volume- ”, “ Power ”. Depending on the device model, there may be variations; in particular, the physical Home or touch buttons under the screen may also be used. In general, the volume keys are used to move through items. Pressing “ Volume+ ” leads to moving one point up, “ Volume- ”, respectively, moving one point down. Confirmation of entering a menu or executing a command is by pressing the “ Power ” key or the physical “ Home ” button on the device.
Installation *.zip
The main, and therefore most frequently used, function in CWM Recovery is the installation of firmware and various system patches. Most of these files are distributed in *.zip , so the corresponding CWM recovery item for installation is called quite logically - “ install zip ”. When you select this item, a list of possible paths for the location of the *.zip . It is possible to install files from an SD card in various variations (1), as well as download firmware using adb sideload (2).
An important positive point that allows you to avoid writing incorrect files to the device is the ability to check the firmware signature before starting the file transfer procedure - the “ toogle signature verification ” item.
Cleaning partitions
To eliminate errors when installing firmware, many romodels recommend cleaning the Data and Cache before carrying out the procedure. In addition, such an operation is often simply necessary - without it, in most cases, stable operation of the device is impossible when switching from one firmware to a solution of another type. In the main menu of CWM Recovery, the cleaning procedure has two items – “ wipe data/factory reset ” and “ wipe cache partition ”. In the drop-down list after selecting one or the second section, there are only two items: “ No ” - for about to start the procedure.
Creating a backup
In order to save user data in case of problems during the firmware process, or to be on the safe side in case of an unsuccessful procedure, it is necessary to create a backup copy of the system. The developers of CWM Recovery have provided this feature in their recovery environment. The function in question is called by selecting the “ backup and storage ” item. This is not to say that the possibilities are varied, but they are quite sufficient for most users. You can copy information from device partitions to a memory card – “ backup to storage/sdcard0 ”. Moreover, the procedure begins immediately after selecting this item; no additional settings are provided. But you can determine the file format of the future backup in advance by selecting “ choose default backup format ”. The remaining menu items “ backup and storage ” are intended for recovery operations from a backup.
Mounting and formatting partitions
The developers of CWM Recovery have combined the operations of mounting and formatting various partitions into one menu, called “ mount and storage ”. The list of revealed capabilities is minimally sufficient for basic procedures with device memory sections. All functions are performed in accordance with the names of the list items that call them.
Additional features
The last item in the CWM Recovery main menu is “ advanced ”. This, according to the developer, is access to functions for advanced users. It is not clear what the “advancement” of the functions available in the menu is, but nevertheless they are present in the recovery and may be needed in many situations. Through the “ advanced ” menu, you can reboot the recovery itself, reboot into bootloader mode, clear the “ Dalvik Cache ” partition, view the log file and turn off the device when all manipulations in the recovery are completed.
Advantages
Prevention
Once you have an idea of what to do if you accidentally deleted a file on your mobile device, you should prepare in advance for such situations.
That is, install an auxiliary program and, preferably, write several backup options onto the memory card - after all, at the moment when you need the data, you may not have access not only to the computer, but also to the Internet.
It’s also worth taking care of the safety of important information, from time to time transferring it to more reliable media (or at least to the same PC, from where it will be easier to return it).
It is also worth noting that for a more complete data recovery, regardless of how this is done, you should avoid writing to the memory of a smartphone or tablet and to a flash card before you get the desired file back.
Tip: Sometimes it’s better to even turn off Wi-Fi and the GSM module, due to which an SMS may be sent to the device or an application update will be installed.
How to recover deleted files on Android
Recovering deleted pictures, photos, and videos. Saving recovered files and the ability to send them by email.
If you have Telegram, you can now download any software or game through our bot, just follow the link and try it!
« Previous entry