A computer is a complex technology that often causes many problems and questions among users. You can connect a huge number of different kinds of devices to it. Most often, PC owners equip their equipment with speakers. But they don't always work. Sometimes there are complaints that the computer does not see the speakers. For what reasons could this happen? What is needed to correct the situation? Why do speakers refuse to work properly? Understanding all this is easier than it seems. The main problem is finding the cause of the device malfunction. It is often discovered by eliminating certain situations.
Incorrect connection
The first and very common reason for the failure of any device connected to a computer is an incorrect connection. Therefore, there is no need to panic at first.
The computer does not see the speakers? It is necessary to check how correctly the user connected them. There are several slots on the PC panel. They are usually painted in different colors and marked with a variety of miniatures.
If the speakers are connected correctly, the plug will be plugged into the line-in jack. You need to find the socket near which the headphones are shown. This is where the speakers are included.
Some people prefer a USB headset. In this case, the speakers must be connected to a USB port. Be sure to turn on the device to the network.
Setting up playback devices
Setting up playback devices can also help, especially often if you have a monitor (or TV) connected to your computer via HDMI or Display Port, especially if through some kind of adapter.
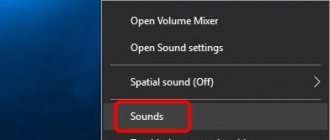
Update: In Windows 10 versions 1903, 1809 and 1803, in order to open recording and playback devices (the first step in the instructions below), go to the Control Panel (can be opened through a search on the taskbar) in the viewing field, set “Icons” and open "Sound" item. The second method is to right-click on the speaker icon - “Open sound settings”, and then select “Sound Control Panel” in the upper right corner (or at the bottom of the list of settings when changing the width of the window) of the sound settings.
Sound card
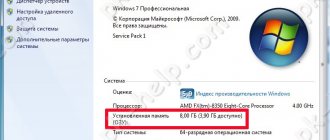
Why doesn't the computer see the speakers? For example, if the user can confidently say that the headset connection was correct, it is more likely that the reason lies in the sound card.
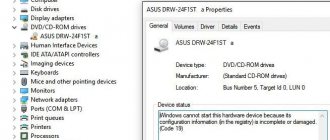
You need to go to Device Manager. To do this, right-click on the “My Computer” icon, then select the appropriate service. Next, the user selects the “Sound, gaming and video devices” item.
What's on the list? If some devices (sound) work normally or with errors, the situation can be corrected without any problems. But more on that later. Indeed, in such circumstances, it is not the computer that does not see the speakers, but the operating system that requires an appropriate package of additional programs for proper operation.
When there are no speakers or sound devices in the above list, it is generally assumed that the sound card is malfunctioning. It is recommended to connect another headset. Did the error happen again? Then you can safely change the sound card in your PC.
Checking sound settings
Perhaps everything is fine with the speakers and sound card - they see each other perfectly and interact. The problem lies in the sound settings. We can talk about both the volume level and system parameters. We talked in detail about solving such problems in the article on how to return missing sound on Windows 10. Let us recall the main points:
- First of all, we check the sound volume and playback settings.
- We use the troubleshooting tool to determine the possible causes of the error. If necessary, disable the sound enhancement feature and other settings by following the advice of the troubleshooting wizard.
- Checking the status of the Windows 10 audio service.
As a last resort, you can perform a system restore. This is an effective method, but it should only be used if other methods do not help.
Drivers
What should you do if the computer does not see the speakers (there is no sound), but they are displayed in the “Device Manager”? Most likely, the cause of the problem is damaged or outdated drivers.
Reinstalling or updating the appropriate software will help correct the situation. To do this you need:
- Go to the speaker manufacturer's website.
- Find the model of the device connected to the PC in the list.
- Download the latest driver for the speakers. Be sure to pay attention to what version of the operating system the content is downloaded for.
- Install the driver or update it. The process is not much different from initializing a regular program.
Next, it is recommended to restart your computer. After this, the connected speakers should work.
What to do if there is no sound
On the front panel
Algorithm of actions:
After updating drivers
Go to the audio card settings, “Driver” section, click on “Roll Back”. The system will restore the previous working version. This method will help restore the sound.
On headphones/speakers
This problem may be due to several reasons:
- Playback settings. You need to set the desired output source (default device) in “Playback Devices”.
- Select the audio output panel (front or rear). Above we gave the answer to how to choose the front panel. This problem usually does not occur on a laptop, since there is only one panel.
- Faulty headphone/speaker cable. Check if the device is really connected. If everything is in order from a software point of view, it is most likely the cords that are damaged.
The computer says: speakers are not connected
You need to make sure that the speakers are properly connected to the PC and the wall outlet (power source). Playback devices are completely disabled. The sound icon when hovered will say “Headphones or speakers are not connected.” You must enable them by following the instructions in the “Playback Devices” section.
After reinstalling Windows
The user may experience no audio playback after reinstalling Windows 7 Ultimate. You need to do the following:
Equipment malfunction
But this is not all the situations that users may encounter. What to do if the computer does not see the speakers?
It would be a good idea to check the device for serviceability. Often it is damage to the speakers that leads to them not coping with their task. To bring your idea to life, another PC will work well.
Speaker malfunction is a problem that is mainly inherent in old equipment. This can be resolved either by repairing faults or replacing the headset.
Correct connection
If you connect the device incorrectly, then it is logical that it will not work. And this applies not only to speakers, but to all devices in general. But specifically with speakers the situation is more complicated. The fact is that connecting a device incorrectly is quite problematic, since each connector in the system unit is designed for the plug of the corresponding device, and if you try to connect the plug to the wrong connector, it simply will not fit there.
That is, theoretically, even the most inexperienced user can plug the plug into each connector one by one and finish doing it when he fits in there - and he won’t make a mistake. The speakers are a completely different story - the speaker jack and microphone jack have the same shape, but if you plug the speaker plug into the headphone jack, nothing will work.
To properly connect your speakers to your computer, follow these steps:
- First and most importantly, find the right connector and do not confuse it with another. The speaker jack is round and green in color, while the headphone jack is pink. Sometimes (mainly in more modern computers) the connectors are marked with corresponding logos, the meaning of which is intuitive. The connector you need, like all the others, is located on the back side of the system unit, but some computer models have additional connectors on the front bottom side of the system unit. This should also be taken into account.
Incompatibility
Another feature that users are increasingly encountering is the incompatibility of the connected equipment with the operating system or PC hardware. Correcting the situation is not so difficult.
The computer does not see the speakers? You need to check that the machine meets the minimum system requirements of the device. If they are satisfied, the reason the device is not working is something else.
System requirements not met? Then the following outputs are offered:
- Buy new speakers compatible with your computer. This is relevant if the PC is new and the connected equipment has been working for a long time.
- Upgrade your computer to suit your speakers' needs.
There are no more options. It is precisely because of the incompatibility of devices that it is recommended to carefully study the system requirements of any equipment before purchasing.
Installing drivers
Any connected device will not work correctly if the necessary drivers for it are not installed on the computer. To avoid this problem, you need to check for the presence of drivers, and then install them if there are none.
Automatic installation
For automatic installation, follow the following step-by-step instructions:
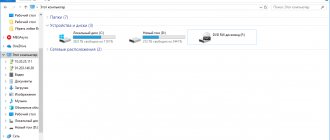
- the “Computer” shortcut on your desktop, then click on the “Properties” .
On a note! Pay attention to the icon next to the device icon. If there is a yellow triangle with an exclamation mark next to it, this means that a problem has been detected with the device. Most likely, the reason is that either the drivers are not installed, or an outdated version is installed.
Manual installation
Automatic installation does not always work. If it doesn't work for you, then you will have to install the drivers manually.
To do this, follow these steps:
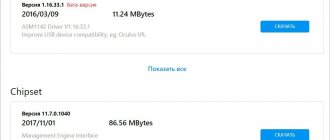
- Download the AIDA64 program. The program is paid, but you can download a free 30-day version at https://www.aida64russia.com/%D0%A1%D0%BA%D0%B0%D1%87%D0%B0%D1%82%D1 %8C . Any version will do.
If the drivers are installed, but the speakers still do not work, then the drivers have nothing to do with it. Perhaps it's all about the virus.
System settings
Has your computer stopped seeing your speakers? If the device was working normally up to a certain point, and then suddenly stopped performing its functions, it is best to check the operating system settings. More precisely, all the programs and options that work using the headset.
It is likely that the operating system recognized the speakers, but did not set them as a sound playback device. To correct the situation, you need:
- Click on the right mouse button on the image of the gramophone in the lower right part of the screen (near the clock) in the operating system.
- Select "Playback Devices".
- In the “Playback” tab, select the connected speakers and click on the “Default” button.
It is also recommended to adjust the audio volume. To do this, after the above steps, click on the gramophone near the clock on the computer and adjust the position of the slider. The higher it is, the louder the sound.
Enable speakers in Windows 10 settings
Most often, the speakers are ready for use immediately after being physically connected to the computer. However, in some cases they need to be additionally enabled in the system. This is especially true if you use different audio devices on your computer: headphones, built-in speakers, other speakers. Windows 10 can get confused about what to play sound through.
The first step is to enable the new speakers. This can be done in two ways - through the “Device Manager” and “Sound Options”.
Enabling speakers via Device Manager:
- Launch “Device Manager” (my favorite way is to right-click on “Start” and select the appropriate item in the context menu).
- Expand the section “Sound, video and gaming devices”.
- Find columns by name.
- Right-click on them and select the “Enable device” option.
- Reboot the computer (optional).
Enable speakers in device manager
The second way to turn on speakers is even faster:
- Right-click on the speaker icon in the notification panel.
- Click “Open sound settings”.
- Click on the “Manage audio devices” link.
Let's move on to managing audio devices
- In the “Output devices” field we look for our speakers. Most likely they will be in the "Disabled" section.
- Select the speakers and click “Enable”.
Turn on speakers in sound settings
Turning on the speakers is only half the battle. In order for sound to flow through them, they must be set as the default playback device.
- Right-click on the speaker icon in the notification panel.
- Click “Open sound settings”.
- In the “Select an input device” line, we indicate the device through which all Windows 10 sounds will be played by default, from system notifications to music, movies and games.
In older builds of Windows 10 and earlier versions of the system, the order of column settings is slightly different. When you click on the speaker icon, a context menu appears, in which there is a “Playback devices” item. Select it to get to the corresponding sound settings window.
Enable display of all devices
Right-click on the free space and check two items: “Show disconnected devices” and “Show disconnected devices.”
Turn on the speakers
Then right-click on the columns and select the “Enable” option. Once enabled, we can also select them as the default playback device.
Other problems
In fact, these are not all the reasons why the computer does not see the speakers. There are still a lot of them. Users may encounter this issue under the following circumstances:
- The computer is infected with viruses. Usually, in this case, the OS suddenly stops recognizing the headset for no apparent reason. The PC is treated, after which the problem is successfully resolved.
- The user has a pirated copy of the OS installed. Replacing the system or reinstalling it helps get rid of the problem. Sometimes just restarting your computer is enough.
- System failure. No one is safe from them. The computer does not see the speakers? Windows 7 or any other system is not so important. If all the previously listed methods did not help, you can roll back the system to the moment when the device was working properly.
It is not so easy to predict the true reason for a device failure. The computer does not see the speakers and does not play sound - two similar problems. And every user should be able to distinguish between them.
Additional ways to fix the "Audio output device not installed" problem
In conclusion, here are a few additional, sometimes effective, methods to correct the sound situation if the previous methods did not help.
Note: the instructions do not describe a method for automatically troubleshooting Windows audio problems, since most likely you have already tried it (if not, try it, it may work).
Troubleshooting is automatically launched by double-clicking on the speaker icon with a red cross through it, you can also launch it manually, see, for example,.
In Windows 7, sound may disappear for several reasons:
- adjusting or disabling volume controls;
- the device is not connected or is not set as the “Default Device”;
- settings failure in BIOS;
- problems with the audio card;
- driver problems;
- problems with cables.
Volume controls
The first thing to check is the regulators. They are located on the taskbar, usually in the lower right corner of the screen, next to the date and time. When active, the sound icon looks like a speaker with sound waves emanating from it.
There are 2 options possible:
To solve the problem:
Playback devices
Often several devices are connected to the computer that can reproduce sound. For example, speakers and headphones. And if the output is configured through headphones, then the speakers will be silent. Or for some reason all audio devices were disabled.
Step-by-step instruction:
BIOS settings
The sound may disappear because The factory BIOS settings are lost and the default audio card is disabled. To correct the situation, you need to enter the BIOS:
Audio card
Confirming that your audio card is installed correctly is one of the important troubleshooting steps:
For your information! It doesn’t hurt to check the dustiness and cleanliness of the contacts.
Cables
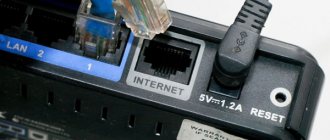
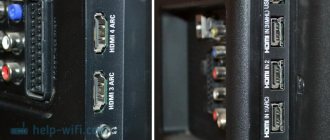
If the computer writes a message that “Speakers are not connected,” then you need to check all the cables. Make sure they are connected correctly and the speakers are receiving power:
- Try turning on the speakers on another computer and check their functionality. Perhaps the problem is in the cable connecting the PC and the peripheral audio output device (this could also be the connection between the computer and the TV via hdmi).
- If there is also no sound, then replace/repair the cable.
Why sound may not work on Windows 7
In most cases, the reason for the lack of sound is a problem with the corresponding driver, which can occur due to incorrect volume adjustment or a device malfunction. There is no sound on a Windows 7 computer for the following reasons:
- The sound reproduction device is not working.
- System service is disabled.
- The sound is turned off in the mixer.
- Silent mode is enabled.
- The audio device is disabled in settings.
- There are no corresponding codecs.
- Sound card malfunction.
- Presence of virus code in the system.
Playback device not working
The devices may have been damaged; it is necessary to visually inspect the device. There should be no visible defects. The cable must be connected to the appropriate connector. If you have a volume control, it is recommended to set a comfortable sound level.
If the problem persists, you need to connect the playback device to another PC or laptop. In the event of a malfunction, the headphones or speakers must be repaired or replaced.
Attention! You cannot connect the device to the recording connector (indicated in pink).
System service disabled
The sound service may be disabled on your computer. The utility may be inoperative due to accidental interruption of activity or changes made by third-party software. To enable a system component, you need to:
- Search for "Control Panel".
- Go to the “System and Security” tab, in the “Administration” branch.
- Among the utilities, select “Services”.
- Find Windows audio, right-click and click “Run”. In “Properties” open the “General” item.
- Set the startup type to “Automatic” and confirm the changes.
- Restart your personal computer.
After completing all the steps, you need to check the operation of the audio devices. To do this, it is recommended to play the video in a standard player, adjust system sounds on the “Taskbar”, and launch audio in an Internet browser. You need to monitor the volume indicator in each player and increase the level if necessary.
Sound is muted in the mixer
Audio is turned off in the volume control mixer built into the OS. Then, when you try to play media files, there will be no audio accompaniment. It is required to set the preferred value using the slider. To restore sound, you need:
- Find the speaker icon on the right side of the Taskbar.
- Click LMB and select “Mixer”.
- Set the necessary parameters.
Sound off (slider in the lower right corner)
The reason may be that the volume slider is at zero. To increase the sound level, you must:
- Find the speaker icon on the right side of the Taskbar.
- Click LMB and set the required volume level.
- If the icon is missing, go to the audio settings through the “Control Panel”.
You should pay attention to the activated “Silent” mode - click on the speaker sign with LMB.
Silent theme enabled
There may be no sound on your Windows 7 computer due to the silent theme installed in the audio playback settings. To restore the volume, you need to:
- Right-click on the “Taskbar” and select “Sounds” in the dialog menu that appears.
- Under “Sound Scheme”, select the “Default” theme.
- Confirm changes and click OK.
Playback device disabled
You can restore sound on a computer with Windows 7 if you activate the equipment in the audio settings. The device may disappear from visibility of the PC or laptop if it is connected incorrectly or if several models are used. Step by step guide:
- Find the speaker icon on the right side of the Taskbar.
- Click LMB and select “Playback devices”.
- Go to the “Playback” tab, right-click on the empty space, check the box next to “Show disconnected devices”.
- Right-click on the device name and mark it with the “Enable” mark.
- Save changes.
Missing codecs
There are no codecs on the newly installed operating system. You must install a third-party component with the player for sound to work or a separate package:
- Go to the official website of the manufacturer. For example, k-lite codec pack.
- Download the software, install.
- To restart a computer.
Sound card malfunction
The sound card is the main component when a computer works with audio files. The board transmits the signal from the processor to headphones or speakers. A malfunction in the module will cause the sound to be interrupted or disappear completely. To check the functionality, you need to connect the audio card to another computer. If there is no sound, the chip will need to be restored or replaced.
Attention! When working with an external sound card, you need to install a third-party driver from the board developer or update the software.
Viruses
Malicious software can damage components of the operating system, causing the sound to disappear. It is recommended to regularly check your computer for viruses using cleaning utilities or perform an antivirus scan. To find and remove viruses, you need to:
- Go to the official website of the antivirus software manufacturer. For example, Dr. Web.
- Download the system scanning utility.
- Open the application, perform verification, the process may take some time.
- Take the measures recommended by the application.
Motherboard failure
Another reason why your computer may not see the sound card installed in it. To check this, connect the component to another PC; if the audio card works, then the problem is a faulty motherboard.
Couldn't fix the problem? Contact a specialist for help!
It is quite difficult to repair it yourself without special knowledge of radio engineering, so it is recommended to immediately take it for repair.
Incorrect BIOS setting
If the built-in sound card does not work, be sure to check the BIOS and its settings. If the sound reproduction device is disabled, no matter how much you want, you won’t be able to make it work in Windows. However, this problem is extremely rare because this device is enabled by default.
- To get to the BIOS options page, you need to press Del or F2 when turning it on. If this method doesn't work, take a closer look at the loading screen. Often there is a button to launch these parameters.
- Once you have managed to log in, find the line with the word “Integrated”.
- Click on it and in the list that appears, find the device you need and see if it is activated. If it says “Disabled”, then you should correct it to “Auto” or “Enabled”.
- Then save the settings and exit the BIOS.
Not just a computer
The motherboard or sound card may burn out, but often sound problems do not arise due to computer malfunctions. The point is in programs that turn out to be incompatible with each other or with Windows; in addition, many important points lie in the operation of different types of the family of this operating system.
Recently, a large number of failures of sound devices or programs occur due to the “updating” of Windows XP to 7, or the transition from “seven” to Windows 8. A couple of years ago this was possible - reinstalling version 7 instead of XP, now do this It’s not possible, because PC models have changed dramatically and are “hardwired” only for a specific Windows.
Even installing a newer version of XP on an older computer can still cause problems with sound, not to mention modern versions of Windows. New programs for which there are no drivers on the systems turn out to be incompatible.
You may have noticed that when you uninstall a program, you receive a warning that other applications may not function properly. This notice is especially important to consider when installing or uninstalling computer audio players, programs for formatting audio files, etc.
Speakers on computer don't work
There are several reasons leading to the problem discussed today. This could be simple user inattention, various failures in the system software, or malfunctions of devices and ports. We should also not forget about possible viral activity. Next, we will try to analyze each reason in as much detail as possible and provide troubleshooting methods.
Reason 1: System failure
By system in this case we mean a set of software tools that ensure the functioning of sound devices. These are drivers, services and proprietary utilities, if any. The first thing to do when a problem occurs is to restart the machine. This can be done either in the usual way or by completely stopping the PC (turn it off and then turn it on again). You should not neglect the second option, as it allows you to unload all data from memory, including those that caused a possible failure.
Troubleshooting Audio Device Detection Error
The main symptom of the error we are studying is the absence of sound from audio devices connected to the PC, as well as a cross on the speaker icon in the notification area. When you hover over this icon, a pop-up message “Output device is not enabled (not installed)” appears.
The above error can occur either as a result of a banal disconnection of the audio device by the user himself, or due to various failures and malfunctions in the system. Let's find out ways to solve the problem on Windows 7 in various situations.
Method 1: Troubleshooter
The simplest and most intuitive way to eliminate this error is through the system troubleshooter.
- If you see a cross on the speaker icon in the notification area, signaling possible problems with sound, then in this case, to launch the troubleshooter, just left-click on it.
- The troubleshooter will launch and check your system for audio problems.
- After problems are detected, the utility will offer to fix them. If you are given several options for action, you must choose the one that is most preferable to you. After the selection is made, click “Next”.
- The troubleshooting procedure will be launched and performed.
- If the result is successful, the “Fixed” status will be displayed in the utility window opposite the name of the problem. After this, the error with detecting the output device will be eliminated. All you have to do is click on the “Close” button.
If the troubleshooter was unable to correct the situation, then in this case, proceed to the following methods for eliminating the problem with sound, described in this article.
Method 2: Enable the audio device in Control Panel
If this error occurs, you should check whether audio devices are disabled in the “Control Panel” section responsible for sound.
- Click “Start” and go to “Control Panel”.
- Go to the “Hardware and Sound” section.
- Click on the inscription “Manage sound devices” in the “Sound” block.
- The Audio Device Manager tool will open. If it displays options for the connected headset, you can skip this step and go straight to the next step. But if in the shell that opens you only see the message “Sound devices are not installed,” you will need to perform additional action. Right-click (RMB) on the inside of the window shell. From the context menu, select "Show disabled...".
- All disabled devices will be displayed. Right-click on the name of the one through which you want to output sound. Select the Enable option.
- After this, the selected device will be activated. All you have to do is click on the “OK” button.
- The problem with the error we are studying will be resolved and the sound will begin to be output.
Method 3: Enable the audio adapter
Another reason for the error we are describing may be the disconnection of the audio adapter, that is, the PC sound card. You can enable it by performing manipulations in the “Device Manager”.
- Go to the “Control Panel” in the same way as described earlier. Open the "System and Security" section.
- In the “System” group, click on “Device Manager”.
- The specified “Dispatcher” window opens. Click on the title of the “Sound Devices...” section.
- A list of sound cards and other adapters will open.
But there can only be one element in the list. Right-click on the name of the sound card through which sound should be output to the PC. If the “Disable” item is present in the context menu that opens, this means that the adapter is turned on and you need to look for another cause of the sound problem. If, instead of the “Disable” item in the specified menu, you see the “Enable” option, this means that the sound card is deactivated. Click on the indicated item. - A dialog box will open asking you to restart your PC. Close all active applications and click “Yes”.
- After restarting the computer, the audio adapter will turn on, which means the problem with the output device error will be resolved.
Method 4: Installing Drivers
The next factor that can cause the problem under study is the lack of necessary drivers on the computer, their incorrect installation or malfunctions. In this case, they must be installed or reinstalled.
First of all, try reinstalling the drivers that are already on your PC.
- Go to “Device Manager” and, going to the “Sound Devices” section, right-click on the name of the desired adapter. Select the "Delete" option.
- A warning window will open telling you that the audio adapter will be removed from the system. Under no circumstances should you check the box next to “Remove driver programs.” Confirm your actions by clicking "OK".
- The audio device will be removed. Now you need to connect it again. Click on the “Action” item in the “Manager” menu and select “Update configuration...”.
- The audio device will be found and reconnected. This will reinstall the drivers for it. Perhaps this action will solve the problem with the error we are studying.
If the described method did not help, but the error appeared quite recently, then there is a possibility that the “native” drivers of your audio adapter have failed.
They could be damaged or deleted due to some kind of failure, system reinstallation and some user actions, and in their place a standard Windows analogue was installed, which does not always work correctly with some sound cards. In this case, you can try rolling back the drivers.
- Open "Device Manager", go to the "Sound devices..." section and click on the name of the active adapter.
- In the window that opens, go to the “Driver” tab.
- In the shell that appears, click on the “Roll Back” button.
- The driver will roll back to the previous version. After this, restart your PC - perhaps the sound problems will stop bothering you.
But there may also be an option that the “Rollback” button will not be active or that after the rollback no positive changes will occur. In this case, you need to reinstall the sound card drivers. To do this, simply take the installation disk that came with the audio adapter and install the necessary objects. If for some reason you don’t have it, you can go to the official website of the sound card manufacturer and download the latest updated version.
If you cannot do this or do not know the address of the manufacturer’s website, then in this case you can search for drivers by sound card ID. Of course, this option is worse than installing from the manufacturer’s official website, but in the absence of another option, you can use it.
- Go to the sound card properties window in Device Manager again, but this time go to the Details section.
- In the shell that opens, select the “Equipment ID” option from the drop-down list. Information about the audio adapter ID will open. Right-click on its value and copy it.
- Launch your browser and open the DevID DriverPack website. The link to it is provided below in a separate material. On the page that opens, paste the previously copied ID into the input field. In the “Windows Version” block, select the number “7”. On the right, indicate the bit depth of your system - “x64” (for 64 bits) or “x86” (for 32 bits). Click on the “Find drivers” button.
- After this, the search results will open. Click the “Download” button next to the top option in the list. This will be the latest version of the driver you need.
- After the driver downloads, run it. It will be installed on the system and will replace the standard Windows version. After this, restart your computer. The problem we are studying should be fixed.
Lesson: Finding drivers by device ID
If you do not want to perform the above steps to search for drivers by ID, you can make everything easier by installing a special program on your computer to search and install drivers. One of the best options is DriverPack Solution. After launching this software, the OS will be automatically scanned for all necessary drivers. If the required driver option is not available, it will be automatically downloaded and installed.
Lesson: Updating driver on PC using DriverPack Solution