Is it worth replacing the cells in the battery?
The main incentive to change the batteries in the battery is the economic component of this process. The cost of a new battery is quite high, and you can purchase high-quality inexpensive batteries on Aliexpress or similar sites. In addition, 18650 type elements in good condition can be purchased on the secondary market, which will also save a lot of money.
Contacting a service center to replace lithium batteries is not always advisable; the cost of work plus the cost of purchasing batteries can be equal to the price of a new battery. But if you’re scared yourself, then you should at least call and find out the cost; maybe in your case it will be easier to trust a professional.
Opening the battery
The battery pack must be opened carefully so as not to damage the plastic case. You can use a screwdriver without sharpening it too much. Carefully remove the old batteries from the case, paying attention that the adhesive materials can be very strong. It is important not to damage the controller board and wiring. You need to separate batteries from electronics from the larger plus sign to the small one, and you can easily determine which sign is which by sight. If you have difficulty determining it, you can use a multimeter.
How difficult is it and what do mistakes lead to?
In general, the process of replacing cells does not take much time, and to perform this work it is enough to know how to use a soldering iron and a screwdriver. The main thing when performing this operation is not to make a mistake with the selection of new batteries, as well as to correctly connect each element of the electrical network.
Mistakes when replacing laptop cans can be very costly. Careless actions can easily damage the battery controller, which will require much more expensive repairs or replacement of the part.
In addition to the danger of damaging the electrical circuit of the battery or laptop, you will need to solder the conductors to the battery, which will require the use of acid flux and a low-power soldering iron so as not to overheat the batteries.
It will be possible to remove batteries from a laptop battery only from Ni-Mh, Ni-Cd and Li-Ion batteries, since Li-Pol will not contain finger-type cells, but something like a package.
Battery types
All batteries operate on the same principle - the reversibility of the reactions occurring in them. Simply put, a chemical reaction goes in one direction, but the charge goes in the opposite direction.
Today, laptops use 2 types of batteries:
- Lithium-ion, or Li-Ion.
- Lithium polymer, or Li-Pol.
The second type of battery is more modern and is increasingly used by manufacturers. At the beginning of the era of mobile devices, nickel-cadmium batteries were actively used.
However, they contain cadmium, which is highly toxic. As a result, serious problems arose with the disposal of failed batteries.
They were replaced by nickel-metal hydride batteries, which lack some of the disadvantages of nickel-cadmium batteries. But their energy intensity was still low, as was the number of recharge cycles.
Lithium-ion batteries have a high energy density and a low self-discharge rate. However, they are not without a drawback: lithium is gradually destroyed, and after a year the battery capacity decreases. In practice, the service life of batteries of this type is 2-3 years, and not the 5 years declared by the manufacturers.
Replacing batteries in the battery
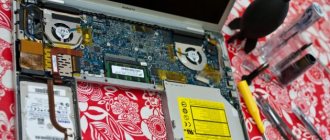
If the batteries are replaced correctly, the likelihood of breakdowns in the laptop's electrical circuit will be minimized. The first thing you need to do when performing this work is to remove the battery from the laptop.
Removing the battery
To remove the battery from the laptop, you must perform the following steps:
- Disable the device.
- Remove the adapter wire from the socket.
- Close the laptop and turn it over.
- At the bottom of the laptop you need to find a rectangular area, which will be the laptop battery.
- Use a screwdriver to unscrew the screws holding the battery (if there are bolts there).
- We move the latches-locks.
- Now you need to pry up the battery case and remove it from the laptop.
If you need to replace the battery on a modern device, you just need to press the special latches that hold the battery and pull the product towards you to remove it from the laptop.
Disassembling a laptop battery
Disassembling the battery must be done very carefully, otherwise fragile parts of the battery may be damaged. In order to divide the battery case into 2 parts, you need to run a stationery knife along the seam of the product. Then, using a thin non-metallic object, carefully widen the hole and walk around the perimeter of the battery in this way, completely separating one part from the other.
To loosen the grip of the glue, you can gently rub the seam several times with a cotton swab and solvent. Despite all the care, you will still cause minor damage to the battery case and cracks, chips and breaks will appear somewhere.
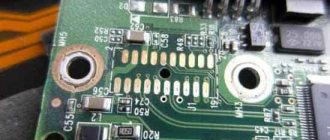
To avoid problems when assembling the battery, after opening the case, take a high-resolution photograph of the position of the batteries or quickly sketch out on paper a small electrical diagram for connecting the elements.
Then you should take a soldering iron and unsolder the wires going to the controller, and then remove the thermocouple, which is attached to one of the elements. We disconnect the microcircuit very carefully so as not to damage the product as a result of overheating or a short circuit.
We disconnect and replace banks
The cans in a laptop battery are connected by a thin steel strip, which can be easily cut with wire cutters or sawed off with a hacksaw. When the elements are all removed, it is necessary to accurately determine their type, rated voltage and capacity.
Then you should find exactly the same new batteries. Power supplies must be purchased as a set or at least from one batch so that they are identical to each other. You can purchase high-quality and inexpensive items on Aliexpress or similar trading platforms.
If you take batteries from different batches or from different manufacturers, the values of capacity, current and voltage may differ slightly, but this is not very good.
When new batteries are purchased, they will need to be soldered together in the same manner as they were previously connected. In production, the conductor is soldered to the elements using resistance welding, but at home you can use a regular soldering iron. In addition to the main soldering tool, you will need to prepare:
- Soldering acid.
- Sandpaper.
- Battery holder.
You can make the clamp yourself. This tool is necessary to hold the battery stationary while soldering the wire. Work should only be carried out in a well-ventilated area, because in order to tinning a steel surface you will need to use a special acid solution.
When soldering, it is important not to overheat the battery, so single contact between the soldering iron and the battery should not exceed 3 seconds. The work is performed in the following sequence:
- A small amount of acid is applied to the battery electrode with a brush.
- Take a significant amount of solder on a soldering iron and quickly rub it into the battery.
- The batteries are soldered together using copper wire.
When the power elements are correctly connected, the wires going to the controller are soldered, and a thermocouple is attached to one of the elements using tape.
Pinout diagrams
Modern batteries have from 5 to 9 contacts. The battery pinout for a Samsung laptop or other laptop may vary depending on the model. That is why users are looking for a diagram for their mobile device on the official websites of manufacturing companies.
If the battery has a seven-pin connector, its pinout may look like this:
- ID.
- N.C.
- SCL/SDA - used for communication between microcircuits.
- BATT_IN - transmission of a connection signal.
- SMB is a line designed to transmit information about the state of the battery.
- DATA- - zero.
- DATA+ - main power supply.
However, it should be remembered that depending on the model, the pinout of the laptop battery from Acer, Lenovo, Toshiba and other manufacturers may differ depending on the specific model.
Pinout diagram for a32 9pin battery for Asus laptops.
To find the pinout of a laptop battery from HP, Dell or another company, the user will have to visit the manufacturer's official website.
If you can’t find the necessary information there, you will have to go to the form for owners of laptops from a specific manufacturer.
An example is the pinout of the mu06 notebook battery used in HP devices.
Battery calibration with new cells
Using a battery with new cells without prior calibration will, in many cases, be impossible. The easiest way to perform this operation is to use the Battery EEprom works program.
You can try to do the calibration manually, but to perform such an operation you will need to make changes to the computer's BIOS, so if you cannot configure the battery using the utility, it is better to contact a specialist.
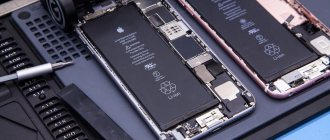
DIY HP laptop battery repair
Laptop batteries are made up of lithium cells called 18650 cells. They do not last forever and have a lifespan of about 2 years. If the laptop is fully charged, but charging does not last even half an hour, this means that the cells inside the battery are dead.
With an old laptop battery, some wires, and tools like a wire cutter and duct tape, you can start rebuilding your laptop battery yourself:
- Open the old battery and take out the 6 cells that are in a 2 x 2 parallel connection.
- Check the voltage of your original battery with a multimeter. As a rule, a battery voltage of less than 3.6 volts indicates that they need urgent replacement.
- Using one wire, connect all cells in a series connection. The circuit should provide about 12 volts.
- Open the original block, remove the faulty cells and, saving the circuit, replace them with working cells.
- Assemble the circuit using the original battery. The battery pack will also have 4 wires - 1 negative and 3 positive (one attaches to the end and two between the battery pack).
- Check the circuit with a multimeter before closing the unit.
- Close the battery case, insert into the PC and start charging.
Precautionary measures
When performing work to replace batteries in a laptop battery, you should adhere to the following safety rules:
- Do not overheat lithium batteries.
- Do not damage the battery housing.
- Do not breathe acid fumes while soldering.
In addition, in order to change batteries and maintain battery functionality, you must handle the controller very carefully. If this part fails during repair, you will need to look for a similar battery to remove a working element.
Do you have any questions, haven’t been able to solve the problem, or have something to add to the article? Then write to us about it in the comments. This will help make the material more complete and useful!
Laptop battery device
The battery is connected to the motherboard with a 5-pin connector. Power supply is implemented via 2 lines. Another 2 contacts provide data transmission about the battery status. A clock generator is used for identification. This is done by giving them electrical impulses.
Upon reaching voltage thresholds of 4.7 or 2.5 V, the controller disconnects the battery from the external power source and from the motherboard, respectively. In addition, it switches off when it heats up to 80-90°C.
Lithium-ion versions have the largest number of fuses due to the high activity of the element.
Smart Battery Repair Tips
Based on their battery repair experience, users share their tips:
- Some laptop batteries require a constant power supply to protect important data in the device's memory.
- When replacing cells in these types of batteries, it is necessary to provide secondary voltage by connecting a 100 ohm resistor to clear the old data. Only when installing new cells can the user remove the resistor, and then begin repairing the laptop battery with his own hands.
- When replacing cells, only rechargeable batteries of the same charge can be used (difference within 10%). Cells with different chemical base, age, or ability cannot be used (i.e., do not use nickel cells if they use lithium cells). Insert lithium cells with the correct polarity as they are sensitive to reverse polarity.
- When charging/discharging or repairing lithium batteries, a protection circuit must be used.
- Copper shunts can form inside cells, which can result in a partial or complete electrical short circuit. When recharged, such a cell may become unstable, causing excessive heating or exhibiting other anomalies, even exploding.