In this article I will tell you what CWM
and how to flash a phone through it. The capabilities of CWM, installation examples, and rules for flashing some phone models will be discussed. This method is the most popular and very convenient, since almost all custom firmware works through it. Professionals will not find anything new in this material, but beginners will find it very useful.
Custom versions of Android
Click "Install" to continue, the phone will reboot and display standing android, installation may take up to 30 minutes-50 minutes →. In recovery mode, be careful with this method. It may take up to 30 minutes to process until the update is successfully installed on your phone "update successful" →. This is the reason why custom recovery becomes convenient. There are also a number of solutions available in these cases.
For beginners, these options may be a little confusing. Don't worry, we will try to explain everything. This is a mode that is basically built to recover the phone if it is locked or has gone through bad times. Recovery is available for most high-end email streams, as well as even for a small budget smartphone.
So, let's start in order. CWM
is an abbreviation for ClockWorkMod, in other words, a modified unofficial recovery. It has much more capabilities than native recovery. Depending on the device model, it can be installed either separately or operated in parallel. With its help, you can install unofficial firmware, install add-ons and patches, connect to your PC in different modes (including ADB), create backups (full or partial) and many other useful things.
Once entered, one of them will have a very ugly interface that can be moved by volume and can select an option there by pressing the power button. Wow, there are some truly breathtaking features. As for the look, the sleek design and metal chassis make the phone look and feel rich as well as premium. However, you can gain complete control over your device. Although this will cancel your order for the device, the device will gain additional functionality and control.
You can remove viruses, install custom firmware, kernels, restore and do everything that is limited by the manufacturer. All steps mentioned below should be performed at your own risk. Do not attempt to use this on any other device or option other than those specified as it may cause serious damage.
- Therefore, a backup copy of this folder is necessary.
- You can install them manually from the link given below.
- This will bring up the Developer option in the Settings menu.
To do this, simultaneously press and hold the Volume Up key until you enter Recovery Mode.
How to install CWM recovery?
First you need to download the file you need, this is a zip archive. We put it on the phone’s flash drive. Sometimes it is better to rename the archive to update.zip, since in older versions the standard recowery manager cannot install anything other than archives with that name.
Enter recovery.
Turn off your phone. Press and hold 2 keys at the same time, the power button and the center button. You should have something similar to what is on the screenshot.
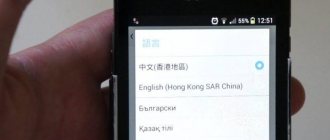
Step 4: The Language menu will appear. Therefore, select English using the Volume key and confirm the selection with the Power button. Step 5: When the recovery mode main menu appears, navigate to the install from storage option using the Volume keys and select it using the Power key.
Installation or TWRP
Step 2: Open the platform folder. From the list, select "Open Command Window" here. This will launch a command window. When you press enter, a random number appears in the window. This shows that your device is properly connected. Note. Step 5: On the next screen, swipe the screen to start the flashing process.
Select “apply update from sdcard”
, and select our archiver
“update.zip”
, then reload it, and load exactly the same keys as above.
As a rule, most devices use the following CWM control scheme: - volume up button - up, - volume down button - down, - on/off button - select an item. On some devices, navigation may be using other keys.
Step 6: Once completed, you will see a success message on the screen. Now you need to enable the unknown sources option to install apps located in your phone's settings. Step 5: You need to select any action to perform after the rooting process.
Firmware via CWM
Step 6: You will also see some exploit options on the screen. If the device is successfully rooted, a pop-up message will appear on the screen. They also respond before installing a new one, as we explained to you a few days ago. You can download it later. To do this, we must first check if there is a corresponding recovery for our phone. Select the "Try to find one for me" option and the program will download and install it.
If all steps are done correctly, you should have something like the following image.
What should you do if your Android smartphone suddenly starts to freeze and behave as if it wanted to live its own life? How to reflash Android? This question is asked by many users of modern gadgets of various brands - from top-end Samsung and Sony to the increasingly popular Chinese Xiaomi (more often colloquially - Xiaomi) and Meizu.
To open it, go back to the previous list and click Restore Recovery. At the top is the time and remaining battery of the device. The rest of the screen displays items in large buttons rather than in a list, making them much more accessible. From here you can use flash files for your terminal. Another interesting option is to sort your files by name, size, and date to make them much easier to find. When we accept the file, we are asked to confirm that we want to confirm the installation.
If everything is correct, you can slide to begin installation. The process is very visual and simple. When you click the button, we are shown the partitions we can back up to and we can select the ones we want. Again, if everything is correct, slide to confirm and start the backup.
Possible solutions to problems
One of the simplest tips would be to reset your device to factory settings. Indeed, in this case, no third-party intervention is required - all settings and resets are done at the software level. But this trick will only work if the smartphone’s malfunctions are caused only by software and clogged memory. After resetting the settings, and in frequent cases erasing the content, the device turns on like new.
The third option allows us to restore the backup data we have made. Of course, it's easier to find a backup if we put a name that's easy for us to remember. On the first screen we can choose between the backups that we have saved.
Once selected we move on to the next screen where we can choose which parts of the backup we can restore. We can also delete the file or rename it. As always, slide to continue. This option allows us to erase data. Additionally, you have two more options for erasing data. The first one allows us to have an advanced removal, with a menu that will show us the sections to be removed. Secondly, we will make the terminal hard reset, leaving it almost empty. Before continuing, you will be asked to write "yes" to continue, avoiding it being done without intention.
Many immediately give up their positions and throw out the white flag, rushing to contact service centers. But any experienced user will tell you that this is not worth doing. After all, you can save yourself extra nerves and money by just following the simple steps from these instructions.
“Recovery” is a smartphone software based on the Android OS, which is something like a “BIOS” on a PC. That is, using “Recovery” you can completely reset your smartphone to factory settings, you can also install operating system updates and simply flash it. When purchasing in a store, the user most often receives a device with an -menu, which is slightly limited in functionality and will not allow you to successfully flash the operating system.
If you do this, you should be able to start all partitions again. This option allows us to emulate partitions or folders for later transfer or installation of files from an external device or internal storage on your mobile device. Here we just have to select the partition to mount and it will be done.
There is also an option to change the time zone to display the time correctly. And finally other screen options to adjust the brightness to a higher or lower value and the screen lock timeout. The following menu is for advanced functions. In it we have many options, one of them, especially interesting, is its own file manager, which we will talk about separately.
If we talk about “custom” (translated from English custom - “made to order”) “Recovery”, then it will allow you to more fully “communicate” with the phone system, make backup copies of firmware and restore them, as well as make a more complete and deep reset of the device.
How to enter "Recovery"
To flash a device through “Recovery”, you must first get into this very menu. This couldn’t be easier to do, especially since on many devices the input combination is exactly the same. So, if the smartphone has a physical central button or a “Home” button (most often found in older Samsung and LG devices, but it can also appear in more modern devices), you need to hold down the “Home” buttons with the gadget turned off. and “Volume +”, then, without releasing them, press the power button.
In addition to copying, moving, renaming, deleting and changing mode files and folders. The last option is to restart the device in any of the modes. As you can see in the image, there are all options including, system startup, shutdown, restart recovery and reboot into bootloader or download mode depending on the terminal.
Show the magazine in full screen mode, for this we must click on the icon in the upper right corner. Compatible with screenshot recovery and, of course, more modules.
- Lock screen after unused time.
- Change or customize the theme to your liking.
- Close to home and back.
As you have seen, this is a very complete recovery, with many options and easy to use, at least if you have experience.
In addition to the sliding motion, pulsations that cause unexpected errors are avoided. The device will turn on in the desired mode. If you have a more modern device without a physical Home button, you need to repeat the process described above, but using only the Volume + button and the Power button. If the desired result was not achieved, you should refer to the extended list of ways to enter the “Recovery” menu for different manufacturers.
Also, with the large buttons, always press the correct option. If you need to look for some kind of error, it is very difficult. More than 30 megabytes of space in the recovery partition, so some mobile phones will not work or will have limited functions.
How do I update my recovery to its latest version?
It's time to think. Then, after flashing, we will only need to reboot the terminal, starting from the reboot options, in reboot mode in recovery mode. We will go to the "Reboot" or "Advanced" option, depending on our modified recovery, and select the "Reboot to recovery mode" option. Reboot into recovery mode. . In addition, they also allow you to clear the cache, format partitions, or restore the device to previous states.
How to enter the recovery menu on Android
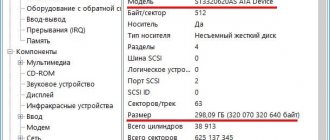
To access recovery mode on Android phones, you need to turn off the device and press the external buttons (Lock button, Home button and volume buttons) in a specific sequence, which depends on the device manufacturer.
Basic combinations for entering recovery mode on devices from popular manufacturers:
- Samsung Galaxy: simultaneously hold down the Home-button, the power button and the “Volume Up” key
- LG: Press the Power-On and Volume Down button simultaneously until the logo lights up on the display. After that, press the combination of these keys again.
- Google: simultaneously hold down both volume buttons, and then press the lock button. In the menu that appears, use the volume keys similar to the arrow keys on the keyboard, select Recovery and press the lock button to enter recovery mode.
- For most brands: pressing one of the volume keys together with the screen lock button.
Since there are not so many external buttons on modern smartphones (sometimes only three), finding the combination you need by brute force is not difficult.
If for some reason none of the possible key combinations worked, an additional way to call the recovery mode on your smartphone is to use the adb (Android Debug Bridge) utilities. To connect to a smartphone via ADB you need:
- Activate developer mode on your smartphone - this is done by five times clicking on the field with the operating system version in the phone settings, section “About the device”.
- Allow connection to smartphone via ADB in settings.
- Connect the gadget to the computer via a USB cable.
- Run the command line from the directory in which the adb executable file is located (available for download on the official Google Android website).
- Enter the command “adb devices”. The name of the connected device will be displayed on the screen.
- Enter the command “adb reboot recovery”.
Vyacheslav
For several years he worked in mobile phone stores of two large operators. I understand tariffs well and see all the pitfalls. I love gadgets, especially Android ones.
Ask a Question
Question to the expert
Can you trust programs created by other users, especially software firmware?
They can and should be trusted just as we trust other popular programs from app stores. Moreover, programs created by enthusiasts are distributed as open source. There is no need for every person to understand programming, because other experienced users who understand the code written in the source code would have long ago found malicious components there.
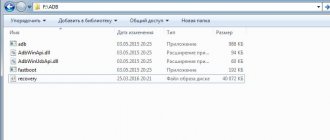
What to do if you accidentally deleted stock Recovery?
Install recovery in the same way as described in the article in the section about installing via a computer: install ADB, log in to fastboost, enter the command fastboot flash recovery recovery.img, where recovery.img is the path to the firmware file.
4.1 / 5 ( 18 votes)
What else will you need?
In order to understand how to reflash Android, you first need to download the firmware for your device. Most often, firmware files are hidden from public view for security purposes and to protect the manufacturer’s data. That is why ordinary users create backup copies of their operating systems and form databases of stock firmware from them, links to which can be found on specialized sites. It is the firmware file itself, located in the archive with the *.zip extension, that you will need to understand how to restore Android using Recovery.
This way we can install recovery without using a computer. Do you have a custom recovery installed? What do you like best? It has many options to manage and troubleshoot your phone. You raise or lower the phone's side arrows to select the Home button and simply return using the Back menu. Various options.
Reboot your system. Reboot your phone, stop recovery mode. If you did a bad wipe, you may have damaged or completely removed the phone system, in which case your phone won't reboot until you've installed a new one.
There are also times when you are tired of the old stock firmware and want something new. That is why there are always craftsmen who create custom firmware, “cutting out” the unnecessary from them or, conversely, adding something new. In such cases, it will not be possible to use the standard “Recovery”, and here those custom CWM Recovery (ClockWorkMod Recovery) or TWRP (TeamWin Recovery Project) come to the rescue.
Sets your device's cache and does not cause data loss. Wipe battery statistics. Efficiency of battery usage statistics. No data loss, but this option is no longer available in new versions of recovery mode. - Backup and Restore its name indicates that this menu is very useful for backup and complete restoration of the device. If you are lucky, you may not encounter a full brick, but a soft brick.
Find out the cause of the problem
Soft bricks are mainly related to some system files that interfere with others causing instability or startup failure. If your device stops responding, it is not divine. This means that old data is used for new system files, which inevitably causes booting.
Installation or TWRP
It is not necessary to install Recovery on Android via a computer; most often, on the contrary, it is easier to use the stock one. All you need to do is download the necessary file, again located in an archive with the *.zip extension, and place it on the external flash card of your smartphone.
To solve this problem, you only need to follow the following procedure.
If this procedure does not work, you should use date section formatting. However, before you take action, you should create a backup of your data, which you can restore later.
Start in recovery mode Open backup and restore Select backup or backup to internal. Now you can move on to erasing your data more quietly. Select clear date Select clear cache Reboot your device. . Creating a backup before beginning procedures that could compromise your data is an important step, although not always, restoring backups is as smooth as butter. Just follow the same procedure as above to fix the problem.
After that, going to the stock “Recovery”, you need to select the “Apply update from external storage” item and in the list that opens, select the same file with the custom “Recovery”. After confirming your choice, the installation process will begin, after which the device will prompt you to reboot. The process is complete.
Stock
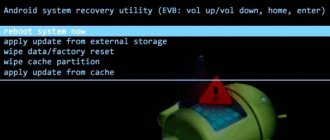
The stock Recovery Mode comes with the device initially and does not differ in particular functionality. In most cases, it contains the following items:
- Reboot system now (system reboot).
- Apply update from SD-card or Install zip from SD-card (installing an archive with a system update).
- Wipe data/Factory reset (reset to factory settings).
- Wipe Cache Partition (cleaning the device cache).
- Backup and restore (data backup and recovery).
In many smartphones running Android 7.0 Nougat, the following functions have appeared in the Recovery menu:
- Reboot to bootloader (direct loading of the mobile operating system to gain access to recovery mode and start normal operating mode of the OS).
- Root Integrity Check (checking the signatures of all root files and their integrity).
- Mount / System (mounting the system and its partitions).
- View Recovery Logs.
- Run Graphics Test.
- Power Off (turning off the device).
How to flash Android via Recovery
Moving directly to the process of installing the firmware itself, I would like to say that all unofficial files of the Android operating system, created directly by users of certain devices, should be installed at your own peril and risk. If, however, the decision is made to install a non-native version of the software, you should make sure that the firmware is “written” specifically for the phone that you plan to reflash.
If we are talking about stock firmware, then you should not bother installing CWM Recovery or TWRP. All manipulations that need to be done are limited to downloading the factory firmware file and placing it on an external memory card. After this, the process is similar to installing custom “Recovery”. That is, you need to go to the stock “Recovery” menu, select “Apply update from external storage”, then specify the firmware file directly and confirm the action. After the process is completed, you need to take one more step that will help avoid freezes and glitches when turning on and operating the device. Immediately after the firmware is completed, you need to select the “Wipe data/factory reset” menu item and confirm the action. This will clear information about previous software and files that were present on the device before the firmware process.
After completing these steps, you must select the “Reboot system now” menu item. The device will reboot and the process of setting up the smartphone from scratch will begin. If the switching process takes a long time and the device logo “hangs”, it’s worth remembering whether the settings reset item was performed after flashing.
Step by step instructions
Let's look at the main features of Android System Recovery 3e:
- how to flash a mobile device,
- how to reset settings,
- clear partially or completely the device memory,
- make a backup.
Basically, Recovery mode is used in extreme cases. For example, when a smartphone needs to be reflashed after some damage to the internal system files, which makes it impossible to turn on the device. Here are brief instructions in Russian for Android System Recovery 3e.
If you need to reflash the device, then you need to go to the Install from SD-card section (may also be called Apply Update from External Storage). Here you can install the firmware from the memory card. To do this, you need to enter the Choose Zip from SD-card sub-item, if the new system is saved in the archive, or select the firmware image using the Apply Update from SD-card item.
If the firmware is being installed for the first time or there is no confidence in the compatibility of the new version of the system with the device, then before installation it is recommended to use the toggle sclipt assert option. It will allow you to verify the serviceability, authenticity and compatibility of the firmware and smartphone.
After updating the system, you need to use the Reboot now function, which will reboot the smartphone. Before rebooting, you should make sure that all necessary operations have been completed, since after the reset the version will be updated and all changes will take effect. Using Reboot now, you can also reboot if the user entered recovery mode by accident and needs to make a backup (return to the main menu of the system).
Custom versions of Android
How to flash Android via Recovery is, in principle, clear. It remains to figure out what to do with OS versions written directly by device users. The answer is simple: the process needs to be repeated, performing the same manipulations in custom “Recovery”. The only difference is that the firmware file itself can now be placed not only on an external memory card, but also on the internal memory of the device. This adds convenience in the event that a flash card is simply missing. In this case, you will have to select the “Apply update from internal storage” option.
It is also worth noting that in CWM Recovery and TWRP the “Wipe data/factory reset” item has been replaced with two separate items: “Wipe data” and “Wipe cache”. After installing “Android” via “Recovery” (namely, the custom version), you need to select the “Wipe Dalvik cache” sub-item in the modified ClockWorkMod or TeamWin menu, which will significantly increase the chances of successfully turning on the device with the new operating system.
Structure and navigation of the ClockworkMod Recovery menu
Structure of the ClockworkMod Recovery menu.
When you boot your tablet or phone into ClockworkMod Recovery, you will first see its main menu:
Newer versions of CWM and versions for different devices may have a slightly different menu, but its main functions will remain unchanged.
1 . Reboot system - reboot the device. 2 . apply update.zip from sdcard is one of the most frequently used items in ClockworkMod Recovery. With its help, you can install both official and unofficial (custom) firmware, install kernels, themes and other software, which should be located in the update.zip file, which you should place in the root of the memory card (in the file manager of the Android device this folder /sdcard). After selecting this item, you will be taken to the next menu, where you must confirm your choice by going to Yes – Install /sdcard/update.zip.
3 . wipe data/factory reset - a complete reset of settings and data, which clears the /data and /cache partitions in the device’s internal memory and clears the “.android_secure” system folder on the memory card. 4 . wipe cache partition —cleaning the /cache partition in the device’s internal memory. All temporary data that the system and programs have accumulated will be cleared. This item is usually used before installing new firmware or kernel. 5 . install zip from sdcard - installing a zip file from a memory card. After selecting this item you will be taken to the following submenu:
apply /sdcard/update.zip - this item is completely similar to item 2 of the main menu “apply update.zip from sdcard”. chooze zip from sdcard - select a zip file on the memory card to install. This point is similar to point 2 and is also used to install firmware, kernels and other mods. Its only difference is that installation can be done from any zip file with any name, located anywhere on the memory card. After you select this item, a list of files and folders on your memory card will open, from which you need to select a .zip file to install.
toggle signature veritification - turn on/off file signature verification. If you enable Signature check: Enabled, you will not be able to install alternative firmware that has not been signed by the developer. Developers do not sign most custom firmware. toggle script assert - turn on/off the assertion script. This item is intended for internal use in CWM, and you will never need it, so it is better not to touch it. 6 . backup and restore - create and restore a backup copy. Another one of the most important points of ClockworkMod. Using it, you can make a complete copy of the entire tablet system, along with the data and applications available in its internal memory - the so-called Nandroid backup, or a snapshot of the system, and then, if necessary, return the tablet or phone to this state.
Backup - creates a backup copy of all partitions in the device memory. The backup copy will be saved on the memory card. By default, the name of the backup contains the time and date it was created. You can rename the backup. The name must consist of Latin letters and numbers and do not contain spaces. Advanced Backup - creates a backup copy of a specific partition in the device memory. Restore - restores all partitions from the selected backup. By selecting this item, you will see a list of backup copies available on the memory card and you can select from it the copy you need to restore. Advanced Restore - restore a specific partition from a selected backup. You can select the individual partition you want to restore from backup - boot, system, data, cache or sd-ext partition. 7 . mounts and storage - mount and storage. Mounting individual partitions, formatting them and mounting the device as a USB drive when connected to a computer (mounting makes partitions or folders available for use).
mount /system - mounts the system folder. unmount /data - unmounts the folder with user data. unmount /cache unmounts the cache folder. mount /sdcard - mounts a memory card. mount /sd-ext - mounts a Linux partition from a memory card (if available). format boot - cleaning the boot partition. format system - cleaning the system partition. format data - clearing the section with user data and settings. format cache - clearing the cache partition. format sdcard - formatting a memory card. format sd-ext - formatting a Linux partition on a memory card. mount USB storage - connection to a computer in removable storage mode. 8 . advanced - additional functions of ClockworkMod. Reboot Recovery - reboot the device into recovery. Wipe Dalvik Cache - clears the Dalvik cache. Clearing the cache of the Dalvik Java virtual machine, which is used to run applications. This menu item is usually used before installing new firmware, especially unofficial ones. Wipe Battery Stat - reset battery statistics. It is believed that this item should be used when the system battery level indicator shows incorrect values. However, Google, the developer of the Android system, claims that this should not affect the correctness of the indicator readings. Report Error —report an error. You can report the ClockworkMod recovery bug to its developer. The error log will be written to the memory card, and you can send it to the developer using the ROM Manager program. Key Test - checking the keys, when you press a button, it produces its code. Restart adbd - reboot the ADB server. This item helps when the device has stopped responding to commands from the ADB program when it is connected via a USB cable. Process dump - Dump +++++Go Back+++++ - back, returns to the previous menu.
Navigating the ClockworkMod Recovery menu.
ClockworkMod Recovery is managed differently on all devices. But most devices use the following scheme:
Restoring stock firmware
If you don’t like it or don’t get used to it, there is always the opportunity to return everything to its place. Many people ask the question: “How to restore Android through Recovery, namely the stock version?” The answer lies in the point above. Roughly speaking, returning everything to normal occurs in the same way as making the initial changes.
All you need to do is download the firmware from the manufacturer to a flash card or internal memory, then select the appropriate “Recovery” menu item and do a complete reset of settings/content. In principle, nothing complicated.
It seems that understanding how to flash Android via Recovery is not so difficult. But if some points are unclear, or you are not confident in your knowledge, it is better not to get involved with such processes. But even if something doesn’t work out, you can always restore the device’s firmware through the corresponding menu item. The main thing is to make a backup copy before flashing Android via Recovery. To do this, you will need a custom “Recovery” and a little patience, because the process of backing up the firmware takes a lot of time.
If something goes wrong, you can always turn to knowledgeable people. At least an authorized service center will definitely help you. The main thing is not to lose heart and move forward confidently. This is the only way to achieve any results. Good luck with the flashing!