10.31.2018 Category: SettingsAuthor: Alexey Gerus
Windows 10 provides a wide range of options for changing the appearance of the operating system. If you delve into the settings, you can find changes in fonts, colors in each individual element of the window, and much more. All this is quite simple to do, but it is worth remembering that any change can lead to a deterioration in the quality of the image display; you need to be prepared for this and, if necessary, quickly correct the situation.
- How to change the default font in Windows 10
How to return the default font back
- Via Screen Options
System Font Size Changer
- Disable scaling
System-wide scaling
How to add a new font in Windows 10
You can install the font using the “Store” or by downloading it from a third-party resource, for example, here.
- To install an additional font, download the corresponding .ttf file to your computer.
Save the .ttf file with the font on your computer - Next, you can use two ways to integrate the font into the system:
- right-click on the .ttf file and select “Install”;
Call the context menu of the .ttf file and select “Install” - You can also copy and open the address “Control Panel\All Control Panel Items\Fonts” into the address bar of Explorer, then simply drag the downloaded file into the window that opens.
Drag the file with the font into the corresponding element of the “Control Panel”
You can also use the Windows Store, but the selection of fonts in the official Microsoft environment is much poorer than in publicly available sources.
- Press the Win+I key combination, then go to the “Personalization” applet.
Press the Win+I key combination, then go to the “Personalization” applet - Open the “Fonts” tab, click the “Get additional fonts from the Microsoft Store” button.
On the fonts page, click on “Get additional fonts from the Microsoft Store” - Next, click on the selected font, and on the product description page click “Get.”
On the page with the font description, click “Get” - We wait until the installation of the new component is completed, usually no more than a few seconds.
Video: how to download and add a new font in Windows 10
Change of size
Let's start studying the topic by changing the scale of the text displayed in a certain part of the window. This can be done in relation to the window title or menu items (including contextual ones). You can change the font in Windows as follows.
1. Call the desktop context menu.
2. Open the window for personalizing the appearance of the operating system interface.
3. In the vertical list on the left side of the window, follow the “Screen” link.
Note: In later versions there are dozens to change screen settings, personalization must be selected in the control panel.
4. Here we move the checkbox to one of the classic text scaling options in Windows 10 or go to the user settings section and set our own text scaling factor.
Below are “Advanced screen settings”, which contains “Additional text changes”, which is responsible for changing the size of labels in a certain area of the window (header, tooltip, menu).
Select the desired item and indicate the size of the letters in pixels and, if necessary, select a bold inscription style.
5. Save the changes made with the Apply button.
How to change the default font in Windows 10
The paradox of working with fonts in Windows 10 is that the design itself is there, but the interface for using it does not exist. The only way to replace the standard font with an interesting one is to edit the operating system registry.
In order not to fiddle around in the editor, you can create a file, the launch of which will make all the changes automatically:
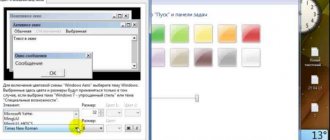
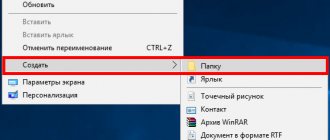
- We create a text document in any convenient place.
Click on an empty space on the desktop and select “Create” - “Text document” - Copy the following lines into it: Windows Registry Editor Version 5.00 [HKEY_LOCAL_MACHINE\SOFTWARE\Microsoft\Windows NT\CurrentVersion\Fonts] “Segoe UI (TrueType)”=”” “Segoe UI Bold (TrueType)”=”” “Segoe UI Bold Italic (TrueType)"="" "Segoe UI Italic (TrueType)"="" "Segoe UI Light (TrueType)"="" "Segoe UI Semibold (TrueType)"="" "Segoe UI Symbol (TrueType)"= »» [HKEY_LOCAL_MACHINE\SOFTWARE\Microsoft\Windows NT\CurrentVersion\FontSubstitutes] “Segoe UI”=”[FONT]” where instead of [FONT] we insert the name of the design from the corresponding list.
Copy and save lines to a text document - Save and close the file. Then right-click on it and select “Rename”.
Right-click on the document and select “Rename” - We come up with any name, but change the extension from .txt to .reg, save it with the Enter button and agree to the change.
Rename the file and give it the extension .reg - Next, simply double-click to launch the file and agree to continue.
Launch the file and agree to the warning - We reboot the PC and observe how the design of Windows has changed.
After the reboot, the fonts in the design will change to the specified ones
Some fonts, as in the example I provided above, are not entirely readable, and therefore are undesirable for use in the operating system. However, there are also those that do not support the Cyrillic or Latin alphabet. In this case, the user will receive either empty buttons or the same squares, indicating the presence of characters that are not perceived by the font. You should be more careful about the design and changes made, otherwise you will have to correct what you have done in an emergency.
How to return the default font back
If the font change is unsuccessful, if you don’t like the result, you can roll back the changes and return to the standard font. This can be done in two ways: through the “Control Panel” or by following a similar previous instruction to edit the registry with the created file.
- In the “Control Panel”, font applet, in the left column, open “Font Options” - this is the second button in the column (in case the design has changed completely unsuccessfully).
In the font menu, go to “Font Options” - Next, click the “Restore default font settings” button, save the changes with the OK button and restart the computer.
To restore fonts, click the corresponding button, save the changes and restart the PC
The method described above may not always help, but reverse editing will work 100%.
- Create another text document with the following content: Windows Registry Editor Version 5.00 [HKEY_LOCAL_MACHINE\SOFTWARE\Microsoft\Windows NT\CurrentVersion\Fonts] “Segoe UI (TrueType)”=”segoeui.ttf” “Segoe UI Black (TrueType)”= "seguibl.ttf" "Segoe UI Black Italic (TrueType)"="seguibli.ttf" "Segoe UI Bold (TrueType)"="segoeuib.ttf" "Segoe UI Bold Italic (TrueType)"="segoeuiz.ttf" " Segoe UI Emoji (TrueType)"="seguiemj.ttf" "Segoe UI Historic (TrueType)"="seguihis.ttf" "Segoe UI Italic (TrueType)"="segoeuii.ttf" "Segoe UI Light (TrueType)"= "segoeuil.ttf" "Segoe UI Light Italic (TrueType)"="seguili.ttf" "Segoe UI Semibold (TrueType)"="seguisb.ttf" "Segoe UI Semibold Italic (TrueType)"="seguisbi.ttf" " Segoe UI Semilight (TrueType)"="segoeuisl.ttf" "Segoe UI Semilight Italic (TrueType)"="seguisli.ttf" "Segoe UI Symbol (TrueType)"="seguisym.ttf" "Segoe MDL2 Assets (TrueType)" ="segmdl2.ttf" "Segoe Print (TrueType)"="segoepr.ttf" "Segoe Print Bold (TrueType)"="segoeprb.ttf" "Segoe Script (TrueType)"="segoesc.ttf" "Segoe Script Bold (TrueType)"="segoescb.ttf" [HKEY_LOCAL_MACHINE\SOFTWARE\Microsoft\Windows NT\CurrentVersion\FontSubstitutes] "Segoe UI"=-.
Copying lines into a text document - Rename it with any name and .reg extension.
Rename the file to the .reg extension - We launch the file, agree to the terms and restart the computer.
Agree with the warning again, then restart the PC
Method number 2: changing the font type for window titles
For the Windows 10 operating system, these are regular files with the extension *.ttf (TrueType) or *.otf (OpenType). All of them are stored in the Fonts folder on the system drive C in the Windows partition (path to files C:\Windows\Fonts). In order to change fonts on Windows 10, you need to do the following:
- Go to “Control Panel”;
- Select the “Design and Personalization” section (if there is no such block, you need to click on “Category”);
- Select “Fonts”;
- From the central block, select the style you like and double-click on the object;
- Click the “Install” button in the top panel (it is also provided in the general menu, to call it, you need to right-click on the object you like and select “Install” from the list).
The installation process will take 2-4 seconds. There is no need to restart your computer. The text style is ready to use. The Fonts folder contains up to 180 types of styles (depending on the version of the OS family). But there may be more. You can download free styles online and in the Microsoft Story Store.
Let's assume that the fonts were downloaded from an online source. You can add them to the main ones in two ways - by copying the file to the Fonts folder or by direct installation. The second method is faster. The algorithm of actions is as follows:
- Unpack the downloaded archive (usually folders are archived);
- Go to the folder and select the object you like;
- Right-click on the style type;
- Select "Install".
A similar result can be achieved by double-clicking the file. This operation will open a new, but already familiar window.
How to change font size on Windows 10
In addition to changing the font itself, Windows 10 allows you to change its size. This way you can enlarge or reduce the letters in the windows for better readability. Fortunately, there is no longer any need to use the registry; there is a special interface for changing the font size, as well as specialized programs.
Via Screen Options
The built-in scaling interface (changing font size) is located in the “Options”, “Screen” column:
- Click on an empty space on the desktop and select “Display Settings” from the context menu.
In the desktop context menu, select “Display Settings” - Scroll down the page that opens a little, find the “Scale and layout” column and click on the “Additional scaling options” button in it.
On the “Display” tab, go to “Advanced scaling options” - Next, in the “Enter a custom scaling size” field, enter the value to which you want to replace the current parameter of 100%. For example, if you need to increase the text by 10%, enter the number 110 in the field. Then click the “Apply” button for the changes to take effect.
Set the text enlargement percentage, then click “Apply” and restart the PC - Then we restart the computer or through the “Change user” menu we restart the OS.
How to change font size using a third-party program
In addition to standard methods for changing font size in Windows, there are external programs and utilities for simpler and more detailed design settings.
System Font Size Changer
System Font Size Changer is a miniature utility whose only function is to change the font size in six main places where it is used. You can download the program from the official website.
System Font Size Changer is a small utility for changing font size
The functionality of the utility is terribly simple: when you first launch the application, it will offer to save the standard registry settings. All work takes place in the editor, so to quickly restore the original settings, you can use the quick file, as shown in the instructions above.
Next, for the work itself, you will need to choose where to change the font and how much to enlarge it:
- We put the toggle switch in any of the positions, for example, the Menu item is responsible for the font size in the context menu.
- Next, move the slider to the right and click the Apply button.
- Then we agree with the message that pops up. It’s just important to know: after clicking OK, your system will close all windows that are called by the current user, so before changing the font size, you need to save all the data and only then make changes.
Select the front of the change, drag the slider to the right, then save the changes and reboot the system
Winaero Tweaker
Winaero Tweaker is a very powerful program for customizing the appearance of the Windows operating system. You can download the program from the official website.
Winaero Tweaker is a powerful program for customizing the appearance and basic functions of Windows
Despite its small size (only a couple of megabytes), the program can completely change the appearance of the operating system. And even more, among the application’s functions you can find system optimization by disabling Defender, Cortana voice assistant and much more. Unfortunately, the program does not provide a Russian interface language, but it is not difficult to understand.
Launch the application and open the Advanced Appearance Settings tab. In each item from this group of settings, you can set and completely change fonts, and not for the entire system, but for individual windows or menus. You can use different fonts, sizes and styles. Even add strikethroughs and underlined lines.
In the Advanced Appearance Settings column, change the font, style and font size
After making changes, you must click the Apply changes button, then either manually log out of the system using the “Change user” button (or restart the PC), or accept the appropriate offer from the program.
Click Apply changes and reboot the system
Customize size
The easiest way is to change the size of the text using “System Settings”. You can get there like this:
1. Click on the gear icon located on the left side of the Start menu.
2. Click on the magnifying glass, enter the word “parameters” in the search bar and select an application with the same name from the results.
3. Call the “Context menu” by hovering the cursor over any part of the desktop and right-clicking, then select “Display settings”.
4. Press two buttons on the keyboard at the same time - Win (floating window) + I (English letter, but you do not need to change the language layout).
5. After going to “Parameters” using any of the listed methods, open the “System” section.
To change the font size you need:
- Among the available subsections displayed in a list on the left side of the window, select “Display” (usually it opens immediately, since it is in the first position in the list);
- Scroll down a little to the “Scale and layout” item. The functionality of this tool allows you to select the orientation (by default “landscape” or “portrait”, it is also possible to flip the image), screen resolution and text size;
- In the “Change text size” item, you need to click on the small black rectangle to display possible scale options - from 100 to 175% in 25% increments;
- Choose a size that is comfortable for the eyes.
After completing the described steps, the font will increase, but not everywhere. For the settings to take full effect, you must log out and log in again (restart your computer).
If the proposed text size options do not suit the user for some reason, he can enter an arbitrary value in the range from 100 to 500%. To do this you need:
1. Click on the active link “Additional zoom options”, highlighted in blue and located immediately below the zoom options offered by the system.
2. In the window that opens, scroll down a little to the “Custom scaling” section.
3. Enter your value in the empty field and click “Apply”.
4. In the same window, just above, you can activate automatic blur correction by moving the slider next to the corresponding setting to the “On” position.
How to solve the problem with blurry fonts on Windows 10
Blurry fonts are a visual problem with the operating system. In the vast majority of cases, it appears in cases of changes that the user makes to the design of Windows. Less common are problems with the graphics driver, when the ability to change the screen extension is lost or the OS display is simply distorted.
Before you start fixing the situation, you need to use the built-in Windows tool:
- Open “Advanced scaling options” as shown in the example above.
- We move the only toggle switch on the page to the “On” position.
In the “Advanced scaling options”, move the “Allow” toggle switch to the active position - Reboot the computer.
Disable scaling
If the example above did not help you deal with blurry fonts inside applications or the system, you need to move on. It is necessary to correct the situation by disabling scaling and bringing the system to its original form. And if blurriness is not observed everywhere and only when using some applications, then you need to slightly adjust the program properties.
System-wide scaling
When blurring is observed throughout the operating system, it is necessary to return all changes in scale to their original state and set the size to 100%. The easiest way to do this is through the “Advanced Scaling Options”. Moreover, if the parameter is already set to 100%, but you definitely changed this value elsewhere, you need to set a number other than a hundred, then save the change and then return the treasured 100 in the parameters. This way the system will return to its original form.
However, if manual configuration is too time-consuming and tedious, you can use the special Windows 10 DPI Fix utility. This is a special small application that brings system scaling to its original form.
- Download and launch the application.
- Leave the checkbox next to Windows 10 and click the Apply button.
Windows 10 DPI Fix allows you to return all scaling settings to their original state - Reboot the PC.
How to increase the font on a page in a browser
If you need to increase the font size on browser pages, you can do this very quickly using the keyboard and mouse. Since every browser supports the ability to increase the content of sites, this will be easy to do in any of the browsers.
- Open the desired page in the browser.
- Ctrl
button on the keyboard, press the
+
to zoom in and
–
to zoom out, or roll the mouse wheel up or down to zoom in and out of the browser page.
As in most cases, there are many third-party programs that allow you to make changes to the registry and change system settings from a convenient interface. System Font Size Changer is one such utility that can be used to increase the font of all interface elements. To do this, you just need to download the program.
- Each time the program is launched, the user is prompted to make a copy of the current settings in order to always be able to restore changed settings. We recommend doing this!
- Next, in the program interface, we select what we will change from the list of available elements (window title text, menu, message box, icon labels, tooltips)
. - The last step is to drag the size slider and click the Apply (after these steps the system will exit, so we recommend saving everything that was opened at the time of exit)
.
If you want to return all settings to standard, use the WindowMetrics.reg file. To do this, open it and add standard parameters to the registry.
Definitely, you can use a more complex method of increasing fonts on your computer, namely using the registry editor. You can go to the path: HKEY_CURRENT_USER\Control Panel\Desktop\WindowMetrics and configure the settings manually, but why, if there is a convenient application that you don’t even need to install.
conclusions
Font enlargement is a really useful feature in Windows. It can be useful in many situations, but not everyone knows how to do it quickly. That's why we wrote instructions on how to increase the font on a Windows 10 computer and separately on how to increase the font on a page in the browser, which will be useful to many.
In the new operating system, the user has a lot of opportunities to customize the appearance of its interface. This includes the color of windows and even the font of inscriptions in any part of them, which was not the case in previous versions of the OS.
Today we’ll look at how to change the font on a computer with Windows 10 installed. This feature is necessary to improve the readability of text if the user constantly works with text documents.