The Internet is fraught with a lot of dangers, especially for the fragile minds of the younger generation. But few parents manage to protect their child from harmful information through prohibitions and admonitions. 90% of schoolchildren easily deceive their mother and father and continue to visit non-children’s resources.
Adults also “sin” by using the Internet for inappropriate purposes. Mistakes made by office workers often arise because 50% of the time they are busy not with business, but with social networks.
Only one remedy can radically solve the problem - blocking unwanted resources. Read how to block a website from children and careless adults using eight proven methods.
Blocking via Hosts file
The method of blocking web resources through Hosts, a local database of IP addresses and domain names associated with them, is designed for the most inexperienced. Since even elementary schoolchildren know about Hosts today, for many it will not be difficult to reset the setting and reduce your efforts to nothing. Therefore, you should take measures to protect it. For example:
- Create an account with limited rights for the user you are going to block access to unwanted sites. Then he will not be able to correct anything in the Hosts file even if he wants to.
- Use tricks to hide blocking records.
The blocking technology itself is very simple:
- Log in to Windows using an administrator account.
- Go to the folder %Windir%\System32\drivers\etc , find a file without an extension named “Hosts” and open it using Notepad or a program that replaces it. To avoid problems with saving changes, you can do this: launch Windows Notepad (file notepad.exe, located in the Windows folder) with administrator rights, through the menu “File” - “Open” go to Hosts and load it into the program.
- In any place in the file, on a new line, add the entry 127.0.0.1 site , where instead of “site” we write the address of the resource being blocked.
- Save the file in its original location. To prevent notepad from assigning the txt extension to it, write the name “hosts” in quotes, and select “all files” from the file types.
After this, the site will no longer open in browsers, since the computer will look for it not on the Internet, but on itself.
Tricks that will prevent a user from deleting your entry in Hosts
The first option is to hide the entry itself in the file. It is impossible to make it invisible, but you can insert 2-3 hundred empty lines between comments (lines starting with #) and it. The user, when opening a file, most likely will not pay attention to the scroll bar of the document and will not see your entry, since it will be far down.
The second option is to move the Hosts file to another, more secluded location. Decide for yourself where to place it, but to prevent the system from losing it, you will have to make a small edit to the registry. Open the HKEY_LOCAL_MACHINE\SYSTEM\CurrentControlSet\Services\Tcpip\Parameters branch in the RegEdit editor and write a new path to Hosts in the DataBasePath .
Editing “hosts” on a PC
Read also: TOP 5 Best VPN services for computers 2020 + Reviews
The “hosts” file stores those addresses that should be blocked on this PC. And this file can be edited. But first you need to find and open it. It is worth noting that even a notepad will do to open this type of file.
It is worth noting that it is in the “hosts” file that you can register the IP addresses that Microsoft uses to spy on users. However, this is a completely different story.
Let's move on to blocking sites. And you need to do the following:
1 Click on the “Start” button (1) , move to the “Accessories - Windows” directory (2) , right-click on “Notepad” (3) , select “Advanced” (4) and click on “Run from” administrator name" (5).
2 Now click on the “File” in the top panel (1) and click on the inscription “Open” (2).
3 Now go to the path “C:\Windows\System32\drivers\etc\” (1), select the “hosts” file (2) and click on the “Open” button (3).
4 Add the required sites (1) and then click on the “File” button again (2). We save the document according to the standard scenario.
That's all
Now the added sites will be blocked at the operating system level. And it makes no difference which browser you use to visit them. A very useful thing is this “hosts” file. However, let's move on to another method.
back to menu ↑ back to menu ↑
Via DNS
Traffic from a computer connected to the Internet passes through DNS servers (which, like hosts, map website names to their IP addresses). In addition to the DNS provided by the provider, you can use others, for example, free public ones.
Some public DNS have a content filtering system, that is, they do not load sites with certain content onto the computer.
Unfortunately, you can't block resources of your choice using DNS, but if you want to block access to adult content or potentially malicious websites, the method is very effective. To use it, you just need to specify the required DNS addresses in the connection and protocol properties of the IPv4 version.
This example uses Yandex public DNS with an adult content filter.
There are other blocking options:
- Yandex: 77.88.8.88 (main) and 77.88.8.2 (alternative) - filtering phishing and fraudulent resources.
- Norton ConnectSafe (Symantec): 198.153.192.40 (primary) and 198.153.194.40 (alternate) - filters phishing, fraud, malware.
- Norton ConnectSafe: 198.153.192.50 and 198.153.194.50 - the same plus an adult content filter.
- Norton ConnectSafe: 198.153.192.60 and 198.153.194.60 - the same plus blocking of any “inappropriate” topics.
In browsers
Modern browsers contain a lot of useful things, but most of them do not have functions for blocking sites of the user's choice. It remains, perhaps, only in Internet Explorer.
To make the ability to block sites appear in your favorite browser, you just need to install a special extension in it, for example, Block Site. This link leads to the Chrome store, from where you can download such a plugin (not just one, but three with a similar name) for Google Chrome and Yandex Browser.
Details
The most convenient option for restricting access to Internet resources in this Internet browser is to use special extensions. In this article we will look at three very convenient solutions.
Website Blocker
The simplest plugin that allows you to block sites in your browser. Download and configure it as follows:
- Go to https://chrome.google.com/webstore/detail/website-blocker-beta/hclgegipaehbigmbhdpfapmjadbaldib.
- Click first on the installation button, and then on confirmation.
- Next, go to an unwanted Internet resource.
- LMB on the new icon.
- Now set the blocking time period.
- And then click on the Block This .
If you wish, you can manually enter a link in the plugin window without going to an unwanted web page.
Advantages:
- Quick blocking of any resource.
- Very fast work in any conditions.
- Possibility to select blocking time.
- Simple process of adding a site to the list.
- Lock with one button.
- Extremely simple installation process.
- Excellent work with Yandex Browser.
- Ease of use.
Flaws:
- There is no Russian language in the menu.
Block Site
A good addition that also has a mobile version (in the form of an application). It is successfully used in Yandex.Browser. You can find it in the official Google Chrome online store. Installation, as in the previous case, is very simple:
- Go to https://chrome.google.com/webstore/detail/block-site-website-blocke/eiimnmioipafcokbfikbljfdeojpcgbh?hl=en.
- Next, click LMB on the blue button.
- After that, select "Install extension" .
- On the page that opens, click “I Accept” .
Then right-click on the new icon and go to “Settings” .
Insert a link to an unwanted resource into the text field and click the plus sign . Then the browser will not have access to it. You can also disable adult resources by checking the appropriate box.
A special feature of the plugin is its ability to synchronize with the mobile version of Block Site for an Internet browser. That is, resources that are not available on a computer will be prohibited on a smartphone.
Advantages:
- Fast and high-quality blocking of any resource.
- Possibility to select the ban time.
- Synchronization with the mobile version of the plugin.
- Excellently designed interface.
- Easy setup.
- Very simple installation process.
- Excellent work in Yandex Browser.
- The plugin is completely free.
No obvious shortcomings were noticed.
Adult Blocker
An excellent extension that allows you to quickly and efficiently block any resource and protect your settings. You can easily find it in the Google Chrome online store, from where it can be downloaded in just two clicks. Proceed according to this principle:
- Open the page https://chrome.google.com/webstore/detail/adult-block/deapbojkkighpdmmjgmankndcjafppck?hl=en.
- Click on the installation button.
- Confirm the procedure.
After installation, a corresponding icon will appear on the toolbar. You need to click on it and then click “Registration” .
Then enter the required data and click “Launch” .
The set password is required to access the Adult Blocker control menu.
Then you should visit the site that you want to block, click on the add-on icon again, enter the previously specified password and click on the red button .
After this, you will have to enter the password that you recently came up with.
Of course, blocking sites using this plugin is a little more difficult, but more reliable. In addition, the plugin has an excellently designed menu and even Russian language. The latter fact will definitely please domestic users.
Adult Blocker is successfully used by millions of users. What's especially good is that the add-on requires very little RAM. This makes it possible to use it even on relatively weak machines.
Advantages:
- Fast and high-quality blocking of any resource.
- Simplest installation process.
- The plugin works great with Yandex Browser.
- Password protection of extension settings.
- Extremely simple and intuitive interface.
- Very nice design.
- There is Russian language in the interface.
- Ability to configure blocking by hour.
- Very simple controls.
- Consumes little RAM.
- Can be used on weak machines.
Flaws:
- It was not noticed.
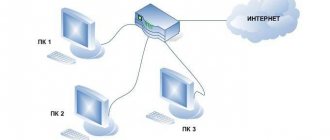
Using Windows Firewall or a third-party firewall
Windows Firewall can only block websites based on IP addresses. This is not the best way, since one IP is sometimes shared by several resources, and large portals such as VKontakte and Odnoklassniki occupy entire address ranges. Third-party firewalls can be configured more flexibly - they allow you to block access to even a single page. To do this, it is enough to indicate its URL in the program, not its IP, which is much more convenient for the user.
Since each firewall is configured differently, and we cannot consider all of them, we will study the principle of setting up a universal tool - the Windows 10 firewall.
To create a blocking rule, we first determine the site's IP. To do this, it is convenient to use the ping_URL (for example, “ping ya.ru”) or whois services.
Next step by step:
- Let's open the firewall. In the left panel, select “Outgoing Connection Rules”, and in the “Actions” list, select “Create Rule”.
- In the next window about (if the site should be blocked in all browsers) or “Program path” (if in one). When choosing the second option, we will indicate the path to the browser executable file.
- We'll skip the next window. After it, we have to indicate the IP to be blocked. At the bottom of the “Area” window, select the “Specified IP addresses” item and click “Add”. We do not touch the top field, since it is intended for creating rules in local networks.
- Enter the IP address or range of website addresses and click OK.
- Next, select “Block connection”.
- Let's mark the network profiles for which we are going to use the rule.
- The last step is to give the rule a name.
After clicking “Finish” the rule will take effect.
How to Block a Website in Windows Firewall
The built-in Windows Firewall in Windows 10, 8 and Windows 7 also allows you to block individual sites, although it does this by IP address (which can change for a site over time).
The blocking process will look like this:
- Open a command prompt and type ping site_address and then press Enter. Make a note of the IP address with which packets are being exchanged.
- Start Windows Firewall in Advanced Security mode (you can use Windows 10 and 8 search to start, and in 7 - Control Panel - Windows Firewall - Advanced Settings).
- Select “Rules for outgoing connection” and click “Create rule”.
- Select "Custom"
- In the next window, select All Programs.
- In the “Protocol and Ports” window, do not change the settings.
- In the Scope window, under Specify the remote IP addresses to which the rule applies, then click Add and add the IP address of the site you want to block.
- In the Action window, select Block connection.
- In the “Profile” window, leave all items checked.
- In the “Name” window, name your rule (the name is up to you).
That's all: save the rule and now Windows Firewall will block the site by IP address when you try to open it.
On the router
Access control settings on routers of different models are not the same, but their algorithm is largely similar. Let's figure out how to block access to unwanted sites using TP-Link as an example.
TP-Link access control (and not only) works in black and white list mode. In the first case, access is allowed to any web resources except those specified. In the second, it is prohibited to apply to everyone, except, again, those indicated. Let's consider creating a blacklist as an example, since it is used more often.
- Go to the admin panel, open the “Access Control” section and click “Setup Wizard”.
- In the new window, select the “IP address” mode, indicate the name of the host for which we are creating a rule, and enter its IP or address range.
- Next, select the “Domain name” mode, write an arbitrary target name (for which a rule is created) and list the prohibited sites.
- The next step is to create a blocking schedule.
- Then we set the name of the rule, check all the parameters and click “Finish”.
- The last step is to select a filtering mode (in our case, prohibit packets from the specified domains from passing through the router) and save the rule. Also don't forget about.
This completes the setup.
Blocking on a smartphone
Read also: [Instructions] How to recover deleted files on Android: Programs for phone and PC
The easiest and most affordable way to block access to a website on a smartphone is to use a special application. Digging into the settings of the device itself is long and difficult. What needs to be done to block?
Previously, there were many applications of this kind on Google Play. But now there are somehow few of them. As an option, you can install a good antivirus with a site blocking option. However, let's not be distracted from our process.
Here are the instructions:
1 Launch Google Play using the corresponding icon and enter “Block it” (1) in the search bar. Then click on the search start button (2).
2 Next, tap on the application name.
3 Then simply click on the “Install” button.
4 Now launch the installed application. In the main window, in the line, write the address of the site that needs to be blocked (1) and press the “Enter” on the keyboard (2).
That's all
Now the hated site is blocked on the smartphone. To remove the blocking, you can remove the address from the list or simply delete the application. As you can see, the method is not particularly complicated. That's the beauty of it.
back to menu ↑
Conclusion
So, we looked at the question of how to block a site on, in a browser and on a smartphone. As it turned out, there is nothing complicated about it. All of the above methods do not require users to have any special knowledge or skills.
back to menu ↑
VIDEO: HOW TO BLOCK A SITE SO THAT IT DOES NOT OPEN ON YOUR COMPUTER
Parental controls
Parental controls are now being built in wherever possible. It is found in many routers, antivirus programs, and even in the operating systems themselves. Before Windows 7, parental controls were a separate system feature. In Windows 10, it became “family safety with settings via the Microsoft website,” but its essence did not change. Parents still have the opportunity to use it to limit their child’s access to network resources.
However, what are we all about Windows and about Windows? Let's look at how parental control works in Kaspersky Internet Security.
- Restrictions are configured through a specially designated section.
- The first thing you have to do after entering it is to set a password to disable the function and change settings.
- Next, you will see a list of user accounts for which you can enable parental controls. Click “Set up restrictions” next to the selected account.
- Restrictions on access to web content are set in the “Internet” section. There are 2 blocking modes: sites for adults (black list) and all sites except permitted ones (white list).
- When you select blacklist mode, you can specify categories of content to be blocked, but without specifying specific sites. When selecting whitelist mode, allowed sites must be added to exceptions. Everything else will be blocked.
The control on/off slider is located at the top of the settings window in the user list.
Blocking a site using Windows system tools
If you can’t do it or you don’t want to install the extension, then you can do without it; there is another option on how to block a site in the Yandex browser. The Windows operating system has built-in tools that help you block access to web pages. To use them, do the following:
- Go to the drive on which you have the operating system installed and go to the “ Windows ” folder.
- Here, find the “ System 32 ” folder, then the “ drivers ” folder, and then the “ etc ” folder.
- In this folder, find the “ hosts ” file.
- Open it using the Notepad .
- In this file you will have your IP address repeated several times (four numbers separated by dots before the word localhost).
- Copy it and enter it in the very bottom line of the document, and then, separated by a space, enter the address of the site you want to block (the part that comes after “ www. ”).
- Save changes and that’s it - the site is blocked.
When you try to enter the site, it simply will not load, and a blank white page will hang in front of you.
Using static routes
A static (permanent) route is a rigidly defined path for packets to follow from one network node to another. For example, from your computer to the server that hosts the website. By registering a false route to an Internet resource (more precisely, to its IP address) in the Windows registry or in the router settings, you will prevent it from opening.
How to do it:
- Use the ping_URL the IP address of the desired site.
- Without closing the command line (it must be launched as administrator), run one more instruction: route -p add target_site_IP mask 255.255.255.0 192.168.1.0 metric 1 .
The answer “Ok” means that the route to the site 213.180.193.3 has been created. Now ya.ru will not open on this computer.
In the Windows registry, all static routes are located under HKEY_LOCAL_MACHINE\SYSTEM\CurrentControlSet\Services\Tcpip\Parameters\PersistentRoutes.
To remove an entry from there that has become unnecessary and resume access to the site, right-click on the entry and select “Delete.” the route - f statement on the command line . The last method removes all existing persistent routes. If you want to remove only one of them, issue the command route delete target_host_ip , for example, route delete 213.180.193.3 . After this, the ya.ru website will become accessible again.
The best addition via block-site
To install, follow the link and click install. The installation process will begin.
Next, go to add-ons and close access and unwanted addresses.
- Turn it on.
- Click on the checkbox to expand.
- Setup button.
To block a visit to a site in Yandex through the block site application, you need to enter only two parameters, see below (I will block Odnoklassniki). Here we enter the domain itself and press the plus sign.
Next, is it possible to set up a redirect where the user will be redirected when entering (in my case) ok.ru in the address bar, I’ll make yandex.ru so that the standard extension page does not pop up. As prescribed, you need to click on the arrow (see screenshot below).
If you do not specify a redirection page, the standard block site stub will be shown. Closes everything, including viral porn portals, Vulcan casino so that it does not open, and the like. You can block access temporarily or permanently while the application is running.
I advise you to read which browser is the best, also the best antivirus for Windows 7, and how to renew your Kaspersky license completely free of charge.
Using local IP security policies (IPSec)
Using IP Security Policy (IPSec) to restrict Internet access is a non-trivial method. Very few people know about the existence of such a possibility (unlike Hosts), and anyone for whom you block a certain web resource will never guess how you did it.
Using IPSec, you can block both an individual IP site and a pool of addresses. The only drawback of this method is that the policy management snap-in is not available in all editions of Windows. So, it is absent in home releases.
Creating an IP security policy may seem complicated, but only the first time. After several attempts, it will not take you more than 2-3 minutes. Moreover, every step of the setup is accompanied by a Wizard.
- So, to access the snap-in, open Administrative Tools in Control Panel, click Local Security Policy, and select Local PC IP Security Policies.
- Right-click on the empty area on the right half of the “Local Policies” window and select “Create IP Security Policy.” The first Setup Wizard will launch.
- In the window that opens, enter the name of the new policy and briefly describe its purpose. You can leave these fields as default, but it’s better to fill them out so you don’t get confused later.
- Then click “Next” without changing anything.
- Complete the Wizard by clicking “Finish.”
- In the properties window for the future IPSec policy, click “Add”. This will launch the next Wizard - creating IP security rules.
- In the “Tunnel Endpoint” window, leave everything as is.
- Under Network Type, select All Connections.
- In the “List of IP filters” (they just need to be created), click “Add”. Next, give your list a name and click “Add” again. The third Wizard will start - IP filters.
- First of all, give the new filter a description (it’s most convenient to specify the URL of the site to be blocked).
- Specify “My IP address” as the traffic source.
- Destination: “Specific IP or subnet.” Below, write the address of the site or subnet to be blocked.
- In the “Protocol Type” section, Fr.
- The last step is to click “Edit Properties” and “Done”. There is very little left.
- Confirm the new filter settings.
- If you want to create another one, click the Add button in the next window. Otherwise, click “OK”. This will launch the Filter Action Configuration Wizard.
In the “List of IP filters”, mark the one you just created and click “Next”.
- Give a name and description of what it will do (block the site).
- In the action parameters, specify “Block”.
- The final step of the stage is “Changing properties” and completing the wizard.
- Now check and confirm the setting again.
- The final push is to create safety rules. The fifth Master will do this.
- When it’s finished, change the properties again and click “Finish.”
- Review and confirm the parameters of the new rule.
- And finally - all the properties of the policy. It has been created and is displayed in the section list.
- All that remains is to put the policy into effect. Right-click on it and select “Assign”.
In the “Properties” section you can later change any policy settings, and through the context menu you can disable, rename and delete.
Other articles on the site
- How to access blocked sites
- How to protect Google Chrome with a password
- How to Speed Up Internet on Windows PC
- The most popular dating sites in Russia
How to block a site through Yandex browser by installing an extension
The first option for blocking sites through the Yandex browser is to install extensions. You can install them from the Chrome Online Store, since the Chrome and Yandex browsers use the same Chromium engine.
What extensions can I use? Choose the one you like the most. You can find them through the search bar. To do this, enter “block site” into it and select the appropriate extension from the proposed options. In this article, I will show you how to block sites using the Block site extension.
Open Yandex browser and go to the Chrome Web Store. Then enter “block site” in the search bar and press “Enter”, or you can go to the link: https://chrome.google.com/webstore/search/Block%20site%20.
Next, in the “Extensions” section, find the extension called Block site and click the “Install” button opposite it.
A pop-up window will appear in which you need to click the “Install extension” button.
When Block site is installed in your browser, you will see the following message.
Now we need to add to it a list of sites to which we want to block access.
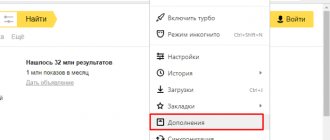
To do this, click on the three horizontal bars in the upper right corner of the browser and select “Add-ons” from the drop-down menu.
Scroll to the bottom of the list, and in the “From other sources” section next to the Block site extension, click on the “More details” button.
Next you need to click on the “Settings” button.
If you want to make it impossible to visit prohibited sites even in incognito mode, then check the “Allow use in incognito mode” box.
After you click on the “Settings” button, the following page will open in the browser. There is a small menu on the left. The “Blocked Sites” tab will display a list of them, and here you can add new sites to block.
On the “Block words” tab, you can specify various keywords to block, for example, “interesting video” or “VK login”.
On the “Activity by day and time” tab, you can specify when to block access to sites and when you can visit them. For example, you can block access on weekdays from 8 am to 6 pm, and at other times and on weekends, access to blocked sites will be allowed.
Let's ban access to the social network Facebook. Go to the start page and copy the address from the browser address bar.
Then we return to the tab with the Block site extension and paste the copied address into the appropriate field. Then click “Add Page”.
The selected site will be added to the blocked list. In the “Redirect to” column, you can specify any other site that the user will be directed to when trying to log in, in our case, Facebook.
You can also specify a “Default Redirect Page”. Then, when visiting any site from the list, the user will be taken to the site specified in this field.
If a person visits a prohibited site in Incognito mode, then by default he will be redirected to the Google search page. You can specify any other site instead.
Now I'll go back to the tab where I had Facebook open. This is the message now displayed. The user sees that access to the site is blocked, and if you put some site in the “Redirect to” field, then the person will not know that you blocked it using the Block site extension, and will not understand why he cannot get to the desired one page on the Internet.
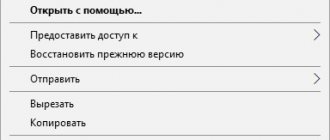
You can block a site in a slightly different way. Once on the desired page, right-click on the free space. Then select “Block site” from the context menu – “Add current site to blacklist”.
If you select “Settings”, the browser tab that was shown in the screenshots above will open.