Mail program The Bat! (part 1)
Where to start? Probably, from the answer to the following question: “I want an email program that will have a Russian interface, work correctly with different encodings, ensure secure correspondence and make sure that I write correctly and...! Yes, by the way, I have more than one mailbox! She must work with everyone at the same time! What should I choose?
Personally, we chose The Bat a long time ago!
About the program
Here is some official information about this powerful and convenient email program, which has many unique and necessary functions:
- Originally The Bat! supports management of an unlimited number of mailboxes that you can open on different servers;
- Flexible options for creating various letter templates based on built-in macros;
- Powerful email filtering tools;
- Any mailbox, folder or recipient can have its own template for a new letter, reply or forward;
- “Quick templates” allow you to insert pre-prepared text while editing a letter and save a lot of time when writing correspondence;
- Correct work with all domestic encodings and a flexible settings system makes it possible to set your own encodings for each mailbox and each recipient;
- Spell checking directly while typing;
- Convenient interface in 17 languages with the ability to switch them on the fly (without restarting the program);
- “Letter Manager” for working with letters directly on the server - you manage correspondence without receiving it on your computer;
- Full multitasking - the program can check mailboxes, sort messages at the same time as you view or edit letters;
- Ability to read letters in HTML-mail format;
- Built-in dial-up function to your Internet provider;
- Powerful search tools in the letter database and address services;
- Built-in PGP support based on the SSLeay library;
- Support for smart cards with a PGP secret key - for bank-to-client postal transactions and other areas where a high degree of security of sent data is required;
- Built-in graphic file viewers;
- You can selectively enable/disable confirmation of delivery of letters for any folder, as well as change the priority of the letter at the time of writing it;
- Convenient address book with the ability to store not only email addresses, but also a large amount of additional information about your correspondents;
- Request forms are a tool for generating messages that are subject to automatic processing;
- Supports IMAP4, POP3, APOP, SMTP, SMTP-authentication protocols. Ability to redefine ports;
- Import messages from the formats of the most popular email clients and from the Unix mailbox format, as well as export to the Unix mailbox format;
- Ability to create user groups and work with them;
- Maintaining logs of work for each box.
In principle, everything listed is present to one degree or another in any email program, but here is the entire list of advantages “in one bottle” - a feature of The Bat!. In many ways, this program is significantly ahead of its competitors, such as Microsoft Outlook Express, Eudora, Netscape Messenger, Pegasus and Becky. Let us substantiate this statement. The Bat! distinguishes:
- A flexible system of settings that allows you to “tailor” the program to the needs of each specific user, taking into account his smallest wishes;
- A developed system of templates that helps to minimize the procedure for writing replies to letters;
- The most modern built-in information protection and encryption system in special versions of the program - SecureBat! and AuthenticBat!;
- Possibility of flexible setting of sorting criteria;
- Protection against viruses, which are now often spread through email. Currently The Bat! can work with almost all existing antiviruses, and scan both incoming and outgoing mail;
- Built-in mailbox backup system, which allows you to quickly restore the entire mail database, address books and mailbox settings in case of any failures.
We're done with the positives. What about the cons? Unfortunately, there are them too... The Bat! does not have the ability to work with news servers (newsgroups), since it does not support the NNTP protocol. It's an annoying flaw, but the developers promised to provide this feature in the new version of the program - The Bat! 2.x.
Preparation
So, now we know in general terms what The Bat! is and why we need it. But before you install the program and start working, you need to get yourself an email address and set up a mailbox. In this case, you need to know the following parameters (for example, let’s take a hypothetical email address on the mail.ru server):
- Your email address;
- address
- Name and password required for authorization on the mail server;
- name: Vasya
- password: 123456
- Addresses of the POP3 server (for receiving mail) and SMTP server (for sending mail).
- POP3 server: pop.mail.ru
- SMTP server: smtp.mail.ru
If you have all this data, you are ready to start working with email. All that remains is to find the distribution kit of The Bat! program itself, that is, the original installation kit. The easiest option is to take it from the website of the program developers, Ritlabs, which is located at the following address: https://www.ritlabs.com.
Home page of the Ritlabs website
Further. Select from the list The Bat! and go to the section dedicated directly to the email client itself. In this section, select the Download . As a result of these manipulations, you are taken to the main download page, from which you can always download the latest version of the program. In addition, there you can always find a list of changes made to the latest version of the program, as well as additional files, such as a language module, PGP plugin and help files.
List of programs to download
The distribution consists of one file, the_bat.exe (currently its size is almost 2.5 MB). We also recommend that you immediately download the language module ( intpack.exe - 3.2 MB). Below we provide several direct links where you can always download the latest official version of the program:
- https://www.ritlabs.com/ftp/pub/the_bat/the_bat.exe
- ftp://ftp.ritlabs.com/pub/the_bat/the_bat.exe
While the download process is underway, here, on the developers’ website, you can read the description of the program or read reviews about The Bat! sent by other users. The Russian version of the Ritlabs website is open for Russian-speaking visitors, located at https://www.ritlabs.com/ru/index.html.
Installation
Well, finally the files are downloaded and everything is ready for installation. The entire installation process of the program is in English (it is not yet possible to select a language during installation). After installation, the program interface will also be in English. We'll tell you how to make it Russian a little later.
Let's start! Run the downloaded file the_bat.exe . The first window will appear in front of you, indicating that the program is ready for installation.
The program is ready for installation
When you click the Setup , the program distribution package is unpacked onto your PC’s hard drive, after which the following window appears containing the License Agreement, which you must accept. It specifies the conditions under which you can use The Bat!
License Agreement Window
After you agree to the license agreement (if you refuse, the installation will be interrupted), the program will display information on the history of changes in each version of The Bat!, starting with the very first.
Window with the history of the program development
Next, the installer will ask where you would like to install The Bat!. By default, as is customary in almost all installers, it offers to select the directory that is provided in the Windows OS for installing program files. We recommend that you do not change anything here and leave the path chosen by the installer. If for some reason you need to change the default settings, click the Change and select the directory you need.
Window for selecting a directory for installing the program
After you click on the Install , automatic installation of the program will begin in the selected folder, and upon completion of the installation, the process of initial configuration of The Bat will also automatically start!
First, a window for selecting the main operating mode will appear in front of you.
Window for selecting the operating mode of The Bat!
Here you need to select one of three modes in which The Bat! can work:
- Workstation with TCP/IP. In this version, The Bat! installed on the local computer as the main program for working with e-mail;
- Server mode. This mode is installed when computers on the local network do not have access to the Internet, or there is no local POP3/SMTP server. In this case, The Bat! can play the role of a mail server for your local network!;
- Client mode. In this case, The Bat! installed as a client for a mail server based on The Bat! However, it does not work either with the Internet or with a regular local mail server.
More detailed information about the last two options can be found on the NoBat.RU website, here. If you do not have a server based on The Bat!, and you are not going to organize one, feel free to select the first option and proceed to the next window.
Window for selecting a mail directory and creating shortcuts
In the window that opens, the program will prompt you to select the name and location of the mail directory (the directory in which your letters and configuration files will be located) on the PC disk, The Bat! in the Start , and also set the following three options:
- Create a link to call The Bat! on the desktop;
- Create a link in the Start ;
- Add The Bat! in the context menu Sender (Send To).
After this, the program will offer to install The Bat! as the main email client that will handle email files (files with .MSG and .EML extensions) and business cards (files with .VCF extension). Agree with these suggestions. Click Yes .
File extension registration window
All! Intermediate finish. We are done with the general settings. Let's move on to creating your first account. This is where you will have to use the data received on the mail.ru server. The following window appears in front of you.
Window for selecting account creation mode
Here you are asked to choose one of the options for creating an email account:
- Create a new account;
- Recovering data from an existing archive.
Select “new box” and go to the next window.
New account creation window
Here you have to enter the name of the mailbox and indicate its location on the disk. Unless absolutely necessary, we advise you not to change the parameter (“default”) and leave everything as it is. Set the name of the box, for example, “Main box” (this name can be changed at any time) and proceed to the next step.
Personal data entry window
In this window, you must enter your name, which will be inserted into outgoing letters in the “From:” field, your email address and the name of the organization. If you correspond with people from other countries, it is advisable to fill in these fields in Latin letters. Please note that during installation you provide only one email address. However, The Bat! can work with an unlimited number of mailboxes. We'll come back to setting them up later.
Next, the program will ask you for the POP3 and SMTP server addresses.
Window for entering POP3 and SMTP server addresses
After you fill in the mail server addresses, the installation program asks for a login and password to access your mailbox. The login is usually the email address itself (most often without a domain name). In our example, the login is “vasya”. When you enter your password, it will be displayed on the screen with asterisks (*) - this is a typical security technique so that others will not be able to recognize it and gain access to your mail.
Window for entering login and password to access the mailbox
Below the login and password there are two checkboxes that allow you to select the following options:
- Use encryption when transmitting passwords (APOP);
- Leave copies of messages on the server.
When using APOP, your mailbox password is not transmitted in clear text, but is encrypted. However, to use this method of transmitting a password, you need to be sure that your mail server supports it. Therefore, contact the support service and clarify the possibility of providing such a service.
If you want to receive the same mail on more than one computer, check the second checkbox. Your correspondence will remain on the server. Just remember that most servers have restrictions on the total volume of a mailbox (usually from 2 to 5 MB).
Next, you will have to answer the question about the type of Internet connection.
Window for selecting a method for connecting to WWW
The first option is to connect manually or via a local network. The second option is Dial-Up, which you can also configure.
Finally, the mailbox is created, and the installation program prompts you to view or change some additional settings. We recommend skipping this step for now (select the No ) and go directly to working with The Bat!
Installation completion window
First start
So, the installation is complete, and the program starts for the first time. The first window you will see when you launch The Bat! looks like this.
Selecting your default email client
The Bat! tells you that it is not currently the default email program (called by your OS by default when working with mail) and offers to fix this. Here you are asked to disable this check for the future, but you should not do this. Yes button , you make The Bat! default email client and finally get to the main program window.
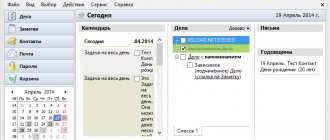
The main window of The Bat!
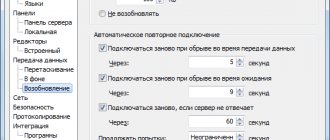
The first thing you involuntarily pay attention to is the black information bar running at the top of the program window - a kind of display notifying the user about incoming correspondence. This is Mail ticker ™ - one of the highlights of The Bat!
By default, this display shows the contents of the From: ("Sender"), To: ("Recipient") and Subject: ("Subject of the message") fields, but you can freely change the size and location of the Mail Ticker ™ on the screen, as well as in general remove it. To do this, go to the “Properties – Settings” menu, and on the “Basic” tab (Options – Preferences – General) change the value of the “Display Mail ticker ™” parameter.
Russification
So, the first launch of the program was successful, but The Bat!, as you probably already noticed, has an English interface. It's not fatal, but still unpleasant. How to Russify it?
To carry out Russification, you should again look at the program website in the Download and download a special language module to your computer (International Pack - intpack.exe - 3.2 MB). Those of you who took our advice and downloaded it along with the program itself can skip this step. For others, we provide direct links to the file you are looking for.
- https://www.ritlabs.com/ftp/pub/the_bat/intpack.exe
- ftp://ftp.ritlabs.com/pub/the_bat/intpack.exe
Language module The Bat! required to install the Russian interface. Also, it contains a translation of the program interface into the following languages: Bulgarian, Dutch, Italian, Chinese, German, Polish, Portuguese, Turkish, Ukrainian, French and Czech. It also includes grammar dictionaries for English (UK and US), Dutch, French, German and Italian. You don't need to download and install a language module every time you install new versions of The Bat! over the existing one on your PC.
Before starting the Russification of The Bat! get out of it. intpack.exe file , you will see the start window of the language module installation program.
Language module installation window
We install the language module and therefore feel free to press the Setup . In the next window, the installation program itself will detect and indicate the location where The Bat! is installed on your PC, and will prompt you to check a number of checkboxes.
Language Pack Installation Window
The “Install Multilingual Interface” checkbox must be checked. It is for this reason that we actually install the language module. Also, you can check one or more radio buttons from the lower block, thereby selecting the installation of modules for checking the spelling of the corresponding languages. By default, spell checking is set to American English only. Once you have selected all the required options, click OK and proceed to the next window.
Warning window before installation
Finally, the program installer will remind you that The Bat! should not be running at the moment. Clicking on the next OK will begin the installation procedure. If everything went well, a window with a corresponding message will appear in front of you, and after clicking (this time, the last) OK , The Bat! will automatically launch.
Language module installed
To switch the interface of The Bat! To switch to Russian, go to the “Properties – Language” menu and select “Russian”. Now the program will be able to delight you with messages in Russian.
Selecting the interface language of The Bat!
As a result of performing these simple operations, in The Bat!, in addition to the Russian-language interface, it also becomes possible to check the spelling of letters, but, unfortunately, only in the languages that you selected during installation. Unfortunately, since the Russian spellchecker is not yet included in the language module. What to do if you need to check the spelling of the Russian language?
We are solving the issue. Users who have versions of Microsoft Office 95, 97, or 2000 with spell checking installed should not worry at all. Implemented in Bat! CSAPI (Spell API) will find the necessary libraries itself. All the user needs to do is select Russian in the “Spell Checker - Language” menu of the letter editor.
Selecting a language for spell checking
What about Microsoft Office XP? Why is it not on the above list?
The fact is that in this product Microsoft has changed the mechanism for accessing libraries responsible for spell checking. Office XP users will have to go a different route. They should download and install the Spell Checker module of the Crypt Edit text editor from PolySoft Solutions. find the file spellset.exe (1.13 MB) here or here.
Installing the spell checker from Crypt Edit
After completing the installation of Crypt Edit Spell Checker, you should restart your email client and perform the steps described above - launch the letter editor and select the required language in the Spell Checker - Language menu.
In conclusion of this chapter, it should be noted that currently the program can check the spelling of letters only in one of the selected languages. However, the developers promised to teach The Bat! check text using two dictionaries at once in the upcoming version 2.0.
Registration
After launching the program for the first time, you will see the following message.
A reminder window that The Bat! not registered
This means only one thing - you are using an unregistered version of The Bat!, and this window is a polite reminder of the limited period (30 days) of free use of the full commercial version of the program (remember the license agreement).
How and where can I register The Bat!?
At the moment, Ritlabs has set the following recommended prices for a single copy of The Bat! on the territory of the former CIS:
- 15 USD — Student (student);
- 20 USD — For individuals;
- 30 USD - A commercial.
In Russia The Bat! can be registered via the Softkey service.
Address books and archives
Currently, there are quite a lot of different email clients. Their main role is to work with email, but they are all very different from each other in appearance, size, and capabilities. If you have already used any of the email programs and have experience working with email, then when you switch to working with the email client The Bat! You're probably wondering: "How can I - and can I even - convert existing mailboxes and address books to The Bat!?"
Do not worry. To ensure compatibility with other email clients in The Bat! there is an “Import Wizard”. You can get to it through the program menu “Tools - Import Messages” and select the import method.
Mail Import Wizard
All you have to do is answer the Wizard’s questions and indicate which folders of the old program should correspond to The Bat! folders. As a result of these manipulations, you will receive in The Bat! complete, including folder structure, a copy of your old mailbox.
Well, you have imported the letters, now let’s move on to importing the “Address Book”. The Bat! Today it supports importing data from the following formats: vCard, ldif, text format, Eudora/Pegasus address books. Thus, if you have previously used these email programs or your old program has export to one of these formats, then you can easily transfer your old address book to The Bat!. To do this, use one of the options of the import function - “Tools - Address Book - File - Import From”.
Importing Address Books
As an example, let's look at importing information into the address book of The Bat! from a text file in which the data is separated by commas. When you open this file in Microsoft Excel, it will look like this.
*.cvs file opened in Excel
Now let's import this file into The Bat! address book. When importing, you need to indicate to the program the correspondence between the fields of the imported file and The Bat! address book.
Window when importing into the Address Book
What should users of Microsoft products do? To convert Windows Address Book (WAB) to ldif format, RitLabs has released a special utility Wab2Ldif.exe (188 KB). You can find it at:
- https://www.ritlabs.com/download/the_bat/beta/Wab2Ldif.exe
- https://www.ritlabs.com/ftp/pub/the_bat/beta/Wab2Ldif.exe
- ftp://ftp.ritlabs.com/pub/the_bat/beta/Wab2Ldif.exe
WAB to ldif conversion program (Wab2Ldif.exe)
There is also another, very simple option for transferring information from the WAB address book to The Bat! address book. To carry out the transfer, you should open both address books and simply drag and drop the addresses you need with the mouse.
So, all the manipulations of transferring mail databases and address books from your old program are completed, and now you are ready to use The Bat! almost all of its power.
This concludes the first, mostly introductory, part of the article about the The Bat! email client! We hope that this publication will be useful and help you make the “right” choice.
[Read the second part of the review]
How to open bat format?
Just like creating .bat files in a text editor, they can be opened with the same notepad, wordpad, or notepad++.
The only thing to remember when opening a bat file is that when you double-click on the file, it will launch the program. That is, to open it for editing, move the cursor over the file being edited and right-click to open the context menu where select open with notepad++
Also, if you click on just open in the context menu, you will also start executing the bat file.
There is another way: Open the text editor Notepad and drag your edited file into it.
Important: users often confuse the concepts of files with the .bat extension and the “The Bat” email client for sending and receiving email documents.
IMAP4 protocol
Using the more modern IMAP protocol allows you to organize access to your mailbox from multiple devices and synchronize changes in real time. In other words, a user can send an email from a computer and receive a response on their smartphone.
The third step differs from the algorithm of actions described above. In the incoming mail settings, set the radio button to the IMAP position. We indicate in the field highlighted with a marker the same server for all domain names “imap.mail.ru”. Set the connection type to STARTTLS.
After completing the connection setup, the authorization window in the Mail.ru service opens. Select the domain name in the drop-down menu marked with one. Enter your mailbox access password and click “Login.”
The About area displays a list of features received by the mail program. Click the “Allow” button to finish setting up the connection and restart the program.
Select the created mailbox in the window. Click on the button on the toolbar. Select the last item in the expanded menu, highlighted in the screenshot with a frame.
In the property tree, switch to the branch marked with one. We check the boxes located in the area highlighted with a marker and marked with the number “2”. Using the drop-down menus indicated by the three, select the IMAP folders that will be used for sent and deleted messages.
Go to the “Delete” subsection. Move the radio buttons indicated by numbers “2” and “3” to the position shown in the screenshot. Using the “Browse” buttons highlighted with a marker, we set the “Cart” directory for each item. Uncheck the area marked with a four. We complete the client setup with the “OK” button.