image source https://4k-monitor.ru
Good and correct display settings are not the last task in order to work comfortably and efficiently not only with images, but also simply at the computer. The factory settings of monitors are always too high for brightness and contrast; manufacturers do not make adjustments at all, and users themselves often simply do not know about it.
I note that we will talk about the simplest screen settings; professional calibration is much more complicated.
You can configure it both software (if your display is connected to a PC with an operating system that has tools for such settings) and hardware. Adjusting using the menu buttons is not much different from adjusting the picture on a modern TV.
Hardware setup
Start by learning the buttons on your monitor. If nothing is clear, then you will have to read the instructions, or use the “unscientific poking method” (not recommended). After you have figured out the control buttons of the device, you can go directly to the settings.
Important note: ensure proper lighting! If the sun or a 200 W light bulb hits the monitor directly, no adjustments will help. Well, this is a separate big topic, but now there are a few basic recommendations:
- The bright light source should not directly illuminate the monitor;
- The light should not hit the eyes;
- It is better to use uniform diffused lighting, for example, in the form of an LED strip.
How to change monitor resolution
Often, liquid crystal matrices are designed to work with a certain monitor resolution. The exact number is written in the “passport” for your laptop. It is possible to violate this value, but this will lead to image errors.
So you've decided to change your monitor resolution. To do this, right-click anywhere on the Desktop. In the menu that appears on the screen, select “Personalization”. Next, in the dialog box that appears, follow the Screen link and select the font size that is convenient for you by moving the cursor to the desired point.
The next step is to configure the screen settings. Follow the link in the top left corner. In the window that opens, specify the resolution that corresponds to the technical specifications of your laptop.
After all steps are completed, save the settings. The screen resolution will change automatically after closing the windows.
If the selected parameters still cause inconvenience in operation, you should test the functionality of your device.
Testing a laptop screen at home
Thanks to modern monitor production, equipment testing can be carried out at home. The process should begin by checking the application of the gray tint. When performing testing, you need to pay attention to brightness, contrast and color gamut.
Next, download special wallpapers to your laptop and install the image on your desktop screensaver. Maintain a normal distance from the screen and look carefully at the monitor. You should see a single-color gradient, not multi-colored stripes.
If stripes are still visible on the screen, then calibration is necessary. Use the Atrise Lutcurve program. Run the file and click on the “Gamma” line.
Show color gamut should not be higher than 1.8. Next, make sure that the square located on the left does not differ from the black background. To do this, change the brightness level. The “White Point” indicators must be reduced to 20, and the “All Cintrols” indicators must be set so that the squares acquire a gray tint.
You will see the test results immediately. The only downside to this program is the cost. However, there are several analogues, for example, the proven CLTest.
If home testing doesn't solve your problem, it's time to seek professional help.
Let us remind you that these are just basic monitor settings. There are a huge variety of programs for people who need special screen options.
To ensure that working on a laptop does not cause discomfort and unpleasant sensations in the eyes of its owner, the screen settings must always be set correctly. This article will tell you how to optimize screen settings for yourself.
Setting and assessing image quality
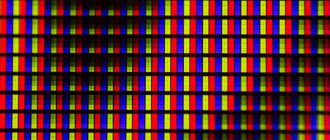
When working with a monitor with a low-quality matrix, errors often occur when choosing colors when processing images, photographs and on print layouts, when creating websites and resources.
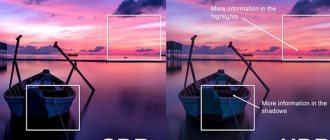
The picture below will allow you to evaluate how well the monitor is configured. On each half of the picture there are numbers 1 2 3 4 5
If you see all the numbers on both bars, then the monitor is set up well. The average level will show you the numbers 3. With a very bad setting, only 1 and 2 are visible.
Remember how many numbers you can see. With this, after configuration, you can evaluate the quality of the improvements made.
But, for starters, a small offtopic “with a beard”: “...I downloaded the program “Cleaning the Monitor from Dust”, laughed, installed it, launched it. The monitor was filled with an even dirty gray color, the keyboard turned off, clicking the mouse did not help. I took a napkin, wiped the dust off the monitor, and saw a barely visible “Thank you, you can exit the program” button. I went out and thought, looking at the blank monitor...”
Therefore, first we put the surface itself in order, after which we move directly to the settings.
Adjusting the Image Using Monitor Functions
Almost all monitors have special functionality (menu) with which you can quickly make color adjustments. The interface of such a menu is as clear as possible and is translated into Russian for most devices, so to change the contrast, color or brightness of the screen, you just need to select the appropriate item using the buttons located below. For more detailed information, you can refer to the manufacturer's instructions, which usually come with the device. For example, setting the color of a Samsung monitor is done using a special Menu button located under the screen, when pressed the monitor menu drops down. It has two main sections responsible for color rendering - Picture and Color, which will help you make all the necessary settings. These sections may be called differently for different manufacturers and different models, but ultimately the meaning is still the same.
Gray setting
Eliminates unnecessary shades that distort the colors on the display. This is done either software or hardware by adjusting the 3 primary colors (red, green, blue). Ideally, a picture with gray stripes should not be interrupted by extraneous shades. Only shades of gray.
Ideal gray setting.
Changing the screen resolution on a laptop
Most modern laptops operate at the “default” resolution set by the manufacturer. If for one reason or another the resolution was “down,” then you can look at the correct parameters in the technical data sheet of the device. It is worth noting that changing the screen resolution from the manufacturer's recommended setting to a custom one may negatively affect the overall image quality (for example, it may become compressed laterally or vertically).
So, in order to change the monitor resolution, you need:
- Go to “Settings” or “Personalization” by right-clicking on the free space on the desktop.
- Click on “Screen” or a similar tab.
- Select the required resolution from the list provided.
- Apply changed settings.
If all previous settings are saved, the parameters have changed, but the feeling of discomfort in the work does not leave the user, he should try to conduct the so-called screen test. This test can be carried out even at home, and it will require special desktop wallpaper, as well as special software (for example, Atrise Lutcurve).
After testing the screen and making sure that all its parameters are optimized for the user, you can continue working on the laptop without fear of any more problems with the image displayed on the screen or discomfort to your vision.
Software setup
We launch the calibration tools programmatically (described for Windows).
In Windows 7, click the “Start” button and write the word “calibration” in the search bar. Launch. You will be given a series of image adjustment tests. There are very few of them. Go through them.
In Windows 10, enter the command cttune in the search bar, ClearType will launch, turn it on and select the display that is most comfortable for your eyes. Then enter the dccw command. The calibration of screen colors, gamma, brightness and contrast will begin. Everything is described in the tests, read and follow the advice.
How to adjust screen contrast
In order to understand what the contrast parameter affects, it is necessary to refer to the very definition of this term. By full definition, contrast is the maximum ratio of brightness levels in an image. For Windows 7 OS it is regulated as follows:
- You need to open the control panel.
- Select "Screen".
- Click on “Color Calibration”.
- In the window that appears, follow the prompts provided, adjusting the contrast setting.
A higher contrast image visually improves its detail, but may be a little harsh on the eyes.
Setting up a monitor screen for a computer running Windows 7
The main advantages of Windows 7 include the ability to simply customize the monitor screen to suit the user's requirements. Of course, it won’t be possible to significantly modify it, but it’s possible for everyone to customize it to their own taste.
The bulk of all the necessary tools for adjusting the screen and font size are located in the “Control Panel” - “Design and Personalization”. It’s even easier to configure by right-clicking on the screen, a menu will appear where you need to click on “Personalization”.
Customizing the Windows 7 screen includes different options: color of the desktop and windows, cursor size, type of sound notifications, etc. It is possible to manually configure each interface parameter. However, it is easier to perform simultaneous customization by using the standard themes provided in Windows 7.
Themes
There are the following 3 types of topics:
- Standard (simple);
- Aero;
- High contrast;
- Individual (custom).
Standard ones do not have decorative elements of the operating system (soft lines, transparency, shadows) and create a businesslike appearance.
The advantage is that it reduces the load on computer hardware. This allows you to use older Windows 7 PCs.
Aero has different background images for the screen, which change periodically automatically, as well as individual window colors.
High contrast – designed for visually impaired users.
If desired, it is possible to download more themes from the official Microsoft website. To do this, click on “More Internet Topics”. There is an abundance of topics available to the user here.
But sometimes you only need to change the desktop image or just the window color, etc., without changing the design as a whole. All the required functions for this are located at the bottom of the “Personalization” menu.
Screen background
To change the desktop picture, you need to click on “Desktop Background”. In the window that appears, select the picture you like or a number of them.
It is possible to select from a standard set of pictures in Windows, but by pressing the “Browse” key you can select an image from the “My Photos” or “My Pictures” folders.
Below the picture selection menu there are keys for placing them on the monitor, as well as a slide show function.
Windows background
You need to click on “Window Color” in “Personalization”. There is the possibility of correction - changing the color and tone of all windows in windows, and it is also possible to adjust transparency, color shades and brightness.
If the user does not have enough of these settings, he should enter “Advanced design options”.
Sounds
In order to configure sounds for events in Windows, you need to click on the “Sounds” button in the “Personalization” menu. You need to decide on the choice of a standard scheme, or manually select the sounds that accompany operating system events.
Perhaps you can simply turn off the sounds by activating the "Mute" function.
Screensaver
To configure the monitor screensaver, you need to click on the “Screenaver” button in the “Personalization” menu.
By default, Windows 7 has 6 screensavers, but if necessary, there are a large number of screensavers on the global network.
To save energy, it is recommended to simply turn off the screen saver.
In the “Personalization” window, commands are available for adjusting icons on the monitor screen, adjusting the cursor and changing the image of the account icon.
How to change font sizes and screen resolution?
To ensure the convenience of working on a PC, you need to adjust the size of icons, fonts, and the clarity of display of inscriptions and images.
These parameters significantly depend on the screen resolution - this is the main parameter of the monitor, determining the number of pixels that fit on the screen.
To adjust the resolution, you need to right-click on the desktop and click “Screen Resolution”. It should show "recommended" in the resolution bar.
With a high value of this parameter, the display is of better quality, but the font on the monitor is significantly reduced, i.e. it becomes inconvenient to work.
To change the font size in the Screen Resolution window, click “Make text and other elements larger or smaller.” A menu will appear asking you to select the required scale.
windowsTune.ru
Adjusting laptop screen brightness
To adjust the brightness on your laptop, you need to find the function button with the image of the sun. F5 and F6 in the top row of the keyboard are responsible for this To set a convenient brightness , hold down the Fn button simultaneously with the F5 (to decrease brightness) or F6 (to increase brightness) keys.
Brightness can also be adjusted via the control panel. Find the “Hardware and Sound” section, select “Power Options” and set the slider to the desired level.
Read more in this article.
Changing resolution and other monitor parameters using third-party software
It is worth setting up ClearType technology if the text on the screen seems angular to you, and your eyes quickly get tired when working with a computer. Changing parameters follows the instructions:
- Go to the “Screen” section of the control panel. In the left column, select ClearType Text Settings.
- A setup wizard will open in front of you, where on the first screen you will need to enable ClearType by checking the appropriate checkbox. Click on the "Next" button.
- Next, you will have to select the best text style option in your opinion several times. Click "Next" each time.
- After you specify your wishes for the system, you will see a message that the display setup is complete. Click Finish and exit the wizard.
The changes will be almost invisible. You will feel the difference over time when you use the computer for a long time - your eyes will become less tired.
The optimal color display mode is 32 bits. In some cases, the system defaults to a different value. You can check the settings and change the color mode in the “Display” section of the control panel. To do this you need:
- Select the line “Setting screen resolution” from the left column.
- In the window that opens, find the “Advanced settings” link under the main settings.
- A small window with several tabs will open in front of you. You need to select the one entitled “Monitor”.
- In the lower left corner of the window there will be a “Color Rendering Quality” item. There are only two options: True Color (32 bits) and High Color (16 bits). It is best to choose the first option; the transfer of shades will be more natural.
- Click the "Apply" and "OK" button.
Now you can enjoy high-quality color reproduction. This completes the monitor setup.
Windows 8 screen settings are different due to the design of the internal menu. But users may encounter problems with this more modern system. The setup can be done through the “Control Panel” or a special system menu.
Read more: TOP 15 best gaming monitors according to customer reviews
This operating system has built-in adaptive brightness technology. It doesn't always work accurately. In order for you to set the brightness settings as you wish, you must disable adaptive technology. Here are the detailed instructions:
- First of all, you need to call up the screen settings menu. To do this, press the key combination Win I.
- In the menu that opens in front of you, you need to select the “Brightness” item and change its settings. Here you can disable adaptive adjustment and set the desired parameters by moving the brightness slider.
- Press Win E to go to "Control Panel". Find the “Power Options” section in this settings block.
- In the new window, select “Adjust power settings” and then “Change power settings.”
- Make any necessary screen adjustments on the power plan you're using. Save your adjustments.
These steps will allow you to work at optimal monitor brightness. In the screen settings menu, you can also change other display parameters, such as resolution.
Resolution and other display parameters can be changed through the settings menu. To do this you need to follow the instructions:
- Open the Start menu and type “Settings” in the search bar.
- In the search results, look for the gear icon. Click on it.
- Select “Computer and Devices2” and go to the “Display” tab.
- A scale will appear in front of you, allowing you to change the resolution. Most often it is already set at the recommended level, but you can change it if you wish.
After changing the settings, you will see a confirmation message. Click on "Ok" and close the settings screen.
Using the Control Panel is no different from setting the parameters in Windows 7. You can find the “Control Panel” through the “Start” menu.
The operating system of the tenth version has more flexible settings options. At the same time, the system interface is very simple and you can literally change the parameters for displaying objects on the screen in just a few clicks. Setting up Windows 10 screens is done according to the instructions:
- Go to the Start menu. Click on the icon labeled “Options”.
- In the window that opens in front of you, select the “System” section.
- In the left column, find the “Screen” item and select it.
- At the top of the window you can adjust the brightness of the Windows 10 screen.
- Next, you can set the remaining parameters: select the resolution, text scale, page display orientation, and enable lighting changes at night.
All items can be configured simply and clearly. You just need to set the necessary parameters and confirm your actions. This settings section contains all the options you may need to customize your screen.
The higher the resolution, the better the clarity of the display. For example, a 22-inch display will have a standard resolution of 1680*1050, which is optimal and maximum for this screen.
All available sizes are available in the settings; it is advisable to choose the largest one offered.
Follow the instructions to change the image resolution of your display:
- Go to the operating system desktop. Right-click on it and select screen options, as shown in the figure below;
Windows desktop settings
- In the window that opens, you can adjust the size of text, icons and other system elements in real time. You can also adjust the screen orientation. To go to the selection tab, enter the word “resolution” at the top in the search bar;
- Select “change screen resolution”;
Opening the Resolution Change Window
- Click on the drop-down list as shown in the figure and select the standard recommended one. Save the new settings.
Applying the recommended resolution
Important! It happens that the recommended resolution is higher than the display. That is, the size of the final image does not correspond to the screen size, so some elements of the desktop may disappear from the user's field of view. Adjusting your monitor will resolve this issue. In the selection options, choose not the recommended one, but the one that fully displays all the elements of the desktop. At the same time, all graphics must be clear.
Several common types of expansion and corresponding display sizes:
- 1024*768 – perfect for screens of 15 or 17 inches. In a display with a resolution of 1024*768 pixels, the color depth is 16 bits;
- 1280*1024 – intended for displays whose size is 19 inches;
- Types of monitors measuring 24 inches most accurately convey the image at a resolution of 1920*1080. All displays with these parameters are FullHD.
The higher the display refresh rate, the correspondingly better the image quality. That is why, in addition to size, it is necessary to pay attention to this parameter. To change the refresh rate follow the instructions:
- Go to the control panel. In the search bar, enter “Screen” (without quotes);
- In the proposed search result, select the item that is responsible for the screen refresh rate, as shown in the figure;
Eliminate flicker
- Set the refresh rate to the highest possible. This will eliminate possible periodic flickering of the monitor.
How to find out the right resolution for your display? This can be done on the official website of the manufacturer or in the instructions that come with the device.
On the boxes of monitors and laptops from Samsung there is information on how to set the correct resolution and what to do if the real one does not match the declared one.
Using a special program that is preinstalled on all computers equipped with an Nvidia family video card, you can also adjust the resolution of the user's monitor. Follow the instructions:
- Open the main Nvidia graphics settings window by right-clicking on the desktop, as shown in the figure;
Opening the video card graphics control panel
- In the window that opens, adjust all the necessary settings;
Main window of the utility
Third-party programs allow you to find out what sizes are available and what displays they fit. The Carroll program is software that is designed to change absolutely all monitor parameters in one single window.
This utility is perfect for Samsung Syncmaster family monitors.
You can also use this application to find out the recommended resolution and the required update frequency.
Appearance of the main window of the Carroll program
Setting up the screen on a personal computer, tablet or laptop with Windows 10 is not very difficult for any user. Its interface is simple and intuitive, which allows you to modify the screen at your discretion in a few clicks. To configure:
- Left-click on the “Start” button.
- Click on the “Options” icon.
In the Start menu, click on the Settings icon
- Click the System icon in the Settings window.
In the "Options" window, click on the "System" icon
- Open the "Screen" tab.
Review your screen settings
- Check your screen resolution. It must match the recommended resolution of the device.
- If the resolution is set correctly, click on the “Graphics Adapter Properties” button.
Click on the "Graphics Adapter Properties" button
- Make sure that your adapter is selected in the “Adapter Type” tab.
Check that the video adapter is installed correctly
- Close Graphics Adapter Properties by clicking OK.
- Change the screen resolution if necessary.
- Close the System Settings window.
- Screen setup is complete.
Other screen parameters can be adjusted as needed.
When installing Windows 10, all screen settings are usually configured automatically. The exception is rare or outdated types of video adapters, the drivers of which are not in the database on Microsoft servers. In this case, the driver is downloaded from the manufacturer’s website or installed from an optical disc that is included with the computer or laptop upon sale. It contains distribution kits of all drivers for installed devices.
Read more: 12 ways to quickly strengthen flaking nails
Programs for setting up a monitor
Instead of understanding the intricate settings of Windows itself, you can use third-party programs for these purposes. They are provided by the developer of the installed video card.
There are three such programs:
- Control Center for AMD cards;
- Intel Control Panel for integrated video (especially common in budget laptops);
- Similar software from NVIDIA.
You can find programs on the website of the video card or laptop manufacturer in the driver download section; often they are installed along with them automatically when you select a full installation.
The program interfaces for setting up the monitor are different, but intuitive and include all the necessary tools for adjusting brightness, color, contrast and other parameters.