How to scan a document from a printer to a computer using the Scanner Wizard? Scanning documents using special software and Paint.
Transferring information from an MFP or printer to a PC is possible in several ways, differing in the use of various software and additional files. The general principle of operation of all methods is almost identical, with the exception of a number of nuances. Knowing them, you can get the highest possible quality of the final image with the ability to adjust text or photos according to specified parameters.
Preparing to Scan
First you need to properly install the scanner on your computer.
To avoid damage to equipment, it is important to follow the correct procedure when working with connection cords. First, connect the USB cable to the printer, then to your desktop computer or laptop. Then plug the power cord into the outlet. Only after this can you press the power button located on the case.
In most cases, after connecting the printer to the computer via a USB cable or an air connection (Wi-Fi), Windows will automatically detect the device, search for and install drivers. After installation is complete, the device will appear in the list of all equipment in the “Devices and Printers” section. The printer icon should not be “light” or contain any icons near it (for example, exclamation marks).
If the indicators on the printer body are blinking, indicating that there is no ink in the cartridges, scanning will still be possible, since ink is not used in this case. Only the scanner starts up. There are often cases when a printer is no longer used due to the high cost of purchasing new cartridges. There is no need to throw away your equipment, because you will always be able to use the scanner.
The installation situation is different when nothing is done automatically. Then you need to use the disk, which often comes with the equipment, and contains the driver necessary for the operation of all components of the device.
Insert the disc into the drive. If the installation does not start automatically or the menu does not open, then through “My Computer” open the disk in Explorer and run the installation file. Next, step by step, agreeing with the installation wizard, finish copying the driver files. Afterwards, additional shortcuts may appear on the desktop to launch software in which you can perform various actions, for example:
- view ink levels in containers;
- clean printer components;
- start scanning;
- align print heads and a number of other functions that differ for each printer model.
In order for the equipment to last a long time, and for no traces of dust or dirt to be visible on the scan, you need to carefully wipe the surface of the glass with a dry cloth or paper towel or napkin.
Problems that arise during the operation of the MFP
Why doesn't the printer scan a document to my computer?
There are several reasons that lead to the inability to scan documents using an MFP or scanner:
- The program is not responding. In this case, the solution is to reboot the device. If normal turning on/off does not help, then you should turn off the device for 60 seconds and turn it on again.
- Error. Sometimes errors may occur in the operation of the device, which have their own code. It can be sent to technical support to receive comprehensive troubleshooting information.
One of the problems with scanning failure may be a full print queue - There are a large number of documents in the queue . Sometimes, when there are many files to be executed in the print queue, the MFP may slow down and not complete the task. To eliminate it, you just need to wait for the executing processes to complete or forcefully stop them by right-clicking and selecting “End task.”
- Driver problems . If the device driver has crashed, you will need to reinstall it.
How to make a scan on a printer
Let's look at the process of creating a scan on an HP Deskjet 2130 MFP printer. The model is very old, but the scanning principle will be similar to other printers. You just need to turn on the printer, put the media under the cover, and start scanning on your computer in any convenient way.
How to scan a document:
- Turn on the device and wait for it to start. The device should make noise for a few seconds and stop making sounds. Then you can scan.
- Lift the printer cover. Place a piece of paper (or other object) in accordance with the icon. The guide shows how to place the paper correctly so that the finished scan of the document is in the correct position, and not upside down.
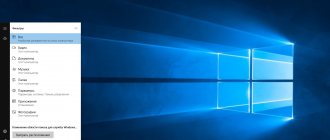
- Go to "Devices and Printers". Press the key combination “Win + R”, then execute the command “Control printers”.
- Find the printer you need, right-click on it and select “Start Scan”.
The “Scanner Wizard” built into the operating system will open.
- Set scanning options. Select color, resolution (dpi, dots per inch), and final file format. If you need a document that needs to be enlarged many times on a computer (for example, electrical diagrams with many small elements), then set the resolution to a higher resolution. The quality will noticeably improve, but the file size on disk can reach large volumes, up to several tens of MB.
- If necessary, preview to ensure the sheet is positioned correctly.
- Click on the "Scan" button. The printer mechanisms will start and a progress window for creating a digital copy of the document will appear.
- After scanning is completed, the system will prompt you to import the scan (save). Set the file name and click on the “Import” button. The document will be saved in the standard folder with images in Explorer.
The driver for the HP 2130 printer includes a program, inside of which there is also a scanning option, for which a separate item is responsible. The software is installed by default along with the Drov installation.
Launch the program and once opened, select “Scan” from the “Print & Scan” menu. The HP Scan utility will launch.
Select the required scanning option. Set the appropriate parameters for the document and click on “Scan”.
The printer will scan the media and offer to save the document to any location, having previously specified the desired file name.
You can open a scan with any graphic editor, but the easiest way is to use the standard “Image Viewer” tool.
Preparatory stage
Printing and scanning devices from different manufacturers do not differ in operating principle. The instructions on how to make a scan on a printer are relevant for a printer from any company.
Important: be sure to install drivers and software from the disk that is always included with the printing device.
To quickly and successfully scan a document from your multifunction device, follow these tips:
- Download and install drivers for your device if there was no disk included
- Attach the front side of the document clearly according to the drawing on the printer glass
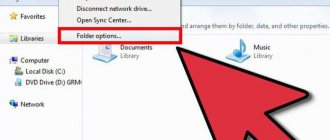
- On your computer, go to Toolbar, go to the “Devices and Printers” section
- RMB call context menu on the device icon
- Set custom options
- Click "Start Scan"
- Wait for the scan to finish.
Scanning software from manufacturers
To ensure easy operation of equipment, manufacturing companies develop special software. All possible functions for controlling a specific device model are available in the software interface.
Features may vary slightly depending on brand. But the basic set of settings/parameters is almost always identical. You can set the scan resolution, select color (black and white or color scan), format (png, jpeg, jpg, pdf and others).
List of scanning utilities:
- HP Scan;
- Epson Scan;
- Xerox Easy Printer Manager;
- Canon MF ToolBox.
There is also software for Kyocera and Samsung; you can download it from the official websites or install it from the included CD.
Which devices support this feature?
In the modern world, in order to obtain a photocopy, it is absolutely not necessary to waste your time searching for firms or companies offering such a service. Everything can be done at home with the appropriate equipment. A separate class of devices that offer scanning or copying capabilities are called MFPs, or multifunction devices. This is a technique that has three capabilities at once - a printer, a scanner and a copier.
FOR YOUR INFORMATION!
There is a wide variety of similar devices on the market, which differ in size, speed, ability to produce full-color printing and the availability of additional options. The price is set depending on the class of the device and its functionality.
If we consider the capabilities of modern printing or scanning devices, it is more difficult to find ones that do not have a photocopying function. As a rule, these are the simplest printers, equipped only with the ability to print text or images.
Modern printing centers, which are used in large offices, are a “real” tower and can process hundreds of sheets at once
Before purchasing, you should carefully read the instructions or consult with the seller to determine the availability of the required function. Also, you can often understand the purpose of a device only by appearance. A conventional printer used for printing has one paper tray, and the finished sheet comes out at the top.
MFPs are large in size because there are several trays and additional mechanics inside for scanning and printing. As a rule, the scanning surface in the form of a glass block is located on top and covered with a plastic cover, which is often removable to facilitate photocopying of bulk materials. Additionally, the multifunctional device may have several trays for loading paper and exiting finished products.
Advanced models have LCD displays to control the scanning process
How to choose a cheap and reliable MFP for home use: rating of popular models. In a special publication on our portal, we will talk in detail about how to choose an MFP. You will learn what an MFP is, why it is needed, types of MFPs for home use and the main technical parameters of the MFP.
Scanning via Paint
Launch the graphic editor Paint. You can open the program using search in Windows 8-10. On Windows XP, open the Start menu, find the Accessories folder, inside which Paint will be.
Next, open the editor’s main menu and select “From a scanner or camera.”
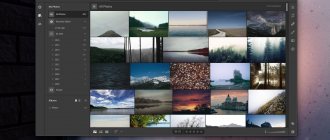
A scanning window will open, where you can select the color of the image, perform a preview, scan immediately and even adjust the quality (resolution, brightness and contrast).
Click “Scan” and wait for the operation to complete. The digitized image will appear in the editor's working field.
Saving the file is done in the main menu through the “Save As” item, where there are several formats to choose from (bmp, png, jpeg, gif and others).
This option allows you to scan to your computer from a printer as quickly as possible. If necessary, you can immediately format the scan using Paint, which is offered on the top panel of the editor.
Is your scanner compatible with Windows 10
Before we move on, we need to make a couple of points. First, your scanner manufacturer may provide drivers for Windows 10, but the device itself may not support the platform.
For example, the Canon PIXMA MG3520 universal printer with a built-in scanner. The "recommended" drivers date back to July 2020, although Canon released a new package six months later. This is still three years old software.
However, the scanner portion of this AIO printer will not show up in the native Windows tools, but will work correctly - effectively using a wireless connection - through Canon's software.
If you encounter problems like these, you may have an older printer or scanner that is not fully compatible with Windows 10. The device may also require a direct USB connection if it is used outside of the manufacturer's third-party tools. For AIO printers, you may need to adjust its network settings so that your Windows 10 computer recognizes the scanner component in addition to the general printer unit.
Other programs
The utilities below are practically no different from the official software. The only difference is in some programs that are designed to make scans into a specific format, for example, PDF.
- FineReader. The software is paid, but there is a free trial version and an online tool. Available in multiple languages. In addition to simple scanning, it can recognize scanned text and convert the document into a format for further editing.
- WinScan2PDF. The free program has a narrow focus - scanning to PDF format. Most often used when working on the network.
- RiDoc. It will be useful for those who often need to receive scanned documents in a variety of formats. If there is no such need, then it is easier to use a standard tool or other simpler analogues.
- VueScan. The functionality is similar to all previous programs. There is a built-in image-to-text converter.
- CuneiForm. Recognizes text and tables from scans, has a wide range of settings for adjusting the final quality of the scan. Downloaded from the Internet for free.
- ScanLine. A small and easy to use utility. Contains a minimum of settings, you can get a scan in just a couple of clicks.