How to connect to PC?
It is not for nothing that the operator is in demand among consumers in different regions of Russia. Indeed, in addition to high-speed data transfer, he simplified the work with his equipment as much as possible. To connect the Yota modem to your laptop, follow the step-by-step instructions.
First, you need to connect the device to your computer or laptop via a USB port. The installation wizard will start automatically. All you need to do is agree to the provider’s terms and conditions for using data.
On modern PCs, the installation process takes place secretly; upon completion, a corresponding notification appears on the screen. After downloading all the software data, the computer will “say” that a new RNDIS device is connected to the USB port. There is no need to carry out any additional manipulations; you can immediately go online. The only thing the user can adjust is the Wi-Fi information.
If you cannot cope with the connection on your own, it is better to contact technical support. Experienced workers will tell you the sequence of actions on how to connect a Yota modem.
Additional settings - turning off the router at specific hours, login and password for authorization. This will protect against unauthorized access to your network.
Mobile router from Yota
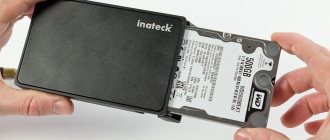
If you need to connect an Yota modem to a mobile device, then the router will be an excellent option. This device works autonomously, so you don’t need to look for a connection for it. The device went on sale not long ago; the body is made of plastic with a matte finish.
- Malfunction of individual components or the device as a whole.
- Lack of cellular operator network.
What to do if the Yota modem does not work? In the case of a network, you need to look for a place with stable coverage. In the event of a general malfunction, the modem will have to be repaired by a service center. If the computer does not see the Yota modem, you can reboot it. In addition, it is recommended to use windows 10 or at least at least XP SP3.
After connecting and setting up, certain operational difficulties may arise.
In some cases, after the manipulations have been carried out, the modem does not show any signs, or it simply cannot connect to the network, the reason may be:
- Computer problems or disabled ports. In this case, the modem will not be visible in the device manager or a yellow exclamation mark will appear next to the modem name, indicating that the software was installed incorrectly. To solve the problem, you need to enable the ports or update the drivers or reinstall the operating system.
- Weak signal or lack of Iota coverage. To determine this, you can look at the modem's LED, which should be blue. You can also find out about the signal by the status on the computer. If the network in your home has poor reception, it is recommended to use special extension cords that allow you to place the modem in a place with a good signal.
- The old operating system, when the modern modem cannot be detected, does not support encryption. This combination can cause characteristic difficulties. If problems arise that you cannot solve on your own, then it is best to contact Iota technical support. Operators will help you connect and configure the modem remotely or point out possible problems and ways to resolve them.
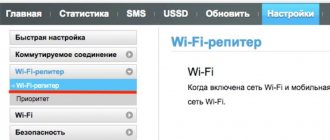
When you connect your device to your computer, it is prompted to launch the automatic installer. This is the preferred option as the system will do all the settings for you. If necessary, you can configure it yourself. This is done like this:
- Launch the router icon in the tray.
- In the window that appears, enter the required parameters.
This method of setting up the Internet from Eta is more suitable for the average person. It is easier than optimization via a web connection. In the menu that opens, you can do everything intuitively. If the options are not enough for you, then you can only change them through the browser.
In the future, if you want to change the server settings or add port forwarding, you will be able to do this only after the Internet is launched. If you do not know how to configure the Iota 4g lte router, contact a consultant.
Read about Yota Free yota internet
Not every person can cope with setting up the Internet. It is especially difficult for people who are not well versed in computers. The lack of a positive result is not always a consequence of a lack of knowledge. Difficulties connecting to the Internet may be caused by:
- Lack of communication with the USB port - they may be faulty or completely disabled in the BIOS. You can recognize the condition by missing connection data in the device manager.
- Lack of access to the Internet or a weak signal requires connecting an additional extension cord so that the device can be placed in a place with a stronger signal. You can recognize the problem by the lack of backlight in the modem.
- Incompatibility with OS - can only be supported by modern operating systems. If necessary, it must be replaced or updated. Installing drivers may help.
If you have any difficulties setting up the Iota 4g router, it is recommended to call the call center. If the consultant is unable to help online, they will dispatch a technical support person. Setting up a yota router should not be difficult.
Yota is an Internet operator that allows you to enjoy high-speed Internet access. To connect the router, just follow the instructions carefully. First of all, you need to connect the device to the computer via the USB port. The automatic downloader will launch the installation wizard yourself, you just have to agree with all the requirements. But on more modern computers, installation occurs in hidden mode; you will know about its successful completion by a notification on the desktop.
After installing the software, the computer will show that there is an RNDIS device in the USB port. It does not require additional configuration, you can immediately start using the Internet. Many users believe that the lack of changeable parameters is a plus - they cannot be broken. The only thing you can configure is the Wi-Fi settings.
The mechanism for correcting problems directly stems from the true cause that caused them:
- If the laptop does not see the Eta modem due to a breakdown of the latter, it should be repaired at the nearest service center. A complete list of them in a given locality can be found in the documents included with the device upon purchase;
- Fix the USB port on your computer if it is the root of all troubles. Repair measures may include the following actions: removing viruses (you can see them after running an antivirus scan), adjusting the power supply circuit, installing the necessary drivers, etc.;
- Stop using USB extension cables longer than 1.8 meters and manufactured under cheap brands with modems. Only high-quality, expensive solutions guarantee full signal delivery;
- Install drivers, without which the computer does not see (does not find) the Eta modem.
Problems may arise when connecting the modem. Below are some of them and possible solutions.
The Yota provider provides clear instructions, in great detail, telling users how to install the Yota modem. The most obvious problem is that after installation, your gadget simply refuses to connect.
Such a malfunction can occur either because the device has a manufacturing defect or there is no connection to the Internet. In any of these cases, it is strongly recommended to seek the help of a specialist.
Related posts:
- Yota tariffs for modem
- How to set up a Yota modem?
- Unlimited Internet tariffs Yota
- Internet settings Yota
Connecting the Yota modem to the router
If you follow the instructions, you won't have any problems. Correctly entered data will ensure uninterrupted access to the Internet.
Connect the router to the PC through a free port. Then in the Control Panel, find the “Network Settings” shortcut, then the “Network and Sharing Center” item. You will need to correct the device data; to do this, select “Change adapter settings” in the menu on the right and find the icon for your Yota Many router. In “Properties”, install Internet Protocol 4 and check the boxes to automatically obtain IP/DNS. Then provide the following information:
- APN – yota.ru
- Access – *99#
The login and password fields remain blank.
However, not all routers need such configuration. Some models begin to function smoothly after self-installation.
The connection to the tablet is carried out in the same way.
Advantages of modems from Yota
The procedure for installing the Yota modem on a laptop is the same for USB Wi-Fi and 4G USB models. To connect and configure a USB modem, follow these steps:
- Place the device in the USB port.
- A new connection will appear in the Network and Sharing Center.
- Launch your browser and you will be automatically redirected to the Yota start page, where you will enter your details and go through the registration procedure. You don’t need to configure anything else, you get installed high-speed Internet.
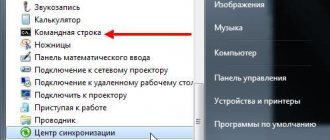
If the modem does not start connecting automatically, it means there is a problem with autostart and the computer recognizes the modem as a flash drive. Go to the folder of the new media and run the autoinstall.exe file, the device will begin to install.
This is how you are convinced that in a few minutes of simple setup you get high-speed Internet via an Iota modem at home, in the office, in the park or by the sea. Wherever the cellular operator operates.
The operator provides subscribers with devices that look stylish and are highly functional. The router has its advantages:
- The client can use the device without additional routers, which allows him to connect to the network not only at home, but also in the office;
- 8 gadgets can connect to the device at once, and this will not affect the network speed;
- A WiFi router from Yota can be used during a trip if there is communication coverage at that point;
- you can use the device outside the city, for this you should use an amplifier or simply position the modem higher;
- The quality of communication will be higher when compared with a mobile router.
In terms of technical characteristics, this device is not inferior to competitors’ devices. A small modem is capable of distributing the network at a speed of 54 megabytes/sec.
The Yota Wi-Fi router can only work from the SIM card of its telecom operator; the device does not accept other SIM cards. But the client can make firmware so that the modem works on any connection. There are restrictions on connecting gadgets; no more than 8 devices can connect to the router at a time. This router can also work via a USB cable, like a simple modem.
The device has the following characteristics:
- It is fully compatible with operating systems such as Linux, MacOS 10.8, and Windows XP SP3 and higher.
- The battery has a capacity of 2000 mA.
- It is recommended to operate the router at temperatures from -10 to 60 degrees, air humidity can be 5-95%.
- The frequency range is 1800/2600 MHz.
- The modem can provide access to the network at speeds of up to 100 Mbit/s, but in reality the operator significantly limits the network connection so as not to overload the connection.
- The device can work offline for up to six hours, the duration of operation depends on workload.
- The manufacturer gives a guarantee for the modem for 12 months of use, the period is counted from the date of purchase.
- The weight of this device is only 85.6 grams.
There are three indicators on the external panel of the Yota router. One of them indicates whether there is a 4G connection in the area. The second shows the connection to the Wi-Fi network. The third is designed to determine the battery charge. Also, on the case there is a SIM card slot and a USB port. You need to start the device using the on/off button. To reset the firmware, the subscriber can use the Reset button on the case.
Read about Yota Router Yota 4G - characteristics, price. Where is the best place to buy an ETA router?
The device has a number of advantages:
- Suitable for any laptop or PC with a USB connector.
- It simultaneously distributes the Internet to 8 devices of all types with Wi-Fi support, there will be no problems connecting it to a computer, tablet and phone at the same time.
- Works with Windows, Linux, MAC OS.
- There is no need to install software yourself; drivers are downloaded automatically.
Connecting a device to a PC is quite simple, but you will need to strictly follow certain rules. First of all, connect the modem via a special cord to the computer. All these components are present in the box from the router. After that, follow the algorithm:
- Connect the router to your computer.
- Run the installer.
- Follow the app's instructions.
You can also activate the modem using Wi-Fi. This is the most preferred method, since Internet access will be available throughout the apartment. To connect to this network, you just need to connect to it. You can recognize your own Yota Internet by the last 5 digits of the IP address.
Beginning of work
Even without hacker and programmer skills, any user can install network equipment. Step by step starting the modem is as follows:
- After connecting using the USB port, the driver installation process will begin. The developers made sure that the procedure was automatic. No action is required from the user, just be patient and wait 2-3 minutes. Once the installation is complete, a message will appear on the screen indicating that the device is ready for use.
- A new line will appear in the list of available networks: YOTA – Connected.
- Such information will be displayed in the “Network” or “Network Center” folder. This depends on the version of Windows.
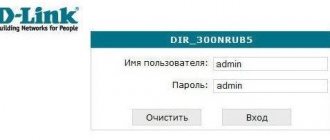
- To complete the process, configure your network settings. To do this, launch your browser and enter the address of any site in the search bar. Instead, the main page of the web interface https://status.yota.ru will appear. If it doesn’t work, then go to the router’s account and write 10.0.0.1 , then 10.0.0.1 status yota . The system web page will open to you. Information about signal quality and data transfer speed is displayed here.
- Fill out your profile in detail. Enter your first and last name, identification data, your mobile phone number and e-mail, select a security question/answer.
If the signal is weak and the network is difficult to catch, purchase an external antenna. It will solve the problem due to which Yota does not connect to the Internet.
Improving the signal using an external antenna
To obtain maximum connection speed, connect an external antenna.
She catches the signal and stabilizes it. The external antenna is connected to the modem itself via a pigtail. There are two options for connecting the antenna:
- Indoors. This installation method is suitable for rented office spaces. The antenna is simply placed on the windowsill in a special stand.
- On the facade of the building. This is the most common method of installing an antenna and allows you to extremely improve the signal quality. For better results, it is placed on the mast.
A practical solution is the Bester model, which gives a signal amplification of 16 dB.
The pigtail must match the modem connector. Direct connection of an external antenna allows you to minimize signal transmission losses. In the absence of a suitable pigtail, you have to purchase a universal adapter. However, in this case, the reception will be reduced by 2 times or more.
How to determine the direction of the antenna? You can try this method.
The Iota 4G router does not have any special design features; it is simple and concise. The modem looks like a small rectangle that connects to a desktop computer. Although this modem was created in order to distribute a network signal, the router is not autonomous; in order for it to function, it requires a power source. The user should take this into account when purchasing a modem from Yota.
The device itself is small in size, its body is made of gray plastic. There is a company symbol on the front side of the device; when connected to the network, it begins to glow. On the back there is a USB, which is intended for connecting to a laptop.
The Yota Wi-Fi router is sold in a white cardboard package; it is required to protect the modem from external factors and damage. The name of the device is written on the front side of the package, as well as the company name. The box provides the user with instructions for setting up the device.
- note
- You will have to buy a USB extension cable separately; it may be needed to install a signal amplifier.
What to do if the modem does not work?
In 99 out of 100 cases, activation and first launch go without problems. However, sometimes subscribers encounter difficulties. The most common mistakes when connecting Iota devices:
- The router is not connected to the modem correctly. In such situations, the blue backlight on the latest gadget lights up. This indicates that the Wi-Fi network has not been created. Most often, the reason is hidden in the unavailability of a signal in a given location or an emergency interruption of communication.
- The Eta modem does not see the computer. Typically, such complexity arises due to an outdated version of Windows. To establish communication, you will need to update the system or download and install the latest drivers for your OS version from the mobile operator’s portal.
Yota Corporation offers different tariff plans for both calls and the Internet. This allows subscribers to choose a package that best suits their needs. Before installing the Yota modem yourself, we advise you to visit the official website and read the recommendations so that the procedure goes smoothly.