Read guide to troubleshoot various network connection problems in Windows
. Five universal methods. You can also study our earlier article “Guide to Troubleshooting Internet Connection Problems”, in which we tried to cover a different range of problems when connecting to the Internet.
The essence of the problem
The concept of the Internet today has become very firmly established in our lives, and most people use it fully and everywhere. On the Internet, people are trained and gain knowledge; visit exhibitions and libraries; communicate via social networks and video communicators ( Skype
,
“Viber”
, etc.);
develop projects; transmit and receive information, letters and documents; learn and share news; watch movies and listen to music and much more. It is not surprising that many different devices support the ability to access the Internet: personal computers, laptops, smartphones, tablets. All of them provide a connection to the Internet in different ways: using a cable, via a “Wi-Fi connection”
or using mobile access capabilities through the services of mobile operators.
Sometimes devices combine different methods of connecting to the Internet, for example, a laptop can connect directly with a cable and using a “Wi-Fi connection”
, the smartphone has
“Wi-Fi”
connection and mobile Internet.
But sometimes there are various connection problems such as no connection, limited connection, inability to access network drives or browse websites, etc. In such a case, you face problems connecting to the Internet or local network in “ Windows"
.
Or you receive error notifications containing such error codes. It happens that the Ethernet
or the
Wi-Fi
of your laptop does not work, or there is a problem in the connection settings. This situation is very upsetting and you try to find a way out of the situation on your own.
In this article, we will try to tell you about various Internet connection problems and how to resolve them for different types of network and Internet connections in the Windows operating system.
.
Most of the methods in this article will work on all versions of Windows
, but some will only be available on certain operating systems.
We will try to list the main possible solutions to fix network and internet connection related problems in Windows.
. You should try these solutions one by one. And one of them may be able to help you troubleshoot problems.
Reasons for the error
The sources causing this error can be very different, but they can be divided into three groups:
- network problems;
- hardware malfunction;
- software malfunction.
First you need to make sure there are no problems with the network itself. The computer may be outside its coverage area or in a blind spot. Many shopping centers and other establishments with their own Wi-Fi networks have very thick walls that interfere with signal transmission. Also, if the Internet suddenly disappears at home, but there are other connections available, then the operator may be carrying out work on the line. You can call him and check the status.
If everything is fine with the network, but there is still no Internet, then you need to consider problems with the hardware. Often, users simply forget to turn on the router or adapter on the computer. If this does not help, then one of the hardware parts may have failed.
But if the hardware is intact, then only some kind of software error remains. Unlike the first two problems, which the user cannot always influence, this problem can be corrected yourself. The instructions below will help you do this.
Instructions for Windows 7 are available in the following video:
METHOD 1: Run the built-in network troubleshooter
Windows troubleshooter and network troubleshooter.
. This tool automatically diagnoses and finds the cause of the problem, and tries to fix the problem if possible.
To launch the troubleshooter, right-click the Network
located in the notification area on
the “Taskbar”
and select the
“Diagnostics problems”
.
The problem detection process will start, the result of which you will see in the Windows Network Diagnostics window.
.
Wait a few seconds, during which time the tool will diagnose networks, perform troubleshooting, check Internet connectivity, find the cause of the problem and show ways to fix it.
In most cases, this built-in problem detection tool will completely fix the problem and restore your Internet connection. As a last resort, he will point out to you the existing malfunction and suggest a solution to it.
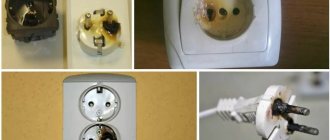
No Wi-Fi connections available
Computer networks occupy an increasingly important place in our lives - even those who have a desktop computer are trying to install a Wi-Fi module. But this solution also has negative aspects in the form of connection problems. The most common of them is a message from your device that there are no Wi-Fi connections available, although the router is turned on.
There may be more than enough reasons for this problem - the main ones are:
- Incorrectly configured router or its incorrect operation.
- Lack of drivers for the Wi-Fi module.
- Malfunction of the router or module in the computer/laptop.
- Glitches in the computer system or router firmware.
Next, we will take a closer look at all these cases in turn and determine what exactly is causing the problem in your case.
What to do
The first thing you will need to do, no matter how trivial it may sound, is to restart both the distribution device and the computer. The fact is that when loading the system or firmware, a small glitch may occur, which will not affect the overall performance, but may well cause a connection problem.
If after a reboot the situation has not changed, then move on.
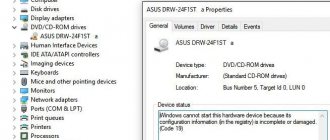
METHOD 3: Assign IP address and DNS manually
After upgrading from previous versions of Windows
Windows 10
operating system , you may have problems accessing the Internet.
Sometimes this may be due to problems with your Internet service provider, and you need to wait a few minutes, or contact the provider's support team. However, if access to the Internet does not resume, then you need to check whether all necessary protocols are enabled in the connection properties. Open the Network Connections
, this can be achieved in several ways:
Method 1
: Right-click on the
“Network”
, which is located in the notification area on the
“Taskbar”
, and select the
“Open network and Internet settings”
.
Or press the keyboard shortcut together “Windows + X”
and select the
"Network Connections"
.
In the window that opens, in the right pane, move the slider down and click the “Network and Sharing Center”
.
In the left side menu, click on the link “Change adapter settings”
.
Method 2
: The easiest and fastest way, press the keyboard shortcut together
“Windows + R”
, in the
“Run”
“ncpa.cpl”
in the command line field .
In the Network Connections
A list of connections will open.
Right-click on the connection you use to access the Internet and select Properties
.
Please note the section "The marked components are used by this connection"
.
The connection protocol cell “IP version 4 (TCP/IPv4)”
.
Otherwise, you need to enable it by checking the box in the cell. If your protocols are enabled, but Internet access does not appear, then try setting up this protocol manually. Click the "Properties"
and go to the next settings window.
Check the box "Use the following IP address"
and fill in the
“IP addresses”
and
“DNS servers”
.
You can find out the input parameters by contacting your Internet service provider's support team. Click OK
to save your changes.
The problem with Internet access should now disappear.
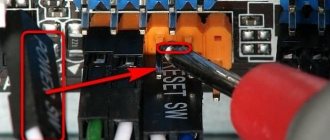
METHOD 4: Using Registry Settings
This method is suitable for "Windows 7, 8, 8.1"
and only if
none of the connection types are displayed
“Network Connections” Remember that the procedure for editing the registry requires you to be careful and accurate. Otherwise, you may make erroneous changes and disrupt the correct operation of the operating system as a whole or its individual applications. Be sure to save its original settings before editing the registry. In the main menu ribbon, click on the “File”
and in the menu that opens, select the
“Export”
.
Name the registry file, select the path to store it and click the "Save"
. Now you can always use the saved version of the registry if the need arises.
- Call window "Run"
Using the keyboard shortcut
“Windows + R”
“regedit”
in the command line field and click
“OK”
to continue.
The system will ask you for permission to launch "Registry Editor"
, click the
"Yes"
to enter. - Next in the left pane of the window "Registry Editor"
go to the following address:
HKEY_LOCAL_MACHINE\SYSTEM\CurrentControlSet\Control\Network
- In the right pane of the window you will see the binary key "Config"
.
Select it and press the “Delete”
on your keyboard, or right-click on it and in the menu that appears, click the
“Delete”
.Don't worry. When you, after deleting the key, open the “Network Connections”
or reboot the system, the
Windows
automatically creates a new key. By deleting the key, you simply clear the configuration cache. - Once you remove the key, close the Registry Editor and open the folder again "Network connections"
, and it should now show all network connections without any problems.