The new version will feature a People hub and OneDrive files on demand, and the Fluent Design interface will be gradually introduced. Windows Defender Security Center includes a new data protection feature, and the Settings app has received many new settings, including for the Cortana voice assistant. The Edge browser and many other aspects of the system were not forgotten.
Like previous updates, 1709 will be distributed in stages. This means that a small number of users will see it on the first day. It will take months to fully roll out, so chances are you'll see this version in the update center closer to the new year. For those who don't want to wait, there are several ways to install the update yourself.
In this guide, we'll cover four methods to do this on computers, laptops, and tablets: through Windows Update, using the update Assistant, the Media Creation Tool, and the Windows Insider testing program.
Installation via Windows Update
The easiest installation method is to wait for the Windows Update notification to appear. You don’t have to wait: when the update starts to spread, you can force install it through the update center.
- 1. Open the Settings app.
- 2. Open the “Update and Security” section.
- 3. Click on the “Check for updates” button.
- 4. If your device is compatible, you will see the update begin to download, after which you will need to click on the “Restart now” button.
When you have completed these steps, the update will begin to install on your device, but it will take a little longer.
If a window appears, select your privacy settings and continue with the installation. You should also remember that in the previous version, Windows 10 introduced a mechanism called the Unified Update Platform. Thanks to it, the size of updates has become 35% smaller and installation is faster.
File compression
To free up disk space, this update may compress files in your user profile directory so Windows Update can install important updates. When files or folders are compressed, two blue arrows appear on the icon. Depending on your settings in File Explorer, you may see icons that appear larger or smaller. The following screenshot shows an example of these icons.
After installing the update, your files return to their original state and the blue arrows disappear from file icons in File Explorer. You must be able to access your files at any time during the upgrade process.
Update using Update Assistant
The computer may be compatible with the latest version of Windows 10, but for various reasons it does not appear in the update center.
In this case, you can use a tool called Windows 10 Update Assistant. If you want to install the update immediately after it becomes available, or if it still hasn't appeared in Update Center after a few weeks, follow these steps:
- 1. .
- 2. Double-click to launch the Windows10Upgrade.exe file.
- 3. Click on the "Update Now" button.
- 4. If the device is compatible, click on the “Next” button.
- 5. Click on the “Reboot Now” button to begin the installation.
After installation, settings, applications and user files will be saved.
When installation is complete, follow the on-screen instructions to complete the setup. This process usually takes less than 30 minutes, although it all depends on the speed of Internet access and the hardware characteristics of the device.
Features and benefits
- The build in question is called Windows 10 1709 Creators Update and is considered a very stable version of the platform compared to earlier releases.
- The “Ten” has significantly expanded the functional range so that users can complete as many assigned tasks as possible.
- Updates from developers continue to arrive automatically.
- OneDrive cloud storage has become more accessible for Windows 10 version 1709 users - the “Files on request” option has been added.
- This operating system allows you to work with a stylus, which will please owners of tablet devices. Handwriting input is also provided.
- Your smartphone can be accessed via PC thanks to improved device syncing.
- Working with personal contacts is also much better than before, thanks to the updated Windows My People service.
- Fluent Design is the name of a new visual language introduced by programmers from Microsoft.
- The Task Manager now shows information about your device's GPU.
- The Windows Store catalog has expanded, and so have its privacy options.
Installation using Media Creation Tool
Microsoft offers a tool called the Media Creation Tool. It allows you to update or clean install Windows 10 version 1709. Sometimes you have to wait before the update becomes available in this tool. When this happens, you need to follow these steps to install:
- 1. .
- 2. Double-click to launch the MediaCreationTool.exe file.
- 3. Accept the terms of the user agreement.
- 4. Click on the “Update this PC now” button.
- 5. Click Next.
- 6. Make sure the “Keep personal files and apps” option is selected. Otherwise, files, applications and settings will be deleted.
- 7. Click on the “Install” button.
After completing these steps, the update installation process will be completed, saving files, settings and applications. If you encounter problems during updates, the Media Creation Tool can also be used to create bootable media from which you can perform a clean install or update of Windows 10.
Using the Upgrade Assistant
The second method is to force install Windows 10 Fall Creators Update using the Update Assistant available at https://www.microsoft.com/ru-ru/software-download/windows10/.
Note: if you have a laptop, do not perform the described steps while running on battery power, there is a high probability that step 3 will completely drain the battery due to the heavy load on the processor for a long time.
To download the utility, click “Update Now” and run it.
The next steps will look like this:
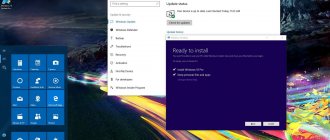
- The utility will check for updates and report that version 16299 has appeared. Click “Update now”.
- The system compatibility will be checked and then the update will begin downloading.
- Once the download is complete, it will begin preparing the update files (the Upgrade Assistant will say “Upgrading to Windows 10.” This step can be very lengthy and may freeze).
- The next step is to reboot and finish installing the update; if you are not ready to reboot immediately, you can postpone it.
Once the whole process is completed, you will have Windows 10 1709 Fall Creators Update installed. A Windows.old folder will also be created, containing files from the previous version of the system with the ability to roll back the update if necessary. If necessary, you can remove Windows.old.
On my old (5-year-old) experimental laptop, the whole procedure took about 2 hours, the third stage was the longest, and after a reboot everything installed quite quickly.
At first glance, no problems were noticed: the files are in place, everything works properly, the drivers for important equipment remain “native”.
In addition to the “Update Assistant”, you can also use the Media Creation Tool utility to install Windows 10 Fall Creators Update, available on the same page via the “Download the tool now” link - after launching it, you will just need to select “Update this PC now” .
How to update to the Fall Creators Update using the Windows Insider Program
Those who want to install the update before everyone else can join the Windows Insider testing program.
This program is designed to give app developers and enthusiasts early access to future Windows 10 features and help them get the final version of the update ahead of others. The testing program contains three different update channels: Early Access, Late Access and Release Preview. The first two offer recently created assemblies, for this reason they may contain errors.
It is recommended that you select the Release Preview option, which will give you the opportunity to receive the update a few days before it is distributed to other users. If you then want to leave the testing program, you do not have to reinstall the operating system.
The Release Preview channel is designed to provide early access to high-quality updates, device drivers, and Microsoft Store app updates.
Here's how to join the testing program:
- 1. Open the Settings app.
- 2. Open the “Update and Security” section.
- 3. Go to the Windows Insider Program tab.
- 4. Click on the “Start” button.
- 5. Click on the “Select account” button.
- 6. Select your Microsoft account.
- 7. On the "What kind of content do you want to receive" page, use the drop-down menu and select "Patches, applications and drivers only."
- 8. Click "Confirm".
- 9. Click “Confirm” again to agree to the terms of use.
- 10. Click on the “Reboot Now” button.
Once these steps are completed, you can use Windows Update to force the Fall Creators Update to download.
Windows 10 Pro Compact 1709 x86-x64
Compact build of Windows 10 Pro
based on original Russian images
of Windows 10 Fall Creators Update v.1709 Build 16299.15
from MSDN.
All the latest updates have been installed, the “Store” has also been updated to the current version 11710.1001.2713.0 - now it is called “Microsoft Store”. Diagnostics and Recovery Toolset 10 (MS DaRT 10)
is integrated into the preinstallation environment . Removed Windows Defender, IME, all tiled applications except the Windows Store itself and Microsoft Edge. All removed applications are installed from the store. The WinSxS\Backup folder has been cleared.
Computer for system:
Processor:
1 GHz minimum or SoC
RAM:
1 GB for 32-bit system or 2 GB for 64-bit system
Hard disk space:
16 GB for 32-bit OS or 20 GB for 64-bit OS
Video adapter :
DirectX 9 or later with WDDM 1.0 driver
Screen:
800 x 600
Windows 10 Pro Compact 1709 x86-x64 torrent, changes:
The system was not audited.
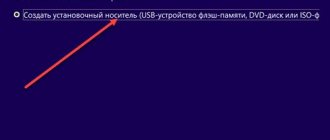
Passes all file and package integrity checks. Installation from a disk/flash drive using Bios or UEFI. To write flash drives, I recommend using
Rufus
MS DaRT and installation:
The system is installed using the built-in Tens feature -
CompactOS
.
When installing in Legacy BIOS mode, the installation will begin with a boot menu with a choice of bit depth; when loading into UEFI, there is no such choice - installation is only x64. Further, no languages, agreements, keys and other dregs, for the purpose of foolproofing, the window with the choice of editions is also hidden - so that they do not try to install an x86 system with an x64-bit installer or x86 in UEFI mode. What you chose at the beginning is what you will install. Since all this canoe is skipped - there will also be no “recovery” button to get into the recovery environment - just close the installation window and get to the MS DaRT
.
In addition, in order not to write flash drives and disks once again, in the sources folder there is a batch file setup.bat - which will deploy the image using DISM and register the bootloader. There will be a choice of regular installation and compressed
CompactOS for both bit depths - you just need to select the option and partition letter for installation, everything is extremely simple there (see screenshots) Fixed missing menu when holding Shft during a reboot.
Differences from the previous version:
Well, the most noticeable ones are the latest updates and MS DaRT, now the system can perform any file and package integrity checks. IME (hieroglyph input editor) and “URA”. As an experiment, the scripts were tested on clean Windows 1709 and 1703 - all updates worked perfectly.
Deleted:
All tiled apps (except Microsoft Edge and Store) Windows Defender and its tiled center. Holographic and PPIProjection. IME - Hieroglyph input method editor. Packages WinSATMediaFiles and RecDisc(WinRE). The WinSxS\Backup folder has been cleared
Disabled:
Superfetch, SmartScreen, UAC (do not notify as it is disabled as standard in the PU), paging and hibernation. Firewall is disabled by default (Control Panel only) Error reporting, indexing, Security Center, and Program Compatibility Assistant. Data collection and telemetry are disabled. Blocking addresses have been added to the Hosts file - open as administrator and edit at your discretion. Automatic installation of drivers from the update center is disabled, I did not completely exclude them; when you click on check for updates, the system will install them. In the “components” window, the following are disabled: Internet Print Client, Work Folders Client, Remote Differential Compression, WCF Services, Services and XPS Viewer. Microsoft .NET Framework 3.5 - the program will not be required, but if you really want to, you can install it, only then run the following commands:
Reg delete "HKLM\SOFTWARE\Microsoft\.NETFramework" /v "OnlyUseLatestCLR" /f Reg delete "HKLM\wow6432node\SOFTWARE\Microsoft\.NETFramework" /v "OnlyUseLatestCLR" /f
Settings:
The following settings have been applied: show hidden folders, extensions, the computer on the desktop, display all icons, do not add a “shortcut” Do not show frequently used and recent folders, open Explorer in the “This PC” section Removed “Network” and “Removable devices” from Explorer navigation areas. Hidden user folders in the This PC section. In WinX, I added “Registry Editor” to the menu and returned the classic “Control Panel”, added the good old “Culculator” - the shortcut can be found in the “Start Menu” among standard applications. Added “Open command line here” (from admin) to the context menu when holding Shift. Added “Windows Batch File” and “Registry File” to the “Create” menu. Default scale 125%, PC name - HOME-PC, workgroup - HOMEGROUP. Disabled autorun, fixed the color of inactive windows to gray. PhotoViewer associations have been returned. The Temp and TMP folders have been moved to the root of the system disk. Checking is disabled when launching downloaded programs. The default input language is en-US, the power scheme is “high Community Best: Natural Landscapes 3” from the MS website
Peculiarities:
The system is not compressed and has not been audited; all manipulations were carried out with an offline image. No left cutters were used, just Command Prompt, Dism and PowerShell. All remote applications are installed from the Store, including Xbox and Skype (well, with the exception of the system Holographic and PPIProjection) Quick semi-automatic installation - there is no key request, all sliders are disabled, no update checks, select only the section and user name.
Checksums:
CRC32:
591F87B6
MD5:
3B275FF85F10DF7775F8B65A760990B8
SHA-1:
A50154D14C2F5D98655BB87608EF0068E3CD89F7
FAQ Frequently asked questions:
Show/Hide text
1. Why is the page file disabled?
It is disabled not so that it does not exist, but in order to set the required size without unnecessary reboots.
In general, we definitely include it - at least minimally. 2. I installed it on HDD - why does Windows load slowly?
We enable the Superfetch and Windows Search services or run the following commands in the command line with administrator rights:
Reg add “HKLM\SYSTEM\ControlSet001\Services\SysMain” /v “Start” /t REG_DWORD /d “2” /f Reg add “HKLM\ SYSTEM\ControlSet001\Services\WSearch" /v "Start" /t REG_DWORD /d "2" /f
3. How to burn a flash drive?
Read and download here
4. How to completely disable User Account Control?
Only through the registry, or commands:
Reg add "HKLM\SOFTWARE\Microsoft\Windows\CurrentVersion\Policies\System" /v "ConsentPromptBehaviorAdmin" /t REG_DWORD /d "0" /f Reg add "HKLM\SOFTWARE\Microsoft\Windows\CurrentVersion\Policies\System" / v "EnableLUA" /t REG_DWORD /d "0" /f Reg add "HKLM\SOFTWARE\Microsoft\Windows\CurrentVersion\Policies\System" /v "PromptOnSecureDesktop" /t REG_DWORD /d "0" /f Reg add "HKLM" \SOFTWARE\Microsoft\Windows\CurrentVersion\Policies\System" /v "EnableVirtualization" /t REG_DWORD /d "0" /f Reg add "HKLM\SYSTEM\CurrentControlSet\Services\luafv" /v "Start" /t REG_DWORD / d "4" /f
5. How can I return “Network” and “Removable drives” to the Explorer navigation bar?
Return disks:
Reg add "HKLM\SOFTWARE\Microsoft\Windows\CurrentVersion\Explorer\Desktop\NameSpace\DelegateFolders\{F5FB2C77-0E2F-4A16-A381-3E560C68BC83}" /f
Return "Network":
Reg add "HKLM\SOFTWARE\Classes\CLSID\{F02C1A0D-BE21-4350-88B0-7367FC96EF3C}" /v "System.IsPinnedToNameSpaceTree" /t REG_DWORD /d "1" /f
6. How to activate this Windows?
If there is activation linked to hardware, it is activated automatically, for those who do not have it
KMSAuto Net 2020 1.5.27
.
What is Compact OS?
Compact OS is a mechanism for compressing system files that works in Windows 10. On a x64 system it can free up up to 2 GB of disk space, on x86 - up to 1.5 GB. How to find out the compression status:
compact.exe /CompactOS:query
How to perform compression:
compact.exe /CompactOS:always
Canceling compression is just as simple:
compact.exe /CompactOS:never
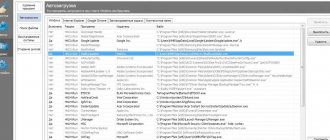
Screenshots of Windows 10 Pro Compact 1709 x86-x64 torrent:
Installation and MS DaRT 10:
Show / Hide text
System 64bit
System 32bit
Integrity check:
Download Windows 10 Pro Compact 1709 x86-x64 via torrent:
Quitting the Windows Insider Program
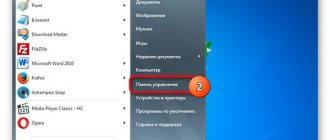
- 1. Open the Settings app.
- 2. Open the “Update and Security” section.
- 3. Go to the Windows Insider Program tab.
- 4. Click on the “Stop receiving Insider Preview builds” button.
- 5. Select the "Continue to send me builds until the next release of Windows" option.
- 6. Click "Confirm".
- 7. Click Reboot Now.
After you restart your computer, you will continue to use the latest version of Windows 10.