Reasons for disabling antiviruses
Typically, antiviruses are disabled when running keygens, activators, or when installing hacked games. The reason for this is that the hacked program or keygen is considered malicious by the antivirus, although, in fact, it does not cause any harm.
Often, antivirus firewalls do not allow the user to access certain sites, since antivirus keys may be distributed on these sites. After all, any manufacturer wants to protect the user from free keys so that the PC owner can renew or buy an antivirus license in the future.
Many users disable their antivirus while playing, as some antivirus programs slow down the system terribly. However, there are many reasons for disabling antivirus software, as well as ways to disable it.
Disabling Windows 10 antivirus permanently:
- Open the Run window (Windows +R), enter the command regedit and click OK.
- Go to the next registry branch
- Right-click on the empty space on the left and create a DWORD value (32 bits) called DisableAntiSpyware.
- Double-click on the newly created parameter, give it a value of 1, and click OK.
- Now you can close the Registry Editor and check the effect of this method through the computer settings. There you can make sure that all Defender-related settings have become inactive. You can also try running the built-in antivirus by clicking the link at the very bottom “Open Windows Defender”
HOW TO DISABLE CHINESE ANTI-VIRUS:
As a result, you will receive a message that Windows 10 Defender is disabled by Group Policy.
If you want to reactivate the disabled Windows 10 Defender, then just delete the DisableAntiSpyware parameter or change its value to 0
Pay attention, our dear and beloved readers! After users begin to resort to such measures as disabling the antivirus. They most often have to call a technician to their home or give the computer to specialists to treat the computer.
Since there are enough viruses on the Internet, and disabling the antivirus can lead to infection of the computer, in order to prevent this from happening, it is best not to disable the antivirus, because in fact, it is not recommended to disable the antivirus at all.
Dear friends, remember that even the most effective or most expensive antivirus will not help protect your computer system if you often turn it off.
General method to disable antivirus
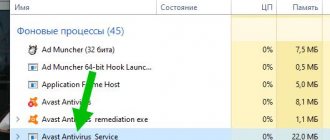
To disable the antivirus program, just go to startup and “unload” the antivirus from it. This can be done using standard tools or special software.
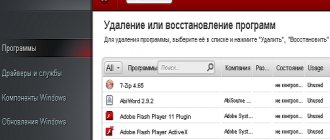
For example, CCleaner has a startup editor that makes it very easy to disable any antivirus. You need to go to the website https://www.piriform.com/ccleaner and download CCleaner using the “Download” button. After installing the program, open “Scanner” and go to the “Tools >> Startup” tab. Then select the lines responsible for the antivirus and click “Turn off” on the right.
Then we restart the computer and continue working with the antivirus turned off. If you need to enable the antivirus program, then just go to the same tabs and click on the “Enable” button. In this simple way, you can disable any antivirus installed on your computer.
To disable the antivirus using standard means, you need to open the command line by simultaneously pressing the “Windows” and “R” buttons on the keyboard. In the window that opens, write msconfig in Latin letters and click “OK”.
In the “System Configuration” window, select the “Startup” tab and uncheck the boxes next to the antivirus. Then click “Apply” + “OK”. After restarting the PC, the antivirus will be disabled.
Some antivirus software includes a firewall, which often interferes with the operation of online games. You don't know how to disable your antivirus and firewall? Let's show the process of temporary disabling using the Avira antivirus as an example. Open the antivirus and in the main window click two switches to the “Off” position.
How to disable Windows 10 Defender?
There are 3 ways to disable Windows Defender Antivirus. All of them are easy to remember, so even a teenager can do the job. The deactivation process for the new OS version is slightly different from the similar operation in all previous versions. To successfully complete this work, you need to choose the simplest method for yourself and strictly follow the given algorithm of actions.
Temporarily disabling the built-in antivirus by adjusting settings
This option to disable Windows 10 Defender allows you to pause the antivirus application. This operation may be necessary in cases where it blocks the loading of a game, application or useful program for the computer.
The shutdown process consists of the following steps:
- Through “Start” open the “Settings” section.
- In the window that opens, find the inscription “Updates”.
- After the transition, click on “Windows Defender”.
- Then click LMB 2 times on the “Open Security Center” item.
- On the page that opens, click on the shield icon.
- There, click on the “Protection Settings” link.
- On the new page, look for the “Protection” item.
- Below it is a slider that can be moved to the left, changing the label from “On” to “Off”.
- Below is the “Cloud protection” parameter, with which a similar operation is performed.
After completing all of the above steps, the protection will be suspended. However, immediately after restarting the PC, it will become active again.
Disabling Defender in the Local Group Policy Editor
This option to disable the antivirus is available only for the corporate and professional versions of the operating system. This must be taken into account, because... Most home computers have a different version of Windows, for which this option to disable protection does not work.
Step-by-step instruction:
- Press the Win and R buttons on the keyboard at the same time.
- A window will open, in the empty field of which enter the command “gpedit.msc”.
- Click with the left mouse button (LMB) on “OK”.
- After this, a window will appear in which the “Configuration” section is found on the right.
- By going to it, select the item “Adm. templates”, where they look for the “Components” folder and the “Security program” subfolder.
- In it, open the “Enable anti-virus protection” file.
- In the window that appears, check the box next to “Enabled”.
- Click the “Apply” button
- Confirm the changes by clicking “OK”.
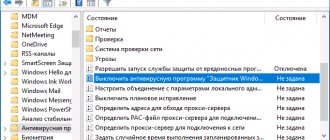
- In the same way, deactivate the “Allow antivirus” and “Allow Windows Defender service to connect” options. The only difference is the check mark next to the word “Disabled”.
- At the next stage of work, the editor returns. There they look for the “Protection” subsection and go to it.
- Double-clicking on the “Turn off protection” file activates this action.
- After that, select the “Check all files” option and put a check mark next to the word “Disabled”.
- Then they go to the “Maps” folder, where they deactivate all indicators except “Send samples” (leave it “On” and select “Never send” in the “Options” menu).
How to completely disable Windows 10 Defender using Registry Editor?
You can disable or remove Windows Defender using the Registry Editor. This option is available on any computer running the Windows operating system.
Algorithm of actions:
- Using the keyboard, press the Win+R combination.
- A window will open where you enter the “regedit” command.
- Press the Enter key.
- After this, the registry editor will appear in which they find the HKEY_LOCAL_MACHINE section (the name must be written in capital letters).
- In it, open the “SOFTWARE” folder and the “Policies” subfolder.
- Then search for “Microsoft” and click on “Windows Defender”.
- Several files will appear on the right.
- On an empty field, right-click and select “Create”.
- After that, go to the “Settings” tab and set the name DisableAntiSpyware (all words without spaces).
- Then click on the created file 2 times and assign it a value equal to one.
- Similarly, 2 more files are created (ServiceKeepAlive and AllowFastServiceStartup), which are set to 0 (the default).
- Return to the list of registry keys and find Real-Time Protection.
- It creates parameters and assigns them the names DisableRealtimeMonitoring, DisableOAVProtection.
- Click on each of them and assign a unit.
- After this, go to the “Spinet” folder, in which they create a DWORD32 file.
Disabling Kaspersky Anti-Virus and Dr.WEB
If you need to temporarily disable Kaspersky, you need to open the main program window and select “Settings” in the upper right corner.
In the “Settings” window, open the “Advanced Settings” and “Self-Defense” tabs in sequence. Then you need to uncheck the “Enable self-defense” option and click “OK”.
Disabling Dr.Web is a little easier. Click on the program shortcut in the tray and select “Spider Guard >> Disable”. Then we enter the code from the picture and confirm the temporary disabling with the “Disable Spider Guard” button.
How to disable Avast while installing the program
Disabling Avast antivirus can be useful if:
- You do not want to uninstall Avast (virus scanning is performed on a schedule);
- The computer is slow or needs additional resources (you have launched Photoshop, Chrome with a dozen open tabs, or are installing a program)
In such cases, you can simply disable the antivirus, and below we will look at two ways to do this. These methods are equally applicable to the Windows 7 and Windows 10 operating systems, as well as older versions of the OS.
Method one: disabling antivirus components
- Open the main window of the Avast program by launching it from the desktop or by selecting “Open Avast user interface” in the notification panel in the context menu. (The notification panel in Windows XP, 7, 10 and others is in the lower right corner.)
- Go to the “Protection” section - “Main protection components”. If not needed, disable the following components:
- File protection
- Behavior Analysis
- Web protection
- Mail protection
Second method (how to temporarily close Avast through settings)
- Go to the “Protection” section – “Main protection components”.
- Set the slider to “Off”. In the "Should I really turn off this screen?" dialog box. set the Avast shutdown interval: from 10 minutes until the next reboot.
- Click “OK” to confirm the disconnection.
During this time, virus protection of the file system will be completely disabled. Don't forget to turn on Avast protection when needed. A switch will appear in the Windows 10 Action Center to turn on virus and threat protection.
In the same way, other antivirus components are disabled - Web screen, mail screen and other components installed by the user.
The third method (via the notification panel)
To pause the antivirus, perform the following steps:
- Right-click on the Avast icon in the Notification Panel.
- “Manage Avast Screens” > “Disable all screens” (you can select the deactivation time interval).
Considering that each antivirus component “eats away” its share of PC resources, disabling each module can increase performance. This is especially useful for low-power computers and budget laptops.
That's all; If you have questions about Avast antivirus, ask them through the feedback form. Good luck in the fight against viruses!
Disabling Avast and Avira
To pause Avast Antivirus, you need to right-click on the tray icon and select “Manage Avast Screens >> Disable Permanently.”
You can disable Avira in the same way. Only by clicking on the “Avira” icon will you need to select “Activate Real Time Protection”. If the umbrella closes, it means that Avira antivirus is disabled.
Remember that you only need to disable your antivirus when necessary, since only it can protect your PC from threats and viruses.
Why turn off your antivirus?
There may be several reasons: some sites do not load, programs do not open, especially “activators”, etc. Moreover, they may not be malicious or viral, but the program will identify them as such. Some people disable the antivirus for the period of games in order to use all the computer's performance, but how to disable the antivirus for a while? Very simple.
Many antivirus programs have a disable function in their system. This is much simpler and more convenient, because you don’t have to reboot.
Before you temporarily disable your antivirus, you need to make sure that it has this function. For example, Avast has it. To do this, find the icon of your antivirus in the tray and, after right-clicking, select “Manage antivirus screens” and mark the required period of time.
Be that as it may, even disabling the antivirus program for an hour indicates that any virus can manage to penetrate the root of the system and begin destroying files.
If you still need to do this, it is best to first disconnect your computer from the Internet and local network. 48 503 Tags: antiviruses
Avast 2020
Before you ask the question “how to temporarily disable Avast antivirus?” , it is necessary to assess the threat of this action. Complete system security depends on the continuous operation of the application. Its suspension is possible only if there is no malware and the home network is disabled. Therefore, we are not responsible for possible negative consequences caused by the blocking, and our guide is posted for informational purposes.
Why it is not recommended to disable Avast
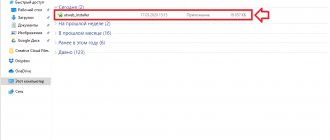
The most common reason for pausing antivirus software is a timeout during the installation of a program downloaded from third-party web resources. As a rule, the installer of pirated software includes files for cracking the license. They represent a prototype of malicious code and are perceived as a threat. This is not a reason to temporarily block protection, since real viruses can penetrate under the guise of safe extensions.
Moreover, the penetration of malicious objects through the network is not limited to banal downloads from dubious sources. All vulnerable elements of the operating system, including outdated applications, hardware and removable media, are susceptible to online infection. It is when antivirus software is disabled that cyberattacks are activated. To avoid such problems, we recommend downloading software only from official websites, and running suspicious files in a “sandbox” - a special module in the cloud, completely isolated from the PC system.
The most common reasons for suspension of protection
As a rule, the performance of weak computers suffers from the simultaneous operation of several services. To lighten the load, you need to stop unnecessary software, for example, while playing a game or working with resource-intensive software. In this case, it is advisable to disable anti-virus protection, but with the condition of logging off from the network. It should be taken into account that online games are not taken into account; a special “No notifications” mode has been developed for them.
Also on Windows 7 and other platforms in this line, Software products can block the installation of competitive distributions. Despite the fact that the developers solved this problem, in some versions this issue remained open. To install protection for other companies, you must temporarily stop monitoring Avast, otherwise the license file will be blocked at the download stage or quarantined.
Instructions: how to disable Avast temporarily
In fact, this process takes only a few seconds, literally a couple of mouse clicks. To do this you need:
- Step: Open the control menu in the taskbar by hovering over the icon and pressing the right mouse button.
- Step: Select the “ Manage Avast Screens ” section.
- Step: Set your preferred suspension period. The " Disable forever " option prevents autoloading until you manually launch the extension.
- Step: Confirm completed actions.