Users of the Windows operating system often encounter difficulties when uninstalling ESET antivirus products. Of course, in our time, few people would think of simply deleting the root folder of the antivirus from Program Files, but attempts at incorrect removal still happen, which leads to unstable operation of the system, and sometimes to a number of critical errors.
At the same time, there are several safe and correct ways to uninstall ESET Smart Security.
How to remove ESET Smart Security
Uninstall via Control Panel
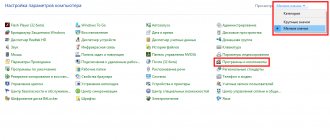
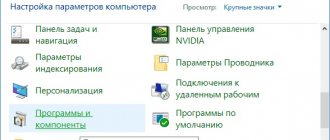
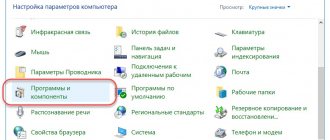
Among the standard tools in the operating system there is also a tool for correctly removing installed programs. If you decide to use it, you need to open the “Control Panel” menu, you need to find the “Add or Remove Programs” item (in some cases “Programs and Features”).
From the list that opens, you need to select ESET Smart Security and double-click to start the removal process.
An uninstaller window will open, following the instructions of which you can easily remove the antivirus product. The interface is intuitive, the uninstaller itself will find and remove all the main components of the program.
Uninstalling ESET Smart Security
Sometimes users set a password to protect their antivirus settings. If this is your case, the Removal Wizard will ask you to enter this password in a special field. If you have forgotten this password, then unfortunately, this deletion method will not be possible for you.
Entering your password to uninstall ESET Smart Security
After completing all the steps, the Installation Wizard will notify you that you need to restart your computer to complete the removal.
Restarting the computer to complete uninstalling the program
After rebooting, your operating system will start without ESET Smart Security.
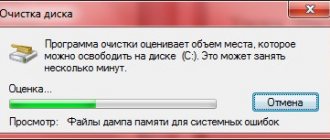
Attention! When using this method, traces of the program often remain on the system, which can lead to decreased performance and even system errors. We recommend clearing traces using CCleaner or a similar program.
How to temporarily disable nod32 | Do it yourself
If you have the NOD32 antivirus program installed, you may have noticed that occasionally it quarantines a file that does not contain viruses. How to solve the problem? Of course, you can remove the antivirus and then install it again. But the solution is not very good, if not completely inconvenient. It's best to disable NOD32 for a while .
You will need
- – a computer with Windows OS;
- – NOD32 antivirus.
Instructions
1. There are several methods to disable this antivirus program. 1st method. Find the NOD32 icon in the tray. Right-click on this icon and select “Open window” in the context menu. In the window that appears, select the “Settings” section. Next, on the right side of the program window, click on “Protection against viruses and spyware.”
2. In the window that appears, click on “Temporarily disable protection against viruses and spyware.” Then in the dialog box that appears, click “Yes”. After this, the antivirus will be disabled and inactive. To enable it, you need to select “Enable protection against viruses and spyware” in the same menu.
3. You can disable NOD32 using another method. Press the combination Ctrl+Alt+Delete or Ctrl+Shift+Esc on your keyboard. The task manager will launch. In it, you need to prefer the “Processes” tab. The window that appears will contain a list of all energetic processes. Click the "Exposition" line. There will be names of processes.
4. Find a process called ESET GUI. Right-click on it and select “End Process” from the context menu. Repeat the same procedure with the process named ESET Service. After this, the antivirus will be disabled. It will start mechanically the next time you turn on the computer.
5. Another method to disable NOD32 looks like this. Click Start. Next, select “All programs” – “Typical” – “Command line”. At the command prompt, enter Msconfig. Press Enter. The System Configuration window opens. Go to the "Startup" tab.
6. Further in the list of programs, find ESET. Uncheck the opposite program box. Click Apply and OK. Restart your computer. The antivirus will not start. In order to return it to system autostart, simply check the box back.
Tip 2: How to disable NOD32 temporarily
The solution to the problem of temporarily disabling the NOD32 anti-virus application may be useful for avid gamers when running some versions of online multiplayer games, but it should be considered that even a short-term disabling of anti-virus protection can cause damage to the computer.
Tip 3: How to remove nod32
Nod32 antivirus is deservedly one of the leaders among antivirus programs, allowing you to effectively protect your system from a wide variety of virus threats.
However, a user who decides to remove nod32 from his system may face some serious difficulties.
The fact is that many viruses can disable anti-virus systems installed on a computer; therefore, disabling nod32 by the creators of the program is meaningfully made available only to a system manager who has both the appropriate authority and sufficient knowledge.
After attempting to delete the antivirus program files manually, the user may find that the folders in which the antivirus was installed are still not deleted, and some of the processes related to it continue to run in the computer’s memory.
If you cannot remove the antivirus in the standard way (Control Panel - Programs and Features - Uninstall), then in order to still remove nod32, carefully follow the sequence of steps:
- Log in as a manager with appropriate authority.
- Exit nod32 by using the corresponding context menu item (opened by right-clicking on the nod32 icon in the system tray next to the clock).
- Open Control Panel, select Administrative Tools, and in the list that appears, launch the “Services” shortcut.
- Find all services related to nod32. Each of them needs to be stopped. To do this, simply right-click on the service name and select “Stop” in the context menu that appears, or place the cursor on the service name and click the “Stop” link on the left side of the window.
- If you cannot stop the service, you should change its startup type. To do this, you need to right-click on the name of the service, select “Properties”, and then change the startup type to “Disabled” or “Manual”. In any of these 2 options, after rebooting the computer, the service will not start, which means there will be a possibility of deleting files and folders related to it.
- After the reboot, log in again with manager rights and delete the Program FilesESET, Application DataESET (in the user data folder), AppDataESET (also in the user data folder) folders.
- Delete the HKEY_CURRENT_USERSoftwareEset registry key.
- System setup, Revo Uninstaller software.
on this topic
Tip 4: How to disable startup
Sooner or later, a situation arises in the life of a computer user when the time that the operating system spends loading is long and unbearable. The reasons for such an incident can be extremely different, from errors in the computer to incorrect processing of startup files. Regardless of the current situation, a solution will always be found.
You will need
Tip 5: How to extend node 32
Eset Nod32 antivirus has recently been no less popular than the world leaders of similar software. The demand for the product speaks in favor of its performance. Moreover, the development company provides everyone with a functional shell program for free.
However, to adequately protect the system, the antivirus needs regular updates of the virus database. These updates are performed mechanically by the program via the Internet, after the user receives a personal antivirus license from the developer.
The renewal of the Nod32 license itself takes place in a matter of minutes, and the computer is once again under reliable protection.
Tip 6: How to turn off the computer keyboard
In some unusual cases, it may be necessary to shut down the computer using only the keyboard.
This happens, say, when malfunctions in the Windows operating system or failure of the computer hardware lead to the inoperability of the USB ports to which the mouse is connected, and there is no access to the system unit together with the power button placed on it.
Removal using ESET Uninstaller utility
It happens that the built-in uninstaller gives an error, the product is not in the list of programs installed on the computer, or the user has forgotten the password set to protect the antivirus settings. In such cases, you can use the ESET Uninstaller utility.
You need to know that the program works exclusively through safe mode. Also, after running ESET Uninstaller, network settings may be reset. It is advisable to prepare for this option before starting the program.
You can download the program from the official website of ESET.
After downloading the program, transfer it to your desktop and boot Windows into safe mode. After the download is complete, launch the utility. It will open in a command prompt window. To confirm the start of work, press the Y key.
Uninstall using ESET Uninstaller
The program will scan your hard drives and display a list of installed ESET products. Typically, there will only be one item with the product we need.
Enter the program number and press ENTER.
Entering program number
To confirm the removal, press the Y key. When ESET Uninstaller finishes, you will see the message “Press any key to exit”.
Confirming program deletion with the Y key
Completing program uninstallation
To complete the removal, restart your computer and do not forget to clean the system of antivirus traces.
Video - How to remove Eset Security antivirus
Disabling Eset Smart Security protection using settings
So, if you wanted to disable Eset using the settings of the antivirus itself (read about setting up updates for this antivirus here), then to do this:
- We open the main window of the Eset Smart Security program and on the left we see a list of possible operations.
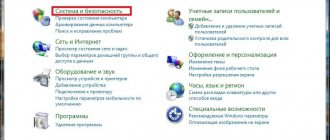
- Select the Settings item and select exactly the protection item that we need for work. The screenshot shows that in this case all the necessary computer protection is in working order.
- To transfer cracks and keygens or any other actions, it will be enough to disable real-time file system protection in the “Computer” section. This can be done for a certain time and before the next reboot of the computer, as shown in the following screenshot. When blocking network traffic, you must turn off Internet access protection in the “Internet and email” section.
- After carrying out such an operation, we return to the Eset Smart Security main page mode and see that the maximum degree of computer protection is no longer guaranteed.
- All subsequent operations of enabling or disabling Eset Smart Security protection can be performed exactly in these steps, using directly only the ESS system functions.
Advice! Such operations can be done regardless of what version of the antivirus is installed on your computer.
Using these simple tips, everyone will know how to disable Eset Smart Security easily and quickly to perform any necessary actions. Read about how to install Eset antivirus here, and you can read about removal here.
The comprehensive antivirus ESET NOD32 Internet Security has many different modules to protect your computer from all kinds of viruses, hacker attacks and malicious applications. Let's go through the settings and configure the antivirus for maximum protection.
Today we will look at the settings of the comprehensive antivirus ESET NOD32 Internet Security, we will try to squeeze out maximum protection and provide even more security.
Special uninstall programs
In fact, there is a universal way to remove unnecessary programs and all traces of them. To do this, you need to download a free or paid uninstaller program. The range is quite large, for example Advanced Uninstaller Pro, Total Uninstall, Revo Uninstaller, Iorbit Uninstaller.
Let's move on to reviewing ESET Smart Security using Revo Uninstaller.
- Run Revo Uninstaller and find the one you need in the list of installed programs.
- Right-click on the antivirus and select the “Uninstall” option.
Uninstalling ESET using Revo Uninstaller
Next, the program will create a restore point and launch the built-in uninstaller, the operation of which was described in the first part.
Running the built-in uninstaller
Regardless of whether uninstallation using the built-in uninstaller was successful, Revo Uninstaller will remove all antivirus components and traces of it.
Removing all antivirus components and its traces
After uninstallation is complete, restart your computer.
Whatever method you choose, we do not recommend ignoring virus threats. Install the antivirus product of your choice, preferably from a reliable developer.
Setting up ESET NOD32 Internet Security during installation
When installing the product, do not forget to activate the security features " ESET LiveGrid
" and the "
Potentially Unwanted Application Detection
" system. This will help reduce the risk of system infection.
If this is not done when installing the antivirus, go to Settings
" and go to "
Advanced settings
".
Find the Cloud Protection
» and enable this option.
After that, go to the “ Detection module”
", activate the "
Enable detection of potentially unwanted applications
" and "
Potentially dangerous applications
" options.
Configure ESET NOD32 Internet Security settings for maximum protection
Go to " Advanced Options"
" as shown above and select "
Real-time file system protection
".
Collapse “ General
”, expand “
ThreatSense Options
”, move the sliders “
Packers
” and “
Advanced heuristic analysis/distributed network attack signatures
” to the active position.
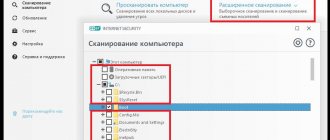
Now, we will need a section called " Malware Scanning Processes"
"where you need to expand "
ThreatSense Options
" and enable "
Mail Files
" and "
Archives
".
Expand « Document protection
" and "
Integrate into the system
".
Go to settings " HIPS systems
"Collapse "
Basic
" and in "
Advanced settings
" activate "
Register all blocked operations
" and "
Notify about changes to applications loaded at system startup
."
Go to the “ Device Control”
" and opposite the item "
Integrate into the system
", move the switch to the active position, click the "
OK
" button and restart the computer.
This will provide automatic control of devices such as a USB drive, Bluetooth or portable hard drive. Allows you to create rules and prevent access to them.
Thus, you can significantly increase the security of your computer using the comprehensive antivirus ESET NOD32 Internet Security.
A little recommendation
. Despite the installed antivirus and maximum settings. We recommend that you scan your computer with anti-virus scanners approximately once a week. This will allow you to identify and eliminate the intruding malware if the main system defender misses.
Users of the Windows operating system often encounter difficulties when uninstalling ESET antivirus products. Of course, in our time, few people would think of simply deleting the root folder of the antivirus from Program Files, but attempts at incorrect removal still happen, which leads to unstable operation of the system, and sometimes to a number of critical errors.
At the same time, there are several safe and correct ways to uninstall ESET Smart Security.