How to make a GIF online
This section contains four services that will help you conveniently and quickly make a GIF online.
Create a GIF on Makeagif
Makeagif - “universal GIF soldier.” Can create GIFs from videos on YouTube, Facebook, from a webcam, from uploaded pictures and videos. A cool tool when you need to do it quickly and with little processing: you can adjust the length, add text, emoticons and simple effects.
To make a GIF from a video on Youtube, just provide a link to it, processing will begin immediately:
How to make a GIF from a Youtube video using Makeagif
I liked that the service is simple: all processing is done in one step. But for full-fledged work you will have to pay $12 per month. There is a trial period of 3 days. Free account limitations:
- only low and medium quality gifs;
- service logo on ready-made gifs;
- length limit up to 20 seconds.
Create a GIF on Giphy
Try making a GIF online using the free editor on Giphy. There are also many options here: as a basis, you can upload your photos, GIFs or videos, give the service a link to YouTube, Vimeo or in Giphy itself (there is an extensive library of GIFs). You can work without registration; there will be no watermark on the GIF.
I'll show you how to make a GIF from a video. We upload the file, select the desired piece and process it: add text, filters, stickers, and if desired, draw something. The finished gif needs to be uploaded to the site; to do this, enter tags and, if necessary, provide a link to the original gif.
You can download your creation: right-click and “Save”. You can also take an embed link for social networks, for HTML5, and so on:
How to make a GIF from a video on Giphy
How to make a GIF on Gifpal
Gifpal is a simple, free online service for creating GIF animations from pictures.
Select the size of the future GIF, upload image frames one by one, adjust their length and sequence, save the result:
How to make a GIF from pictures using Gifpal
The only limitation of the service is that there will be a small inscription GIFPAL in the lower right corner.
How to make a GIF from a YouTube video
For those who are going to make GIFs only from Youtube videos, there is a way where you don’t even need to go anywhere. On the page of the video from which you want to make a GIF, enter the word gif in the address bar before youtube. Like this: “www.gifyoutube.com/video...”.
Press Enter and you will be taken to the GIF editor on Gifs.com. Here we customize our gif: add text, stickers and effects. There are many effects in the editor: changing color and brightness, blurring, adding fields, horizontal and vertical reflection.
Once configured, we create a GIF. The watermark cannot be removed - a pop-up with Drake pops up and offers to buy a paid version for this from $1.99 per month. We choose whether our GIF will be public or private, and complete the process. The final result can be downloaded in two sizes: original and compressed ten times. You don’t have to download, but copy the link for posting on a social network or embedding it on a website:
How to make a GIF from a Youtube video
Gifs.com can also process uploaded videos and videos from Vine and Instagram. Options are available from the main page: to go there, click on the icon that says GIFS.
Note! SendPulse allows you to make a GIF from a YouTube video and immediately upload it to an email - read the instructions in our knowledge base.
This method is suitable if your video weighs up to 100 MB.
Programs for creating gif animations
1) UnFREEz
Program website: https://www.whitsoftdev.com/unfreez/
A very simple program (probably the simplest), which has only a few options: specify files for creating animation and specify the time between frames. Despite this, it is popular among users - after all, not everyone needs everything else, and creating animation in it is easy and quick!
2) QGifer
Developer: https://sourceforge.net/projects/qgifer/
A simple and functional program for creating gif animations from various video files (for example, from avi, mpg, mp 4, etc.). By the way, it is free and fully supports the Russian language (that’s already something).
By the way, this article shows an example of how to create small animations from video files.
The main window of the QGifer program.
3) Easy GIF Animator
Developer website: https://www.easygifanimator.net/
This program is one of the best for working with animation. It not only allows you to quickly and easily create animations, but also edit them! However, to take advantage of all the features of the program, you will have to buy it...
By the way, what is most convenient about this program is the presence of wizards who will quickly and step by step help you perform any of the work with gif files. 4) GIF Movie Gear
Developers website: https://www.gamani.com/
This program allows you to create full-fledged animated GIF files, reduce and optimize their size. In addition, you can easily create animated banners in standard sizes.
It is quite simple and has an intuitive interface that allows you to quickly get the job done, even for a novice user. The program allows you to open and use files of the following types as frames for created animation: GIF, AVI, BMP, JPEG, PNG, PSD.
Can work with icons (ICO), cursors (CUR) and animated cursors (ANI).
Programs for creating GIFs on your computer
You can make a GIF using programs on your computer. Yes, installing software is not always convenient, but you will get a GIF of any size and resolution, and without a watermark.
How to make a GIF in Photoshop
Photoshop gives you two options for how to make a GIF - from pictures and videos. Let's look at both methods.
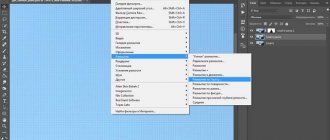
How to make a GIF from a photo in Photoshop. Create a new file in the program. Layer out the elements of the future gif that should be on different frames. Now in the top panel open the “Window” menu and select “Timeline”. A new panel will appear at the bottom, in the center there will be a button that can be toggled with an arrow to the right of it. Select the “Create frame animation” value for the button and click on it.
The first frame appears on the scale, immediately set its duration and leave only the desired layer visible. We copy the finished frame the required number of times. For each frame, leave the corresponding layers visible:
How to make a GIF from pictures in Photoshop
We save via “File - Export - Save for WEB”:
Menu section for saving GIFs from images in Photoshop
Setting up saving options. Click on the file option that you would like to save: they differ in quality and, accordingly, weight. The selected option can be further reduced by choosing fewer colors and reducing its width and height.
Make sure that in the settings the output file format is also indicated at the top - GIF, and at the bottom, in the animation settings - “Repeat options: Constantly”. Then you will get a looping GIF:
Settings when saving a GIF created in Photoshop
How to make a GIF from a video in Photoshop. This method is suitable for processing small files, for example, 50 MB or less. With heavier videos, the program will take a very long time to load.
Create a new file and go to the “File” menu - “Import video frames into layers”:
Menu through which you can import video into Photoshop
Select the desired video and the import window will appear. Select the piece you need. It is not necessary to do this with precision down to the second; then you can remove the excess. To make the future GIF easier, let’s check the “Leave each” checkbox: if you put 2 here, then there will be two times fewer frames, if 3, then three times less. This won't affect the quality much, it's just that the GIF won't be as smooth as the video. And check the “Create frame-by-frame animation” checkbox. Here are some sample window settings:
Video import settings for creating GIF animations in Photoshop
Next, we do the same as when creating a gif from pictures. Call the timeline in the “Window” panel, the video frames will already be on it:
Timeline when creating a GIF in Photoshop
Edit the frames as desired - change their duration or delete unnecessary ones. You can add some more pictures or text to the video sequence. We save it in the same way as a gif from pictures - through export for the Web.
How to Make a GIF in Photoscape X
You can make a simple GIF from pictures on MacOS using the free version of Photoscape X. It also works on Windows 10.
Photoscape X is easy to work with: it's also an image editor, but much simpler than Photoshop. You can first crop the pictures, adjust their color, make a collage, or add text, arrows and other shapes.
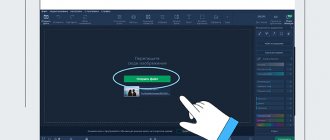
Now I’ll show you how to create a GIF from pictures using Photoscape X. Select the size of the future GIF on the right. Drop your images into the editor window and drag them in the desired sequence. Then adjust the length of each frame and the transitions between them:
How to make a GIF from pictures on your computer
Creating animation on a computer in Photoshop
Hello, friends! Why do some users create animated images? Of course, to make money online. After all, such pictures can be sold on the Internet and still make a good profit. Or make them to order as a freelancer.
How can you create an animation? There is a program called Photoshop. It can be downloaded and installed on your computer completely free of charge. On the official website of Photoshop, you will find the latest version of this program.
So, now that you have installed the program, let's start creating an animated picture. Typically, animated pictures are saved in the Gif format; they acquire a lively appearance while viewing.
So, for a picture to become animated, you don’t have to draw it yourself. To do this, you need to go to Yandex pictures, find the picture you like there and download it. Then, open the downloaded image in Photoshop. Click on the downloaded image with the left mouse button, and right-click on the menu to select open with Photoshop. (Picture 1).
Next, click file – save, and select the file type – Gif. (Figure 2).
In this case, you will create an animated picture. So, here we are, learning how to make an animated picture in Photoshop. For a beginner, this option for creating an animated picture is simple. But that’s not all, next we’ll make another picture in the Crello service.
How to make a GIF on your phone
Two applications for creating GIFs on iOS and Android - in case you want to instantly turn the photos and videos you take into GIFs.
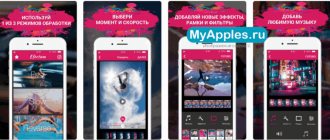
GIF Maker
This application will help you make a GIF on Android. In it you can make a GIF from a picture, from a video, shoot and turn a video from the screen or from your phone camera into a GIF:
How to Make a GIF in GIF Maker App
The application has an interesting pricing policy: almost all functions are available in the free version. The catch is that you can't undo steps while editing - there's no Undo/redo function, and there are quite a lot of ads shown while working. For 219 rubles you can buy a premium version, where all restrictions are removed.
Giphy
A free application of the service of the same name, which I described above. Available for both Android and iPhone. You can make a GIF from files from your phone or take photos and videos directly in the application for processing.
To create your own GIF, click on the plus sign - it’s in the center of the bottom panel in the application. The camera will open. If you want to take a photo, click on the circle, if you want a video, press and hold the circle as long as necessary. If you will be using materials from your phone, click on the gallery icon to the right of the circle.
Processing is approximately the same as in the Giphy online service: text, filters, stickers. You can download the finished result as a video or GIF, and also upload it to the Giphy database.
How to make a GIF in the Giphy app
Crello service, editor and design
Crello service is a free online editor for creating animated pictures and presentations. It is intended for users who create animated images and make money from it. What can the Crello service do? Using it, you can create an animated picture and video presentation from animated pictures.
This resource differs from Photoshop in that it is simple to use. It doesn't require time to study. There you can create animated pictures in a few minutes. To proceed to the process of creating such images, first register on this service. Otherwise, it will be impossible to save the image to your computer.
When you enter your data immediately after clicking the register button, you will be taken to your personal account for this service. Website in English. Therefore, to change it to your native language, click on the language control panel icon at the top and install yours. After this, you can proceed to the process of creating a picture. On the main page you can click on any template. (Figure 3).
The service allows us to choose many animated images that we can change. In the control panel at the very bottom of the picture there is a play button. Turn on to create a live image.
Now that our animated picture is ready, you can download and watch it. How it will look while watching. The image downloads from 1 to 5 minutes. Since the design is being prepared. It turns out that an animated picture can not only be saved in Gif format, but also through a regular player. This is what happened. (Figure 4).
Thanks to the creation of animated pictures on this service, you can make high-quality presentations and short videos for congratulations.
How to insert a GIF into an email
GIFs in letters are an opportunity to show animation where all other methods are not supported. For example, it is not always possible to insert a video into an email. Animation is mainly used for:
- Bright letter design, attracting attention.
- Product display. For example, several pairs of shoes replace each other in one gif, or one thing is shown from different angles.
- Demonstrations of capabilities - show how the product works directly in the letter.
Step 1. Create a GIF
First, make a GIF. When creating, focus on two important parameters.
- Size. If the gif is planned to span the entire width of the letter, make it at least 600 pixels wide - this is the standard size for displaying a letter in email programs on the desktop. If you do it at half the width, then 300 pixels and so on.
- Weight - ideally up to 1 MB . Most users view email from a mobile phone, so loading speed is important. A heavy GIF will take a long time to load, and users with slow Internet may scroll through it without even seeing it.
You can compress a GIF in these services:
- Ezgif
- IloveIMG
- Compressor.io
Note! If you just need to convert a video to GIF format without processing, use the Online Convert service.
Step 2. Insert a gif into the letter
In the SendPulse editor, a GIF is inserted into an email using the “Image” block. Open the block letter editor, insert the “Image” block into the desired place in the letter and add your GIF to it:
Adding a GIF to a letter in the SendPulse block editor
Be sure to include alt text in case the gif doesn’t load. You can also add a link to it:
Add alt text to the GIF and, if necessary, a link
Creating animation
Now that we have figured out which tool we will use to create animation and where to find it, let’s move on directly to our main task.
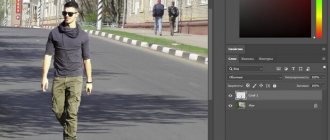
We will take our website logo as the source image.
- We place the frame and the inscription itself on different layers. The background on both layers should be transparent.
- Go to the timeline, where we click the “Create timeline for video” button.
- As a result, we will get the following result. The upper limit of the scale can be moved up using the left mouse button held down to accommodate all the information. As we can see, both layers, with the exception of the background one, appear here as separate tracks.
- There can be many animation options. We will try to make it according to the following scenario: first the frame appears, then the inscription - from left to right.
- Let's start with the frame. Click on the small arrow next to the upper right corner of the layer thumbnail.
- The properties of the selected layer are displayed on the left side of the scale. Here we click on the stopwatch icon next to the Opaque option.
- After this, a key frame, or, in other words, a key in the form of a yellow diamond, will be displayed on the scale.
- Now we need to set up the layer state for this key. According to our task, the frame should appear smoothly, therefore, at the beginning it should not be visible. Therefore, in the layer editor, set the layer opacity to 0%.
- Move the scale slider a little forward and create a key again. Now we click not on the stopwatch icon, but on the small yellow diamond next to it.
- For this key, in the layers palette, set the opacity to 100%.
- We have the opportunity to test the effect by moving the slider or using the playback control buttons at the top left of the scale.
- If, after viewing the effect, you want to speed up its appearance or, conversely, stretch it out longer, you can move the final key in the desired direction.
- So, the frame has appeared and you can move on to the text.
- Move the slider on the scale a little to the right of the last key, when the frame is already fully visible.
- In the layers palette, create a new one and fill it with white.
- After this, you need to slightly change the arrangement of the layers. At the very top there should be a layer with a frame, then with a white fill, and then with text.
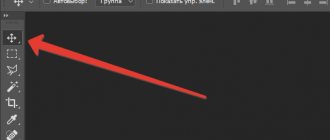
- On the canvas, align the left border of the white background with the beginning of the text.
To do this, we need the “Move” tool, which you can select from the sidebar.
- On the timeline, the beginning of all layers must be aligned.
- Move the slider forward and set it slightly to the right of the end key of the layer with the frame. Open the properties of the layer with a white background. Click on the stopwatch icon next to the “Position” parameter. This will set the key for the starting position.
- Move the slider forward and create another position key.
- Taking the “Move” tool, on the canvas we move the layer with the white background to the right so that all the text becomes visible.
- Using the method of shifting the slider (or playback control buttons), we check whether the created animation works correctly.
If required, you can make final adjustments to the tracks - shift the keys to, for example, edit the speed of appearance of letters, etc.
- Now you need to trim off the excess part of the animation. To do this, hold down the left mouse button and drag the right end of any track to the left to the duration that we need.
- We perform similar actions in relation to other tracks.
- Go to the “File” menu, select “Save for Web” to save the animation.
- The format we need is GIF. For the repeat option, select “Constantly” and click the “Save” button.
- Select the folder to save, specify the file name and click “Save” again.
Animation in GIF format works in web browsers and programs specially designed for this. Using standard applications for viewing photos and images, you will not be able to play the animation.
- And we got this result.
Things to remember
You can create GIFs using online services, desktop programs and mobile applications. I recommend:
- for online - Makeagif, Giphy, Gifpal, Gif.com;
- for desktop - Photoshop, Photoscape X;
- for mobile - GIF Maker, Giphy.
If you are creating a gif for writing, pay attention to its size and weight. When choosing a size, assume that the width of the letter on the desktop is 600 pixels. When choosing a weight, think about the fact that your letter will be viewed via the mobile Internet - try to make GIFs no heavier than 1 MB. If you get more, then use these services for compression:
- Ezgif
- IloveIMG
- Compressor.io
Now you know how to make GIFs.
Experiment, use GIF animation in different channels and don't forget to track conversions! Register with SendPulse to quickly add GIFs to your email templates and view your email results in a simple and understandable way. [Total: 3 Average: 5/5]
How to create a GIF on your phone or tablet
Giphy has an easy-to-use mobile app for creating GIFs on your phone or tablet. Download the free app from the iOS App Store or Google Play Store, the Giphy app allows you to capture video or upload clips from your camera to turn into GIF animations.
Here's how to make a GIF on your mobile device:
- Download GIPHY (iOS, Android) on your phone or tablet and open the app.
- Click "Create +" in the upper right corner of the screen.
- Use the camera button to record a video, or select the library icon next to it to open footage from your device's camera.
- Select Share GIF to download the GIF to your device or share it on social networks.