In this article we will tell and show: how to set up a scanner on a computer if the printer is already working and was connected earlier, how to install and add a separate scanning device (not an MFP) in Windows 7, 8, 10. We will also give some recommendations on how to correctly enable different Canon, HP, Samsung models and working with various types of documents. Based on the settings, popular problems will be considered: finding the default disk space for saving scans, displaying a shortcut to the scanning program on the desktop.
What operating system are you using?
- Windows 10 61%, 468 votes
468 votes 61%468 votes - 61% of all votes
- Windows 7 29%, 220 votes
220 votes 29%
220 votes - 29% of all votes
- Windows 8.1 7%, 50 votes
50 votes 7%
50 votes - 7% of all votes
- Windows XP*4%, 27 votes
27 votes 4%
27 votes - 4% of all votes
Total votes: 765
25.02.2020
* - added by visitor
×
You or from your IP have already voted.
Connecting devices
When purchasing a stand-alone scanner or multifunctional device, the kit almost always includes a USB cable for connecting the equipment to a computer. A network cable is required to be connected to a 220V network.
Before connecting the scanner to the computer, it is recommended to inspect all the wires and the device body itself for damage. There should be no chips or broken pieces from the body. The wires must be intact, which is especially important for a network cable.
To ensure a secure connection and minimize problems, you need to follow a simple algorithm when connecting:
- Turn on your computer and wait for Windows to fully load.
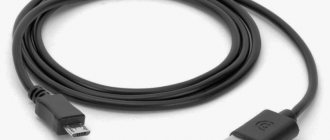
- Connect the computer to the MFP or scanner using a USB cable. The kit usually comes with a USB-USB-B cable. You insert regular USB into your computer, and USB-B into a peripheral device. For a desktop computer with a system unit, it is strongly recommended to connect to the connectors on the rear panel.
- Connect the device to the outlet. Press the power button, which is located on the top or back of the device. The location depends on the model of equipment.
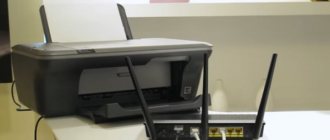
Connecting the scanner to the computer
First of all, even before connecting, you should allocate the device its place in the workspace. Consider its dimensions, the length of the cable included in the kit, and how comfortable it is for you to scan. After the equipment is installed in its place, you can proceed to the beginning of connection and configuration. Conventionally, this process is divided into two steps. Let's look at each one in turn.
Step 1: Preparation and Connection
Pay attention to the scanner package. Read the instructions for use, find all the necessary cables, make sure that they are not externally damaged. In addition, the device itself should be checked for cracks and chips - this may indicate that physical damage has been caused. If everything is fine, proceed to the connection itself:
- Turn on your computer or laptop and wait until the operating system is fully loaded.
- Install the scanner's power cord into the appropriate socket, then plug into the outlet and start up the equipment.
- Nowadays, the vast majority of printers, MFPs or scanners are connected to a computer via USB-USB-B. Insert the USB-B cable into the connector on the scanner. Finding it won't be a problem.
Connect the other side with USB to your laptop.
There are no differences when using a PC. The only recommendation would be to connect the cable through a port on the motherboard.
This completes the first part of the whole process, but the scanner is not yet ready to perform its functions. Without drivers, such equipment cannot work. Let's move on to the second step.
Step 2: Installing Drivers
Usually the scanner comes with a special disk with all the necessary drivers and software. When checking the package contents, find it and do not throw it away if your computer or laptop has a disk drive, since this method will be the easiest to install the appropriate files. However, not all companies now use CDs, and modern computers are less likely to have a built-in drive. In this case, we recommend that you review our article on installing printer drivers. The principle is no different, so you just need to choose the appropriate method and follow the instructions given.
How to install a scanner
To install on Windows 7-10, in some cases you will not need to do anything. After turning on the scanner, the system will recognize the equipment model, find drivers and install software, after which scanning will become available. Similarly with stand-alone printers of new models and 3-in-1 devices (MFP, printer, scanner and copier).
You can make sure that the scanner is ready for use by trying to do a test scan of one sheet. Also, the equipment will definitely be added in the “Devices and Printers” section, which can be accessed in several ways - through the control panel in the “Hardware and Sound” section or through the “control printers” command. The latter must be entered into the “Run” window, which is launched by the key combination “Windows + R”.
Find the device icon. It should not be a light shade and contain no exclamation marks next to it. To ensure that the device is the main one, especially if other scanning devices are connected, it is recommended that the scanner be set as default.
Installation from disk
Automatic installation does not always occur. The manufacturer almost always includes a CD with software along with the equipment. Insert the disc into your computer's drive, open the contents of the media, and run the installation file. Follow the installation wizard and finish copying the files. Then restart your computer and check the operation of the equipment as described in the previous paragraph.
There are no problems with this method of installing scanning equipment, but there may be two situations:
- there was no disk in the box with the device or it was lost;
- The laptop does not have a disk drive.
Then you will have to install without a disk.
If there is no disk
Go to the official website of the company that manufactured your device.
Write the brand name into Google or Yandex search and in most cases the official resource will be on the first line of the search results.
Find the driver section on the website, which may have different names, for example:
- support;
- BY;
- drivers;
- download and more.
Specify the equipment model and available drivers will be offered for download. Depending on the technology, one or more drivers may be offered. So, if you have a scanner as an independent device, then most likely there will be only one file with the driver. If you own a whole MFP, then the manufacturer can offer several driver packages for each unit - copier, printer and scanner. In addition, manufacturers always have proprietary software for settings and more flexible control of equipment. It is also recommended to install it.
Download the driver to your computer, run it and follow the standard installation procedure step by step. Restart Windows and try to scan the document.
Let's look at an example of software search using the HP brand as an example.
- Go to the official source https://www8.hp.com/ua/ru/home.html.
- From the Support menu, go to Programs and Drivers.
- Determine the product for which you need a driver.
- In the search bar, start writing the name of the model. The system should offer the exact name, which is what you need to choose.
- On the next page, your computer's OS will be automatically detected and a list of available drivers for it will be offered. Click on the “Download” link, select a location to save the file, and install after downloading.
- If the system is identified incorrectly, then click on the “Select another OS” link at the top and make the correct choice. For example, we additionally looked at the list of drivers for Windows 10 x64. As you can see, the site offers as many as three packages. It is recommended to install the largest package, which includes not only the driver, but also full-featured software.
Standard device adding tool
- In the "Devices and Printers" window, click on "Add".
- Wait for the system to load the list of devices available for connection.
- Select a scanner.
- Decide on the type of connection.
- In order for Windows to find suitable drivers in its own database, specify the exact model.
- Finish the installation.
If the printer is already connected
When a printer has a scanning function, it means that it is a multifunctional machine that can print, copy, and make scanned copies.
Externally, the MFP is one device, but inside it is a combination of three devices.
In most cases, the manufacturer provides a general driver on the disk, which, when installed, allows all components of the MFP to work at once. It is recommended to download the same driver from the company’s website.
But it happens that you need to install several packages, each of which is responsible for a separate device. Therefore, if the printer works but the scanner does not, then carefully look at the contents of the disk. It is likely that there is also a driver inside that will need to be installed for the scanner to work.
As a last resort, download the necessary “firewood” from the office. website and install immediately. Restart your computer system. Then check the scanning function.
Driver file names for scanners usually contain the words “scan” or “scanner”. From them you will understand which driver needs to be loaded.
Installation on Windows 8
On versions 8 and 8.1 there is a problem with automatically adding a scanner due to the need for a digital signature on the driver. The installation cannot complete and at the end is accompanied by a notification on the monitor “The scanner cannot be connected.”
Let's perform a number of actions with Windows, you can solve the current problem.
- Hover your mouse over the right edge of the screen and go to the Options menu.
- Next, go to “Change computer settings.”
- Then go to “System Update” and “Update”.
- Restart your PC. Immediately after disconnecting, hold down the Shift key and do not release.
- A menu will open. Where you need to select “Diagnostics”, and then “Boot options”.
- From the list of items, enable “Enable mandatory driver signature verification.”
- Reboot the OS again.
- The boot options window should appear, where by pressing the “7” key, activate a similar item.
- Try installing the software again. After successful installation, use any program and print or scan something.
How to scan to computer in windows 10
"Ten" is the newest version of Windows OS. Therefore, there are cases of problematic operation of devices. In particular, problems arise with drivers.
For example, Canon brand devices recommend installing older versions of drivers, which causes a conflict between the software and Windows. Such cases rarely occur, but it is necessary to understand the possibility of such a situation and to be armed.
The situation is similar with outdated technology. Sooner or later, printer models that are too old will no longer be supported. Drivers are not updated to modern Windows requirements. In this case, scanning will not work at all. The only option is to connect the device to a computer on which the system with drivers is installed.
There may be problems with scanning over a local network. When several PCs are connected to each other on the same network and the scanner is used as a common device for all computers, then secondary computers may not recognize the device. In this case, you need to temporarily connect the scanner to the host computer and scan.
In most cases, one common driver is used to install an MFP. When unpacking the program, all driver packages necessary for the operation of all equipment components (scanner, copier, printer) are installed. But sometimes, for each mechanism to work, you need to install separate drivers. Therefore, if there is more than one installation file on a disk or several disks are provided, it is recommended to install the entire software package. There are times when a person installs firewood, the printer works, but the scanner and copy function are unavailable. Know that this may be the problem.
Scanner Installation
- First, connect the cord between the scanner and the PC.
- Plug the power cord into the machine first and then into a power outlet.
- With the computer turned on, press the “On” button on the scanner body.
- Wait until the scanner is recognized and installed automatically. If everything went well, the equipment will appear in the “Devices and Printers” window (“Win + R” and the “control printers” combination). You can start scanning.
- Otherwise, you will need to use the driver disk that comes with the scanner. If there is no disk, then the software is downloaded from the manufacturer’s official website. Go to the office. website, find the section responsible for software. Specify the model of your scanner, download the software and install it on your computer by running the downloaded file.
- We reboot Windows.
Quick Scan
The first and easiest method to scan a document is to use the wizard through the scanner's context menu. The method has already been described above in the article, so to avoid repetition, we will provide a link to the instructions - go to the description.
Scanner application
The application is free, but initially after installing Win 10 the program may not exist. Then you need to download and install the software from the official Windows store.
- A store opens in Pusk.
- Next, enter “Scanner” into the store search and select the application from the available list.
- Click on “Get”, then the installation should begin. In this case, additionally click on the “Install” button.
- The offer to open the scanner will be available in the notification immediately after installation.
You can also open the application through “Start” in “Recently added” or find it through search.
The Scanner will open in a new window. To scan the media, you need to do the same steps as in the previously proposed options. Select the desired scanner, set the required settings, and, if necessary, preview the scan made in the future. Resolution, file extension, color type are selected after clicking on the “More” link. There you can also choose where the copy will be saved – the “Destination folder” item. By default, saving is performed in the “Images-Scans” folder; you can easily get to the directory through Explorer in the window with all disks.
Then click on “Scan” and receive a digital document.
Problem solving
- If the device has just been purchased, then problems are unlikely. But there are times when even from the store immediately after purchase or after a short time of use, equipment at home can already malfunction. In this case, you must return the purchase under warranty to the service center, and if a malfunction occurs repeatedly, request a replacement or refund.
- Driver problems are the main ones. They begin with the banal absence of a disk and the need to search, followed by downloading and installation. They simply end with the impossibility of installation for various reasons - incompatibility with the operating system or conflicts with standard software in Windows 7-10. For example, proprietary software creates a conflict with the standard Fax and Scan application. Disabling the last component will help correct the situation. Go through the control panel to the “Programs” subsection, then “Programs and Features”. On the left side of the window, click the “Turn Windows features on or off” link. Expand the tree to the desired path, as shown in the image below, and uncheck the component. Then restart Windows and try using the functions of the MFP or specialized scanner.
- There are often cases where there are no signs of life in equipment due to incorrect or poor connections. Check all cords and cables for severe kinks or kinks. If possible, use new connecting cords. Pair with the computer only through the connector on the motherboard, which is located on the rear panel of the system unit. The front connectors are often simply not connected to the motherboard.
- If the device was previously working smoothly, all tasks were performed without problems, and suddenly some function stopped working, then be sure to pay attention to the display and error codes. The indication is located on the control panel on the device body, and errors can be written both on the monitor during the launch of a particular operation, and on the built-in display of the equipment, if one is provided.
Network connection
If you need to install a network scanner on Windows 7 , follow these steps:
- Connect the USB cable to a network computer or modem.
- Click “Start”, activate “Control Panel”, then “Devices and Printers”, select our network MFP.
- By right-clicking on the MFP icon, enable the “Install” function, then “Add a network, wireless or Bluetooth printer.” Now the scanning function will be available to other computers connected to the network.
You can install the scanner on Windows 7 manually in this way:
- On the appropriate page, enter the name of our scanning equipment or select the default option. The specified name will be displayed on the “Devices and Printers” page. Click the “Next” button;
- settings for sharing are performed automatically. You can cancel the feature by selecting the “No sharing of this device” option;
- installation is completed, now everything is ready to go.
You can also connect the MFP to your computer using various third-party programs, first downloading them and then installing them on your PC.
We recommend that you read:
Open Control Panel. (Click here to learn how to open Control Panel.) If your Brother machine's shortcut is not listed in the Scanners and Cameras window, you will need to install the scanner driver. Go to the Files section of this website on the page of your device model and download the Full Driver and Software Package or the Scanner Driver. Installation instructions are available on the download page.
source
Scanner settings on your computer
All settings for scanning equipment come down to connecting and setting scanning parameters. All parameters are set in the dialog box that appears immediately after calling the scan command.
Right-click on the icon of the desired model and select “Start Scanning”.
The next window will contain a number of parameters that affect the final scan image and its quality.
Let's figure it out point by point.
- Profile. To avoid setting up scanning again each time, you can create a profile in which the settings you need will be saved. Thus, when starting the next scan, a profile is simply selected and all settings are entered automatically.
- Innings. There are different types of scanners - flatbed, broaching with double-sided feed, and so on. Depending on the type of scan you need, select a feed option. In 90% of cases, tablet devices are used at home and in small offices, so there is no need to change anything.
- Paper size. If the device has advanced sheet format options, then it will be possible to set the type of media being scanned.
- Color format. You need to get a color scan - set the appropriate settings. You need to scan your passport - you can choose “Shades of Gray” or “Black and White”. A color picture will take up more disk space.
- File type. Sets the format (extension) of the finished scan. JPG – regular picture file; PNG – the empty area on the scan will be transparent, not white; BMP – image of the highest quality, can occupy tens of MB; PDF – is usually used to create scans that will be sent by mail or transmitted over a local network, but the format is also actively used to combine several scans into one.
- Resolution (DPI). Directly affects the quality of the picture. Measured in dots per inch - the more, the better. High resolution allows you to enlarge the scan many times on a PC, which is especially useful for documents with small inscriptions, electrical diagrams and others. The maximum value of the parameter depends on the device, and can reach 4000 dpi or more.
- Brightness and contrast. The settings do not require explanation. If the document is dark, you can increase the brightness.
- View. To see what a digital copy of a document will look like, there is always a preview function. Allows you to control the quality and, importantly, the correct location of the document on the scanner glass.
- Scan. When you press the button, the conversion of information from physical media into electronic form will begin.
At the very top of the window you can change the scanner that will start working. So that the system itself selects the desired device, you can make it the main one immediately after installation, setting it as default.
Create a shortcut on the desktop
It can be inconvenient to go through certain menu options each time to scan physical media, especially when scanning needs to be done frequently. Therefore, a reasonable solution would be to display a shortcut to launch the scanning program through which the work is launched.
If you are installing official software from the manufacturer, and more specifically, the maximum package with a full-featured program, then the default shortcut should appear on the desktop.
But when the shortcut does not appear or proprietary software is not used, then you can display the icon on the workspace yourself. Open “Start” and start typing the name of the desired program in the search bar. From the proposed options, right-click on the one you want and select “Create shortcut”. Or simply hold down the left mouse button and drag the shortcut to the slave. table.
On Windows 10, the above method will not work. There are fewer options for interacting with the desktop, but you can pin the program to the Start screen (located inside the Start menu) or to the taskbar.
Establishing a cable connection with a PC
I am considering the standard option: connecting via USB. A USB AM to BM cable is required. Found in the box with the scanner. If it's lost or missing, you'll have to buy it.
The USB plug (BM) is inserted into the connector of a laptop or desktop PC. USB (AM) - into the connector of the scanning peripheral device.
Once the cable connection between the computer and the scanner is established, plug the peripheral device's power cord into an electrical outlet. Turn on the scanner (use the power button, switch to the “On” state).
It must be added to the list of connected devices. Often the tenth version of the OS will perform the task automatically. In the case where automatic detection did not occur, it is entered manually by the user.
Access Settings
You need to go to the OS settings software tool (“Options”).
Key combination
On the hardware keyboard, press Win (with the OS logo) and I at the same time.
Start button
Right-click on the on-screen button of the main menu “tens”. Required line: Parameters (click on it).
Search by OS
The search bar is located on the Taskbar. Option: the input field is not visible - click on the icon stylized as a magnifying glass to the right of “Start”.
Enter: parameters
On This Computer
In the utility text menu: “Computer” item. Open the settings - there is a corresponding sub-item.
Where are scans saved?
If during the settings the user did not change the file saving path, then the scan ends up in the standard directories. Depending on the scanning method, the scan may be saved in the “Documents” folder, then “Scanned Documents”.
Or a new folder is created in the directory with images, which is named as the current date (year and month) and the created scans are placed there.
In the latter case, an example is shown using the standard scanner wizard through the device’s context menu (see below).
The last step suggests importing (saving) the document, where you can configure the saving parameters - set the path where the file will go, set the name of the folder to save and whether it needs to be created at all (select the “No” option in the drop-down list).
Video material
Buying the right device is half the battle; you also need to properly configure it so that its operating mode meets your expectations. But, as a rule, modern models are not very difficult to set up and connect, so you can probably cope with this task yourself, taking into account the recommendations from this article and from the instructions from the manufacturer of your equipment.
How to use the scanner
Depending on the task at hand, you can scan in different programs. These can be either built-in programs in Windows OS or completely new software that needs to be installed. Moreover, the set of programs for scanning in Windows differs depending on the version of the system. In Windows 7, there is only the Fax and Scan service, and in Windows 10, the developers added a modern Scanner application.
Programs can be from the official manufacturer of the equipment or developed by third-party developers.
It is always strongly recommended to install only the official set of programs. It contains all the standard settings for high-quality scanning. But if you need software that will allow you to perform non-standard tasks, then you will need to familiarize yourself with and choose a third-party solution.
Our website already has ready-made articles that will help you scan a document using all available methods. Use the links below.
It is also sometimes necessary to obtain a scan in other formats. For example, scan several sheets into one PDF file, or make a scan in Word.
5 / 5 ( 1 voice )
How to scan in Windows 10 and Windows 7: Detailed instructions
The problem of how to scan documents in Windows operating systems can be solved exclusively using standard tools. Those. The use of any third-party software applications in this case is not a prerequisite. To do this, these operating systems usually have a tool called “Windows Fax and Scan”. Working with it is very easy and simple, and you can see this for yourself by carefully reading the instructions below.
Scanning in Windows 7
- If you are using a scanner that is connected to a personal computer running Windows 7, then first you need to make sure that the connected equipment is in working order. To do this, you need to check for the appropriate drivers by going to the Device Manager list. Scanners, regardless of the model, are necessarily placed by the operating system in a section called “Image processing devices”.
- Next, go to the “Start” menu and in the special search bar “type in” the name of the Windows 7 OS system tool “Fax and Scan”. Click on the result that appears in the search window in order to launch this program, which is included in the standard set of the system.
- After launching the program, a new window will open in front of you, which displays all the information related to received faxes or previous digitization processes. To start a new process, you just need to click on the “New” button, which is located on the top panel.
- In the dialog box that opens, configure all the optimal parameters by setting the desired values. For example, you need to indicate what exactly you plan to scan: text, photograph, etc. Also, be sure to adjust settings such as file format, resolution, contrast, and brightness level according to your needs and needs. If you don't do this, there is a chance that the result will upset you.
- After making the settings, which you can leave as default if necessary, use the function to preview the result. If everything suits you, you can proceed to the main process by clicking the “Scan” button.
- In the end, all you have to do is wait for the scanner to complete its job. The finished digitized image will be available along the path “Document” => “Scanned Documents” or in the window of the program itself.
Scanning in Windows 10
- As for scanning in Windows 10, to do this you need to open the Start menu and use the search bar to find the corresponding program, i.e. Windows Fax and Scan.
- Next, a window with options for scanning will open in front of you. Pay attention to the toolbar, where you need to select and click on “New” (New Scan).
- A new window will display the scanning settings in front of you. Its right half is completely empty - it is intended so that you can preview the results of document digitization. To do this, click the Preview button, which is located under this empty area.
- After launching the preview function, you just have to familiarize yourself with the results and, if necessary, make the necessary changes to the scan settings. If you are satisfied with everything, then you can safely click on “Scan”. It should be added that during the scanning process, if necessary, you can cancel the process by clicking the corresponding “Cancel” button.
- After the process is completed, the program will open the finished image for you. You can also find it in the “Scanned Documents” folder by using the search in the “Start” menu for this purpose.
Scanning in Windows 10 and Windows 7 Link to the main publication
printeros.ru