Let's look at common ways to connect two laptops running different versions of Windows. By connecting one device to another, you can quickly and comfortably exchange files, eliminating the need to connect flash drives or removable hard drives. Network users can work together on projects in various software, text and graphic editors, and also play their favorite games in multiplayer mode.
- Wireless connection between two laptops via Wi-Fi in Windows XP, Vista, 7
- How to connect laptop to laptop via Wi-Fi on Windows 10 and 8?
- We use LAN ports and a network cable
- Instructions for connecting to a Bluetooth network
- How to connect devices via USB?
- Possible problems and solutions
There are two main ways to connect computer equipment - through wired and wireless communications. The first option is more reliable, the second provides greater mobility. To use one of the methods, you will need to make a few simple settings. Let's look at each method in detail.
The only method that we decided not to consider is a wired connection via an HDMI cable. These digital connectors on laptops are not intended for full data exchange, but can only transmit video and audio to external devices, for example: monitors and TVs.
An easy way to connect laptops via Wi Fi on Windows XP - 7
Before you begin the task, you should make sure that the network adapter is turned on on both laptops. The screenshots below show examples of what a switch built into the case and a hardware button on the keyboard look like. The location of the function key depends on the laptop model.
In Microsoft operating systems up to “seven”, the following method of creating a wireless network is possible:
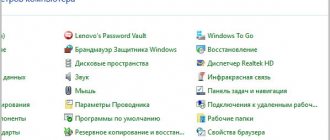
- Go to the “Control Panel”;
- In the window that opens, change the display from categories to small icons;
- Select “Network and Sharing Center”;
- Open the item “Manage wireless networks” (located on the left);
- Press the "Add" key;
- Follow the wizard to create a “Computer to Computer” connection;
- Enter the network name (SSID), then specify the encryption type and password;
- Don’t forget to check the box next to the line with saving the specified configurations, after which you just have to click “Next” and “Finish”.
Before you enable Internet sharing, you need to configure and set several permissions so that another user can open, view and copy content in folders on your PC.
- To begin, you need to go back to the “Network and Sharing Center...” and click “Change additional sharing settings”;
- We look at the window called “Network discovery”, by checking the boxes, select “Enable” opposite all the items;
- Click “Save changes”;
- Now the possibility of transferring files between equipment is open. In addition, you can use one access point to access the Internet network.
Via home router
A simple way to connect network equipment is to use a router, which is found in every home. It does not matter which connection is used - patch cord or over the air. All connected devices receive their own IP address and access to the Internet, which allows data exchange between them.
For clarity, you can watch the video:
To connect 2 laptops to each other via Wi-Fi, use the following instructions:
- With the router running and configured, activate the Wi-Fi transmission modules (install them if we are talking about a stationary PC).
- Go to “This PC”, select the “Computer” tab, click “Properties”. On both PCs, the name in the “Workgroup” field should be the same. Standard – Workgroup.
- Next, open the “Control Panel”, click “Home Group”, click “Create a Home Group” if there is not one yet. You should make sure that your Internet settings are set to Home network type. If you have a group, you can start setting it up.
- You need to highlight the items available to the second PC and change additional options related to sharing.
- In them, you need to activate network discovery and open access to printers and files. It is better to refuse password protection. On the “ten” you need to go to the “Control Center...”, go to “Change additional sharing settings” (in the menu on the left).
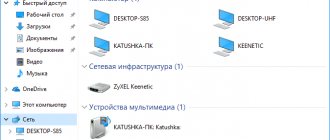
- All you have to do is go to the “Control Center...” and open “Network Map” next to the active connection. A new window will show you how to connect the router, the Internet and connected PCs. Simply click on the connected device to grant access to it.
The default settings allow access to part of the data located on drive C. You can manually fully open access:
- Right-click on the drive or directory that you want to access from another computer.
- Open the “Sharing...” menu, select “Advanced settings...” (for disk), “All” (for directory). If you open access to the disk, just select “All” and check the boxes for the proposed permissions.
The instructions allow you to connect computers via Wi-Fi. Now there will be no restrictions on the exchange of information, and PCs will equally have access to the Internet.
Using this method, difficulties may arise, including connection errors, a requirement to enter a password, and more. This is due to the peculiarities of Windows, which has vagaries in the field of security.
In such cases, you should check the following settings:
- Firewall or antivirus software settings. Both tools can block the connection, so it's a good idea to turn them off to see if they're interfering with the connection.
- Account settings. An attempt should be made to create identical records with identical codes and names. You should not set an empty access code. You can create a Guest by granting all available permissions.
- Both computers may have different date and time settings. This one is also worth considering.
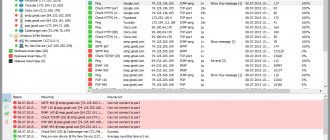
To check if the connection is working, you can use the command line:
- Open the “Network Map”, hover over the laptop to see its IP address.
- Press the Win+R combination and type cmd to launch the text interface.
- Enter ping, separated by a space and type the IP address of the device.
- If packet transmission is in full swing, there are no problems.
Thus, you can connect not only two computers via a Wi-Fi router. The only thing is that the more connected devices, the lower the data transfer speed may be.
However, to noticeably reduce the speed, you need to connect more than 20 users.
How to connect computers running Windows 8 and 10?
Unfortunately, for owners of most builds of Windows 8, 8.1 and 10, the above method is not available. Apparently, in this way, the developers from Microsoft decided to “secure” the OS. We'll tell you how to connect computers in this case:
- Open the Start menu and enter CMD into the search bar;
- Right-click on the classic utility and click “Run as administrator”;
- At the command line, type netsh wlan show drivers (you can copy the command from here) and press Enter;
- A notification about wireless display support will appear at the bottom. If this message is not present, you will have to download or update a special driver for the Wi-Fi device. Most laptops are equipped with the necessary drivers for the WiFi module and there should be no problems;
- Next, enter the command netsh wlan set hostednetwork mode=allow ssid=network name key=security code (you can come up with any name for the network connection, the security key must consist of at least eight characters);
- Now write the command netsh wlan start hostednetwork and complete the action by clicking Enter.
What needs to be done to ensure proper operation of all connected computers and laptops?
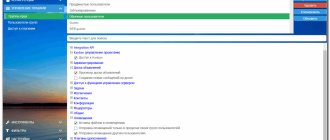
- Go to the “Network and Sharing Center” (right-click on the web connection icon in the tray or enter through the control panel);
- Click the “Change adapter settings” tab;
- We look for the network we need, right-click on it and select “Properties”;
- Next you need to select “Internet Protocol version 4 (TCP IPv4)”;
- Set to automatically obtain an IP address and DNS server and save the configurations;
- The lower corner of the taskbar will display different wireless connection options;
- Select the desired network name, confirm the auto-connect function and enter the password.
It is noteworthy that this method turns the main laptop into a Wi-Fi router, which means the Internet can be distributed to other laptops, tablets, smartphones and other mobile devices. Of course, with your permission!
Connect directly via Wi-Fi
Now I’ll briefly tell you the principle of operation. Since we will be connecting without a router, we need to distribute Wi-Fi from one laptop. The second one will connect to it. It's simple, now let's set it up.
NOTE! If any of the first methods fail, this means that your operating system is not updated. You can simply use the command line - I wrote how to do this below. If this does not help, it means that the drivers for the Wi-Fi adapter on your laptop are not updated. On updating the “firewood”, I wrote a separate article here.
Windows 10
- Start Menu;
- Gear icon or “Options”;
- Find the network and internet section;
- In the left menu, select “Mobile hotspot”. Now we simply move the slider to “On” mode. To change the network name and password, click on the “Change” button just below;
- We change the values;
- If the Internet is connected to this laptop, then you can also distribute it along with the WiFi network. To do this, in the highlighted block as in the picture above, you need to select this connection.
Windows 7
- Click on the connection in the lower right corner and select the first item;
- “Wireless Network Management”;
- Add a new connection;
- We create a “Computer-to-computer” network;
- Here you can read what kind of connection we are creating. Just click “Next”;
- We come up with a name for the grid and a password for it. Be sure to select the checkbox at the bottom and click “Next”;
- If you also want to distribute the Internet from the first laptop, then be sure to click on the button.
Command line
If the previous options did not work, then you should use this one.
- In Start, in the search bar, enter the name “Command Prompt” or “CMD”. Right-click to open as administrator;
- We write:
hostednetwork mode=allow netsh wlan set netsh wlan set hostednetwork mode=allow ssid=”TEST_WIFI” key=”pass1234567890” keyUsage=persistent
- Instead of “TEST_WIFI” – enter any name of the network. This is where we will connect. And instead of “pass1234567890” – enter the key.
After this, the network will already begin to exist. Also, in the future, to quickly launch it, you will need to write the command: netsh wlan start hostednetwork. To stop local network distribution, you need to write: netsh wlan stop hostednetwork. Also, there will be no Internet on the network, if you need it, you can read the instructions in more detail here.
How to connect using a LAN cable?
As in the case of desktop computers, we will need a special LAN cable (twisted pair with identical plugs).
You can buy one at any computer store. Connect these crossovers to the network card connectors of your laptops and follow the following recommendations:
- Press the key combination Win + R and enter ncpa.cpl;
- Find your local network connection, right-click on it and select “Properties”;
- Go to the “IP version 4 (TCP/IPv4)” tab;
- For the first laptop, you must manually register the IP address 192.168.1.1 and the subnet mask 255.255.255.0 (we do not touch the main gateway);
- For the second computer, go to a similar section and set IP 192.168.1.2 , the mask remains unchanged;
- When you confirm the action, both PCs will be connected, now you can get to work.
All computers will be available in the network environment using their IP address.
Method 1. Connecting laptops via WiFi.
For the last 10 years, all laptops, netbooks and ultrabooks have an integrated WiFi module, so this method will not require any financial costs at all. Moreover, you can combine 3 or more laptops, computers, tablets or smartphones into one network. But the most interesting thing is that you don’t even have to install any additional programs - everything you need is already in Windows 7, Windows 8 and Windows 10.
You need to start by setting both laptops to automatically obtain an IP address. To do this, go to “Control Panel” => “Network and Sharing Center” => “Change adapter settings” (or press the Win+R key combination and type the command ncpa.cpl ).
Once in the laptop’s network connections, you need to find the “Wireless Network” icon and right-click on it. In the context menu that opens, select “Properties”. The Wireless network properties window will open. Double-click with the left mouse button on the item “Internet Protocol Version 4 (TCP/IPv4)”:
Check the boxes “Obtain an IP address automatically” and “Obtain a DNS server address automatically.” Now you need to create a wireless network on one of these computers. To do this, you need to open a command prompt with administrator rights. In Windows 7, to do this, type the phrase “Command Prompt” in the Start menu and right-click on the icon that appears and select the “Run as Administrator” menu item. In Windows 8 and Windows 8.1, this is done easier - press the Win+X key combination and in the quick launch menu that opens, select Command Prompt (Administrator):
Now in the Windows command line we type the following commands: 1. Create a wireless network nastroisam.ru with the password 87654321 with the command: netsh wlan set hostednetwork mode=allow ssid=nastroisam.ru key=87654321 Network name SSID and password - you can use your own, whichever you want . 2. Start a wireless WiFi network with the command: netsh wlan start hostednetwork
After the wireless network is created and launched, on another computer or laptop you need to go to “Wireless Networks” (simply by clicking on the network icon in the lower right corner of the taskbar), where you should see the created wireless network, left-click on it and click the “Connect” button.
Windows will ask you to enter your network security key:
Next, when asked to search for devices on the network, click “Yes”.
The laptop on which the WiFi network is created will have an IP address of 192.168.173.1. The IP addresses of other computers connecting to this laptop via Wi-Fi will be from the same subnet. You can view the address in Network connection information:
Separately, I note that this connection option turns a laptop into a WiFi router, to which you can connect 3 or more computers or laptops, tablets, smartphones, TVs, and even distribute the Internet.
Connecting both devices via Bluetooth
If two laptops have built-in Bluetooth remote communication modules, do the following:
- Find the Bluetooth icon in the system tray and right-click to open the context menu;
- Select the item “Show Bluetooth devices”;
- Don't forget to run the Bluetooth module on the second laptop;
- When the search procedure is completed, you will see a list of available gadgets, select the one you need and click “Link”;
- The dialog box that appears will display a password protection code; you must enter it on another laptop to synchronize data.
If you do not have integrated Bluetooth, you can buy an external one; it looks like a standard USB flash drive and is configured in the same way as the instructions above.
How to connect a laptop to a laptop using a USB cable?
For this type of connection, you need a special USB cable with a Windows Easy Transfer adapter (shown in the screenshot).
The cable comes with software, after installing it on both laptops, you can connect the equipment and begin settings, following the instructions of the step-by-step wizard.
Basic errors when connecting two computers and methods for eliminating them
If you were able to establish a connection, but you are unable to open a shared folder from one of the devices , we recommend that you make sure that the access settings are correct:
- Open Explorer and right-click on the required folder;
- Select “Properties”, go to the “Access” tab and click “Advanced settings”;
- Activate the checkbox next to the corresponding item and save the changes.
If problems with the network are detected, it would be a good idea to check that the drivers are up to date:
- Open "Device Manager";
- Expand the “Network Adapters” tab;
- Controllers that are not working correctly will be highlighted in yellow; you can update the drivers for them and get rid of the failures.
You shouldn’t rule out blocking access due to disabling some guest policy items:
- Hold down the Win+R keys and type secpol.msc;
- Find the “Local Policies” section and enter the “Security Settings” subsection;
- Next, you can enable settings related to guest mode.
When connected via a LAN cable, check that the correct cable is being used and that it is connected to the correct connectors.
Connecting a computer to a computer via a router
This article will describe the processes of creating a local network in different versions of Windows, as well as some of the nuances associated with obtaining full sharing of folders and media files on PCs located in the same network group. The methods for combining several computers with different OSes are slightly different, so they will be described separately.
Option 1: Create an over-the-air pairing in Windows 7
The instructions below do not require the use of any third-party programs or special user experience. All you need to do is create a new local group and configure remote access to it.
First you need to create a network by following these steps:
- In the desktop tray there is an icon displaying available Internet points. By right-clicking on this icon, use the lowest section “Network and Sharing Center”.
- A window will open where you should look at the “Change network parameters” block. Next, you need to click “Set up a new connection or network.”
- You will have the opportunity to choose the most suitable function. Of all the options, you will need the bottom one - “Setting up a wireless computer-to-computer network.” Select the line and click on the “Next” button.
- In the next window you can read information about this connection. After reading or skipping (if you are not interested), click “Next”.
- This time a window will open in which you will have to independently come up with and enter a name for the new network, as well as a password (access key) for it. In the “Security Type” line, you will need to select “WPA2-Personal” (most likely, this item will already be selected there). For the next action, you need to check the “Save this network settings” box and click on the “Next” button.
- As soon as the following window appears, you will be able to observe the process of creating the network. After a few seconds, a notification will pop up indicating that network optimization has completed successfully. The same window will say that you now need to connect your computer to your computer using Wi-Fi. In principle, the necessary network is ready (it will only need to be modified a little). You can safely click the “Finish” button and move on to the next manipulations.
After completing the steps described above, you will need to change the access settings for the connected device. Open the familiar “Network and Sharing Center” window, in which select the “Change advanced sharing settings” line.
At the last stage, you will see a final window, after some manipulations in which you will complete setting up a new access point. To do this, all that remains is to rearrange two points. Place one opposite “Enable network discovery”, the second opposite the line “Enable file and printer sharing”. At this point, the creation of the connection is completed and you can synchronize the second computer.
Note! If the second computer does not see the created network, the reason may be hidden in different workgroup names. Go to computer properties and, if necessary, rename the required value to the same names for both devices.
Go to computer properties and go to the “Advanced system settings” tab.
Select the Computer Name section and click Change.
At the bottom of the window that opens, you can rename the workgroup.
Option 2: Merging two computers in Windows 8/8.1/10
Unlike the seven, in the 10th version there is no function “Setting up a wireless computer-to-computer network.” To organize such a connection, you need to perform the following steps:
- Right-click on “Start” and select “Command Prompt (Administrator)” or “PowerShell (Administrator)” from the list that opens, depending on your Windows settings.
- In the window that opens, you will need to enter the netsh wlan show drivers command. Find the line below “Hosted network support”, the word “Yes” should be there, but if it says “No”, then you need to download and install the latest version of the driver for the Wi-Fi adapter from the official website of your computer manufacturer.
- Now you need to enter the following command netsh wlan set hostednetwork mode=allow ssid=”network name” key=”connection password”. This way you will create a local network with the previously specified name and password.
- To activate this network, you need to enter netsh wlan start hostednetwork, which will start open access to computer files.
- Now on the second computer, find a new access point and enter the password to combine the devices.
Note! The creation of an entry point is saved only for a while until the computer restarts, and the next time you turn it on you will need to create the connection again. If you often need to connect PCs to each other, then it is better to create a .bat file with the above commands saved in it.
Connection nuances
Thus, you can create a wireless network between two computers not only with the same version of Windows, but also with different ones. For example, you can connect a computer running Windows 10/8.1/8 to a computer running Windows 7 using Wi-Fi. Using a local network, it will be possible to exchange files between two computers, control the same printer from two devices simultaneously, play online games, etc.
Conclusion
In this article, you learned how to connect two computers using Wi-Fi. We figured out the purposes for which such a network is needed and learned that you can connect computers with different versions of Windows over the network. By following the instructions above, you will be sure to pair the devices you need.