RAM is one of the most important components that affects computer performance. Therefore, adding it is one of the most common “upgrades”. The first sign that there is not enough RAM is the slow operation of the personal computer. The PC stops coping with many of the tasks assigned to it by the installed software, and cannot ensure the correct and good operation of new games.
The most budget-friendly way to solve this problem is to install additional RAM. This can be done both on a desktop computer and on most laptop models. Before we jump into the proper steps, it's worth mentioning that desktop iMacs can only install RAM designed for laptops.
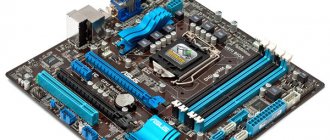
Installation process on a desktop computer
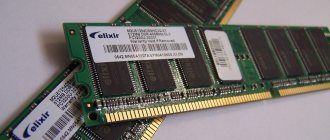
The first thing you need to do is determine what type of RAM is installed on your computer in order to install a new one or replace it entirely. This will depend on the type of motherboard. To understand this, you can open the case or look at the attached documentation. If the necessary documents are not available, you should go to the manufacturer’s website.
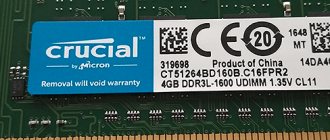
There are only three types of RAM, DRR, DDR2 and DDR3. The vast majority of modern desktop computers are equipped with the last two types of RAM. The essence of identifying RAM is its speed and throughput. It is very important to make sure that both characteristics will fully correspond to the factory parameters of the motherboard. These parameters are also called identifiers. The following examples of determining compliance can be given. An ID such as PC3 12800 means that the maximum bandwidth is equivalent to 12.8 GB. Another identifier, for example, DDR3 1800, tells us that the speed is 1800 MHz.
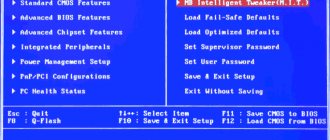
Is it possible to install memory with different frequencies and timings?
The answer to this question for DDR4 and DDR3 memory is almost always yes. The memory will work. But it will do this at frequencies and timings of a less productive memory stick. Problems with dual-channel mode usually do not arise either (provided that the memory capacity of each module is the same).
If for some reason the frequency and timings of a less powerful RAM module are not supported by a faster stick, then the BIOS will set those parameters (even lower) that will be safe and supported by both modules: there will be one, since all of them can work with basic parameters for its memory type.
Slots
The next step to installing memory is to determine the number of slots intended for RAM modules. Most motherboards have a limit on the amount of RAM. And this indicator will not depend on how many connectors it has.
You also need to decide which RAM manufacturer to choose. The fact is that there are quite a lot of companies specializing in this. It is very important to pay attention to cost and quality. The most popular brands due to their excellent reputation and reliability of products are Kingston, OCZ, Crucial, Patriot, Corsair, A-Data and some others. You can browse the forums and read user reviews or trust specialists from stores or online stores.
In any case, the best option would be to buy SDRAM RAM. If you choose RAM, you will have to purchase two or four modules. Example: to get an “extra” of 8 GB of RAM, you need to take two 4 GB modules or four 2 GB modules. It is important that they all have identical parameters that we mentioned above (we are talking about speed and throughput). If you ignore this issue, the overall performance of the computer may decrease significantly, since the system will configure itself in accordance with the minimum factory values recorded in the PC. It is very important to double-check the motherboard's capabilities.
Volume and channels
For those who are familiar with such a concept as “dual-channel RAM operating mode,” it will not be a revelation that, when choosing between
- 4 sticks of 4GB each
- 2 sticks of 8GB
- 1 stick for 16GB
preference should be given to option number 2, since the joint operation of 8+8 will provide better speed performance by using two channels to access the combined memory bank.
In general, the features of this mode are quite difficult to briefly outline, so we advise you to devote several tens of minutes to a detailed study of these basics.
In the meantime, it’s worth considering that for a full-fledged dual-channel mode you will need RAM sticks with the same frequency (which will be described below), the same capacity and the same type.
As for its application to the topic at hand. “Dual-channel” will allow you to achieve maximum performance from the selected configuration, but is not a mandatory recommendation for implementation.
The only mandatory requirement is to adhere to the established limit of the motherboard; otherwise, the choice of volume is not limited.
No one limits the installation, for example, 1 stick for 2 GB, the second for 4 GB, the third for 8 GB, the fourth for 16 GB. There is never too much RAM, but it is necessary to adhere to reasonable limits, since such bundles will not be able to reveal their potential 100%, and this is exactly what every user is looking for from upgrading their computer.
Preparation
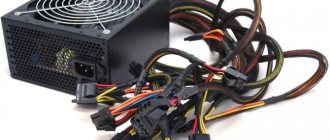
Before installing memory, you need to turn off not only the computer, but also all peripheral devices - monitor, mouse and keyboard. Only after this can you open the case and then place it on a table or floor so as to gain maximum access to the motherboard.
It is important to completely eliminate the possible occurrence of static charges. This may damage some computer components. You can get rid of charges in two ways:
- touch the body of a switched off computer while it is connected to the network;
- Wear an antistatic wrist strap.
Also, do not stand on the surface of a carpet or carpet while working with the components of the PC system unit.
How to connect RCDs and automatic machines?
Before starting connection work, it is recommended to draw a schematic diagram of the connection. Next, the task will be to place all the devices in the electrical panel.
Two way switch
Step by step guide:
- Modern electrical appliances have a modular design. Special mounting DIN rails are designed for their installation. Their use makes the installation process much easier. Switches, residual current devices and much other equipment have a mount for installation on such a rail.
- Next, we place all the necessary devices and parts at the mounting points in the electrical panel. After this, guided by the PUE, we connect the devices according to the diagram.
- There should be a two-way circuit breaker at the electrical input to the panel Its main task is to protect the electric meter from short circuits, overloads, and make it possible to carry out work to replace equipment.
- The input machine also serves as a limiter for the maximum power consumption of an apartment or house. Its rating is selected according to the maximum permitted power consumption. Mount the input machine on the top DIN rail.
- After the input circuit breaker , we connect the electric meter. To connect the meter, you need to unscrew the sealing screw and remove the bottom cover. Below it will be a group of contacts. Typically, the contact connection diagram is located on the inside of the cover. If it is not there, look in the instructions for the device. The electric meter contacts have two clamping screws for each connected wire. Their task is to ensure reliable contact. After connection, the meter is sealed and there will be no access to the contacts.
- In most meters, the first contact receives the supply phase. The outgoing phase is connected to the second. The third one comes with a neutral wire. To the fourth is the outgoing neutral wire.
- After the meter, an RCD is connected. The contacts on the device are usually labeled. The top contacts are supplied with incoming voltage. Accordingly, contacts are connected at the bottom of the device, which will go to subsequent circuit breakers and other devices. In this case, polarity must be observed. The phase contact must receive phase, not zero.
- After installation is completed, it is necessary to check the RCD for functionality. For this purpose, there is a Test button on the device. When it is pressed, a leakage current is simulated. The device should operate by turning off the voltage supply.
Removing the video card
There are some motherboards whose design is such that the video card will significantly interfere with the correct installation of RAM. This means that before installing the memory, it will need to be removed. One or two power cords can be connected to the video card. You should pay attention to what the mounting diagram is.
Usually there are levers on the cords, after pressing which the cord can be easily pulled out correctly. The next step is to unscrew the screws connecting the video card to the motherboard. Most devices have a latch or retainer located on the PCI Express slot. It is to this socket that the video card is attached, and it serves to ensure that the card can be connected very tightly to the connector. This is necessary, since this is the only way to provide support from the front side. On the reverse side, screws serve as fastenings. The latch will need to be moved back enough so that you can easily remove the video card. It should be remembered that each procedure is carried out as carefully as possible, the card is pulled out and not pulled out of the slot from the front side. There is no need to apply force.
Now we have access to RAM. But there is one more point. If the computer has been in use for a long time, then removing the video card gives us a chance to clean it. Only a soft brush should be used. There is absolutely no need to disassemble the cooling system of the video card, since its design is very fragile. You can carefully clean only the fan, but even here, using force can lead to damage.
How RAM sticks of different sizes work
It is possible to install RAM boards of different sizes, but it is not advisable, since in this case the RAM will switch to single-channel mode, as a result of which its operating speed will decrease. You can maintain speed only by installing pairs of strips of the same volume and clock frequency.
How RAM sticks of different sizes work
It is important to note that for RAM to work in multi-channel mode, the strips should be installed in pairs. In other words, two 8 GB RAM cards (with the same clock speed) will be faster than one 16 GB card.
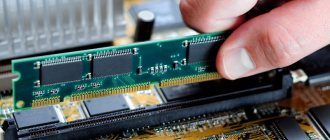
Insert the memory module
Let's return to RAM. Then you need to pull out the RAM module by opening the clips on both sides. The new module is removed from the packaging, but it must be held in such a way as not to touch the contacts on the bottom and the microcircuits located on the sides.
The module is inserted so that its groove clearly coincides with the protrusion in the motherboard connector. To do this, you need to lightly press the module, which, after it enters the connector, must be fixed using the connectors.
When performing this procedure, you must ensure that installation is done in the correct slots. The latter are marked on the motherboard, or they are different from each other in color. But it's still worth looking through the documentation again. According to the described scheme, each RAM module is installed.
Types of RAM
Have you thought that you need to decide on the volume first? Like, more gigabytes means more happiness? No, first you should find out what type of RAM you need.
The computer market, despite pessimistic forecasts, is constantly evolving, and RAM is improving along with it. From time to time, new technologies and standards appear that make it possible to increase the speed of memory and reduce its power consumption and heat dissipation. So, generation after generation, more and more new types of RAM are released.
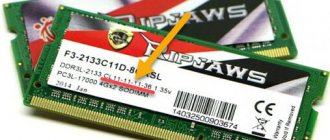
You can easily find out which generation a memory stick belongs to by the DDR marking (double data rate). You won't see regular DDR in desktop systems for a long time, just like DDR2. On older, but not released assemblies, DDR3 may still be found, but if we are talking about current computers with brand new “offal”, then there will be no option for DDR4. The memory of the fifth generation has been looming somewhere on the horizon for many years, but for now we can forget about it.
Thus, if we focus on new current processors and motherboards, then the choice comes down to the DDR4 memory type. By the way, even if you made a mistake and bought the wrong type of RAM, you don’t have to be afraid of ruining your computer - you simply won’t be able to install this stick in the motherboard. Each type of memory comes on a board with a special connector, which must correspond to the connector on the motherboard. Do you see that the notch on the memory chip does not coincide with the partition in the slot? Congratulations - this type of RAM is not suitable for your machine! All that remains is to negotiate with the store and exchange it for something more useful.
It’s clear with DDR4 - we’ll only talk about it further. But what else is DDR4 DIMM? What about DDR4 SO-DIMM? Or DDR4 DIMM Registered? Well, DIMM is just a Dual In-line Memory Module (double-sided memory module), that is, a direct and not very necessary designation of the fact that this is a RAM module of a certain form factor and nothing more (or less). DDR4 DIMM is just what you need for desktop computers.
Memory modules of the SO-DIMM (Small Outline Dual In-line Memory Module) format, as is clear from the English translation of the name, are distinguished by more compact dimensions compared to DIMMs. Such strips are used in systems with limited internal space. Laptops and mini-PCs are the habitat for such memory.
DDR4 DIMM Registered is a registered memory with a buffer that partially takes over control of data transfer in memory. Such modules are considered more reliable and fault-tolerant, but they are usually a little more expensive and, they say, a little slower than a regular DIMM. They are used almost exclusively in servers and are of little interest to the classic home user.
Briefly about the main thing. Are you assembling a computer from new, up-to-date components? This means that you don’t have to understand the types of memory and immediately check the box next to DDR4 DIMM, ignoring all the others.
We complete the process
Before closing the housing, it is highly advisable to completely clean the surface of the housing and all components using a compressed air supply device. This will increase air circulation inside the case, which, in turn, will increase the performance of the computer.
After cleaning, you need to close the computer case. There is no need to turn it on if the case is open, this will negatively affect the cooling process. Peripheral devices must be connected to a non-working computer.
Installation location
Typically, the installation location of the RCD is in the electrical panel. It contains various devices for metering and distributing electrical energy of voltage up to 1000 V. In the electrical panel, along with the RCD, there are automatic circuit breakers, an electric meter, distribution terminal blocks, and other electrical devices.
If you have an installed electrical panel, then to install the residual current device you will need a minimum set of electricians. It will include pliers, side cutters, a set of screwdrivers, and a marker.
In rare cases, you may need a set of socket wrenches and an electrical tester. The RCD is installed on a DIN block. If there is no space on the existing block, you will need to install an additional one.
Connection diagrams for RCDs in a three-phase network
Urban housing is usually powered by a three-wire, single-phase network. The previous section described how to connect an RCD in an apartment.
Country houses and households often consume much more electricity. They are often connected to a three-phase network. In a country house, electric heating boilers and powerful water heaters for hot water supply can be used. Workshops equipped with machines for various purposes are often organized in utility rooms.
Many powerful loads are designed for a voltage of 380 V. To power them, wiring must be used consisting of five conductors - three phase, neutral and a protective ground wire. Many locations operate outdated four-wire networks that lack a separate grounding conductor. In this case, to use a three-phase RCD, the owners have to make a grounding circuit themselves and lay a grounding network.