Editing BIOS
Begin the installation by editing the BIOS properties. To configure the basic BIOS system, press the key to enter the setup, usually DEL. The order in which the keys are turned on differs between motherboards, so the user will need to consult the technical documentation of their computer. Even if you don’t need to edit the BIOS settings, it’s still better to first familiarize yourself with the enabled laptop modes. The BIOS screen of different motherboards looks different.
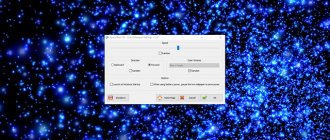
Open the system information page in the BIOS and make sure that the amount of RAM in the list matches the size that was set during setup. If the screen does not show RAM, a piece of hardware may be placed incorrectly and you need to correct this failure before continuing to install Windows 7 on your laptop through the BIOS.
If there is no system information page in the BIOS, the motherboard will reflect the amount of RAM detected on the POST screen immediately after pressing the power button. You need to check the SATA configuration parameter and make sure it is configured as AHCI. If you are using Windows XP, you need to change this parameter to IDE or AHCI.
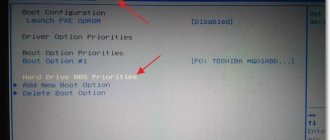
Find the BIOS Boot Order or Boot Priority page and make sure that the installation disk or flash drive is listed first in the list, and the hard drive on which the OS will be installed is second. Some BIOS utilities divide the screen into two menus - one for setting the boot order for various media (CD-ROMs, hard drives, USB drives), and the other allowing you to select the boot order for hard drives only. If the last one in the list is not detected, it may not be connected correctly or may be faulty. In this case, turn off the computer and recheck the connections.
Instructions on how to install WINDOWS 7 from a flash drive to a laptop using the example of ACER PB ENTE69
Good time!
Article with detailed PHOTOS HERE.
How to make a bootable USB flash drive with WINDOWS 7, XP or 8 with the MULTIBOOT program.
Today you will learn how to install the Windows 7 operating system on an Acer laptop model Easy Note 69. The OS installation will be carried out from a flash drive that already has all the system installation files.
Setting up the BIOS to install Windows 7 from a USB flash drive
Before turning on the laptop, insert the flash card into the USB port and turn on the laptop. After turning on, press the “F2” key to get into the BIOS. In the BIOS, find and go to the “Boot” tab and set USB as the device from which the laptop system should start. The first line should be set to “Legasy”, the second line should be “Disable”, and the third line should be set to USB. To select the desired item, use the “F6” key. After setting the desired parameters, go to “Exit” and press the “Enter” key twice.
Let's start installing Windows 7
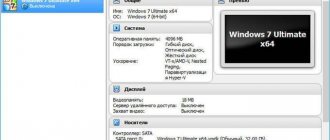
After you have configured the initial settings, restart your laptop. The download will start from a flash drive that has all the operating system installation files. After the flash drive starts loading, you should select “Install Windows 7″ Ultimate” 64 bit. After which the system installation process will begin. Now the laptop will display information about the start of downloading files.
After which we will be asked to select the installation language and we select “Russian” everywhere and click the “Install” button. Next we will see the information “Setup in starting”. Next, we must again select the version of Windows, we have it “Maximum”. Then click “Next” and accept the agreement. Then click “Full installation”.
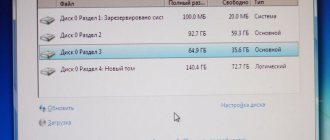
After making the selection, we will be taken to a screen where we must select the hard drive partition on which the system will be installed. Let us remind you that there can be 3 partitions and one of them has a size of 100 Megabytes. It is created by the system itself to save backup files. We select one of the remaining sections. If the installation system prohibits partition selection or nothing happens after clicking, then do the following:
• Click the “Disk Setup” button;
• Delete all partitions;
• Re-create 2 partitions (1 partition for the system and 2 partitions for the necessary files).
When creating partitions, the system will create its own, 100 Megabytes in size. Under Windows 7, allocate at least 50 GB of space, and leave the second partition with the remaining size. Install the system on a partition that was created for the system. After selecting the partition, the system installation itself will begin. When installing the OS, the computer will perform several reboots, during which you will not need to perform any actions.
After the first reboot, the system will display the Windows logo, and then the message “Setup is starting services” will appear. This means that the installation process is proceeding correctly. After the second reboot, the message “The installation program is preparing the computer for first use” will appear. We wait further and do nothing.
After this, the program will ask for a computer name, which you must come up with and enter in the right place, then click “Next”. You can skip specifying the password and you also don’t have to enter the key. Next, click the skip button. If firewall protection is required, select "Skip", this can be done from the installed system later. Next, you can set the time zone in which you are located and set the local time. Now click the "Next" button. That's it, the laptop will reboot a third time and start from the already installed Windows system.
After installing the operating system, you can install the missing drivers.
For a complete understanding of installing the operating system from a flash drive and installing additional drivers from Driver Pack 14, we suggest watching a detailed video from our channel:
- < Back
- Forward >
Preparing a laptop for updating in UEFI mode
If a user purchased a new laptop, there is a 99.99% chance that the motherboard has UEFI firmware installed. The successor to BIOS, Unified Extensible Firmware Interface (UEFI) adds some interesting features, but some of them prevent the installation of another operating system: Secure Boot, CSM, GPT. Therefore, you will need to remove these restrictions when installing Windows on a laptop or another operating system different from the one that was installed on it.
First you need to determine whether the motherboard has UEFI firmware or not.
Verification algorithm:
- Go to the motherboard firmware settings and look for the term UEFI in the search menu. If this information is found, then the motherboard has UEFI firmware.
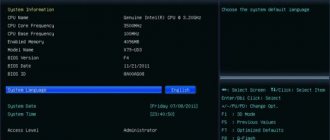
- Study the information about the motherboard, open: “System Information”> “System Information”> “BIOS Mode”.
- Open the command in msinfo32: “Run”.
- Follow on-screen instructions as appropriate for your situation and purpose.
- Make sure that the system disk uses the MBR partition table.
If a laptop user has UEFI firmware and wants to install the 64-bit version of Windows, he does not need to disable any features before installing Windows on the laptop as all 64-bit versions of Windows are UEFI compatible.
Installation process
The BIOS on Acer laptops is standard and includes various elements of the UEFI system. It is for this reason that installing Windows 7 on Acer is quite a difficult task for untrained users. From the very beginning, these same UEFI options must be disabled and after that you can proceed directly to the installation.
First, you need to pay attention to the fact that the Acer laptop itself, on which you are going to install the Windows 7 operating system, supports a floppy drive or USB connectors. To do this, you need to go into the BIOS, for which at the very beginning during boot you need to press the F2 key, go to the initial section of the BIOS (BOOT) and press the F5 and F6 keys (depending on what you will use - DVD or USB connector, - put the appropriate device in priority place).
After this, you need to go to the “Exit” tab and select “Save”. As soon as this is done, all necessary information will begin downloading directly from the drive being used, and only then from the computer’s hard drive.
Immediately after this, all that remains is to correctly indicate the most suitable edition of Windows 7. For example, if your Acer laptop is 64-bit, then you should install the 64-bit system accordingly. If you see the message “Press any key to boot from DVD or CD” on your screen, you just need to press any key - this way we accept the agreement to boot from DVD/CD and after that the download begins.
If the installation for some reason does not start, then most likely this means that you have an outdated version of the laptop and you need to press the F10 key to enter the menu, and then do the same as described above. But besides the above actions, it is highly not recommended to do any others, especially if you do not have experience in carrying out this work. This can seriously affect the continued performance of your computer. The most important thing here is that all actions must be performed in accordance with the instructions indicated.
As soon as the 100% mark on the installation progress indicator appears on the screen, the computer will restart and that’s it - the installation of Windows 7 on an Acer laptop has been successfully completed.
Installing 32-bit versions of Windows
All 32-bit versions of Windows and some OSes that are not UEFI compatible require modifications to mimic the BIOS environment and allow installation of these operating systems. This is what is called an object in the standard BIOS or "Legacy" mode.
To install Windows on a 32-bit laptop or non-UEFI OS on a motherboard with this firmware, you must complete the following three steps:
- deactivation of secure boot;
- activation of CSM - compatibility support module;
- converting the partition table of a system disk with MBR size.
The Compatibility Support Module (CSM) is a component that enables legacy BIOS mode and allows you to emulate the environment and install UEFI-compatible operating systems.
Installing Windows on a laptop (step-by-step instructions):
- Disable secure boot.
- Includes CSM Compatibility Support Module.
- Convert the system disk to MBR.
- Install Windows in legacy BIOS mode.
- Enabling this option will disable the UEFI environment in favor of a legacy BIOS environment.
- Access the UEFI firmware settings on the motherboard.
- Change the Boot Mode option for CSM Boot or Legacy Boot. On some motherboards you need to set UEFI Boot to Disabled.
- Save your changes by selecting Exit.
In a legacy BIOS environment, system drives use the MBR partition table to boot the operating system. It is necessary to convert the GPT system disk to MBR so that you can install Windows on your laptop from the disk.
If the latter is in MBR, you can proceed to the next step, but if it is in GPT, you will have to convert it to MBR, after which all data on the disk will be deleted, so first backup your personal files.
Now that secure boot is disabled, CSM is activated and the system disk is in MBR format, you can begin setting up the Windows installation on your laptop.
Installing Windows
The procedure for reinstalling or installing the operating system from scratch is determined by the version of Windows and the HDD layout features. General step-by-step instructions for installing Windows include the following steps:
- After turning it on again and Press any key appears on the screen, quickly press any button - for example, the spacebar. This will allow you to start the installation from the prepared media. If there is no sign and the download proceeds as usual, the installation flash drive was not written correctly.
- Wait while the temporary files are unpacked onto your hard drive.
- Select the OS interface language, time format, keyboard layout, and then click “Next”.
- Click on the “Install” button located in the center of the new page.
- If the image includes multiple OS versions, select the appropriate one. You can install only one option at a time.
- Accept the terms of the license agreement and select the "Full installation" option instead of "Update".
- Determine which HDD partition the operating system will be installed on.
- If there is no partition, first create a new one.
- Wait while the system unpacks files and configures components and updates. The process will take quite a long time.
After several reboots, Windows will prompt you to create a username and password. This will complete the installation process.
Installing the OS on an external hard drive
Sometimes it happens that the only solution that can be applied to the difficult problem of restoring the functionality of a laptop is to disconnect the hard drive from it and perform a Windows installation as an emergency exit via an external hard drive connected to USB.
Reasons for installing Windows 7 on a laptop via an external drive:
- The computer will no longer boot.
- There is a problem with the device connected to the laptop.
- An unexpected error occurred.
- The BIOS is inaccessible and the boot settings are incorrectly configured, which prevents you from restarting and restoring Windows.
- There is no way to boot from a CD player or bootable USB drive.
Before you begin installing Windows, you need to fix hard drive errors. This is a fairly lengthy process, sometimes taking about thirty hours. But patience will be rewarded, as as a result it is possible to restore all photos and videos.
Next, you will need to format the disk to reinstall Win on external media. To download Windows from a flash drive to a laptop, you must first fulfill the following conditions: you will need a CD with Windows files, you can download an ISO image from Microsoft or another source.
Execution algorithm for Windows 10:
- Prepare the hard drive for installation.
- Click on the Windows Start menu.
- Select Administrator Command Prompt from the Windows 10 Start menu.
- Type diskpart in the command line and confirm Enter, the Windows Disk Partition Utility will open.
- Type a list of drives at the command prompt and press ENTER to display a list of connected hard drives.
- Select the Windows installation drive by typing: “Select drive 1” or another number if the corresponding drive is not the first one in the list. Since such operations format the disk and delete the data that was on it, you must first save it all.
- Type the command create partition primary, then Enter to create the partition on which Windows will be installed.
- Type the command in the format fs = ntfs quick, then press Enter to format the partition.
- Click the link in the invitation to activate the section.
- Enter the letter "E" to assign it to your hard drive.
- Enter the exit command to exit Diskpart.
The hard drive is ready, now you just copy the Windows files using DISM (Deployment Image Servicing and Management), a tool for managing and maintaining Microsoft deployment images.
Preparing to create a bootable USB flash drive
For many years, operating systems have been sold on DVD. However, this media is far from the most powerful and may even be unsuitable for netbooks - inexpensive laptops that do not have an optical drive.
In this case, a USB flash drive can become an interesting alternative for both netbooks and traditional computers, whose users see this medium as a safe, mobile and, above all, faster assistant.
Installing Windows 7 on a laptop from a USB drive is very convenient when used to configure several machines. But this trick may have another advantage over laptops over netbooks - download speed through the use of flash memory.
On a Windows computer, you can use either a Microsoft tool or Rufus software for installation. Using the former is generally easier, while Rufus has some additional features. To complete the process you will need:
- A computer with Windows or MacOS connected to the Internet.
- The user must have administrator rights.
- Bootable USB flash drive Windows 7 - a drive with at least 4 GB of space.
Mounting external media with Rufus
You can create a downloadable installation flash drive, for example, for Windows 7, to get an updated and secure version of the installation, you will first need to visit IUware and obtain a product key.
Installation algorithm:
- On the IUware Windows page, select 32-bit or 64-bit version.
- Accept the license terms and click: “Get product key.”
- Copy it to use later.
- Download and run the image creation tool.
- Agree to the license terms, enter the key and click “Next”.
- For the Microsoft tool to create a bootable Windows 7 USB flash drive, make sure that it is connected, select it and click “Next”.
- In order to use Rufus, for example, for Windows 8.1, select the ISO file and click “Next”. This will save the .iso file on the laptop.
- Proceed to download Microsoft Windows 8.1 from the download page and run the installation tool.
- Accept the license terms.
- Enter your Windows 8.x product key and click Next.
- Select the ISO file and click Next. This will save the .iso file on your computer.
- Visit the Rufus page and download the latest available version of the software.
- Connect the USB flash drive, back up all the data on the drive to any other location as the drive must be completely free as all the data on it will be deleted.
- Run Rufus software on a PC running Windows 7, 8.1 or 10.
- Find your USB device from the Device drop-down menu.
- Select a breakdown scheme from the three available options.
- To install a disk with an MBR partition scheme, select “MBR partition scheme for PCs with BIOS and UEFI.”
- Select the system as NTFS, since FAT32 cannot be used for the boot disk.
- You can skip the Cluster Size section.
- Click the browse icon next to “Create a bootable disk” to navigate to the Windows .iso file, and then select it.
- Select the Windows To Go option before clicking the Start button.
- A dialog box will appear if the USB has the Removable attribute.
- You can ignore this warning and click Yes.
- Next, a warning “Your USB drive will be erased” will appear.
- Click OK to begin installing Windows.
- Software preparation of a disk can take more than an hour.
- Once the work is completed, a message indicating that the device is ready will appear.
- Now you can restart your computer to check the newly prepared Win disk.
Updating the system on SSD or SSHD machines
You will need a functional PC to create a bootable USB installer for Win. Armed with a bootable USB for Win, connect it to a free USB 2.0 port. If your laptop doesn't have USB 2.0 ports, USB3.0 will do.
When you turn on the power, depending on the brand of laptop, press either ESC, F2, F8, F10, or the Del key to enter the BIOS. The user can skip this step if he knows which key is called by the boot order in the laptop.
Installation algorithm:
- After entering the BIOS, you need to review the boot device parameters and the order in which they are placed. These can be completed in the "Advanced" or "Download" section at the end of the listed tabs.
- You may need to enable the option to make the BIOS see the USB drive as a removable drive/CD.
- Select the USB drive as the primary boot device.
- Go to “Exit”, save the settings and wait until the laptop reboots with the new settings.
- A screen appears allowing you to select the installation language, time and currency format, and keyboard or input method.
- Click: “Next”.
- Click: “Install Now”.
- Enter the activation key in the field next to the keyboard icon. If the user doesn't have one, you can confirm: "I don't have a product key."
- Select Custom: Install Windows Only to perform a clean installation.
- Select the disk partition on which the OS will be installed.
- Click: “Next”.
- A screen will appear where the OS will begin installation. This process can take anywhere from a few minutes to an hour, depending on whether the laptop has an SSD or SSHD.
- When the installation initiates a reboot, go back to the BIOS and check what the primary boot device is. Ideally this should be Windows Boot Manager.
- After this, the laptop with the updated OS will work successfully.
How to install Windows 10 on a laptop without an operating system
Lately there has been a lot of controversy about the fact that Windows 10 does not work very well on weak hardware, that you often have to install drivers yourself, etc. The other day I was convinced of exactly the opposite and I want to share this with you.
Let me start with the fact that I was lucky enough to get my hands on an entry-level Asus R540SA laptop, which is supplied and naturally sold in our stores without any operating system. I decided to install Windows 10 Pro on it, pursuing 3 goals: to find out the installation process itself (I haven’t done this for a very long time), to check the possibility of activating Windows 10 with a key from Windows 8 (fortunately, I had one key lying unclaimed for 3 whole years), and also see how the system behaves on fairly average laptop hardware. First things first.
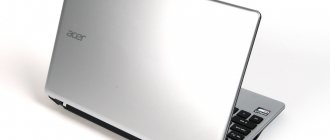
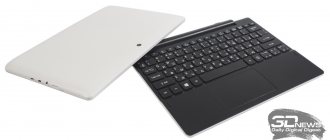
A little about the Asus R540SA laptop
Despite its budget price, the laptop looks quite stylish. The dark chocolate lid made of durable plastic and the light brown body look very good together. I was struck by the lightness of the laptop, only 1.9 kg, as well as the body thickness of 25.4 mm, which is very unusual for budget laptops. Therefore, it is very light and easy to transport. It would seem, what can you expect from a laptop for 6,000 hryvnia? But it is equipped with all the connectors necessary for operation. Here they are all located on the left side of the case: a 3.5 mm headphone jack, one USB 2.0, 3.0 port and also a new USB Type-C connector, which is quite rarely found on laptops in this price segment. Nearby are HDMI, VGA and LAN RJ-45 connectors, that is, you can connect to the Internet not only via a wireless interface, since the laptop is equipped with a Wi-Fi 802.11 a/b/g/n module, but also use a wired one, which I’m sure will please you many, because for some reason manufacturers have recently preferred to get rid of this connector in budget laptops.
ASUS R540SA also has a Bluetooth 4.0 module, which allows you to transfer data between devices at speeds of up to 1 Mbit/s.
Particularly noteworthy is the island-type keyboard, which allows you to quickly and easily type text without the risk of making a mistake when pressing keys, and a fairly sensitive touchpad with an increased area that supports some of the gestures. Of course, you shouldn’t expect that such a laptop will have the latest hardware installed.
The 15.6-inch ASUS R540SA has a standard resolution of 1366×768 for an inexpensive laptop and a glossy surface, although it does not reflect much in the sun, which makes it comfortable to work on.
It is worth noting that ASUS developers were able to implement, even in such an entry-level laptop, a whole range of software and hardware designed to improve sound quality. Watching movies, TV series, videos and listening to music on it is a pleasure. He will definitely get his money's worth in this regard. But with the camera for video calls, everything is sad: it is only 0.3 megapixel resolution in our time!!! For me, such a camera is no longer very pleasant and convenient.
It's even worse with performance and memory. I understand that for such a price it’s still divine, but still. The laptop is powered by a dual-core Intel Celeron processor with a maximum clock frequency of 1.6 GHz (2.16 GHz in Turbo Boost mode), 2 GB of RAM and integrated Intel HD Graphics. The processor is built on a modern 14-nm process technology, which means it does not heat up and has low power consumption. Okay, it's a mid-range processor, but in 2020, 2 GB of RAM is very little. I'm thinking about adding memory if the module is not soldered to the motherboard. It's worth mentioning that it supports DDR3L 1.35V low voltage mode instead of the 1.5V that DDR3 typically uses.
The laptop has a non-removable lithium-ion battery, which will allow you to work for up to 4 hours, according to the manufacturer. I can say from personal experience that up to 3 hours works no more.
As you can see, I have a very average laptop and still without any operating system, the installation of which I want to tell you about later.
Installing Windows 10 Pro
I already wrote above that I haven’t installed an OS on such laptops for a long time, so it was very interesting how exactly the new Windows 10 would cope with this task. With your permission , I will omit the details of preparing the Windows 10 ISO image. I have already written about this many times in my articles. I will only note that I have once again become convinced that no third-party utility other than MediaCreationTool is simply needed. It does an excellent job of installing the OS.
Since my laptop is completely naked and there is nothing on it, my first step was naturally to look into the BIOS. This has also been written and discussed many times. Let me just post a picture with possible key combinations for entering the BIOS for almost all laptops.
Having entered the same BIOS, our main and only task is in the BOOT , which can be easily accessed using the up - down , right - left , and find here your bootable USB flash drive, which do not forget to insert into the USB connector of the laptop. Now you need to put it in the system boot priority using the same up and down , then press the F10 and Enter key. We kindly ask you not to click or change anything else in the BIOS.
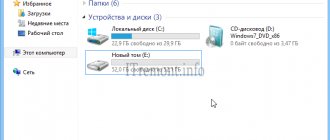
You will know that the download has started when you see a page with a choice of interface language, country and operating system version. That is, the procedure is actually similar to a clean installation of Windows 10. But I had one nuance, the solution to which I want to tell you about. When choosing a disk to install the operating system, it turned out that I could not do this, since my disk partitions are in MBR , and GPT is required for installation. Many people encounter this problem, so I think it is necessary to describe ways to solve it.
You can solve the problem of converting MBR and GPT partitions using Command Line , which can be opened by typing Shift+ F10 diskpart utility then enter the command List disk to display a list of physical disks connected to the computer. Next, select the desired disk from the list that appears with the command select disk N , where N is the number of your disk that you want to convert. It must be cleaned by entering the clean . convert gpt command and the disk is ready to install the operating system. In the same way, you can convert from GPT to MBR , changing the last word during conversion. I also want to note that in recent years I have stopped partitioning my hard drive into separate partitions. I once asked this question on the Microsoft forum, to which I received an explanation that new HDDs/SSDs do not require special partitioning. While HDD drives are usually divided into partitions, many manufacturers do NOT recommend partitioning SSD drives. I predict your reaction to this phrase and therefore point out that NOT recommended does not mean IMPOSSIBLE. It all depends on your personal desires and needs. Everything works fine for me without dividing into sections and there have never been any force majeure circumstances.
I was very pleased that the installation took me no more than 40 minutes. Just answer the questions and click next. There is one observation: recently, when installing Windows 10, the system asks you to enter the router PIN code instead of the WI-FI password, which can be easily found on the case of your device. I don’t know what this is connected with, but the fact remains a fact. And I highly recommend that when installing Windows 10, you must have access to the Internet. The reason for this request is very prosaic: if there is an Internet connection, then Windows 10 installs the drivers itself, providing a digital signature. Simply put, you don't have to dig through manufacturers' websites to find the drivers you need. Forget about it if you bought a new laptop, even without an installed operating system.
After a while, the desktop will open and all pre-installed programs and applications from Microsoft will be loaded into your laptop, which means you can safely use your device.
Activating Windows 10 with a Windows 8 license key
As I said above, after installation the Desktop opened, the system works fine, but it needs to be activated. This can be done in two ways: when the system asks you to enter the key during activation itself (I simply skipped this point) or through Settings-Update and Security-Activation. Since I did not have a Windows 10 activation key, I decided to try to activate the OS using the Windows 8 activation key, which had been quietly waiting in the wings for 3 years. I read that there is such a method, but I had to check it.
To my surprise, everything went smoothly and without surprises. Literally a minute later, my Windows 10 Pro was activated, which was eloquently written about in the Activations section. That is, there is also this method of activating Windows 10. I don’t know how long this loophole will exist, but it saved me a decent amount.
How Windows 10 Pro works on a budget laptop
Lately I’ve been hearing and reading a lot of complaints about the operation of Windows 10. Some users complain about the poor performance of the system on old hardware, as well as on low-power laptops, such as my now ASUS R540SA. I have been interested in this question for a very long time and now I am ready to share my answer with you.
For almost a week now, I have been working daily on a new laptop: writing articles, making presentations, communicating on social networks, reading news on portals, etc.
Of course I don’t play on it, I rarely play games at all. I can say with full responsibility that the laptop copes with its task “excellently”. Yes, it's slower than the Surface Pro 3, and it lacks RAM and doesn't have a very fast processor, but it's worth the money. In today's economic crisis, if you set it up correctly and don't expect anything supernatural from it, you can easily buy a budget laptop for home use and study. Windows 10 works great on it and copes with all the tasks necessary for the average user. It is important to configure the system correctly, do not download programs from unfamiliar resources, and do not search for drivers and utilities. And then using Windows 10 will bring only joy.
For those who want to know more
- How I fixed a broken laptop using Windows
- Full overview of changes in Windows 10 Update Anniversary
- Three ways to update to Windows 10 after the ban
- 7 common misconceptions about Windows 10
- What I don't like about Windows 10
Creating a key for the XP version
The diskpart installation utility exists in Windows XP, but does not support USB drives. Therefore, it will be necessary to activate the section differently. Format the USB key or bootable flash drive before starting the Windows XP installation on the laptop:
- In “My Computer”, select your flash drive (key) and “Format ...” in the context menu by right-clicking.
- Check the quick format option, give the key a name, for example Seven, and begin the procedure. After a few seconds, the operation of installing Windows XP on the laptop ends and you can close this window.
- Next, use a small software to make the partition active. Download the MBRWIZ utility from the software library. There are 32-bit and 64-bit versions of the system. This software does not require installation. Simply place it in an easily accessible directory, such as your desktop.
- From the Windows Start menu, select Run and enter CMD.
- Go to the “Desktop” directory using the “CD Desktop” command and confirm the action.
- Enter mbrwiz / list. A list of “X” drives will appear, including those in the USB key.
- Find the number indicated after “Disk:”, for example, 1.
- Enter the command mbrwiz / disk = X / active = 1, where X is the number found in the previous step.
- Confirm the operation and answer “Y” to the question to make the partition active.
- The key is ready to host Windows 7 system files.
Windows 7 disk installation
You can update the laptop OS at any time, and this is the simplest solution, because system files are replaced with Windows files, the user keeps his documents intact, but sometimes you have to make unnecessary changes to settings that slow down the laptop, so in practice it’s still better to download full version of this operating system. If you use the limited 90-day version of Windows 7, then during installation there will be no window for entering the key.
Procedure:
- To install Windows 7 on your computer, place the Windows DVD in the DVD drive and restart the device.
- Press the DEL or F2 key on the keyboard to enter the laptop BIOS and change the boot sequence from the DVD.
- After changing the boot sequence and restarting the computer, it will ask the user to press any key to launch the installation disc.
- On the screen in the window, set the language, time and keyboard and click: “Install now”.
- In the next window, check the box: “I accept the terms of the license agreement” and further.
- In a new window, choose to update or install a copy of Windows.
- In the next window, indicate the Windows installation path.
- Click the button to start downloading Windows 7.
- Depending on the laptop parameters, it may be longer or shorter.
- At the end of the installation, Windows reboots.
- When you restart, a window opens in which you enter the user name and computer name. It will appear on the network if the owner has a computer network.
- They press the button. Typically, at this point, a window will appear asking you to enter the product key on the Windows DVD box.
- In this window, select: “Use recommended settings” to enable automatic updates and the Windows 7 firewall. The latter protects itself from possible attacks from the Internet.
- Click on the button and select the time zone, as well as the date and time, in the window.
- They press further.
- Windows is finishing setting up the operating system on the laptop.
- At the end of the configuration, the user is taken to the Windows desktop and can effectively perform their tasks on the machine.
Final stage
Installation of the operating system on the laptop, roughly speaking, is complete. All that remains is to fill in your personal data and other attributes:
- The system will ask you to set your username and device. Also in this window you can set a password that will protect the laptop from intruders.
- If you are using a licensed version of the OS, you will need to enter the serial number, which Microsoft usually carefully leaves on the disc box. Often the numbers can be found on the bottom of the device case - turn the device over and find the required code.
- If you are installing a pirated version, then the assembly should include some kind of activator or key from Keygen.
- We fill in the date and time, and then just enjoy the result.
Important! The Windows operating system will only work for thirty days without using a license key or crack.
Virtual CloneDrive boot program
Microsoft offers software that makes creating a bootable disk easier. To do this, the user will need a key (or memory card) with a capacity of 4 GB.
Disk creation procedure:
- Download Windows 7 USB/DVD Download Tool.
- Prepare source iso files.
- Download the Virtual CloneDrive software and install it. This software will allow you to “mount” a Windows 7 image on a virtual disk and does not require a reboot.
- Go to the directory where the Windows 7 image is located and select the desired file.
- Right-click on this file and select the entry: “Edit using virtual CloneDrive” in the context menu.
- Prepare a USB drive.
- Download WinToFlash and install it.
- In the “Tools” menu, then “Options”, select the “Language” tab and, if necessary, change the language to Russian or English.
- The assistant suggests using the wizard, select this option and click the “Next” button.
- The next step is to select the source of the Windows files and their destination.
- They examine their computer and find a Windows 7 DVD or ISO file mounted in Virtual CloneDrive on one side and in a USB drive on the other.
- Then they click “Next”, accept the license for Windows 7 and, noticing a warning that the drive will be formatted, start the operation. This should take about 10 to 15 minutes, depending on the performance of the USB key.
As you can see, installing Windows on a user's laptop is a simple procedure and can take a couple of hours when installing Windows on a new laptop.