For a beginner, dealing with critical errors in the Windows system is quite a difficult task. At any moment, a blue screen may appear on the monitor with a description of the problem and a code. To eliminate problems of this kind, you will need a set of actions.
You've probably encountered error code 0x8007025d while installing Windows. It is worth noting that the problem is related to software glitches and technical problems have nothing to do with it .
Possible causes of the problem
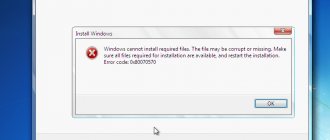
When installing Windows, you may see an error message on the screen : “Windows is unable to install the required files. Error code: 0x8007025d" . The reason for the phenomenon is not entirely clear, but one thing is for sure - a problem with the hard drive and, most likely, at the software level. The reason may be a damaged file system.
Possible causes of the problem:
- During the system installation process, drivers are installed. If the assembly is incorrect, they may not install and the installation will stop.
- Boot sector failure.
- Problem with RAM.
- Conflict when connecting equipment.
- Lack of space on the partition.
Windows also sometimes gives an error while working in the system. For example, copying large files to a hard drive, archiving and other actions aimed at working with HDD or SSD drives.
Attention! If the steps below don't help, it's likely that the drive is physically faulty and should be replaced.
How to fix the problem?
We will do this in two stages: the first is cleaning and testing the hard drive, the second is removing unnecessary language packs. The last step also allows you to create some free space. So, to clean and check the screw, you need to perform the manipulations from the list below:
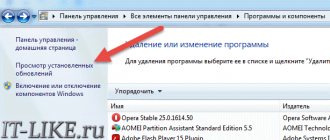
Open the “Computer” Explorer window with shortcuts to the hard drive partitions.
Right-click on the system partition shortcut and select “Properties” from the context menu that opens.
The partition properties window will open, in which you need to go to the “General” tab (active by default) and click on the “disk cleanup” button. Here is a picture explaining this:
Next, the disk scanning process will begin, after which we remove the language packs:
- Open a command line window and type the command: lpksetup /u.
- The process of uninstalling unnecessary language packs will begin.
- After the process is completed, restart the computer and try to update Windows again. In theory, the error should no longer appear.
That's probably all you need to know about error 0x8007025d when installing and updating Windows.
How to fix error 0x8007025d on Windows 7, 8 and 10?
Steps to resolve error 0x8007025D:
- Disable peripheral equipment: various USB devices, external hard drives.
- If you have a desktop computer and more than one HDD, leave one and disable the others.
A number of actions related to other errors will help you get rid of the error.
For example, the error code 0x8007045d is associated with the specified code. These actions are carried out quickly and simply, so you do not have to resort to the help of professionals and experienced friends; if you have not encountered this, at first it is better to contact a knowledgeable person. Important! On different models of motherboards and laptops, the entrance to the Boot Menu, as well as the BIOS, is different. Therefore, you need to find out on the Internet how to get there.
Take a flash drive or disk with the Windows operating system and boot from it. You can do this as follows:
- If you are booting from an optical disk, go to the BIOS and look for the First Boot Device option in the “Advanced BIOS Features” section. Find the “CDROM” parameter and select it.
- In another BIOS version, the algorithm for setting parameters may be different: On the “Boot” tab, find the “Boot Device Priority” section, where the priority of bootable devices is located, where we select “CDROM” on the first line.
- In both cases, press F10 to exit the BIOS while saving the settings.
- If you boot from a flash drive, then select your USB drive instead of the disk. But you can take an easier route: insert the USB flash drive, turn on the computer and quickly press the ESC key to enter the Boot Menu. Next, select the flash drive from the list with the arrow and press Enter to boot.
- After loading, a window will appear on the screen asking you to install Windows. At the bottom left we find the item “System Restore” and click on it.
- In the window that opens, launch the command line and begin writing the following commands:
- diskpart – utility for working with disks;
list volume – displays all disk partitions.
- Now you need to determine the system drive letter. In the “Information” column it will be designated as “Boot” and, possibly, will be designated by the letter C.
- We finish working with Diskpart; to do this, enter the Exit .
- Immediately enter the command to check the disk for errors: chkdsk M: /F /R . Where M is the designation of the drive with Windows, which we defined above.
Then you need to wait a little until the error correction process is completed successfully.
Deleting partitions
If there are problems with the disk, then you will have to transfer important data from all partitions to another drive:
- We boot from the boot drive or disk and reach the stage where you need to select a partition for installing Windows.
- To get rid of errors on a disk, sometimes it is enough to format it, but in this case we will do it a little differently. Click on the “Disk Settings” button, in the menu that appears, delete all partitions in order to create unallocated space. As a result, our disk will be assembled into a single whole.
- Next, you need to click on the “Create” button and select the required volume for the system disk. Approximately 100 GB. The remaining space can be used for files.
- Let's try to install Windows.
Checking RAM for errors
Some users were able to resolve the problem by removing one of the RAM modules . In fact, the reason may also lie in the RAM, so it’s worth paying attention to this too. Try removing one module at a time and checking functionality.
The next step is to check the RAM for errors. memtest86 utility from the official website and write it to a USB flash drive. As soon as you boot from the flash drive, the scan will begin automatically. It is worth checking only one module. We take out except one and check in order. If there are errors, they will be highlighted in red in the utility.
Error 0x8007025d
In some cases, an error such as 0x8007025d . She says that there was an error during the file copying phase , so any changes made will be discarded. This is due to the fact that update files are incorrectly written to the computer’s hard drive. Most often, the installer does not have enough free disk space , but other reasons are also possible.
Keep in mind that, for example, the 32-bit version of Windows 10 requires at least 16 GB of free memory, and the 64-bit version requires 20 GB. Check the free space on your disk. Make sure your PC has enough free space for your specific OS version.
If there is enough free space , then try the following steps:
- Disconnect unnecessary equipment from the computer except: monitor, keyboard and mouse;
- If you use more than one hard drive, disconnect all HDDs except the one on which the operating system is installed ;
- If installing from an operating system: completely disable its antivirus software .
Another possible reason for the error: corrupted files on the installation disk . Try rewriting the installer again, using stable versions of the recommended software, downloading them again from the official developer sites.
How to fix an error if the reason is lack of space
First of all, you need to clean the disk where the current operating system is installed. This is done using automatic cleaning. To run it, you need to do the following:
Open Explorer , find the “ Computer ” section there and enter it.
- Find the system partition and right-click on it, find the “ Properties ” sub-item there and enter them.
- In the pop-up window, find the Clean Disk button and click on it. It is located under the section usage statistics.
- The disk will be scanned. You need to select the necessary options, and then begin the cleaning process.
Removing unnecessary system languages
After performing these steps to save memory after installing the operating system (10, 8 or any other Windows), you can remove unnecessary system languages that are not used in the computer. To do this you need:
- Open Command Prompt using administrator rights. Type Cmd and press Enter.
- Type the command lpksetup /u and press Enter.
- Restart your computer when the languages are removed.
Additional features
In the case when an update to Windows 10 occurs, it is better to double-check whether the update package has already been downloaded? Most often it is stored on the “C:/” drive. If it is downloaded, it is better to delete it and install the update again to avoid errors. It can be stored in the following directories:
- C:\Windows\SoftwareDistribution\Download
- C:\Windows\SoftwareDistribution\DataStore
It would be best to double check them and clean them if necessary. After this, the computer should be restarted. And you can start installing the Windows 10 operating system again.
What should I do if there is an error during installation?
When installing Windows 7, various problems may arise: the process may be interrupted at various stages and at specific steps (when copying/unpacking files, formatting HDD/SSD, etc.).
If you cannot understand the reason for a particular error, be sure to start by checking the image of your copy of the OS for integrity.
If after at least two attempts you are unable to successfully complete the system installation, pay attention to the error code that appears during installation. The rest of the article discusses the most common of these errors, as well as methods for correcting them.
2.
Error 0x8007045d
One of the most common problems is code 0x8007045d. It occurs when installing operating systems of different generations - 7, 8, 10. The most common cause of occurrence is physical failure of the hard drive. But there are other reasons as well.
What are the types of errors?
In addition to the fact that such a code in most cases indicates an error during the installation of the operating system, it can appear when some other problems occur. Code 0x8007045d can also occur when:
- Archiving files using the built-in Windows utility;
- Transferring large files via Card Reader to a flash card;
- When working with files (copying them, moving them within the system, transferring them to archives).
During Windows installation
Error 0x8007045d occurs most often when installing Windows, when there are any problems with the HDD or SSD . This indicates a physical malfunction. There may be two options: the installation disk or USB drive is faulty, or there is a problem with the hard drive of the computer itself. The most common case: physical failure of the hard drive , in which everything is corrected solely by replacing this component.
Of course, there may also be a malfunction of the media itself, but the easiest way to eliminate it is just insert it into another computer and try to start it . With an incorrectly functioning hard drive, everything is more complicated.
In this case, during installation, the creation of partitions for the operating system proceeds without failure , as does the formatting of disks. But when the installation itself begins, an interruption occurs with an error code displayed. The first step when such a problem occurs is to check the hard drive and the media with the operating system for failures; this can be done using special software.
How to fix the error
To effectively eliminate this error during installation of Windows 7, 8, 10 or other versions, you need to adhere to a certain algorithm. By adhering to it, you can calmly deal with such a problem yourself, without involving professionals. At a minimum, the user will be able to independently test problems with the HDD, and if it is impossible to fix them on their own, contact a specialist for advice.
First of all, you need to insert the media containing the operating system into the computer. Then you need to restart your computer and enter the BIOS. In the Boot , you need to find the media and specify it as bootable. After this, the installation should begin normally.
An installer window should open. Don't press the button. You need to find the inconspicuous inscription “ System Restore ” and run it.
A menu will open. You need to go to the command line through the appropriate item. In the line itself, you need to click and type the command: diskpart then click on again and enter the command: list volume After pressing the key again, the recovery system will start, which will examine the hard drive and display detailed information.
After this you need to find the boot disk. You need to look in the “ Information ” section. After finding the disk, you should remember its name. Enter exit and use the button again.
Then type the command chkdsk X: /F /R. Moreover, instead of X, you will need to indicate the letter with which the media with the operating system is marked. To complete this, press the key.
The result will be the launch of testing of the section specified by the user. If there are malfunctions that negatively affect the installation of the Windows 7, 8, 10 or other operating system, the system will try to fix them. This can lead to the HDD returning to working condition.
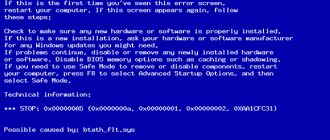
Errors 0x8007045d and 0x8007025d in Windows Update: causes and solutions
Errors may occur while Windows Update is running. The reasons for their appearance in general can be very different: Missing, damaged or moved files; Incorrect entries in the system registry; Hard drive failures; Lack of PC RAM; Problems connecting to Microsoft Update servers; Incorrect file permissions and permissions; Service failures.
Errors 0x8007045D and 0x8007025D are related and indicate file I/O problems.
0x8007025d when installing Windows 10 from a USB flash drive
Windows 10 has many advantages, but it is difficult to upgrade to it due to numerous problems that users encounter during installation. Error 0x8007025D is very common. It occurs when the installation stops at a certain percentage. Trying again will result in the same problem.
Error 0x8007025D is caused by several issues, but they all relate to the USB buffering system. After briefly explaining this error, we will provide you with steps to resolve it.
Problems with RAM
Poor RAM leads to problems during system installation. Since pure Windows does not “fight” for space with other programs, the entire OP is dedicated to installing the necessary system components, so even minor damage or malfunctions can cause error 0x8007025D. To install Windows 10, at least 1 GB of RAM is required. If data is copied to a bad sector, the buffering will receive a message that will be displayed on the screen with the code name 0x8007025D.
Additional solutions to the problem
If the above methods do not help, try these additional options:
- Check if the official website of the manufacturer of your motherboard (if it is a PC) or laptop has separate drivers for USB. If available, download and install.
- If an error occurs when copying to an SD card, check for drivers for the card reader and install them.
- If an error occurs when copying to an SD card, try deleting the card reader in the device manager, and then select “Action” - “Update hardware configuration” in the manager menu to reinstall it.
- Attention: when performing this action, at one point your mouse and keyboard connected via USB will turn off, but they will turn on again after a reboot. Therefore, I recommend saving all important data first, and in the advanced power plan options, enable “Shut down” when you press the power button so that you can reboot. The method itself: if the error appears when copying to a flash drive or external hard drive, try removing all USB controllers (the “Root USB con” items in the device manager, and then restarting the computer).
These are all the fixes I can suggest. Just in case, if you have them, you can try using system restore points, but in this situation they are rarely useful. It may also make sense to check the functionality of the drive to which you are copying on some other computer: there is a possibility that the cause is a hardware malfunction.
And maybe this will be interesting:
- Programs for SSD - configuration, optimization, testing
- How to change Windows 10 system icons
- How to recover data from an external hard drive
- How to transfer photos from iPhone to Windows and Mac computer, via cable and Wi-Fi
- Location inaccessible, access denied when opening flash drive - how to fix