Step one
: Create a new account on your computer Although if you already have an account you can use it, I decided to do this to specifically authorize my computer through my Android phone.
If you still create a new user, you can do it like this: Start
, then
the control panel
and then
adding and deleting accounts
.
There is nothing complicated here, just create a regular account. At the end, don't forget to set a password.
Step two
– creating a shared folder on the computer I would like to note that you can connect not only a folder, but also drives, for example C. Select a folder or partition and double-click on it, then go to the “
Access
” tab and click “
Sharing
”. Enter your username in the drop-down menu. Important, the username should be the same as in the previous step, also select read and write.
The general section to which we will connect has been successfully created. Step three
– creating a server in file mode For further work we will need the program
ES File Explorer
, which you can install on Google Play.
Have you downloaded it? Then go to the program itself and select the LAN tab. Press the “ Menu
” key, after “
Create
” and in the dialog box click “
Server
”.
Here you will see many different settings.
I'll tell you what to do. the “ Domain
” field empty, but in the “
Address
” field enter the IP of your computer (if you don’t know it, write the ipconfig command into the Windows console, screenshots below).
Field " Login
" - this, as you already guessed, is the account name, you need to enter it the same as you entered in the first step.
Also enter the same password as in the first step. “ Name
” can be left blank or named as your imagination dictates for the server.
After entering all the data, click “ OK
” and, lo and behold, the server is created. Now you can log into your computer from your phone or tablet.
Now we can start the process of sharing the folder on the Android device itself. The smartphone and PC must be on the same Wi-Fi network. Take the smartphone and go to your computer, select a folder or file, and press the icon.
Now select an action (for example, copy or cut) and go to the PDA tab.
Select the folder where you want to paste the file, and voila, it’s on your phone. The same can be done with cloud servers. Select the “Network” tab.
We add the server in the same way as we added it on the computer, only here you will have to enter the credentials of your account in the cloud service.
After adding cloud servers, you can do the same file sharing activities as you would with a PC. You can also exchange directly between the cloud and a PC using a smartphone (without downloading information to it).
If, unlike me, you use an FTP server somewhere, then know that adding and setting up are similar. The only thing is to check the correctness of the port, login and password (if required). It is much more interesting to get through a browser to a smartphone using FTP. To do this, you need to go to the ES Explorer settings.
Select remote access settings (Root rights are not needed).
And we set everything up: select the port (any port is possible, but let it stand as it is) and the root folder (the folder into which the first login will be made). Next, we set up accounts (this is if you want to limit access to your smartphone), then set up the encoding (if the browser shows hieroglyphs), and quickly launch the FTP server (creates a shortcut on the smartphone’s desktop). To get to your smartphone from a computer, you need to type ftp://192.168.0.103:3721 in your browser (just enter the IP address of your phone, it is listed in the “Remote access” section).
Today, smartphones and tablets have become closely integrated into our daily lives. It’s hard to imagine that a few years ago no one knew what Android was, and that there might not be a device running this operating system in every apartment. But in addition to Internet surfing, games and communication on social networks, advanced users use tablets and smartphones to view photos and watch videos. Therefore, we are often asked questions like:
- How to watch a movie on a tablet from a computer over the network;
- How to log into a computer from a smartphone;
- How to access a network folder from a smartphone.
Today we decided to answer these questions. Because thanks to the abundance of applications on Google Play, this problem can be easily solved. Below we will talk about how to access a network folder on a computer from an Android device.
Access from Android to Windows. Settings on the computer side
2 Open access to the desired folder. As an example, we took a typical and simple situation: we place media content on a separate disk and open access from the local network to the entire disk:
Right-click on the desired folder/drive and select Properties
:
Go to the Access
and click the
Advanced setup
:
Check the box next to Share this
folder, provide a name for the network folder and click
OK
:
Access is open. Now click Close
to close the folder properties window:
Pre-setting
Before you connect Android to your home Wi-Fi network, you need to do a little setup on the computers you want to access from your tablet. This procedure is not mandatory, but we still recommend doing it to fully guarantee the functionality of this method.
Creating a new user
The recommendation is that you must have a user password set on your computer so that you can log into your PC from an Android device. If a password is not set for the account, then there are several ways to solve this problem:
- Install it on your account, and then you will need to enter it every time you turn on your PC.
- Create a new account with a password, grant it rights and leave it (you can forget about it), continuing to use your existing one without a password.
This is done because when you log in from Android, you will need to fill out a mandatory password field, and if you don’t have one, then in some cases you may not be able to log in to your PC.
In our example, we will create a new user. This is done as follows:
- Follow these steps: “Start” > “Control Panel” > “Add and remove accounts.”
- Create a user with a username and password: access rights can be set to “Normal” rather than “Administrator”.
We provide file sharing
If you have previously used a network between computers, you have probably already shared access to the necessary folders or drives. If not, then we will show you how to do it. You can share not only folders, but also entire disks - the choice is yours.
- Right-click on the folder or drive you want to share with other devices.
- Select Properties.
- Next, open the “Access” tab.
- Click on the "Advanced setup" button.
- Check the box next to “Share…”.
- Click on the "Permissions" button.
- If you are using a computer on a home network, you can leave the user type as “Everyone” and simply check the “Allow” boxes at the bottom next to the desired operations on your files. If you often use your PC on public networks, then click “Add”, select the account you just created and give it the “Allow” rights opposite “Full access”.
Access from Android to Windows. Settings on the smartphone/tablet side
Installing the application.
Launch Play Market:
In the search bar, enter es file explorer
and click
Search
:
In the search results, select the ES File Explorer
from the developer
ES APP Group
:
Click Install:
Click Accept
:
Once the download and installation of ES File Explorer
(or
ES File Explorer
) click
Open:
Setting up ES File Explorer
The application has three screens:
- HomePage(HomePage);
- Device;
- Net
.
Go to the Network
Create
button in the lower left corner :
Select connection type from the list: LAN
:
In the Server
please indicate:
- Server IP address;
- Username;
- Password;
- Display name (optional)
and click OK
:
To the list called LAN
your computer will be added (it can be a laptop, server, network storage, in general, any network device with a storage device).
Useful video: The easiest way to connect your phone to a computer via Wi-Fi
Step one
: Create a new one on your computer Although if you already have an account you can use it, I decided to do this to specifically authorize my computer through my Android phone.
If you still create a new user, you can do it like this: Start
, then
the control panel
and then
adding and deleting accounts
.
There is nothing complicated here, just create a regular account. At the end, don't forget to set a password.
Step two
– creating a shared folder on the computer I would like to note that you can connect not only a folder, but also drives, for example C. Select a folder or partition and double-click on it, then go to the “
Access
” tab and click “
Sharing
”. Enter your username in the drop-down menu. Important, the username should be the same as in the previous step, also select read and write.
The general section to which we will connect has been successfully created. Step three
– creating a server in file mode For further work we will need the
ES File Explorer
, which you can install in .
Have you downloaded it? Then go to the program itself and select the LAN tab. Press the “ Menu
” key, after “
Create
” and in the dialog box click “
Server
”.
Here you will see many different settings. I'll tell you what to do. the “ Domain
” field empty, but in the “
Address
” field enter the IP of your computer (if you don’t know it, write the ipconfig command into the Windows console, screenshots below).
Field " Login
" - this, as you already guessed, is the account name, you need to enter it the same as you entered in the first step.
Also enter the same password as in the first step. “ Name
” can be left blank or named as your imagination dictates for the server.
After entering all the data, click “ OK
” and, lo and behold, the server is created. Now you can log into your computer from your phone or tablet. Now we can start the process of sharing the folder on the Android device itself. The smartphone and PC must be on the same Wi-Fi network. Take the smartphone and go to your computer, select a folder or file, and press the icon.
Now select an action (for example, copy or cut) and go to the PDA tab. Select the folder where you want to paste the file, and voila, it’s on your phone. The same can be done with cloud servers. Select the “Network” tab. We add the server in the same way as we added it on the computer, only here you will have to enter the credentials of your account in the cloud service.
In the search bar, enter es file explorer
and click
Search
:
In the search results, select the ES File Explorer
from the developer
ES APP Group
:
Click Install:
Click Accept
:
Once the download and installation of ES File Explorer
(or
ES File Explorer
) click
Open:
Setting up ES File Explorer
The application has three screens:
- HomePage(HomePage);
- Device;
- Net
.
Go to the Network
Create
button in the lower left corner :
Select connection type from the list: LAN
:
In the Server
please indicate:
- Server IP address;
- Username;
- Password;
- Display name (optional)
and click OK
:
To the list called LAN
your computer will be added (it can be a laptop, server, network storage, in general, any network device with a storage device).
Using ES File Explorer to access your computer over the network from an Android device
Click on the icon of the newly added network device (see figure above).
If the login and password were specified correctly, you will see a list of network folders.
In our example, we opened the desired network folder with media content under the name Media
.
Therefore, we go to the Media network folder:
In it we see video recordings:
And audio recordings in the Music folder:
We check music playback - click directly on the file in the network folder. A window appears asking you to select a player. Check the box Set as default
and select your favorite player:
The recording will be played:
You can switch the folder view to a list or table using the View
:
How to copy a file from your computer to your Android device
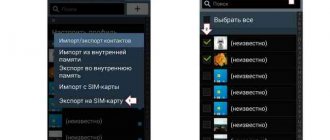
Long press on the file to turn on selection mode.
Check the files you want to copy from the network drive to your Android device.
Click the More
and select
Copy to:
Select the folder on your Android device where you want to copy files from the network folder and click OK
:
Create another folder in the folder or just click OK
to copy files directly to the current folder:
Files are being copied:
Greetings, dear readers! Today, almost every second person has such a convenient thing on the road as a tablet computer. Therefore, in this article I will look in detail at how to include Android 4 in our local wifi network - after all, this is the operating system that most modern devices work with. We will learn how to connect it to the Internet, how to connect Android to a PC via wifi and a few other interesting and useful things.
Internet WiFi Android 4
I write “4” since this is the newest version, but on the rest, wifi is configured in the same way. I wrote about simply connecting Android to the Internet via wifi a year ago in an article about a home network - there is nothing complicated about it, so I won’t repeat myself, but will simply show you a video that tells how it’s done.
We are more interested in learning about other possibilities for operating an Android tablet within a wireless network. For example, how to connect it to a computer? To implement this idea, you will need to install one additional program - wifi manager “ES Explorer”. Download it for free from Google Play. The program replaces the standard folder and file viewer and significantly expands its capabilities.
We need to select “LAN” or “Local” - depending on how you write it. There is no need for an additional connection to the local network - after all, if your tablet is already connected via wifi to the router, then it is already inside your network. After that, click on the “Search” icon to search for computers within the network. It should be noted here that in order for something to appear as a result of this search, you must either:
1. To create a home group using one of the computers - I wrote about how to do this in. To do this, you must have a Windows version higher than the Home Basic version.
2. Or have the Home Media Server program running on your computer. I analyzed her work when...
So, if one of these conditions is met, then you will have computers inside the local network or a computer with a home media server enabled. Either their names or their IP addresses can be displayed.
Now you can go to any of them and see the contents of folders that are shared, that is, they are publicly accessible from the network.
And finally, the third option is to make a LAN server on Android itself. This does not require the two conditions outlined above.
First you need to create a new account with a password on your computer (Start - Control Panel - User Accounts).
After that, go to the LAN section on the tablet and click on the “Create” icon. Enter the computer's IP address and login/password for the newly created account.
In the name field, enter what will be displayed in the list - the name for the computer. I just entered his IP.
That's all, you can view folders for general use.
Preparing your computer to connect an Android mobile device to it
Of course, a local network can already be created and there are shares in it? folders. In this case, the user can proceed directly to the next item. If this is not the case, then you need to do the following:
1. Right-click on “My Computer” and go to “Properties”, then make sure that the name and workgroup are specified. If one of these parameters is missing, give them values.
2. Follow the path “Start” - “Control Panel” - “Network and Internet” - “Network Sharing Center”.
3. In the right part of the window, click on “Change additional…”.
4. Expand the settings items in the “Private” field, set the bullets as shown in the screenshot, and save.
5. Create a folder (or use an existing one), then right-click on it and go to “Properties”.
6. In the displayed window, in the “Access” tab, make it public.
Important : the computer must be connected to a router (switches are allowed along the route), through which the Internet is distributed to the phone, otherwise nothing will work.
Connecting to an FTP server using WiFi program for Android
Another cool feature of the ES Explorer program that uses a wifi connection via Android is to connect to a flash drive configured as an FTP server - remember, we did this too. To do this, select the “FTP” item in the same drop-down list from the upper left corner of the program.
As the server, we indicate the IP of the router to which the drive is connected. In my case, this is 198.162.1.1 And further down the list are the login and password specified for working with it. We leave the port “21”.
After this, we will receive a list of files that are available for the account you entered.
Camera Android WiFi
But that's not all! From our favorite Android tablet we can monitor the built video surveillance system running on the program. This is very easy to do - just enter the IP of the computer and the port on which this program runs into the browser line - for example, for me it is 192.168.1.225:1010. Or, if you use the DDNS service, the level 3 domain you registered. We discussed all the details about setting these parameters in the article about organizing surveillance, the link to which I provided above.
The simplest solution to connect an Android phone to a computer via WiFi is ES Explorer. The application is free and has a clear interface, but most Android phone owners limit themselves to using it only as a file manager. To open the network capabilities of the program you must:
If the connection is successful, all directories on the computer available for public use will be displayed.
To open files from your phone to your computer via WiFi, it is recommended to use another menu item: “Network -> FTP”. No authentication or selection of additional settings is required. The application will independently create an FTP server on your smartphone, open the required port and provide a ready-made link for connection.
You can view or download files from your phone via WiFi in any browser. It is enough to enter the specified data in its address bar.
If, in addition to viewing files, you need to download from an Android device or upload folders to it, this can be done through standard operating system applications. To do this, just enter the server address that was provided by the program directly into the “Explorer” line. Directories located in the smartphone’s memory will open in the same form as files and folders on the computer itself.
Important! The most complete use of the smartphone's file system when connecting in this way can be achieved using specialized FTP clients, such as FileZilla or SmartFTP. But even when working through the standard File Explorer file manager in Windows, you can copy files from and to your phone.
Using the AirDroid app
In addition to viewing files on your smartphone, this application ensures full synchronization of your phone with your computer. Connecting to a computer via WiFi is carried out in several stages.
It is important to remember that the Android device and the computer must be connected to the same network. Moreover, if a router is used, a wired connection can be used for the computer, and the smartphone will connect via WiFi. If difficulties arise at the synchronization stage, the smartphone may be connected via mobile Internet.
After synchronization is confirmed, the connection to the phone is completed. Almost any action that can be performed can be done remotely, via a computer and a WiFi connection. The interface is designed as a separate desktop. In the upper right corner, information about the device and the amount of free memory are displayed. Just below is the control panel, with which you can send files and folders from your computer to the device.
The icons on this desktop work like menu options on the phone itself. For example, the call log displays full call details. Synchronization is performed in both directions - with the ability not only to view records, but also to delete them. The changes will be applied on the phone.
When you open contacts, all numbers in the smartphone's memory are displayed. People from the address book can be sent SMS or called using a computer.
One of the interesting features of the application is the use of the Android device’s camera. There are not many practical applications of this feature, since the phone is already within the range of the WiFi signal.
Connecting to the device screen via WiFi works in the same video streaming mode. There may be a delay when updating information, but it is not so large that it interferes with your experience.
AirDroid also allows full access to the smartphone's file system, just like ES Explorer. Data on the phone is transferred via WiFi in both read and write mode.
Solving possible problems
If you are unable to connect your phone to your computer via WiFi using any of the suggested methods, restrictions may be set by your router. In some cases, its settings can set a mode in which various devices on the local network do not have direct communication with each other, but are used exclusively to access the Internet.
You can change the settings in the router control panel. For Huawei: “Home network -> WiFi Settings - WiFi encryption - Enable access point isolation.” For TP-Link routers, the corresponding item is in the menu: “Wireless mode -> Advanced settings -> Activate AP Isolation”.
If the connection via FTP is successful, but the smartphone does not display other devices in the ES Explorer “LAN” menu, it is recommended to change the sharing settings on the computer.
Setting up a local network
Usually, when connecting through a router, there are no problems, everything happens automatically, dynamic IP addresses for devices are issued. But it is important that all your computers are in the same workgroup. How to do it?
Go to “Control Panel > System”, look for the section “Computer name, domain name, workgroup name” and click “Change settings” and “Change” again.
In the “Work group” field we write “WORKGROUP”. Then click “OK” and restart the PC.
Go to “Control Panel > Network and Internet > Network and Sharing Center” and share the folders.
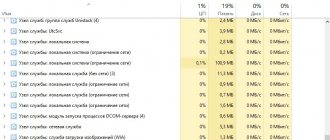
If for some reason we receive an error about the RPC server being unavailable, then go to “Manage (right-click on the “My Computer” icon) > Services and Applications” and start the services:
- Remote procedure call (RPC);
- Server;
- DCOM server process launcher;
We try to detect our PCs in EN Explorer, if unsuccessful again, move on to the next section.
Setting up IP addresses
If it is difficult to connect devices on a local network, it is recommended to register the IP addresses of devices manually. The task is tedious, but not difficult :)
1.
On your computer, go to “Control Panel > Network and Internet > change the view to “Large icons” in the upper right corner > Network and Sharing Center > Change adapter settings.”
We select our connection, my laptop is connected to the router via an Ethernet cable (“Local Area Connection”), so I’m setting it up. You can configure “Wireless connection” in the same way.
2.
To simplify your task, right-click on the icon of our connection and select “Status”, in the window that opens, click the “Details” button.
We are interested in the current IP address of the computer and the main gateway. We will need them in the next step. Leave this window open for now.