07/23/2018 Category: OptimizationAuthor: Ekaterina Vasilyeva
Over time, every computer starts to slow down. The reason for this may be not only the presence of “junk” files in the system, but also a service called Superfetch, which, although designed to optimize the operation of the device, in some cases only causes harm to the computer in the form of performance problems. Why was the option created? How to disable it if the device refuses to work stably with it?
- How to set up SuperFetch service on Windows 10
- Should I disable the SuperFetch service?
Negative effects from the SuperFetch service
- Benefits of this service
- Disable via Services
Video: deactivating SuperFetch in Services
- Scanning system files in the Command Line
SuperFetch service in Windows 10: what it is responsible for and what it is needed for
The service, known to Windows 10 users as SuperFetch, is responsible for maintaining and improving system performance, as stated in its description in the Services window. Its other names are svchost.exe and SysMain. How does it optimize the device's performance?
This component of the system analyzes how RAM is used: which applications are loaded into it most often. Gradually, the service marks these utilities as “frequently launched” and begins to load them in advance into the PC’s RAM. As a result, programs open noticeably faster because they were already partially in RAM.
The SuperFetch service determines which utilities you use most often and places them in advance in the RAM.
SuperFetch fills with popular utilities (caches) only the free part of the RAM. If the system suddenly needs additional RAM memory for programs that are not included in the list of frequently used ones, the service immediately frees it up so as not to reduce the speed of work on the PC.
What kind of service is this
SuperFetch speeds up the OS by loading frequently used programs or files into RAM so they start faster. This is called caching. In the list of running processes it may be called SysMain.
While running, the service accesses the disk to read data, which is loaded into RAM. This speeds up memory performance. But frequent access loads the disk, and it starts to work slower, which affects the entire system and running applications.
The service is effective for PCs that use hard drives (HDD) and a small amount of RAM. When using solid state drives (SSDs), this feature is not needed, so you should disable it.
How to set up SuperFetch service on Windows 10
The SuperFetch service is easy to configure for your computer: enable its individual options. This can be done in the Registry Editor, as well as in the Local Group Policy Editor window. The configuration principle is the same for both cases: you need to set a certain value in the parameter that is responsible for this service. The instructions are quite simple, so even a beginner can handle it. Let’s use “Registry Editor” as an example:
- We call the universal “Run” window to launch windows and programs using the familiar Win + R combination. We print the regedit request, which will call the “Registry Editor”. We immediately click on OK.
Enter the command regedit in the "Open" field
- Click on “Yes” to allow the editor to make changes on the computer.
- In the left area of the panel you will see several main branches. Open the third one called HKEY_LOCAL_MACHINE.
Open the HKEY_LOCAL_MACHINE folder on the left side of the editor window
- Now launch the following folders one by one: SYSTEM - CurrentControlSet - Control - Session Manager - MemoryManagement - PrefetchParameters. When you open the last one, switch your attention to the second part of the panel. It will contain a list of specific registry entries. Find EnableSuperfetch among them.
In the PrefetchParameters folder, find the EnableSuperFetch parameter
- If it doesn't exist, you need to create it. To do this, right-click on the last opened PrefetchParameters folder and select “New” and then “DWORD Value” from the list of options. Give it an appropriate name.
Create an EnableSuperfetch parameter in the PrefetchParameters folder
- Now we right-click on it and select “Edit” in the context menu or launch it by double-clicking the left button.
Click on the “Change” item in the context menu of the parameter
- In the gray window that opened on top of the editor, we are interested in the “Value” field. In it you need to write one of the following numbers, depending on what exactly you want to optimize:
- 1 - caching frequently used utilities;
- 2 - acceleration of startup of Windows system components only;
- 3 - optimization of the launch of both Windows components and programs.
- The recommended setting is the latter. By the way, it is installed by default.
Changing SuperFetch technology settings
This section will talk about how to configure SuperFetch. Advanced users recommend using group policies or the system registry for this purpose. The first and second options generally repeat each other. Let's focus specifically on the change through the system registry.
Regedit is enabled by pressing the key combination Win+R and adding the appropriate name “regedit” to the command line
You need to find the PrefetchParameters directory in the HKLM branch. You can search manually or through the search bar. The directory should contain the following keys: EnablePrefetcher and EnableSuperFetch. The second key may be missing, in which case it must be created through the Edit DWORD parameter. Give the key an appropriate name. It is possible to enter 4 values for each of the specified keys:
- 0 – completely disabled
- 1 – only launched applications are optimized
- 2 – only the launch of system components is optimized
- 3 – balance between acceleration of system components and programs.
The recommended automatically set parameter is “3”
Using the services.msc command, you can open the settings window for currently running processes and services. You need to find Superfetch in the list. From the list of settings, select the required startup type (from 0 to 3). This way you can manage SuperFetch modes and the SysMain SuperFetch service.
Should I disable the SuperFetch service?
Do I need to disable this option to optimize PC performance? It is definitely worth deactivating the service under the following conditions:
- You have less than 1 GB of RAM. This volume is not enough for stable operation of the service.
- You have noticed that a large amount of RAM is consumed and at the same time performance has deteriorated during active operations with RAM.
- You regularly use a large number of applications that consume a lot of PC resources.
- Your RAM and hard drive are very worn out. In order not to overload them once again due to the active operation of the SuperFetch service, disable it.
If SuperFetch does not consume a lot of resources and the computer is working in good mode, there is no need to disable the option. To help you make your choice, we will also consider the pros and cons of using the service.
Negative effects from the SuperFetch service
What might motivate a user to disable this option on a PC:
- SuperFetch is a background process, so it always uses both random access memory (RAM) and central processing unit (CPU) resources.
- When the service is enabled, applications will still take some time to load (depending on resource consumption and system state). SuperFetch only speeds up this process to one degree or another, but does not eliminate the need to load utilities into RAM at startup.
- If you play demanding games and have less than 4GB of RAM installed on your system, there is a chance that they will constantly close or malfunction as SuperFetch will also constantly upload and download data from these utilities.
- If you have an SSD on your PC with Windows 10 installed, you don't need SuperFetch. It simply won’t have any effect, because such a hard drive works fast on its own.
- Windows may start slowly when you turn on your computer because the SuperFetch service will immediately load a certain amount of data from your hard drive into RAM. If your resources are heavily loaded for several minutes when you start Windows, you might want to consider disabling this feature.
Benefits of this service
For the most part, the SuperFetch service is very useful for Windows 10 clients if the device has a large amount of RAM. Even if you have average technical specifications, the function will work normally and you will not have to endure any inconvenience.
What are the advantages of using SuperFetch:
- Speed up the launch of Windows and the most popular applications installed on your computer.
- Runs OS components and useful standard Windows utilities in the background, which are designed to improve PC performance and protect it from malware. For example, this could be Windows Defender and the Disk Defragmenter service.
- Caching of images and some other website elements in browsers. The next time you launch them, the pages will load noticeably faster.
Superfetch – should I turn it off or not? Advice from professionals
If synthetic tests on advanced hardware do not give visible results that Superfetch is loading the disk or somehow reducing system performance, then the words of the professionals will put the finishing touches on it.
- The background operating mode ALWAYS uses processor and RAM resources, and this, one way or another, additionally loads the parameters of your PC.
- Superfetch does NOT load data completely into RAM. You will experience the same delays during boot processes with Superfetch enabled or disabled.
- The effect of Superfetch is noticeable only in a combination of SSD and Windows 10, provided that the RAM is selected in accordance with the user's needs.
- High wear on SSD drives due to frequent access to the memory module. With Superfetch enabled, your SSDs will die faster.
- Superfetch caches its own data and other active applications that are not involved in workflows. In the background it is uncontrollable.
- Freezes in games when RAM is less than 4 GB. This occurs due to periodic requests to RAM, which is already maximally involved in the gameplay.
How to disable SuperFetch
You can deactivate SuperFetch using several standard methods. In this case, only built-in Windows tools are used. Let's take a closer look at each of the options.
Disable via Services
The most popular way to disable the option is in the window where all Windows services are collected:
- Click on the magnifying glass icon on the “Taskbar”, which is located to the right of the “Start” button. In the request line we type “Services”. The required system partition will immediately appear in the search results. Click on it once with the left mouse button.
Enter "Services" in the search bar
- The second way to launch the same service is through the small “Run” window. Call it using the Win + R key combination. In the “Open” line, enter the command services.msc and click OK or press Enter. After that, click on “Yes” to allow the “Services” window to make changes on your device.
Paste the command services.msc into the “Open” field
- The list of services will be in alphabetical order, so we are looking for SuperFetch at the end of the list of objects with English names. Click on it with the left mouse button. In the left panel, click on the blue “Stop” link.
Click on the “Stop” link in the left menu
- If the left menu is missing, switch from the Standard tab to the Advanced tab at the bottom of the window.
- The stop option is also available in the element's context menu, which is launched by right-clicking.
Click on "Stop" in the SuperFetch context menu
- In the mentioned context menu with a list of options, click on the “Properties” item.
- A new window will open. In the “General” tab, click on the “Stop” button. After that, change the launch type in the block of the same name. In the drop-down menu, set either “Disabled” or “Manual”. The last value is set if you want to enable this service yourself if necessary.
Set the "Startup Type" drop-down menu to "Disabled" or "Manual"
Video: deactivating SuperFetch in Services
Deactivation in the Command Line
In the standard Windows “Command Line” service, you can change the launch type of SuperFetch:
- Let's use the standard Windows Search service again. Click on the “magnifying glass” on the “Taskbar” and print the query corresponding to the name of the console. As you type, the system will predict what exactly you want to find. Usually it is enough to enter the first few letters.
Start typing "Command Prompt" into Windows Search
- Now right-click on the desired section in the results and in the list click on the “Run as administrator” option.
Select the first option “Run as administrator”
- In the black window, paste the copied command: sc config SysMain start= disabled. Immediately press Enter for the “Command Deadline” to execute it.
Type or paste the command sc config SysMain start= disabled in the black editor
- We restart the device so that all the changes made take effect.
Using Registry Editor
In this standard Windows window, you can not only enable individual options for the SuperFetch service (individual optimization of Windows or applications), but also completely disable it. How to do this:
- Using the instructions in the “How to set up SuperFetch service on Windows 10” section, open the PrefetchParameters folder and find the EnableSuperFetch registry entry there.
- Double-click on it to open its parameters.
- In the “Value” line, in the small gray window, instead of 3, write 0. To save the changes, click on OK.
Set EnableSuperFetch to 0
- Restart your PC for all changes to take effect.
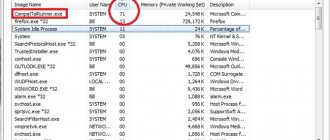
In the "Task Manager"
This method will help disable the service only for a while, in particular, only for the current session. When you restart your computer, the service will be enabled again automatically. This method is suitable for you if you want to deactivate the option only at the moment, and not turn it off completely. To change the service startup type, use the instructions in the “Disable through Services” section.
So, how to temporarily deactivate SuperFetch in the Task Manager:
- Click on the “Taskbar” with the right mouse button. In the black context menu, select the “Task Manager” object. You can also call its window using a combination of three keys: Ctrl + Alt + Delete.
Click on the “Task Manager” item in the context menu of the “Taskbar”
- Switch directly to the “Services” block. We also click on the heading of the first column for easier searching.
Click on the "Name" column header to sort the list
- In the list we find the SysMain service. This is another name for SuperFetch. Right-click on the item and select “Stop” from the small list.
Click on “Stop” in the SysMain context menu
Ways to disable a service
So, we have more or less figured out whether SuperFetch needs to be disabled in Windows 7/10, now let's see how you can deactivate this service. There are at least three tools for this: the service management snap-in, the command line, and the registry.
Through the Services snap-in
The easiest way to get to the service management interface is to run the services . You can also open Task Manager, go to the Services tab and click the Open Services link at the bottom.
Next in the list, find a service called SuperFetch and double-click on it.
In the dialog box that opens, click the “Stop” button, and in the “Startup Type” drop-down menu, select the “Stopped” option. Click "Apply" then "OK" and restart your computer.
Using the command line
You can also disable supersampling from the command line. Open a CMD console as an administrator and run the command sc config SysMain start= disabled.
net stop command is not suitable in this case, since it will only temporarily stop the service, but will not change its startup type. For the new settings to take effect, restart the computer.
Using Registry Editor
Finally, the Registry Editor allows you to disable SuperFetch. Open it with the regedit in the Run window and expand the branch:
HKEY_LOCAL_MACHINE/SYSTEM/CurrentControlSet/Control/Session Manager/Memory Management/PrefetchParameters
In the right column of the editor you will see the DWORD parameter EnableSuperfetch . It can take four values:
- 0 – disables the service;
- 1 – turns it on only for program files (only applications will launch faster);
- 2 – enables the service only for system boot components (Windows boot acceleration);
- 3 – enables supersampling for both the system and programs.
Accordingly, to completely disable SuperFetch, you need to replace the current value with 0 and restart your computer.
- 0shared
- 0Facebook
- 0Twitter
- 0VKontakte
- 0Odnoklassniki
Error starting SuperFetch service
It may be difficult to re-enable the SuperFetch service. Even entering the required values in the Registry Editor does not help - the service does not start. In this case, a message about an abnormal termination or access denial usually appears. As a rule, the error message about the impossibility of starting is numbered 1067 or 1068.
What causes the error:
- The computer does not have enough RAM to run the service.
- A conflict has occurred between the RAM sticks.
- There are damaged system files on the computer. In this case, fix them using “Command Prompt”.
- These may be failures in the system itself. In this case, configure the service repair tool in the Properties window.
- There are viruses on the device. Check your hard drives with an antivirus.
Scanning system files in the Command Line
Windows is capable of healing itself: by scanning, it identifies damaged system files and replaces them with new “correct” ones. However, this check is initiated by the user. Follow the instructions to activate scanning:
- In Windows Search (magnifying glass icon), type the query “Command Prompt”. Right-click on the corresponding section in the results. In the gray submenu, select the first item “Run as administrator”.
- Feel free to click on “Yes” in the next window to allow the editor to make changes on your device.
Click “Yes” to allow Command Prompt to make changes to the device
- In the black window, enter the command sfc /scannow and press Enter for the system to run the scan.
Run sfc /scannow in the editor window
- The process can take from a few minutes to half an hour. In the window you will see the progress of the scan as a percentage.
The editor will display the progress of the check as a percentage
- As a result, the system will detect “wrong” files and solve the problem with them.
Should I turn off superfetching?
Supersampling, like many other components of Windows 7, is active by default for a reason. The fact is that a running Superfetch service can speed up the performance of the operating system on weak computers at the cost of increased RAM consumption, albeit insignificant. In addition, supersampling can extend the life of traditional HDDs, no matter how paradoxical it may sound - active supersampling practically does not use the disk and reduces the frequency of access to the drive. But if the system is installed on an SSD, then Superfetch becomes useless: solid-state drives are faster than magnetic disks, which is why this service does not bring any increase in operating speed. Disabling it frees up some RAM, but too little to have a serious impact.
When should you disable the element in question? The answer is obvious - when there are problems with it, primarily a high load on the processor, which more gentle methods such as clearing the hard drive of “junk” data cannot cope with. You can deactivate superselection in two ways - through the “Services” environment or through the “Command Line”.
Note! Disabling Superfetch will affect the availability of ReadyBoost!
Method 1: Services Tool
The easiest way to stop supersampling is to disable it through the Windows 7 service manager. The procedure follows the following algorithm:
- Use the Win+R key combination to access the Run interface. Enter services.msc into the text line and click OK.
- In the list of elements of the Service Manager, find the “Superfetch” element and double-click on it with LMB.
- To disable supersampling, select the “Disable” option in the “Startup Type” menu, and then use the “Stop” button. To apply the changes, use the “Apply” and “OK” buttons.
- Restart your computer.
This procedure will disable both Superfetch itself and the autostart service, thus completely deactivating the element.
Method 2: "Command Line"
It is not always possible to use the Windows 7 service manager - for example, if the operating system version is Starter Edition. Fortunately, there is no task in Windows that cannot be solved by using the Command Line - it will also help us in turning off superselection.
- Go to the console with administrator rights: open “Start” - “All applications” - “Accessories”, find “Command Prompt” there, right-click on it and select the “Run as administrator” option.
- After launching the element interface, enter the following command:
sc config SysMain start= disabledCheck that the parameter is entered correctly and press Enter.
- To save the new settings, reboot the machine.
As practice shows, using the Command Line is more effective than disabling it through the service manager.
What to do if the service does not turn off
The above methods are not always effective - superfetching is not disabled either through service management or using a command. In this case, you will have to manually change some parameters in the system registry.
- Call the “Registry Editor” - here we will again need the “Run” window, in which we need to enter the regedit command.
- Expand the directory tree to the following location:
HKEY_LOCAL_MACHINE/SYSTEM/CurrentControlSet/Control/Session Manager/Memory Management/PrefetchParametersFind the key there called “EnableSuperfetch” and double-click on it with the left mouse button.
- To disable it completely, enter a value of 0, then click OK and restart the computer.
Conclusion
We examined in detail the features of the Superfetch service in Windows 7, provided methods for disabling it in critical situations and a solution if the methods were ineffective. Finally, we remind you that software optimization will never replace upgrading computer components, so you cannot rely on it too much.
We are glad that we were able to help you solve the problem. Add the Lumpics.ru website to your bookmarks and we will be useful to you. Thank the author and share the article on social networks.
Describe what didn't work for you. Our specialists will try to answer as quickly as possible.
How does SysMain work on Windows 10?
By default SysMain is designed to occupy all available RAM space with preloaded applications. Don't worry, this is only about unused memory. As soon as your system requires more RAM (for example, to load an application that was not preloaded), it frees up the required memory as needed.
Before Windows 8.1, if an application needed to use, for example, 5 GB of memory, and the computer only had 4 GB of RAM, then Windows was forced to send 1 GB of this data to the page file on the hard drive. Thanks to this virtual memory, it becomes possible to run and use this program, but it will work slower than with enough RAM.
Starting with Windows 10, when the operating system needs more memory than it has available, then the process of compressing the data, like ZIP, into RAM , instead of sending it to the hard drive in the page file. Thus, if we need to store two data packets of 6 GB and 3 GB and the computer has only 8 GB of RAM, then Windows 10 compresses the 3 GB packet by reducing it to 1.5 and receives a total of 7.5 GB instead of 9 GB and can receive it accesses from RAM without resorting to exchange.