Preparatory stage
First of all, you will need to stock up on the necessary files and software, as well as a smartphone or tablet and a USB connecting cable to connect to a computer or any USB flash drive. The storage capacity must be at least 1 gigabyte. We've sorted out the hardware, now let's determine what kind of software you need. Its choice depends on which method you chose to create a bootable flash drive: using a computer or directly on your Android mobile device.
- An installation image of the Android operating system, specially adapted for installation via a bootable USB flash drive. The images are distributed in the form of files with the ISO extension, and you can download them from torrent trackers, directly from the websites of some mobile device manufacturers, or from this website (https://www.android-x86.org/download). It runs different versions of Android, including version 6.0, already adapted for various devices. On the download page you will see a large table with four columns. The first displays the Android version and download links, the second shows the devices for which the build is adapted, the third shows the creation date, and the fourth shows the author. Look carefully at the list of devices, and click on the View button next to the required assembly, after which you will be automatically redirected to the download page. What’s remarkable is that you don’t even need any activation keys to use it.
To ensure installation reliability, it is better to turn to trusted resources - just select the appropriate version and download it
- A utility for creating bootable media if you plan to use a computer. Use the one that is most convenient for you. Many people find the most suitable option to use the excellent UltraISO program, but it is paid, in addition, its main purpose is to work with disk images, so for most users it will seem oversaturated with unclaimed functions. In this case, it is best to use the excellent Linux Live USB Creator utility (https://www.linuxliveusb.com/en/download). It can create bootable media both for installation on a hard drive and for use directly from a flash drive, for example, to test the operation of an assembly.
- The DriveDroid application allows you to emulate a bootable USB flash drive to connect to your computer if you want to use a smartphone or tablet. A very cool thing that helps you always have the necessary files at hand, completely without computer software.
Having dealt with the files, let's move on directly to creating the media. Let's consider two ways.
When do you need to install Android from scratch?
- Failure of working software or its parts during operation;
- Buying a device with crooked firmware;
- OS update failed;
- A noticeable decrease in the speed of the system due to its overload with undeletable software and files;
- Purchasing a foreign, non-Russian device with global Chinese firmware.
All reasons come down to making the device faster and more functional. But for a successful flashing, you will have to carefully select the software and install it in accordance with the instructions. Any wrong step can permanently damage your smartphone or tablet.
Creating a bootable USB flash drive using a computer
- Download all the necessary files, unpack the archives, place everything in one folder on your hard drive.
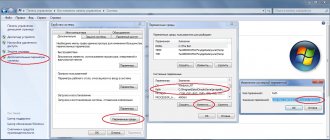
- Connect the flash drive to a free USB port on your computer or laptop. When properly connected and identified, the computer should beep. Please note that the smartphone or tablet must support connection in external USB storage mode. To activate it, in the notification shade, click on the notification that appears during connection and select “USB storage”. You may have to activate it by additionally clicking on the second notification that appears after turning on the mode.
Select the connection option as USB storage device
- Check whether important data is stored on your flash drive or memory card. If so, copy them to your computer, as the media will be formatted and all data will be erased from it.
- Launch the utility for burning bootable media, select your flash drive or memory card from the list, the downloaded system image and click the start recording button. For example, if you use UltraISO, click File - Open - mark the image - Boot - Burn Hard Disk Image - select media - Burn. In Linux Live USB Creator, select the flash drive, then click on ISO / IMG / ZIP - select the file - if desired, check the desired settings (if you plan to run Android directly on Windows without rebooting, check the third option) - click on the lightning bolt at the very bottom.
- If you choose to start the system without restarting when using Linux Live USB Creator, in the root of the created bootable media in the VirtualBox folder, run the file Virtualize_This_Key.exe to start Android. A separate window will open and the system will work as a normal program.
- I don’t disconnect the flash drive from the computer, reboot. In the BIOS settings, select it as the main drive, or simply press F11 or F12 and select it from the list.
- After a couple of seconds, you will see a boot menu with several options. You will be interested in two of them, usually the first and fourth. If you just want to start the system, select Live CD - Run Android-x86 without installation, but if you need a full installation - Installation - Install Android x86 to harddisk. In the first case, all your settings will be stored directly on the flash drive, in the second, Android will work as a full-fledged operating system.
Run without installation
The Android-x86 distribution has the function of starting the system without installation. In this mode, you can use all Android features, but the changes you make are not saved. Essentially, this is a demo mode that helps you understand whether it will be convenient to work with Android on a computer.
Restart your computer and boot from the USB flash drive - the same as when reinstalling Windows. In the menu, select the first item Run Android without installation.
After a short boot, the language selection screen and other initial settings will appear. At this point, your keyboard, mouse, and touchpad should work if you're running Android on a laptop. You don’t have to configure anything - anyway, the configuration is not saved in this mode.
Click “Next” until you get to the main system screen. Check how this version of Android works on your computer. Wi-Fi, local network connection, video playback - everything should work by default, without additional configuration.
Creating a bootable USB flash drive using the Drive Droid application
To use this utility, you must have a smartphone or tablet on a modern version of Android, at least half charged, root rights, a memory card with a little more free space than the image of the operating system you are going to record, as well as a computer with any a program for burning disc images (UltraISO is the best option for this).
- Download the DriveDroid application (https://yadi.sk/d/EQmQNrht3DbiiW or https://yadi.sk/d/zWzixhjY3Dbip2) and install it on your device. By default, the ability to install software not from the Play Market is blocked; disable this restriction by going to Settings - Security and uncheck “Unknown sources”.
- After launch, the settings wizard loads. Go through all the steps to set up the application. You will be asked to provide root rights, then configure the image directory, that is, the folder in which the working files will be stored.
- Connect your device via cable to your computer to activate the USB connection system. Select Standard Android Kernel - Show as USB device, then check in Explorer to see if the image you just mounted is displayed in it. If everything shows up, select Next and check if the computer boots through your test unit. If successful, we move on to the next stage.
In this case, you also need to select the connection type as to a USB drive
- Select “DriveDroid loaded successfully”, after which the program displays a report. You will see that a test image is currently mounted to check operation, and there is a flash drive icon next to it.
- To mount a custom Android image, move it to the folder you chose when setting up the app.
- After that, click on the file name and select the mount mode you need - Read-only or Writable. After finishing, you will see a flash drive icon next to the name.
- Now connect to your computer, select your device in the BIOS and rejoice.
Instructions for reinstalling Android on a tablet
Experienced users know very well how to flash a device. And beginners should not worry that reinstalling the system will be an impossible task. Absolutely anyone can handle it if they carefully study the instructions.
There are several ways to install updates:
- In automatic mode (by air).
- Manually using a tablet.
- Manually via computer.
Options for flashing a device differ in complexity and, accordingly, each method has its own instructions. Therefore, the user must decide which method is right for him.
If a person wants to update a gadget using software from the developer, a method with automatic mode or manual mode, where only a smartphone is used, is suitable. A third-party OS version will not install on its own. You will need to perform the operation manually on the tablet, and if this cannot be done, use a computer.
Auto mode
The Android operating system is regularly updated, which is why people simply do not have time to keep up with the release of new versions. To always be aware of updates, the developers have provided a function to automatically notify users about the availability of firmware that requires installation.
If such messages are not received and the tablet has not been updated for more than six months, you need to check whether the auto-update function is enabled.
To activate automatic firmware downloading, you need to:
- Open tablet settings.
- Go to the “Software Update” section.
- Check the box or move the slider to the active position next to the “Auto-update” item.
Automatic system reinstallation is suitable for those who want to update the OS. People who want to use a version of the operating system that is not provided by the developer need to use another method.
After enabling auto-update, every time the official version of Android appears for a specific tablet model, a person will receive a message in the form of a push notification about the need to install the firmware. The operation will be automatically performed at the same moment when you click the “OK” button or at another time if the device owner selects the “Later” option.
There is often a situation where automatic Android updates do not work, although the function is enabled. In this case, you can reflash the tablet yourself “over the air”:
- Go to the gadget settings.
- Select "Software Update".
- Click the “Update” button.
You won't have to take any further actions, and Android will reinstall automatically if the next version of the software is available.
Manually on a tablet
Errors in Android occur for various reasons. Some of them affect not only the operation of applications, but also the ability to reinstall the system. In such a situation, manual flashing will help, which is also used at the moment when you need to install another OS.
Manually reinstalling the system on the tablet is performed in two ways:
- Through the device interface.
- Using the engineering menu.
The first option is a little simpler, but does not always work if the current version of Android does not function correctly. However, it cannot be ignored.
To install updates via the tablet interface you need:
- Download the software version you are interested in onto your gadget.
- Open the file, having first assigned it the apk format.
- Click on “Start”.
Flashing using the engineering menu is performed as follows:
- Download the firmware file to the tablet.
- Turn off the device.
- Press and hold the power button and the top volume rocker for a few seconds (if nothing happens, you can try holding the power button and the bottom volume button or both at once).
- After the engineering menu appears on the screen, click on “System Upgrade”.
- Press the “Start” button.
When performing flashing using any of the presented methods, we must not forget about pre-clearing the data. If a person forgets this, a warning will appear on the screen with the option to reset to factory settings with one touch.
It is not recommended to download firmware from unofficial sites. In this case, no one can guarantee the safety of the user and the functionality of the system.
Preparing a Windows 8 tablet
You can't just go and install Android on a tablet like this. First, you will have to do a little magic with the settings of your native system.
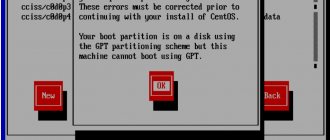
First, make sure that Secure Boot is disabled on the tablet. Go to Settings -> Change PC Settings -> Update and recovery -> Recovery. Here we select Restart Now.
In the menu that appears, use the arrows to select Troubleshoot -> Advanced Options -> UEFI Firmware Settings. The BIOS will open.
Find the Security item on the left side of the menu and install Supervisor Password.
Next, go to Boot -> Secure Boot and set the option to Disabled.
Now press the power button to reboot the tablet. Next, hold down the Windows buttons until the image appears on the screen. This manipulation is a quick way to go to the BIOS screen. You can use it to make sure that UEFI is selected as the boot mode.
Install via PC
To fully change the firmware, you need to connect your mobile device to your PC via a USB cable. For installation you will need specialized software.
Install the software on your computer
Before you start working, install the necessary software, we offer 2 options:
- Fastboot – available separately or as part of the Android Software Development Kit. In order not to waste extra space on hdd/ssd, it is better to download separately.
- ADB (Android Debug Bridge) Run.
The process of downloading a new OS version through both programs is approximately the same, but Android Debug Bridge is simpler.
When the software is installed, check its functionality by:
- Connect your mobile device to your computer with a USB cable.
- Open the start menu on your computer.
- Enter the word “cmd.exe” in the “Find programs and files” column.
- Click
- Left-click on the cmd.exe file in the list that appears.
- To check if ADB is working, type “adb devices” and press Enter. The system should display several lines, one of which will indicate the data of the connected device. If you receive a message consisting of three lines and there is no information about connected devices among them, then adb is working, but does not see the smartphone or tablet.
- To check that Fastboot is working, first enter the command “cd ***” and press Enter, where instead of **, specify the directory with the installed program. Next, try entering the command “fastboot flash”. The system will display a message about waiting for the device to connect if it is not connected.
If you use ADB Run and not Fastboot, then to check the program you need to run its exe file, not cmd.exe. If you see a menu of 16 items on a white background, then the software is working.
Upload firmware to device
Move the firmware to the same directory as the Fastboot or ADB Run program file.
Fastboot
You will have to install the firmware via Fastboot from the command line using text commands. To open the command line, use the instructions from the previous section, namely points 1-5.
The specific algorithm for entering commands varies depending on the type of device. But the essence remains the same - you need to put the device into the desired operating mode, remove system locks, if any, and start flashing. For a list of commands for this, see Table 1.
Commands for flashing a smartphone or tablet
| Problem | Solution |
| You need to enter data loader mode | Enter the command “adb reboot bootloader”. |
| Need to install firmware | Enter the command “fastboot flash cache ****.img”. Instead of “****”, indicate the name of the image, which is located in the same folder with the software. Please be aware of letter case. If there is any discrepancy between the names, the system will notify you about it. |
| Need to reboot | Enter the command “fastboot reboot-bootloader” so that after turning on the mobile device will again enter a special mode for flashing. Enter the command “fastboot reboot” to return to normal operation of your smartphone or tablet after rebooting. |
| You need to unlock the data bootloader | Enter the command “fastboot oem unlock” or “fastboot flashing unlock” |
| You need to unlock the bootloader using the key | Enter the command “fastboot.exe -i 0x0fce oem unlock 0x****”. Replace "****" with the key value. The key is the bootloader unlock code obtained from the website of your smartphone. If there is no code, it is better not to unlock it this way, as the phone will turn into a brick without the required code. |
Remember to press Enter to confirm the action after entering each command.
Each of the above actions will immediately lead to responses from the mobile device system. Most commands will need to be confirmed on your smartphone or tablet. Follow the instructions on the device screens.
The advantage of this method is that it lacks an interface and various additional functions:
- minimizes the risk of software failure during flashing;
- makes the software as flexible as possible, you can find more commands for a wider range of needs.
But if working with the console is an unnecessary complication for you, try ADB Run. Its interface is minimalist, but it is there and you don’t have to enter long commands.
If Fastboot suits you, see how it works using a specific example in the video.
ADB Run
Fastboot is already included in the ADB Run package. In the program menu it is located at number 5, among other numbered actions.
The algorithm of actions is as follows:
- Press "5" and Enter. Make sure that next to the number 5 it says Fastboot.
- Press "3" and Enter. Make sure that next to the number 3 it says Recovery.
- Find and run the image file with the firmware through a simple explorer in the window that opens.
- Wait for the process to complete.
Everything is much simpler. As with the previous subsection, ADB Run software provides additional capabilities. For a general overview of the interface and other features, watch the video.
Update Recovery on your device
If the firmware becomes crooked or you don’t like something with a positive result, there will be no turning back. But this path can be created if you take care in advance to save a backup copy of the system.
The recovery mode in purchased phones allows you to return smartphones to factory settings and update them. To expand the functionality, you need to replace Recovery Mode with another one. An example of an available program is Clockworkmod Recovery (CWM).
With CWM you can additionally:
- just install third-party firmware;
- update the system;
- create backups;
- restore from backups;
- use mobile device management functions via ADB;
- reset to factory settings;
- reformat the hard drive.
Install CWM via Fastboot. For this:
- Download the CWM program image.
- Rename the image to recovery.img.
- Place the img file in the same directory as Fastboot.
- Connect your device to your computer.
- Run cmd.exe.
- Open the directory with fastboot with the command “cd ****”, instead of “****” enter the desired address. After entering, click
- Check the availability of the smartphone using “adb devices” and press Enter.
- Type "fastboot flash recovery recovery.img" and click
All you have to do is wait and check the R mode in action after the message about successful installation.
Back up your data
The Internet describes a dozen different ways to create a copy of the OS with all the settings and installed programs. This is convenient because during recovery you do not have to reinstall useful applications.
The easiest way is to make a backup using standard means of the mobile operating system. For this:
- Open Settings on your smartphone or tablet.
- Open the “System” or “Backup and Restore” section.
- Select "Data Backup".
- Select the copy source. Options may include cloud storage from Google, Yandex, Samsung... or a microSD card.
The main disadvantage is that only the data is copied, but not the entire firmware.
Copying via custom recovery
To make a backup version of the entire thing, use CWM's advanced custom recovery.
Enter Recovery mode. Read how to do this individually for your smartphone. As a rule, to do this you need to turn on the device and hold down the volume and power keys in a certain sequence.
Follow the instructions:
- Switch the items in the list that opens to “backup and restore”. To do this, use the volume keys.
- Press the Power key to select a list item.
- Find and select "Backup" just like you did with "backup and restore".
- Wait for the software to expire. 15 minutes is enough.
To prevent the device from unexpectedly turning off or interrupting due to lack of memory, leave 60% of the battery and 600-800 MB on it.
Copy via PC
If you need to upload a backup directly to your computer, the Flashboot program (flashboot.net) will help. Follow the instructions:
- Download and install the Flashboot program.
- Install the MTK driver if it is not there.
- Extract files with resolution txt and weg_l.bin from the firmware. Place them in a separate folder.
- Run Flashboot as administrator. To do this, right-click on the program file and select “Run as administrator.”
- In the window that opens, select scatter.txt.
- Go to the “Memory Test” tab.
- Check items 1 to 5.
- Turn off your mobile device.
- Click on the “Start” button in the program window on your computer.
- Connect your smartphone to your computer via USB connectors.
- When the reading process is complete, disconnect your smartphone or tablet.
- Copy the received data into a notepad and save.
- Uncheck the first item in the main Flashboot window.
- Open the Readback window.
- Click on the "Add" button
- Double click on the added line to edit.
- Specify where to save the backup.
- Come up with and enter a clear name for the backup copy.
- Change the Length column for sectors. In it you need to specify data from a document previously saved in a notepad.
- Click on the "OK" button.
- Reconnect your mobile device and wait until the copying process is complete. The ending will be accompanied by an information message on a green background.
As a result, you will receive a complete copy. If it is of particular importance, copy it and store it in several places in case the storage hard drives fail. You can also use cloud services.