Category: Soft Published 06/04/2014 · Comments: 72 comments · Reading time: 8 min · Views: 14,479
Hi all! Sound normalization is not a problem for those who know how to use Audacity even at the most basic level.
Let's start with a definition.
To normalize sound is, simply put, to process it in an audio editor so that it is pleasant to listen to, namely:
- remove background noise,
- equalize the volume of speech throughout the entire audio track,
- remove sharp emissions/peaks in volume,
- remove unwanted sounds (cough, for example),
- make the recording volume such that it can be comfortably listened to on all types of computers and mobile devices, setting the device volume to a medium level.
How important is it? Very important! A good video with bad sound is a waste of money. Video “rules” in Internet marketing. Whether you are selling through your online store, promoting your services online, building a corporate website, or trying to boost your Youtube channel - you need to be able to make a decent video everywhere. But video is video, and if your soundtrack is quiet, muffled, with noise and other defects, then consider all the work in vain. No one will continue to watch such a video for more than 10 seconds.
I’ll say right away that if you rely on your ultra-modern expensive professional video camera, then it’s in vain. It will record noise even better than a smartphone. So you won’t be able to “pull out” the sound 100% with first-class hardware.
Professionals use sound editors for this. They take a separate audio track and edit it. In this post, I will teach you how to use Audacity to normalize audio.
Why Audacity? Because it:
- A specialized program is an audio editor for sound files.
- Powerful enough to do anything with sound.
- Free.
- Quite easy to learn. Especially when it comes to standard, simple operations with sound.
Well, let's get started.
From this article you will learn:
In order for everything to be as close as possible to real life and understandable, let’s take a video recorded on the most ordinary smartphone - htc one v. He shoots video in HD resolution. Today this is no longer something prohibitive, but a standard. The sound captures like a smartphone - if close, then it’s good, if at a distance, then it’s mediocre. So, our very first task:
How to trim a recording using Audacity
You can often encounter a situation where you need to edit an audio file: trim it or cut out a fragment, for example, for a ringtone for your phone. When performing even such simple tasks, users who have never done anything like this before may have problems, but if they use special audio editor programs for these purposes that are not overloaded with unnecessary functionality, difficulties should not arise. One of the most popular representatives of this software segment is Audacity - a simple audio editor, free, and even in Russian.
How to Trim Music Using Free Audio Editor (Windows)
You can download Free Audio Editor from here: https://www.dvdvideosoft.com/ru/products/dvd/Free-Audio-Editor.htm
The program for cutting music Free Audio Editor pleasantly surprises with its fast work. However, this product cannot boast of rich functionality. The real capabilities of the program are limited to cutting music. Despite its narrow functionality, Free Audio Editor supports a large number of popular formats. The program is able to work with music files in mp3, wav, aac, wma, etc. formats.
This program for cutting music copes well with its direct task. It is perfect for use by novice users. This program will most likely not be suitable for more advanced users, since with its help it will not be possible to trim the desired fragment of the song as accurately as possible. This is because Free Audio Dub does not have a built-in visual editor, and there is no way to select a fragment with millisecond precision.
Main features of the program:
- Editing most popular file formats
- Simple and convenient cutting of fragments
- High speed
- Auto power off function after saving
Pros:
Fully Russified menu, simple and user-friendly interface, free, hotkey support, support for popular formats WAV, MP3, MP2, OGG, AAC, AC3, WM, M4A.
Minuses:
The program's functionality is quite narrow, it is not possible to select fragments of a music file with millisecond accuracy, and there is no visual audio editor.
Basic file processing in Audacity
In this article, we’ll look at how to use the Audacity audio editor to trim a song, cut a fragment from it, or, conversely, paste it, as well as how to merge several songs into one.
Trimming the audio
First you need to open the record that will be edited in the program.
- Use the “File” menu and select “Open” from it, then find and select the desired file in “Explorer”, then add it to the program.
It is advisable, first of all, using the “Zoom In” tool to reduce the step of the track to one second - this will help to more accurately indicate the required area.
Start listening to the recording and determine what needs to be trimmed (or rather, on the contrary, left). Select this area with the mouse.
Click on the “Crop” button, after which you will only have the previously selected fragment.
Cutting out a fragment
In order to remove any fragment from a song, repeat the steps described in the previous part of the article, up to the first half of the third paragraph, but this time use the “Cut” tool. In this case, the selected fragment will be removed, and everything else will remain.
Inserting a fragment
Audacity allows you not only to trim audio and cut out unnecessary things from it, but also to insert fragments. Alternatively, you can add another chorus to your favorite song.
- Select the required area and copy it using the “Edit” - “Copy” menu items or the Ctrl + C key combination.
- Now move the pointer to the place where you want to insert the fragment and, again, use the “Edit” - “Paste” items or the Ctrl + V key combination.
Gluing audio files together
To merge several songs into one, open two audio recordings in the same program window. The easiest way to do this is to simply drag the second file under the first, that is, create another track. Now copy the necessary elements (or the entire song) from one entry and paste them into another using the menu items mentioned above or the Ctrl+C and Ctrl+V combinations.
We hope we helped you understand one of the most popular basic-level audio editors, or rather, one of its most important functions - trimming audio files.
Thank the author and share the article on social networks.
How to trim a song
Many people have this question: how to trim a song? In theory, there is nothing complicated about this. You just need to use special programs and that’s it. Nothing more. You can trim not only music files, but even cut songs from clips, with their further processing.
Nowadays there are a huge number of different programs for such purposes. For example:
- Audacity;
- Mp3DirectCut;
- Adobe Audition;
- And many others.
Let's look at some.
Audacity
This is a free music editor. It has great functionality. If you use this program, great opportunities will open up for you. You can record various sounds, as well as change various characteristics of any music. It is mainly used for trimming or editing music. Audacity allows you to work with files such as mp3, wav and ogg.
Mp3DirectCut
This is a very small program that also serves for editing music. But, due to the fact that it is very small, it can only work with mp3 files.
Using this program, you can: change the volume, join files, trim files, split files, and so on. When working with music files, their quality is not lost. Because the program works without compression.
Adobe Audition
This is a very powerful program for working with audio of any format and any complexity. Using Adobe Audition, you can do almost anything. The main thing is your imagination and knowledge of this program.
Because this is not a simple program, like a notepad. Of course, cutting a song is not that difficult, but all the other functions are quite complex, and not everyone can figure them out the first time.
Let's try to trim one song, using the Adobe Audition program as an example.
How to trim a song with Adobe Audition
Let's launch the application.
As you can see, the program has a lot of different functions and capabilities.
There is no need to be afraid of all this. Trimming a song is quite easy. Open any track and insert it into the program. You can use the drag and drop method, or simply go through the “file” menu and then “open”.
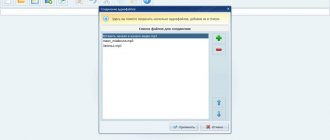
We take and load any file into the program workspace.
The file will have to be read and processed first. After this you will be able to work with it. Once the file is downloaded, it will be displayed in the list. In order to start working with it, you need to double-click on it. Only after this you will see the audio track of this track.
So. The workspace is ready. Now the main thing remains.
We simply place the cursor in the place where we will need to process the music. That is, the place from or to where you need to cut.
The point is this. You simply select an area and then click on the “Delete” button. The fragment you selected will be deleted. After that, just save the file and that's it. It’s worth noting that if your music is paused, you won’t be able to delete it. Click on stop, and only then can you remove a piece.
How should I highlight? Just. Do as shown in the screenshot.
After that, delete and save.
Saving a file
There are different ways to save the file. Adobe Audition allows you to save your file in any format. Moreover, you can save the file in any quality.
For example, your file weighs a lot, since it is in 320 kbps quality. In theory, this is not much.
But if you have little space on your phone or mp3 player, then songs can be saved in 128 kbps quality. The quality will be slightly worse, but you won't see the difference.
How to trim a song on your computer: Audacity can do more than that
Do you want to make a ringtone for your mobile phone from a popular song, but don't know how to cut the song on your computer? After reading this article, you can significantly expand your capabilities in digital music processing.
You, of course, know about the existence of huge collections of ringtones that you can download to your computer and “upload” to your phone. But sometimes you want something that is not in any collection. Then you have to roll up your sleeves, figure out how to cut a song on the computer and create.
To trim a song on your computer yourself, we will need:
Simple audio compression in Audacity
In principle, the recorded voice can be immediately uploaded as a podcast. But it’s better to sit a little, understand at least the basics and carry out simple sound processing. There is one minimal action, not at all difficult to understand or implement, but the sound structure will change dramatically for the better. We are talking about sound compression. When I first heard about compression, I of course thought about mp3 or ogg, or any other formats that allow you to compress audio files in size. As it turned out, compression is not here at all 
To understand what compression is, let's start right away with practice and get into the essence of the matter along the way. Here is a fragment of my speech without any processing (from some episode of the first season of “Personnel”):
And this is how this sound looks graphically in the Audacity editor: At first glance, the sound is just like sound. But everything is learned by comparison. This fragment has one drawback - the sound “jumps”. From the graph you can easily see how my voice becomes quieter and louder; moving around the chair, I changed the distance to the microphone during the conversation, and besides, I either whispered or actively proved something, raising my voice and tone. As a result, if you listen to such a recording, the sound will either hit your ears or be heard too quietly.
The purpose of compression is to “compress” the sound, average it, make it denser, reduce the distance between the quietest moments and the loudest. That's all! That's all the compressor does!
He does this, of course, not as he wants, but as we tell him. This is where complex terms and misunderstandings begin, but in reality everything is as simple as shelling pears.
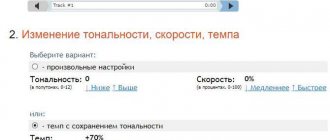
Let's select the entire fragment (Ctrl+A, from the English “a ll” - “all”) and go to Effects->Compressor. In the screenshot below, I have set all the values to maximum, just to show what this window looks like. There are three sliders here.
The first is “threshold” (threshold value, threshold). Anything above this threshold will sound quieter after compression. Roughly speaking, the threshold is the value at which the compressor is activated, a certain boiling point.
The second is “ratio”. This value is set as a number-to-number ratio. The maximum value in the screenshot is 10:1. This means that once the signal reaches the threshold, the volume will decrease by a factor of 10. This happens very simply - for every 10 decibels of the input signal, the compressor will pass only 1, as a result the volume will decrease.
The third is attack time. This is the time it takes for the compressor to respond to an increase in signal. In the example above the value is 1.0 seconds. Here's how it works: the signal reaches the threshold value, the compressor thinks for 1 second, if the signal remains in this zone (does not drop below the porg), then the volume decreases. If a pistol shot is heard in the recording, then at a value of 1 second its volume will not even change - the shot is too fast, the compressor “will not have time” to react.” In more advanced editors, the compressor has more settings, at least there is also a release time - release time. It's the same thing, only from the other end: how long does it take for the compressor to stop lowering the volume.
The checkbox “Normalize to 0 dB after compression” speaks for itself. After compression, the overall signal level will usually decrease, the sound will become denser, but quieter. With this checkbox, the sound will become louder, reaching a level of 0 dB, which is the standard for podcasting.
This is the entire sound compression mechanism! Let's try to put this knowledge into practice. Here's what I'll do:
- I will set the threshold value to -25 dB
- The coefficient value is 6:1
- The attack time value is 0.1 seconds
- I'll check the box "Normalize to 0 dB after compression"
- ... and click OK
After a short process, we will see the following picture: And with sound - this:
Do you feel the difference? Even if you say no, it is a hasty conclusion. Listen to the first 6 seconds of both recordings and you will understand that the compressed sound is more pleasant to listen to, you don’t need to listen to “what did he mumble there??!..”. And if you listen to a podcast for an hour and a half (Oh, Frames!..), then poorly compressed or no compression sound simply tires your ears and brain. Good sound quality is not distracting and relaxing.
You need to understand that the action described in the article: firstly, is not the best . The same fragment of sound can be compressed much better. Secondly, it is not universal for all records: in your specific case, you may need other values. ... As you can see, it’s not difficult at all, and the result affects a lot! At least out of respect for the listeners, they should be presented with good sound. Nice.
I myself became acquainted with compression thanks to the podcast “Theory and Practice of Sound Recording” from the well-known Umputun. Which is what I advise you to do. You can also read short articles about compression from him:
- Compression (why is it needed)
- What does compressed sound look like in pictures?
- Compression without using the brain
Next time we'll tackle other aspects of audio processing.
Original on Podcastim.ru
Instructions for trimming a song on your computer using Audacity
Nobody forbids using the entire song as a ringtone, but as a rule it lasts several minutes, and for a call I would like to choose the most interesting moments. If they are far from the beginning of the composition, then you will almost never hear them. Therefore, users often want not only to use this or that song as a ringtone, but also to cut out a certain section from it.
To do this, I suggest using the Audacity program, which can be downloaded for free from the official website. I note that this application has many functions that are far from limited to shortening musical compositions.
How to Trim Music Using Wave Editor (Windows)
You can download Wave Editor from here: https://www.wave-editor.com/ru/
Here is another simple program for cutting music. Its distinctive features can be considered excellent speed, ease of learning and operation. The program menu is as strict as possible, without many additional functions. Wave Editor supports all basic operations such as cut, copy, paste and delete. In addition, the program boasts the presence of some sound effects (normalization, reverse, inversion, smooth fading, insertion of silence, and others). Wave Editor does a great job with simple music editing. For more serious operations, it is better to use more powerful programs (for example, the same Audacity).
Key features of Wave Editor:
- Quickly edit music files
- MP3, WMA, WAV format support
- Ability to connect plugins to expand functionality
- Saving finished compositions in MP3 and WAV
Pros:
Simplicity of the interface, high speed, completely Russian menu, free.
Minuses:
Limited functionality compared to professional editors, lack of support for audio recording, not the highest quality of effects, no “echo”, “reverberation”, “noise reduction” effects.
How to Record Audio in Audacity
To start recording, you need to press the record button (REC) and start speaking into your microphone. When you start broadcasting, a sound wave with a recording of your voice will begin to appear in the program’s working window.
If the recording is long enough, you can click on the “Pause” button and press this button again to resume recording. To end recording, you need to click on the “Stop” button.
Interface overview
The program has a standard interface for sound editors; at the top there are buttons for recording control, recording and playback volume, various tools and settings for output devices. In the middle of the screen there is a sound diagram, on the left side there is a channel mixer. Even lower is the status bar.
How to record sound
Before recording, you need to select the device with which the audio fragment will be recorded, then:
- select the capture device called “ Stereo Mixer ”;
- in the drop-down list next to it, set mono or stereo recording;
- To start recording, click on the “ Rec ” or “Record” button. After the process is completed, click “ Stop ” or “Stop”. You can listen to the recorded excerpt by clicking “Play” ;
- to save the project you need to follow the path “ File ” - “ Export ”;
- in the window that opens, select the file format and click “ Save ”;
Instruments on the soundtrack
The audio track has a drop-down menu; you can call it by clicking on the arrow next to the name of the downloaded recording.
Let's get acquainted with its main functions:
- Title – allows you to assign your own title to the selected track.
- Move up – if there are two or more tracks, shifts the selected one up one position:
- upload 2 tracks;
- on the lower track use the raise function;
- get the result.
- Wave – displays the signal as a function of amplitude over time.
- Oscillogram – displays changes over time in sound waves, the frequencies that make up the sound and their intensity.
- Spectrogram – shows the frequency distribution spectrum.
- Mono - Sets playback to the right or left channel.
- Left Channel - Sets playback of the left channel.
- Right Channel - Sets playback to the right channel.
- Make Stereo – turns the selected track and the track below it into stereo.
- Split stereo track – creates two mono tracks from one stereo track.
- Format – sets the bit depth of the audio file (16, 24 and 32 bits).
- Rate – sets the project frequency.
- Mute button .
- “ Solo ” – when you press this button, only the selected track will be played.
What kind of program is Fraps - how to set it up and use it correctly
How to trim a track
To start trimming music in Audacity, you need to select a fragment of the audio recording, holding the left mouse button (LMB) at the beginning, and drag it until the end of the desired fragment. The following will appear at the top:
The fragment is selected, the next step is trimming . You can trim the track on both sides, leaving only what is selected, or you can cut out this fragment:
- in the first case, you need to click on the “ Delete ” button. The result is visible in the selected area;
- for the second case, you need to go to the “ Edit ” tab, select “ Remove Special ”, then – “ Trim Audio ”;
- Result.
Merge sound
To merge you need:
- select two audio files and place them on different tracks;
- use the “ Time Shift Tool ” or “Time Shift” to combine;
- A tool will become active, with which you need to drag one of the entries to the end of the other.
Mixing
The settings on this panel provide control over the input and output parameters of sound cards. Both sliders will be positioned in the “-” position if audio recording is not supported by the sound card parameters. Sometimes this is due to the fact that there are no drivers , or the sound device is not very common.
The left slider controls the volume of the output sound, and the right slider controls the level of the input signal (microphone, line input, etc.). If distortion and noise occur during recording, you need to lower the level of the right slider.
How to remove noise
To clear sound from noise:
- go to the “ Effects ” tab, “ Noise Reduction ” item;
- A window will open in which you can adjust sensitivity and other parameters. First, you need to “teach” the function to recognize where there is noise and where it is not. To do this, select a fragment of audio where there is only noise;
- click on the “ Create noise model ” button;
- click “ OK ”. The suppression procedure will start.
What is Launch manager and why is the program used?
How to add a voice to music
Voice overlay occurs as follows:
- load the track with “ minus ”;
- add a track with voice through “ File ” – “ Import ” – “ Sound file ”;
- place the tracks so that they approximately coincide using the “ Time Shift ” tool;
- Using the menu “ Tracks ” – “ Mix to last ”, perform mixing;
- The result will be combined on one track.
Decay and rise of sound
To change the decay and rise you need:
- select a fragment of a recording;
- to create a fade-in, go to “ Effects ” – “ Smooth fade-in ”;
- result:
- in the same way with fading - select a fragment ;
- go to “ Effects ” – “ Smooth Fade ”;
- result.
Save the result
To save a project in mp3 format you must:
- follow the path “ File ” – “ Export audio... ”;
- in the window that opens, select the file format, quality, specify a name and click “ Save ”;
You can also watch video instructions on how to use the program.
How to save an audio recording
After the recording is ready, it needs to be saved. In order to do this, you need to go to the “file” menu item and select the “Export Audio” sub-item.
After this, a window will appear in which you need to select a location on your computer to save the audio file, as well as set a name and select a format.
The most popular format for audio is MP3 . Most people on the Internet use it, and therefore it is best to save audio recordings in this format.
After clicking the “Save” button, a window will appear in which you can fill in the metadata of your audio recording. This is done so that audio information is displayed in the file properties. This information will also be displayed in the player when listening to an audio recording.
This step is optional, so we can immediately click OK.
And another window will open with a warning: “Audacity requires the lame_enc.dll file to record MP3 files.” The fact is that initially, after installation, the Audacity program does not know how to save audio in this format, so you need to download the Lame_enc.dll file to your computer.
Click the “Download” button and a page with instructions for installing the LAME file will open.
We click on the link “LAME download page” and we are redirected to another page where we can download the LAME file itself
Click on the link “Lame v3.99.3 for Windows.exe” and download the LAME file. (Please note that your file version may be different from the one I have, but there is nothing wrong with that, feel free to download)
Launch the downloaded file. The installation is simple: constantly press the “Next” button, then press the “Install” button and finally click on the “Finish” button. That's it, the LAME file is installed and now we can save our audio recordings in MP3 format.
How to trim music on a computer
Every person, having heard an interesting song at least once, wanted to download it to their mobile device.
But you don’t always need the whole song; sometimes a piece you like is enough to, for example, set it for a call, SMS or alarm clock. Especially for this, developers have come up with a sea of utilities for trimming audio tracks.
The difficulty is how to choose a utility that is right for you. First of all, we'll look at how to trim music on a computer using Audacity.
Copyright
Remember that all the examples given should not become the basis for our readers to unrestrained copying of the author’s content and using it for their own purposes. In particular, the example below was removed immediately after it was used as a tutorial.
Free software for cutting music
Audacity appeared somewhere with the first Pentiums, back in the early 2000s. This means in our country, because abroad the first fifth-generation processors appeared about 10 years earlier.
But Audacity really came out in May 2000 and immediately gained considerable popularity. The program's interface is extremely simple, and most of the options will never be needed for simple music trimming.
Among the useful properties, we can note the ability to remove the introductory part of any composition and the final part, as well as manipulate fragments at your discretion.
Let's say we have a clip from YouTube at .com/watch?v=6LSarhZpnMs. Here's how to trim God Bless America by Celine Dion on your computer:
- Go to YouTube and download the music video. The authors like the service www.video2mp3.de/, there is no point in looking for another one. Enter the clip address in the request line.
- After downloading the file, open it in Audacity.
- The naked eye can see that there is emptiness at the beginning and at the end. It needs to be cut out. For greater accuracy, zoom in by pressing Ctrl + 1. The same can be done with the mouse wheel while holding Ctrl.
- It's time to select the empty space with the mouse and cut it out: Edit → Delete. To do this, click on the beginning of the composition (blue graph on the screen), and the cursor is moved as far as possible to the left. The track slides, while holding the left button, the entire piece to zero will be selected.
- It's time to listen to what happened. It turns out that the announcer announces to the ladies and gentlemen that the unofficial US anthem will now be played. It’s 100% that no one needs this rhetoric, let’s cut it off too. To listen, use the player located in the upper left part of the window.
- The purpose of the buttons is obvious from their appearance. The recording will be played from the place where the vertical line of the positioner is located, moved with the mouse. You need to play back from another moment, then playback stops, the line moves to the desired time reference, and “play” is pressed again. To make it more convenient to search, you need to reduce the scale using Ctrl + 3 or with the mouse. For our reasons, the recording begins at 9 seconds, everything that was before is removed.
- That’s better, but I would like to hear something more intelligible than applause across the introduction, if you want to put a melody on your smartphone as a leading one. To do this, you need to find a recognizable and clearly distinguishable motif by cutting it off on both sides. Celine comes in at 14 seconds, when the instruments stop playing. We cut from here to the beginning, we get a playmotiv for our cell phone.
Save Audacity result
After this, the ending is processed in the same way. But Audacity will not save the result as mp3. Through the File menu, go to the Export submenu, select the mp3 extension to save, and a warning message will appear. What to do? This question from the category of “Who can live well in Rus'” can scare only lamers. You need to go to the Edit menu → Options, select the Libraries tab.
It says here in Russian that to download the required library (lame_enc.dll - which in English means “end to the lamer’s torment”) you need to click on the Download button. Following the advice will take you to an English-language site where there is a hyperlink to obtain the required library. There it should be left-clicked, as recommended in the text.
On the new page you should go to download Lame_v3.99.3_for_Windows.exe. The installation begins by double clicking on download. Windows will issue several warnings, which, according to the advice of the English-speaking author, should be ignored. After this, a Lame for Audacity directory will be created in the Program Files folder (for the 64-bit version - Program Files (x86)).
All that remains is to indicate the location of the saving library through the program interface. There is another method. In this case, lame_enc.dll is downloaded from any resource, for example, dll.ru, and then copied to the program folder. Then you need to specify exactly this path through a pointer (sometimes it is allowed even without specifying). And everything will work.
How else can Audacity be useful?
It cannot be said that Audacity has an extensive selection of formats for export, but in many cases this is completely enough. The main advantage is the processing of records.
You can give a familiar composition a new twist if you configure all the filters correctly.
For further manipulations with fragments, it is recommended to use the shareware program Free Audio Converter, which will allow you to obtain the desired format for almost any device.
mp3DirectCut utility
You need to download a program called mp3DirectCut from the network (mp3directcut.ru/). Be careful, because along with the utility on some sites, scammers drop a malicious object, so we recommend using an antivirus.
After you have downloaded and unpacked the utility, let's move on to work. In addition to it, the archive contains imposed software. Without this, the utility will not be installed. To avoid this violence against your personality, do this:
- Run the file mp3DC222.exe from the archive and no other.
- In the window that opens, click Browse... to change the installation path. Specify a folder outside the system drive. You can even put it in the root directory and on a flash drive.
- Click OK and begin the installation process.
- Without any notification, the program will leave a shortcut on the desktop. You can work!
Installation and configuration
When you launch it for the first time, a welcome window will appear.
Select “OK” and then begin setting the program language. Let it be Russian, all that remains is to click Restart.
The interface instantly changed to Russian. In the penultimate menu item (before the “?” sign), in the first subitem there is a tab where you can select your preferred program language if the settings are lost at first. After selecting the language, you must restart the program.
Trimming
When trying to load our beloved God Bless America, a warning pops up that the graphical appearance of the song is built from a compressed algorithm of audio data, so, unlike Audacity, its appearance may not match the actual volume of the song.
You can check the box to prevent this warning from popping up again. Playback starts on the player located in the lower right corner (light triangle). There is no pause, instead - Stop. Stops the composition in the same place where the button was pressed, does not return to the beginning.
Indeed, it is clearly visible that the shape of the graph is very different from what it was in Audacity. After the track starts, vertical green markers indicate the level in decibels, and a horizontal scroll bar allows you to navigate the time scale. Then everything is familiar to us. You can select a piece with the mouse, or press the button for the beginning of the fragment and then the end button as the composition plays.
If you did everything correctly, then the desired passage will be highlighted in a different color. All that remains is to save the result. Open the “File” tab and select “Save Selection...”. You must specify the name and storage location of the new record, otherwise the source will be overwritten. After everything, just click “Save”.
How to trim music on a computer using online services?
Not all programs can be installed on a computer. Although Audacity is also available for Linux. To trim a fragment of an audio track in any operating system, we use a browser, with which we go to a resource called www.mp3cut.ru.
The very first page is decorated with an “Open file” link. We click, after which we will be given the opportunity to select the required track in our device. After the track is completely loaded, click “Start”. In appearance, the shape of the curve differs little from Audacity.
the track begins to play, and two sliders will help us. Blue indicates the beginning of the track, and green indicates the current playback location of the track. Using these two sliders, select the fragment that we need.
This service is convenient. There is no need to capture fractions of seconds; you can simply move the blue slider where needed. Using the same principle, we determine the end of a new track.
Now that the desired fragment has been determined, click the “Crop” button.
the path is ready. All that’s left is to upload a new track to your laptop. Another feature of this resource is that it will assign a new name to the object, and also allows you to use Google Drive.
Source: https://feetch.com/kompyuter/obrezka-muziki.html
How to edit an audio recording
After the audio recording is ready, you need to edit it. After all, often when recording there are unfortunate moments that I would like to cut out. Audacity makes this very easy.
In order to cut out an extra, unnecessary moment of recording, you just need to select it with the mouse and press the button with the scissors drawn.
To make it more convenient to edit an audio recording, you can change the scale of the audio track. This is done using two buttons with drawn magnifying glasses and “+” and “-” signs, respectively.
If you did something wrong while editing, deleted, for example, too much of a recording or cut out the wrong piece, you can undo these actions. This is done using two buttons with drawn arrows.
Trimming tracks
You can cut out only the desired section of the track to save it later. For convenience, you can change the scale using the zoom tool.
Next, find the desired area and select it, switching again to the Selection tool and marking part of the recording. A highlight will appear on the audio track:
Next, open the menu Edit -> Copy. Then create a new project and select Edit -> Paste :
You now have the part of the recording you need. You can also go the other way and just mark and delete the ones you don't need. Then save what's left. Audacity is very easy to use.
Gluing tracks
You can combine several tracks into one. To do this, use the File -> Import to load several media files:
Then add them at the end of one, you can move the tracks using the time shift tool.
Mixing
You can set the tracks one below the other and then layer them so that they sound together. Then all that remains is to save the result:
Noise filtering
Often, extraneous noise gets into the recording. Therefore, you may need to use Audacity to combat noise. You need a section of the recording where there is only noise, mark it:
Then open the Effects and select Noise Reduction :
From this menu, select Define Noise Profile .
Then select the entire track and open the noise reduction window again, then click Ok to remove noise from the recording. You can also adjust the noise level using the dB slider and click Preview to see how the noise will be removed.
Saving the result
If you just save what you got, Audacity will save the project. To get a finished audio file, you need to export it. To do this, open the File menu and select Export:
Then all that remains is to select the location and file format: