Greetings to all! Since you are reading these lines now, it means that you, like me, are creative people who are exploring the world of photography processing and want to learn new things. I am happy to help you with this. And today we will look into a very important and necessary topic when working with the program: how to install a new font in Photoshop.
Fonts in the editor
One of the benefits of Photoshop is its good selection of different tools, including Type.
All inscriptions appear on separate layers, which makes it easy to customize their parameters - the size of characters, the distance between them, style and fonts.
Thanks to layering, texts can be edited while creating an image or even after saving it in PNG format.
The set of fonts for Photoshop is the same as that installed in Windows. Therefore, if you need to find something original and different from other spellings, you will have to create symbols yourself, buy them or download them from the Internet. This will make the image unique - although the main focus is still usually on the image.
How to insert text in Photoshop
Open the photo or picture of interest using the “ File ” tab and selecting the “ Open ” command. Before adding, you should decide on the color (default “black and white”) for the inscription. There are two ways to change the color:
- palette for choosing a unique color;
- "B" key to return to standard dialing.
On the toolbar (to the left of the workspace) select the required text tool. We will use " Horizontal Text ".
The source of the finished text is not important. In a Word document or Notepad, type the required fragment or phrase. Copy to the clipboard using the keys (ctrl+c).
Select the area for the inscription.
Paste using the combination (ctrl+m), or the paste command from the menu. After the area is filled, you can proceed to the initial editing - change the font type, size, execution method (italics, bold).
Afterwards, we agree with the chosen inscription.
Method number 1. Copy to fonts folder
The simplest method, which only works on older operating systems - for example, Windows XP.
The user is required to perform several simple steps:
- Go to the folder where the font was previously downloaded.
- Copy or cut a file.
- Paste it into the Fonts folder, which is located in the Windows directory on the system drive.
After adding a font to a special folder, it will become available in almost all programs.
Including MS Office and Adobe Photoshop, where you can select it from a list.
For system
If you think about it carefully, installing fonts in Photoshop is not such a difficult procedure. The first advice that users are given is to download new “letters” into Windows.
How to install fonts in Photoshop CS6? To do this, you can use the following algorithm of actions:
- Download the required tool. Typically fonts are represented by archives.
- Unpack (if necessary) the document to any place convenient for working with the file. For example, on the desktop.
- Go to C:\Windows\Fonts. The Fonts folder stores all fonts recognized by the operating system.
- Upload a previously downloaded document by dragging or copying.
- It is advisable to reboot the OS. This is an optional step.
This will end all work with fonts in Windows. Loaded letters will now be recognized in all applications, not just Photoshop. This method has some disadvantages. But more about them a little later. First you will have to understand how to install fonts in Photoshop CS6 using other methods.
Method number 2. Using the context menu
A method that also allows you to install the font automatically - but requires less time from the user.
The procedure is as follows:
- Right-click on the font file.
- Select “Install”.
- Wait for automatic installation.
After installation, the font also becomes available for use by most programs.
If the character set has already been installed, the Remove option will not appear in the menu.
Find out how to install fonts in Adobe Photoshop using OS tools?
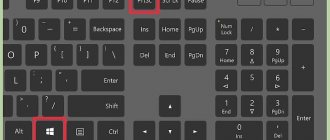
Owners of Windows from “seven” and higher can take advantage of the standard OS capabilities to implement their plans. It looks like this:
- Just select the finished sample or right-click on it;
- Open the context menu and select “Install”;
- Done, the new letters will automatically appear not only in the corresponding Font section of Photoshop, but also in any other software.
Method number 3. Through the font control panel
Using this method, you can install new character sets as easily as copying them to the Fonts folder.
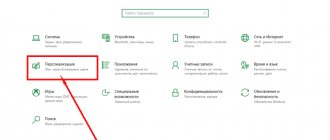
To do this, you will have to go to the “Control Panel”, then select the “Fonts” item from all the elements.
Now you can simply drag and drop the desired files into the window, one at a time or in groups.
If you need to save space on your system disk, select “Font Options” in the left column.
Here you need to check the box that allows you to use shortcuts. After this, the font files can be located in any directory.
Changing the font
We activate the tool with a hotkey or using the icon with the “T” symbol, which will allow you to write text in Photoshop.
By clicking the mouse in the work area (in the image), we get a new text layer in which we select the area for the font.
After entering the last letter, pay attention to the editing icons , there are fifteen of them in total. The first half changes the font and size, and the second half changes the location of the text in the area, its shape (deformation) and color. The demo version includes a tool for creating a 3D font.
Removing unnecessary objects in Photoshop - useful tools and their use
Selecting the “ Editing ” tab from the drop-down list, select “ free transformation ”. With this tool you can:
- Rotate the selected font. You need to move the cursor to the corner of the selected area.
- Resize . It is enough to stretch the area with the Shift key held down.
- Expand horizontally . Move the cursor to any corner and wait for rounded arrows to appear.
- Add a reflection or shadow . The bottom layer is copied. This technique is good to use to reflect an inscription on any surface: from glass to water surface.
Using the text warp tool, the selected object is distorted, taking on a visual resemblance to a letter ribbon.
Installation Features
New fonts will increase the capabilities of Photoshop, but for this you should use the following recommendations:
- The program must be closed during installation.
- After installing the font, the editor will have to restart.
- Some character sets do not contain Cyrillic. This will not allow you to create inscriptions in Russian. Therefore, it is advisable to check the fonts in advance.
There is another problem, although only users of older PCs face it - with a large number of fonts in the system folders, the computer may run slower. Files with character sets can be copied to the Adobe\Fonts directory, intended for all Adobe products. For a PC with high-performance hardware, this does not make sense.
Start with a brief
Creating a font is a long and painstaking job, so it is very important to have a clear understanding of what this font should be.
Developing a brief will certainly require research and thought. How will your font be used: will it be needed for a specific project or for personal use? Is there a problem that your font would solve? Will your font fit into an array of similar designs? What makes it unique?
There are many options. Fonts can be created, for example, specifically for academic texts or for posters. Only when you know how your font can be used, then you are ready to start designing.
Search for fonts
Character sets can be purchased on the developer's websites. But there are services with thousands of free options. Among the most popular pages are:
- Fontov.net is a page where you can find more than 7,000 fonts sorted by category. Some of them are free. It is possible to find the letters you need in sets.
- Fonts-online.ru is a huge collection of character sets. From here you can download paid and free font files, add your own and see the style of the characters before downloading.
- Xfont.ru is a resource with about 24,000 sets uploaded. For user convenience, each font is placed on a separate page with a detailed description and examples.
- 1001freefonts.com – A site with 15,000 fonts that can be sorted by style, name, or date added. Part of the collection is paid, but access to it will cost only $19.95.
- Fontsquirrel.com is an aggregator of fonts available for commercial or personal use. There is convenient filtering, and even searching for analogues using pictures.
There are services that contain fonts specifically designed for Photoshop.
For example, photoshop-master.ru is a site where you can download sets of beautiful symbols for different versions of the editor, post your work and communicate with other designers.
How to create a color font in Photoshop using Fontself - let's look at it from all sides
Last month I published a brief overview and summary of color fonts, the latest developments in the world of typography. Unlike traditional fonts, color fonts contain full-color graphics for each character, meaning you can now print creative text styles directly in Photoshop and Illustrator without the need for any additional effects. The folks at Fontself reached out to me and asked if I'd like to try out their tool for creating custom color fonts, so in today's tutorial I'll be sharing how I easily created my first color font using the Fontself extension for Adobe Photoshop.
Some of my most popular free downloads on Spoon Graphics include my Vintage Mailing Bag Sets with Labeling Light Bulbs . Since fonts (until now) could only contain flat shapes, these full-color highlighted letters had to be saved as separate PNG images or layers in a Photoshop document so that the designer could then copy and place each character to spell out the desired words. Color Font technology solves this problem! After converting the letters into an OTF font file using Fontself, you can now work with those highlighted letters like you would any other font, quickly typing out words using your keyboard.
How color fonts were made
I already had all of my letters from my vintage labeling bulbs pack saved as a separate PNG file, so I used the Load Stack Files command in Adobe Photoshop to automatically merge them all into one document.
Each letter was originally saved with a transparent background, which is a requirement for using a color font.
The recommended bitmap color font size is in the range of 500-1000 pixels to strike a balance between resolution and memory requirements causing crashes. Resizing my document to 800px placed the letters at this recommended scale.
Preparing your drawing to be converted into characters is very simple. They just need to be lined up so that the Canvas tool is used to provide a nice wide working area. The guide helps set a baseline for the typeface.
This is interesting: How to create your own Judge Dredd badge design
First, all the letters were roughly arranged using the Selection tool and the Automatic Layer Select option in the top toolbar so that the graphics could be easily clicked and dragged.
The baseline alignment was then set for each letter at a much higher zoom level. This is especially important for trigger characters that would otherwise sit too high without alignment to the guide.
It's easy to create a real font. The Fontself extension has buttons to automatically import A-Z characters, lowercase characters, numbers, or import just one time and the extension allows it to be processed. Since my letter pack only contains uppercase letters, I selected the appropriate A-Z layers and imported them in both uppercase and lowercase.
Layers for 0-9 were selected and imported as numbers. Fontself automatically recognizes the characters and applies the appropriate keyboard ID.
Fontself did not recognize the small collection of characters in my character set, so they had to be set manually by pressing the correct keyboard key.
The fuller, professional grade color font also includes punctuation and supports multiple languages. Any missing characters in my quick example will simply revert to the default font.
The shadows that initially appeared with each letter in my highlight character set caused some spacing issues, but simply installing a standard monospace shape tamed the terrible kerning between certain characters somewhat. You can fine-tune kerning pairings and set alternate characters, and create a complete family of fonts in a variety of styles and weights.
Once completed, my main color font was exported as a standard OTF file. This font can then be installed as usual, although support for color fonts is still quite limited, so it can currently only be used in the latest versions of Photoshop and Illustrator.
The ability to type words and instantly apply effects just by choosing a font from your library is truly exciting. You'll immediately notice the terrible letter spacing in my marquee font, but it can be quickly tamed using the Character panel in Photoshop or Illustrator.
Tracking adjustments and kerning adjustments using ALT and Cursor Keys is still much faster than manually composing individual letter graphics from my original highlight character pack!
These free labeling light bulb downloads have been updated to include a color font along with the original PNG and PSD graphics, but you can download the color fonts right here to experiment with them.
Download free fonts My Marquee Sign Color
| Share on social networks: | Rate this article: |
Where can I get new fonts?
It often happens that you need to design something in Word or Photoshop (Oh, how many times has this happened to me). But standard built-in fonts were no good. Somehow I didn’t want to make a beautiful greeting card for someone’s birthday with Times New Roman or Arial embedded. And if you find something more or less beautiful, it turns out that it does not support Russian letters and you will be left with your nose. Well, after all, I’m not writing an official document or a speech, but I want to make the postcard more beautiful.
But the world is not without good people, so on the Internet you can always find some new font that you like. You can simply go to any search engine (Yandex or Google) and write in the search bar something like “Download Russian (Cyrillic) fonts.” And already in the first searches you will find wonderful sites with an excellent selection for every taste and color.
And with this I end our lesson... Just kidding) Of course, this is just the beginning. Now let's go in order.
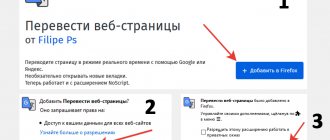
- Go to the site from the search results. Usually the website www.fonts-online.ru/ comes up first. I highly recommend it, and I’m constantly looking for something new there. It shows examples of writing text for each font.
- By the way, if you visited the site directly, you can see a sidebar on the right side, in which you can select the appropriate font category (Russian, designer, Gothic, etc.). Choose any one. In addition, above you can select an example of text writing and color to make sure that the font suits you.
- You should now have all the fonts in the category you selected. Has it appeared? Well, this is just great! Look for what suits you best or what you like.
- When you have chosen a new font for yourself, click on it with the left mouse button and you will see a detailed description of this writing. Below you will see a link where you can download this font. Click on it. And don’t forget to remember, because you will have to solve a mathematical example to prove that you are not a robot, to a real homo sapiens.
- When a document in ttf format (sometimes other formats) has been downloaded, go to the folder where this file arrived (by default “Downloads”). Alternatively, right-click on the downloaded file and click “Show in folder.” Your treasured font will be there.