Graphics editor Picasa
Picasa is a popular graphic editor, organizer, and image viewer. Developed by Lifescape and acquired by Google in 2004. The operating systems that Picasa runs on are Windows, MAC OS X and Linux. It is distributed free of charge and supports not only English, but also Russian.
The program has a built-in so-called Easter egg. If you press Ctrl + Shift + Y, Teddy bears will appear on the screen.
Key Features
The main features of the program that are worth paying attention to for those who want to learn how to use Picasa:
- photo editing;
- auto-viewing of images in both normal and full screen modes;
- the ability to download images to a computer using a scanner or camera;
- indexing photos on your hard drive automatically;
- creating collages;
- creating a slideshow from photos;
- sending photos by email or automatically publishing them on blogs;
- assigning keywords and labels to images.
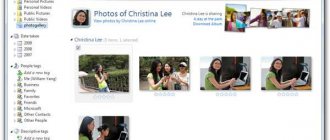
⇡#Uploading photos to web albums from Picasa
You can add pictures to web albums either one at a time or in entire folders at once. To do this, just right-click on the folder or selected photos and select “Add to Picasa Web Albums.”
After this, you will need to enter your Google account information again. If you're working on a home computer, it makes sense to let the program remember your Web Albums login information. Thanks to this, every time you start Picasa, you will be logged into the service automatically, and the program will be able to synchronize data (of course, if the corresponding option is enabled).
By default, the program creates albums based on the folders in which photos are stored, but if you wish, you can create additional albums and move photos to them. Each album can have a name (by default it is the same as the folder name) and a description. Albums can be public (then they are available for everyone to view), private (photos can only be viewed by the owner, as well as those people who know the exact link to the album), with limited access (to view such albums you will need to log in to the Picasa Web Albums website under your account).
Photos can be uploaded in their original resolution, or automatically reduced to 1600, 1024, or 640 pixels in width. By uploading photos, you can immediately see how much space is still available on the photo hosting site.
Once photos are added to web albums, they will be marked with a green arrow in the Picasa window.
If you need to quickly remove a photo from the Internet, you can do this using the “Block adding” command, which can be found in the context menu. The same command can be used to prevent a specific photo from loading when adding an entire folder to web albums. Photos that have been blocked from downloading are marked with a red arrow.
When you create web albums, Picasa uploads not only the photos themselves to the Internet, but also other information, such as descriptions you add to the photos. Later, descriptions can be changed both in the program and on the album management page in the browser.
If you plan to add new pictures to the album, as well as change information about them in the program, it may make sense to use the synchronization function. When you do this, Picasa will automatically upload new photos to Web Albums that appear in monitored folders on your hard drive, and update their details. Photos that are synced are marked with a blue icon in Picasa.
Once a photo album has been uploaded to the Internet, when you select it in Picasa, an “Add to Shared” button will appear, which, when clicked, will open a menu with various commands. With their help, you can enable or disable synchronization, change the type of web album (for example, from private to public) and the resolution of images uploaded to it, copy the link to the album to the clipboard, and delete it from the Internet.
Working with Images
We looked at the main features and disadvantages of Picasa. We also found out what kind of program this is. It's time to talk about how to work with her.
To work with an image and then edit it, you need to find it in the gallery using Explorer and open it. You can process photos using the “Image Correction Toolbar” editor window.
Using the buttons on the menu bar, you can do the following:
- Remove red eye. To do this, just select the photo you need and click on the “Red Eye” button.
- The crop function will help you trim off unnecessary elements. Select the desired area on the photo and click on the “Apply” button. The program will delete everything that was outside the selected area.
- Alignment relative to the grid. This is used if the photo was taken with a poorly configured camera.
- Automatic contrast correction. Using the function, you can set the most optimal level of contrast and brightness without spoiling the color saturation.
- Auto color correction – helps eliminate color deviations and evens out color balance. In this case, the contrast parameters are preserved.
- Retouching. Allows you to remove various stains, streaks and other defects from photographs.
- “Text” button – allows you to add text over the image.
- Leveling Lightening – using the button you can add light to the foreground or background and balance the color.
Program features
Picasa scans your hard drive or individual folders to find available photos from which you can create:
- thematic albums;
- slideshows for presentations;
- posters (enlarges the original up to 1000% and prints it in equal parts of the specified format);
- video with musical accompaniment;
- desktop background
- collages.
The program allows you to add one photo to several albums or mark your favorite pictures with original tags like: holiday, family, birthday. Version 3.9.0, available in Russian, recognizes up to a million images without reducing performance. To prevent your personal collection from being seen by strangers, it can be protected with a password. Before support was discontinued, the software interacted with web albums, automatically adding new works there. Now this has to be done manually.
Among the functions of the photo editor, the latest version received:
- A set of filters for decorating photo cards.
- Ability to change the tilt, scale, panorama and angle of images.
- Tools for working with files in EXIF mode.
- Automatic red-eye correction, saturation, contrast and white balance.
- Retouching brushes.
- Support for watermarks and inscriptions.
- Face recognition.
Picasa supports a limited number of formats that you can use:
- Images: png, jpg, tif, bmp, psd. There is compatibility with documents in RAW resolution. Animations in gif format are not supported.
- Video files: wmv, avi, mov, mpg, asf.
The editor's capabilities include assigning keywords to images (similar to tags, but for a larger number of files) and labels. They are displayed through the preview, also known as Picasa Photo Viewer, where the cards can be viewed in normal, full-size form or by launching an automatic slide show. Directly through the program, you can transfer photo cards to other folders or to devices connected to the computer: smartphones, flash cards, external hard drives, or transfer images for printing to a printer in any of the available formats.
One option to save a collection of images is the function of archiving images onto a CD or DVD. Among the related functions, the creation of a CD with a slide show of congratulations recorded on it stands out.
Effects for photo processing
Do you know how to use Picasa to process photos and add various effects? It's quite simple.
The program supports 12 basic effects that can be applied by simply opening the “Image Processing Tools” tab. These include:
- The “Enhance Clarity” effect will help make the outlines of objects less blurry and increase the sharpness of the photo.
- Sepia will add reddish-brown tones.
- Using the Black and White function, you can convert any color image to black and white.
- Warmer Tones - Using this feature helps improve the display of different skin tones.
- Grain helps improve the appearance of a photo when printed.
- "Different Tint" is used if you want to change the color of the image. In this case, you yourself choose the shade you need, which will be superimposed on top of the original. This function works not only in Picasa 3, but also in earlier versions.
- The “Saturation” button is designed to adjust color saturation. Adjustable using a slider.
- Soft Focus helps create a blurry effect around a selected point.
- The Radiance effect allows you to increase the brightness of the light areas of a photo.
- Black and White Filter creates the effect of taking a black and white photo, but with a color filter applied.
- Black and White Focus also turns the image into black and white, but leaves the circular area you specify in color.
- The Tone Selector feature includes a graduated filter based on the color you select.
⇡#Creating collaborative web albums in Picasa
Recently, Picasa introduced the ability to create collaborative web albums. This means that not only the owner can add photos to them, but also other users who have been allowed to do so. Let's take a closer look at how this feature works.
When you create a web album, the owner must make it accessible to other users. To do this, in the “Open access for” list, you need to select contacts who will be allowed to work with the album. Picasa loads your Gmail address book, making it easy to find the users you need. After selecting your contacts, pay attention to the “Allow these people to add photos to the album” checkbox. It is already installed by default. If you remove it, selected users will only be able to view the album, but if you leave it, they will also be able to upload their photos to it.
Use the shared albums feature with caution: be aware that photos that other people upload to your albums eat into your account's available disk space.
Let's say you get the ability to upload photos to someone else's album. How to do it? In the window for adding photos to an album, expand the “Send to this album” list and select the “Add to a friend’s album” option.
After that, provide the name or email address of the person who gave you access. Picasa autofills addresses based on your Gmail contacts, so in most cases you just need to start typing an address to find the contact you're looking for. When a user is selected, the same window will display the names of the albums for which you have access. Select the one you want and upload photos in the same way as in your album.
Artistic filters and effects
The program also contains a “Other filters and effects” tab, where there are 24 different artistic effects that can be applied to the finished image.
We will not go into detail about how to use Picasa when using these functions, but will only list them. So these include:
- Infrared film.
- Lomography.
- Holga style.
- HDR effect.
- Cinemascope.
- Orton effect.
- 1960s.
- Invert.
- Thermal imager.
- Cross processing.
- Posterization.
- Duplex.
- Gain.
- Soften.
- Vignetting.
- Pixelation.
- Sports focus.
- Pencil.
- Neon.
- Comics.
- Circuit.
- Shadow.
- Passepartout.
- Polaroid.
Making collages
The last thing we'll look at is how to use Picasa to create collages. You can launch the function using the “Create a collage” button, having previously selected the photos and images you need.
The main modes in which you can create collages:
- randomly scattered photos (with and without frames);
- mosaic (two types);
- net;
- index-print;
- multiple exposure (overlaying images on top of each other).
While creating a collage, you can change the size of the photos and their position in space relative to the selected angle.