Rename the USB drive
To rename a flash drive, just open Explorer and right-click on it. Then select “Rename” from the context menu.
After this, the text in the desired field will be highlighted and you can type whatever you want. Finally, press "Enter" on your keyboard.
Please note that the maximum number of characters that can be used is 11.
Now the drive has a different name, and it will be much more convenient for you.
How to assign a permanent letter to a flash drive
Windows automatically assigns a drive letter to each storage device that you connect to your computer. By default, this is the first free letter found in the English alphabet after letters already occupied by other computer devices.
However, you can make sure that the same letter is always assigned to a flash drive. This can be achieved either by “manually” making changes to Windows settings, or by creating special files on a flash drive that “tell” the computer which letter it needs to assign.
Change the name of the drive through Properties
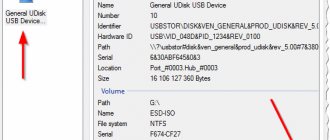
Everything can be done in another way. To do this, right-click on it and select “Properties” from the context menu.
In the properties window, go to the General tab. Next, in the field at the top, enter the appropriate words, then click “Apply” and “OK”. The flash drive will be renamed.
Autorun file
The latter feature allows you not only to rename the removable drive, but also to give it individuality by assigning a unique image.
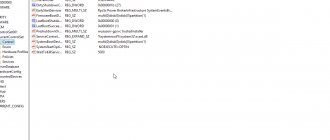
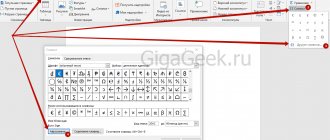
The icon for the flash drive can be found on the Internet, for example on the Iconspedia website. Icon files must have the extension ICO. Having placed it in the root of the drive, open the Notepad editor. Copy the text below into it or type it yourself, as shown in the screenshot. In the “Icon” line, after the “equal” sign, indicate the full name of the icon with its extension. We enter the desired name of the flash drive by analogy in the “Label” line.
[Autorun]
Icon=Red.ico
Label=Red Kingstone
We save the result to the root of the drive with the name “autorun.inf”.
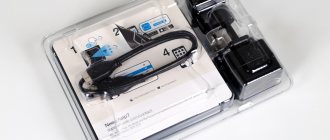
In order not to accidentally erase the icon or autorun file, we will change the visibility attributes for them. Right-click to open the Explorer context menu. Select the last item in it, marked with a two in the screenshot.
In the properties window, check the “hidden” box. We record the changes and repeat the steps for the second file.
Having completed the preparatory operations, reconnect the drive to the PC. Having opened Explorer, we see that the device now has its own icon and is called as written in the autorun file.
Renaming using formatting
You can also rename a USB drive during the formatting process. Please note that formatting will delete all files stored on your removable device. So, before formatting, save important files to your computer.
You can format a flash drive using standard Windows tools, or by installing suitable programs, for example, HP USB Disk Storage Format Tool. I'll tell you about the first method.
To do this, right-click on the flash drive in Explorer and select “Format”.
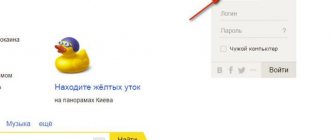
Then, in the “Volume Label” field, write a new name and click the “Start” button.
When formatting is complete, the flash drive will be erased and renamed.
How to rename a flash drive and make a flash drive icon
In this method, we will consider the option of not only renaming a flash drive, but also making colorful icons for a flash drive that will allow your device to be different from others.
First, let's select suitable icons for the flash drive. You can select the desired image and reduce it to 64x64 px in Photoshop, or you can go the other way and turn to the online icon search service iconsearch. Using this service, you can select icons of absolutely any topic and make an icon of the appropriate size.
Once you have selected an icon, download it in .ico format (any other format will not be displayed).
Now, in the root section (on the device itself) of the drive, create a file called autorun.inf using any text editor and write the following lines there:
Icon=car.ico Label=Tramp
Accordingly, car.ico is the name of our icon, and Tramp is the name of the drive. If you want to rename the flash drive using this method, write the name of the icon in the Label field.
The flash drive was renamed and acquired its own icon, but now we have two whole files responsible for the name and icon of the flash drive, so that these files are not accidentally deleted, let's hide them. Right-click on the file, select properties and in the properties menu set “Read Only” and “Hidden” - this will allow you not to delete these files when you work with the flash drive.
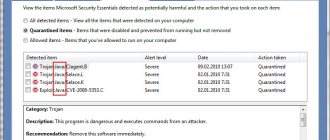
It turned out very beautiful and original. But, in addition to design, creating a personal icon for a flash drive allows you to protect yourself from viruses to some extent. The thing is that when a virus penetrates a folder, it first attacks the autorun.inf file and changes the icon to the standard one. That is, if you connected the device to your PC and saw that the icon there was replaced with a standard one, you know that some kind of nasty thing has moved onto your flash drive. That is why be sure to use a good Antivirus on your PC.
If you can’t insert an icon, watch the detailed video
For comfortable viewing, set the video quality to HD quality and expand to full screen.
Flash drives are currently very popular among users, because they are a quick way to transfer files from one computer to another. This device can also be used to store, for example, documents, photos or videos.
But if you have several flash drives (especially those of the same type) that you rarely use, then it will be difficult to remember what exactly is stored on it. Even after connecting it to a computer, for more detailed information, you will have to open it and see what folders are recorded on it. After all, the standard name for USB drives is the manufacturer or brand of the device. And by renaming the device, for example, “Windows 7,” you will know that it contains installation files for this operating system, or “Photo 2016” – photos from your vacation.
Flash drives can also be externally made in the form of a cartoon character, or any other unusual shape. And if you purchased something similar, why leave the boring name of the manufacturer? Let's look at how you can quickly give a new name to a flash drive and change the drive letter selected by the operating system for it.
Changing the drive letter for a flash drive
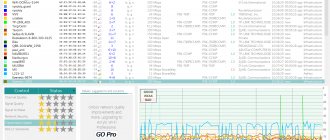
If, in addition to the name, you also need to change the drive letter, then click the “Start” button and enter “Computer Management” in the search bar. Then select the appropriate item from the search results.
In the Computer Management window, in the left area, click on Storage Devices, then Disk Management.
Now find which disk in the list corresponds to the flash drive, under it it will be written “Removable device”, and right-click on it. From the context menu, select "Change drive letter or drive path...".
Then a window like this will open. In it, click on the “Change” button.
Now select another letter from the dropdown list and click OK.
After this, the flash drive will be assigned a different drive letter.
So, in just a couple of clicks, we renamed the USB device, and now you can easily determine what is stored on it, and the name itself is nice to look at.
Rate this article:
About the author: Oleg Kaminsky
Webmaster. Higher education with a degree in Information Security. Creator of the portal comp-profi.com. Author of most articles and computer literacy lessons
- Related Posts
- How to create a disk image (CD or DVD).
- How to find out the system bit size: 32 or 64 bits in Windows 7, 8, 10
- How to find drivers by device instance code
Discussion: there is 1 comment
- SV:
20.11.2019 at 18:15what can I say, great))) everything worked
Answer
How to change the drive letter?
Now let's change the drive letter itself. Usually we use a drive with a given default letter. Go to the computer settings in the “Disk Management” section. Next in the list we find our external drive and right-click. Then select “Change drive letter or drive path.” Now click on the “Change” button. Select a letter for our drive and click on the “OK” button. If everything worked out for you, then well done. Feel free to rename your external drive.
Manufacturers of modern flash cards decorate flash drives in all sorts of ways. They use rare materials for the body (up to platinum and gold), and make devices in the form of everyone’s favorite cartoon and video game characters. But, no matter how beautiful the flash drive is in appearance, when we insert it into the computer we will see everything - the same template icon that the operating system uses to designate it. But, as you understand, this pattern can be easily corrected - rename the flash drive or select colorful icons for it.
So, first, let's look at the simplest option, how to rename a flash drive without using an icon.
In order to rename a flash drive using Windows, we need to connect the flash drive to the computer, go to the My Computer menu and find your device in the devices with removable storage section. Next, right-click on it and select Rename. Enter a new name and click OK.