Let's see how to disable the touchpad on a laptop to turn off the touchpad while working on the computer, if you use a computer mouse on the device. A touchpad is a touch-sensitive device in the body of a portable PC (laptop) that performs the functions of a computer mouse.
The touchpad in laptops is used to control the cursor and to execute various commands on the computer. A touchpad is an alternative to a hand-held mouse used on desktop PCs.
The majority of users, for greater convenience, use a mouse on laptops: wired, connected directly to the computer, or wireless, connected via an adapter inserted into the USB connector, or connected to the PC via a Bluetooth radio module.
In some situations, when working on a computer or during a computer game, the user accidentally touches the touchpad, which causes the cursor to shift, which causes inconvenience. Therefore, users have questions about how to disable the touchpad so that it does not interfere with productive work or play.
There is no danger in deactivating the touchpad functions on a laptop; a disabled touchpad can be enabled again if necessary.
There are several ways to disable the touchpad in Windows, which differ depending on the manufacturer of the computer and the touch device:
- using hardware keys on the keyboard;
- in Device Manager;
- in BIOS;
- through the mouse properties settings;
- in Windows Mobility Center;
- using a third-party program;
- physically disconnecting the touchpad or covering the touchpad with thick material.
In this article we will look at how to disable the touchpad on a laptop in different ways on the main popular brands of laptop manufacturers: HP, Dell, ASUS, Lenovo, Acer, MSI, Samsung, Sony Vaio.
The article contains instructions on how to disable the touchpad on ASUS, HP, Samsung, Lenovo, Dell, Acer, Sony, using hot keys on the laptop keyboard. In most cases, laptops use the “Fn” function key in combination with one of the “F1” to “F10” function keys, which must be pressed simultaneously.
Physically disabling or blocking the touchpad
Physically disconnecting the touchpad from the system chamber of the laptop is the most 100% effective method, but also the most inappropriate. Not every user will disassemble a laptop in order to disconnect the cable coming from the touchpad from the connector on the motherboard.
A similar method: stick a special plug made of durable material, such as thin plastic, on the panel of the laptop on which the touch panel is located. In this case, the cap will protect the touchpad from getting the user's fingers on it. This is not the best way to solve the problem.
Disable the touchpad in Device Manager
You can use Device Manager to disable or remove a touch device that functions as a touchpad.
Follow these steps:
- Open Device Manager using one of the convenient methods.
- Find "Mice and pointing devices" in the list. One of the devices will have the word "TouchPad" in its name, although other options are possible. On some laptops, the touchpad may be located in the “HID (Human Interface Devices)” section.
- Right-click on the device and select “Disconnect Device” from the context menu.
If there is no “Disable device” item in the context menu, then the device can simply be removed from the computer. To prevent it from being installed again after rebooting the system, you must perform the following steps (this method works in older versions of Windows: Professional and Enterprise):
- Launch Local Group Policy Editor on your computer.
- In the Local Group Policy Editor window, follow the path:
Computer Configuration → Administrative Templates → System → Device Installation → Device Installation Restrictions
- Open the state policy "Prevent installation of devices not covered by other policy settings."
- In the “Prohibit installation of devices not described by other policy settings” window, activate the “Enabled” option, click on the “OK” button.
- Restart your PC.
Using Device Manager
If the hotkeys do not work and you cannot or do not want to find the touchpad drivers for your laptop, then try deactivating the built-in mouse through the device manager.
- Press the Win+R combination on your keyboard or launch the “Run” window through the “Start” menu.
- Run the command "devmgmt.msc" to open Device Manager.
- Expand the "Mice and other pointing devices" or "HID devices" section and find the touchpad. It is usually labeled as Port TouchPad, but other names may also appear.
- Right-click the touchpad and select Disable.
If you cannot find the touchpad by name, disconnect all available input devices one by one and check if the touchpad has stopped working.
Disabling a touch device through mouse properties settings
Most laptops use Synaptics touchpad models. In this case, you can use the mouse properties settings to disable the touchpad.
Do the following:
- Open Windows Control Panel.
- In the All Control Panel Items window, click Mouse.
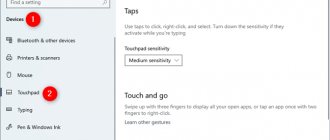
In Windows 10, you can use another method to access the settings: from the Settings application, open Devices, go to the Touchpad tab, in the Related settings section, click on the Advanced settings link.
- In the “Properties: Mouse” window, go to the “Device Settings” tab. The touch device is displayed here - the touchpad.
- Click on the "Disable" button and then on "OK".
If you want to always disable the touchpad when using a mouse on your laptop, do the following:
- In the “Device Settings” tab, click on the “Settings” button.
- In the touch device properties window, check the box next to “Disable internal pointing device when connecting an external pointing device” or “Disable internal pointing device when connecting an external pointing device to the USB port.”
- Click on the "OK" button.
A similar method is used when using ELAN models.
Some laptops have special programs designed to control the touchpad, created by the computer manufacturer.
Disabling the mouse via the control panel
In order to disable the mouse on a laptop, you can go to the Control Panel. To do this, use the Start button. In the drop-down menu, select and click on the inscription Mouse. A new window opens in front of you.
In the menu that appears, you will need to change the parameters slightly. To do this, select the touchpad, and then press the Disable button. Confirm the operation by clicking on OK. In a similar way, you can reactivate the touchpad.
Disabling the touchpad in BIOS or UEFI
In some situations, you can use an effective method: disabling the touchpad in the BIOS or UEFI. When using this method, you will not be able to re-enable the touchpad from the Windows operating system; you will need to enter the BIOS settings again to change the settings for enabling the touchpad.
Follow these steps:
- Enter the BIOS when your computer boots using the appropriate keyboard keys.
You may also be interested in:
- How to enter BIOS on a desktop PC and laptop: table
- How to enter BIOS without a keyboard
- Use the arrow keys to navigate to the appropriate tab to disable your touch device. Depending on the BIOS version, the options for disabling the touchpad may be in different tabs, for example, in the “Advanced” or “Boot” tabs.
- The parameter itself may be called “Touch Pad Mouse”, “Internal Pointing Device” or similar. Go to the desired parameter, press the “Enter” key.
- Select the “Disabled” option, press the “Enter” key.
- Save the new BIOS or UEFI settings by pressing the “F10” key.
To enable the touchpad on a laptop, you will need to enter the BIOS settings again to enable the “Enabled” option in the touchpad settings.
Disabling the touchpad with a button
Speaking about how to disable the mouse on an asus laptop or other models, first of all, it should be noted that there are several ways. The most common and simplest of them is to use the keyboard, or rather some of the function keys that are located here.
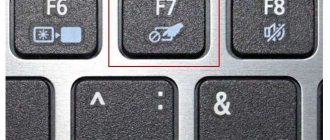
Some laptops have a small button in the top left corner of the touchpad that acts as a switch. But it is not available on all models, so sometimes you have to resort to other methods. So, the button for calling additional functions Fn in combination with one of the F keys will give us the desired result. But it may vary on laptop computers from different manufacturers. For example, if we are interested in how to disable the mouse on a Lenovo laptop, then it will be Fn and F8, on Acer - Fn and F7. You can recognize a function key by the designation on it; a crossed out square should be drawn here. After you disable the touchpad, if the Fn button interferes with your work, then read this article on how to disable the Fn button on a laptop.
It happens that the user wants to activate the touchpad function in the above way, using hot buttons. If such an operation does not work, it is quite possible that this is due to the settings of the laptop. So, you can enable a function in which the touchpad will automatically turn off when a wireless mouse is connected to the device.
How to Disable Dell Touchpad via Windows Mobility Center
Dell laptops have an add-on built into Windows Mobility Center that allows you to disable the touchpad. There is a special button that disables the touchpad.
Follow these steps:
- Right-click on the battery icon located in the notification area (system tray).
- In the context menu that opens, click on “Windows Mobility Center”.
- In the "Windows Mobility Center" window, in the "Set up by Dell Inc." area, in the "Touchpad" option, click on the "Turn off" button.
How to disable the touchpad on a laptop when a mouse is connected?
Sometimes you need to disable your laptop's touchpad. We offer you 4 ways to do this.
Hotkeys
The touchpad can be turned off by simultaneously pressing the Fn key and one of the F row keys. Which one depends on the manufacturer and the specific model of the laptop, but there is a hint - an icon in the form of a crossed out touchpad. If such an icon is missing, you can search for the desired button yourself. However, below are the keyboard shortcuts for the most popular brands:
- Samsung: Fn+F5;
- Acer: Fn+F7;
- ASUS: Fn+F8 or F7;
- Lenovo: Fn+F5 or F8;
- Sony: Fn+F1, Assist;
On HP laptops, the touchpad is disabled not using hotkeys, but using a pair of quick touches or a long press on the upper left corner of the panel itself;
This method is not applicable to all laptop models. If it turns out to be useless in your case, then you should try other means.
Task Manager
The touchpad turns off and using the device manager. You can enter it either by simultaneously pressing Win and X and selecting the appropriate item in the drop-down list, or by typing the command devmgmt.msc in the input line of the Run dialog box. The latter is called by the Win+R key combination.
In Device Manager, you can find the touchpad under the Mice and Other Pointing Devices category or under the HID Devices category. Finding the device is quite easy: words like touchpad or sensing pad in the name indicate it. It may also be hidden behind the phrase “USB input device,” but in any case, detecting it will not be difficult. After this, you need to right-click on the name and select “Disable device” in the window that appears. Another option is to left-click the touchpad name and disable it in the “Driver” tab.
Automatically turns off the touchpad when turning on a USB mouse
A method that is interesting because it allows you to do everything once and forget about the problem for a long time. To configure your operating system to automatically disable the touchpad, follow these steps:
Step 1: Open Control Panel or Settings. This can be done in different ways:
by typing control in the command line of the Run dialog box. You can call it, as noted earlier, with the key combination Win+R; By right-clicking on the “Start” button or simultaneously pressing Win+X, open a list in which one of the items will be “Control Panel” or “Settings”;
Step 2: Enter the "Devices and Printers" category if the "Control Panel" was opened using the "Run" window. If you prefer another option, you can immediately go to point 3.
Step 3. Find the touchpad and mouse in the list of devices, click on this item, select USB mouse connection options and check the box next to “Touchpad turns off automatically.”
It is worth saying that in the latest update of Windows 10, instead of the ability to automatically turn off the touchpad, it became possible to adjust its sensitivity levels. Low values of this characteristic may allow you to work comfortably on the keyboard without disabling the touchpad.
BIOS
The most inconvenient of the methods proposed in the article, since it requires turning off or restarting the laptop computer. But in some cases, only this can work: this is how the author of the article managed to turn off the touchpad on the ASUS X552M with its help.
Entering the BIOS on laptops from different manufacturers is performed differently. Below are the options for the keys that need to be pressed when turning on the laptop, from most to least common:
- Samsung: F2, F8, F12, DEL or combination Fn + F row key;
- Acer: F1, F2, Ctrl+Alt+Esc; for Acer Aspire Ctrl+F2; for Extensa and TravelMate F2, Del series;
- Asus: F2, Del, F9;
- Lenovo: F2, Fn+F2, F8, Del;
- Sony: Vaio series Assist key; old models F1, F2, F3, Del;
- Hp: F10, Esc; older models: Del, F1, F11, F8;
- Dell: F2, F1, F10, Del, Esc, Insert;
After entering the BIOS, use the arrows on the keyboard to go to the “Advanced” tab, select “Internal pointing device” from the list that opens - this is the touchpad. To turn it off, you need to press Enter and use the arrows to select “Disabled”, then “Enter” again. You can leave the BIOS, saving all changes, by pressing the F10 key.
The methods discussed above for turning off the touchpad are not the only ones, but they are the most accessible. We hope that the information presented in this article will be useful to you.
How to disable the touchpad when a mouse is connected - video
Disabling the touchpad using a third-party Touchpad Blocker program
The user can block the touchpad using third-party software. A program installed on your computer disables the touchpad.
The free Touchpad Blocker program blocks the touchpad when accidentally pressed. After installation on the computer, the program is registered in Windows startup.
The “Block accidental taps and clicks” setting is responsible for blocking the touchpad if you accidentally press the touchpad. In the application settings there are options to configure blocking time and pop-up messages.
Using hotkeys, you can enable or disable the touchpad lock (Ctrl + F9), and on computers with Synaptics touchpads, you can enable or disable the touchpad (Ctrl + Alt + F9).


