Content:
- 1 What to choose: monitor or TV 1.1 Arguments for installing a monitor on a desktop PC
- 1.2 Why do they still connect TVs?
- 3.1 General connection diagram
- 4.1 Plan for connecting a TV to a PC via HDMI
- 5.1 Connection step by step
- 6.1 Diagram for connecting devices via Wi-Fi
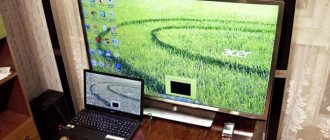
The monitor of a laptop or desktop computer is smaller and clearer than the screen of a modern TV. When you pair your devices, you can easily watch movies and TV shows on the big screen. Often, if you have joysticks, 3D glasses, TV and PC are connected for computer games with complete immersion in the world of virtual reality. Let's look at all the ways to connect a TV to a computer instead of a monitor.
Connecting your TV to your computer
It's simple. The only nuance can be the lack of suitable connectors on both devices. But this problem can also be fixed.
How to connect a TV instead of a monitor? Via cable or Wi-Fi.
- HDMI and DisplayPort cables will provide high-quality images in Full HD quality and excellent sound, without additional connections.
- But you should resort to VGA and DVI in the absence of the above plugs. Why? Read below.
Topic: 5 effective ways to connect a TV monitor to a PC
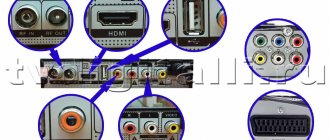
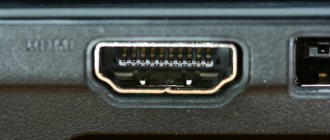
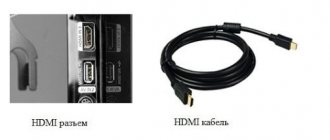
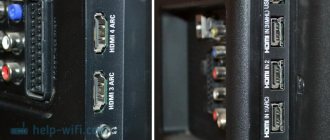
HDMI
The simplest and most common connection method. There may be several such connectors on a TV. One cable transmits high quality audio and picture. No other cables are needed, provided that the TV and video card are equipped with this port.
Using DVI and VGA
DVI transmits high-quality images. But you can’t do without an audio cable.
Let's analyze three DVI cable options in the table:
| View | Characteristic | DVI version |
| DVI-A (hardly used) | The picture quality is low. | analog |
| Converting a signal from digital to analog. | ||
| DVI-D (common option) | High quality signal and transmission of video information. | digital |
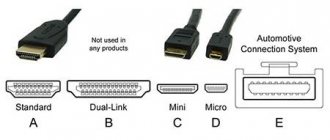
| Two-channel subtype Dual Link (resolution 2560x1600 pixels, frequency 60 Hz) and single-channel Single Link - 1920x1200 pixels, frequency 60 Hz. | ||
| DVI-I | 1 digital and 1 analog transmission signal (Single Link). | combined |
| There can be 2 digital and 1 analog (Dual Link) - they function independently of each other. |
Unlike the modernized DVI, VGA is an outdated type of interface. All that comes out is “pictures” of not the best quality. The picture will not be displayed in HD format. In addition, you need to use a cable (RGA) or minijack (3.5 Jack) to transmit the audio signal. Modern TV models are not equipped with it. To connect, both devices must be turned off.
The TV does not have DVI-I, but the PC video card does - connecting devices help. Options: DVI-VGA or DVI-HDMI.
The “disadvantages” of the cords are the fastening connection of the socket. If the cord gets caught, damage to both devices cannot be avoided.
Useful article: What to do if there is no sound on the TV monitor - 5 current reasons and troubleshooting tips
DisplayPort
Transmits image, video content and audio signals in the form of packets. Provides high quality transmission without the help of other devices. Audio or video can be transmitted separately. The difference from HDMI is the application. Despite the fact that the latter can be synchronized with a PC, its main purpose is multimedia technology.
The adapter will help synchronize the cord with the DisplayPort source and the VGA display. Or connect to 1 channel DVI or HDMI display.
Interesting article: How to connect a MacBook to a TV or monitor: 7 effective tips
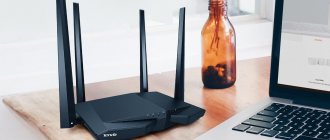
WiFi
Undoubtedly a better option than a cord. There is no need to place the system unit near the TV due to the short cable length. This affects the attractive appearance of the room in the absence of a large number of hanging cords.
“Minus” - depends on the internet speed. Connects if the Internet is at least 30 Mbit/second. Wireless synchronization in three ways:
- via Wi-Fi adapter (external). For TVs without a shared Wi-Fi adapter;
- via DLNA. For home local network. On your PC, enable network discovery and file sharing. To activate, go to the “Network and Sharing Center”. In the TV menu, click on wireless connection;
- via WiDi software (Miracast). This is a home media server for conveniently duplicating content playback to external devices via Wi-Fi.
What to choose: monitor or TV
Modern wide TVs have good contrast and brightness. They are more convenient for watching full-length films and TV series. The picture turns out richer, and it’s easier to notice all the special effects.
Modern Smart TVs support game consoles and 3D cinema. It is believed that they almost completely replace the computer, allowing the use of social networks and search engines Google, Yandex.
Other advantages of using a TV instead of a monitor include:
- Convenient sound and image adjustments;
- More visible area options;
- Connecting a PC to TV is quite simple;
- Sound effects are better if you don't have good PC speakers.
But there are situations when you should not use the TV as a monitor.
Arguments for installing a monitor on a desktop PC
Computer monitors are equipped with height and angle adjustments. They can be easily turned away from the sun and adjusted so that the screen is at eye level for the user. There is no such function on TV. The height can only be adjusted using brackets fixed to the wall.
There is also no point in installing a television screen on a small computer desk. It will take up too much space or will not fit at all in the allotted space.
Important! When deciding which is better for a computer, a monitor or a TV, keep in mind that the distance from the TV screen to the viewing location should be greater than from the monitor. Looking closely at TV is harmful to the eyes. As a result, headaches and eye fatigue may appear.
When positioned correctly, the seated person should be 50 cm away from the monitor. And you need to watch a 25-inch TV at a distance of 2 meters.
Important! TVs do not support most graphic editors, photo editors, and text applications. It is impossible for them to fully replace the monitor, only for watching movies and entertainment events.
Why do they still connect TVs?
A TV instead of a computer monitor is often used. And there are many reasons for this:
- The cost of a good-quality large-diagonal TV is less than a good monitor. So, you can save on setting up a home theater to watch movies on the big screen.
- The functionality of modern TV includes a backlight mode for dark scenes or game scenes. This allows you to view the moment of interest in maximum quality.
- The large display allows you to work with small details. This is important when editing video, so videographers often have to use both a TV and a monitor. One for viewing, the other for installation.
- Higher quality of playback of films and TV series. It is TV that allows you to completely immerse yourself in the world of the movie and see all the action scenes. But on the monitor the video will not look so bright and dynamic.
It turns out that it is better to connect a TV instead of a monitor when watching films and playing computer games. But for work and video editing, preference should be given to a classic home PC set.
How to connect a set-top box to an old and modern TV
The players connect to any “box” - old or new. The main thing is to stock up on the necessary cable, adapters and 3-5 minutes of free time.
The connection process occurs in five stages.
- Turn off the TV and player. It is necessary to protect equipment from short circuits.
- Identify the ports on the set-top box and monitor.
- If there is an identical one, connect through it. If not, find one that transmits the content with the least distortion. Or buy the necessary adapters and connect through them.
- Connect and wait 5-10 seconds until the receiver connects to the TV.
- Turn on the devices, follow all the instructions on the screen and watch what you want.
But how to connect a TV set-top box to a monitor if they have different ports? Let's look at the most common combinations, which are described in the following sections.
We buy quality: How to check a TV for dead pixels: 2 solutions
HDMI to VGA
To connect a player with HDMI to a screen with VGA you need:
- HDMI cable;
- HDMI to VGA adapter;
- speakers through which sound will be played.
What they will be depends on the player. Some models only support mini-Jack (3.5 mm standard), others work with RCA (tulip), and others connect over the air.
The connection goes like this.
- Turn off the TV, player and speakers from the network.
- Connect to the player via HDMI.
- Connect the adapter.
- Connect it to the screen.
- Connect the speakers to the player.
- Turn on the entire system.
Connecting speakers directly to the TV is useless. VGA cuts audio. Therefore, you only need to connect to the player.
Note: What to do if there is no sound on the TV - 5 current reasons and troubleshooting tips
HDMI to DVI-D, DVI-I
For movie lovers, we recommend purchasing an HDMI-DVI cable or adapter (if you already have one of the wires). The connection algorithm is standard: turn off → connect → turn on.
With DVI you can only get a Full-HD picture with stereo sound. This is enough to watch most films and TV series.
HDMI to RCA, VGA to RCA
What should those whose player or TV only support “tulip” do? How can they connect to the same HDMI or VGA? Again, special adapters will help! And if with HDMI-RCA it transmits sound with a picture, then with VGA-RCA everything is a little more complicated. VGA only works with images, so you just need to connect the yellow “tulip” wire to the adapter. This converter needs external power. It runs on batteries or via USB charging using the 2E USB Wall Charger type.
Educational article: TV screen refresh rate: which is better
Owners of devices with RCA and VGA should take a closer look at the backup connection option. If your device with a “tulip” has an S-Video video input, you can try connecting to a VGA display. The picture quality in this case is much better than in the “tulip”.
RCA to VGA, HDMI
Adapters to the rescue! But you shouldn’t count on a good picture and clear sound. "Tulip" produces images in SD quality. Interference is inevitable - the age of the interface affects it. It began to be used back in the 40s of the last century.
Read: Review Apple TV media player (A1625): the future of television
SCART to VGA, HDMI
A SCART connector is available on all TVs, including Smart TVs. Having adapters on hand, you can connect any equipment to your TV. Old media players and game consoles (the same Sega) connect to any TV via a SCART-VGA cable. Yes, the image quality will not be the best, but it will allow you to immerse yourself in a nostalgic atmosphere. With this connection there will be no sound. You'll have to accept it - these are the features of VGA.
When connecting a SCART TV to an HDMI set-top box (PlayStation), you need to buy a SCART-HDMI cable and connect it to the appropriate ports. The image quality will be better since SCART produces almost Full HD. And since HDMI transmits sound, there is no need to connect external speakers to the player.
With proper preparation, the connection itself will not take more than 2-3 minutes. However, before connecting the digital set-top box to the monitor, you should find the necessary adapters. This is the only way everything will go without a hitch!
How to choose the right TV screen
After weighing the pros and cons of TVs instead of monitors, it's worth deciding on the type of screen that's best suited for your PC. Among modern display production technologies, LCD and plasma panels are distinguished by quality. The latter are already fading into the background due to their short service life.
It makes no sense to use kinescope models to connect to a personal computer. They do not support modern video and audio formats.
And when choosing LCD TVs, it is worth remembering about the varieties of these types of equipment. For example, Samsung produces a TV with a Super Amoled display with brighter and better color reproduction.
Options for connecting a PC to TV
To use a TV as a monitor, you need to choose the optimal connection method and connect the devices according to a common circuit. After this, the quality of audio and video transmission is checked. And only then do they enjoy watching films.
You can connect TV to PC using the following methods:
- A wireless connection involves creating a local network or a direct connection via Wi-Fi with special adapters or built-in modules in the TV.
- Wired connection via appropriate connectors. Available interfaces include HDMI, VGA, DVI.
When choosing a connection method, you must take into account that not all wires support the transmission of both audio and video. Therefore, it is better to choose modern connection methods such as HDMI 2.0 and higher.
Advice. You can choose tulips to connect devices, but they have low bandwidth and will not be able to broadcast Full HD and stereo sound.
General connection diagram
You can use your TV as a monitor. To do this you need:
- See what wired connection options are available on PC and TV.
- Decide on the availability of a wireless connection or via a local network - for Smart RV.
- Select the optimal cable or adapters.
- Carry out synchronization according to the instructions for the selected method.
- View files and videos from your PC on your TV screen.
Remember that the distance from the TV to the viewing position should be much greater than from the PC monitor. Therefore, it is recommended to work at a computer as part of the basic configuration of the device.
Features of connection via HDMI or Displayport
In order for the TV to work as a monitor for a computer, it must be connected correctly. For these purposes, the HDMI interface was created, which is found in most consumer electronics. It is used to connect game consoles, projectors, players, various equipment and a computer. Feature and advantage - high quality video transmission with simultaneous broadcast of clear sound.
Displayport is a development by VESA for connecting equipment to a personal computer. Essentially, it is an improved version of HDMI, but not an analogue. The quality and speed of file transfer using this method is much faster and better.
But not all manufacturers equip PCs with a DP input. They give preference to HDMI only, which reduces the ability to play 4K and higher resolutions.
Advice. If you plan to use a laptop with a separate screen, it is better to pay a little extra and immediately buy the option with a Displayport connector. This gives you greater user flexibility than with HDMI.
Plan for connecting a TV to a PC via HDMI
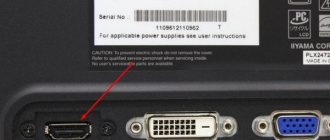
The easiest way to connect a TV instead of a monitor is via HDMI. This connector is found in most modern technology. And it’s not difficult to look for it - it’s signed with the appropriate letters.
The connection steps are as follows:
- Check the presence of appropriate connectors in the laptop or PC and on the TV.
- Purchase a cable of the required length so that the plugs fit freely into the connectors without stretching the wire.
- Connect one end to the PC, the other to the TV.
- Take the TV remote control. Find the Input key or in the menu and go to the “Signal Source” section and change it to HDMI. Some TVs offer HDMI 1 and 2. You need to switch to the one in which the plug is inserted.
- The TV screen may begin to flicker slightly, and then the correct signal will appear and display the computer desktop.
When connecting the equipment for the first time, problems may arise with incorrect screen display. You can correct the error through the appropriate PC settings. To do this you need:
- Right-click on an empty space on the screen.
- Select “Properties” in the drop-down window.
- Find the "Options" tab.
- In them, find the “Advanced” button and select the desired option in the drop-down menu to customize the screen.
- Click save via the OK key.
There it is advisable to set the maximum resolution of the selected screen. The subsequent connection should occur automatically.
Additional connection settings
Sometimes, setting up your TV as a monitor requires additional settings. They are needed if the computer does not find the TV automatically. To search you need:
- Right-click on an empty space on the screen. Select Properties – Options from the menu that opens.
- There in the center where the monitors are drawn, press the “Find” key.
- Upon completion of the search, select the maximum screen scan value.
- Go to the “Monitor” tab and select “Frequent Updates”.
- Then, go back to the settings and assign a number to each display, where 1 is the main one, and 2 is the additional one.
- Click on “define”. The number 2 will appear on the TV.
- Save all changes.
Important! To make the most flexible settings, you should take into account the characteristics of the video card. And only then set the resolution and color palette. After making all changes, the PC must be restarted.
Troubleshooting audio transmission errors
Sometimes, after connecting the TV as a monitor, no sound is produced. In this case, the HDMI or DP cable itself transmits audio and video tracks simultaneously. To correct this parameter you need to:
- Right-click on an empty space on the screen.
- Find the “Playback Devices” item.
- In the open menu, select “Speakers” and “LG TV” or another connected equipment model from the list of connected devices.
- Click on the name of the TV. And set "Use as default".
- Click save changes using the “OK” button.
After these simple settings, you can use your TV instead of a monitor.
Wired connection
This is the most stable and simplest option. It does not require any specific settings and works great in the “as is” format. You can connect a TV to your computer instead of a monitor in several ways: via DVI, VGA, HDMI or DisplayPort.
HDMI/DisplayPort
The HDMI interface is used to connect media players, game consoles and other equipment. Through the HDMI port, you can transmit a high-quality video signal in high resolution along with an audio track, and with almost perfect response.
DisplayPort is the next generation of interfaces developed by VESA. For connecting to a system unit, this is an ideal option that meets all modern technological trends. Both interfaces are quite common, especially HDMI. DisplayPort is found only on new technology, so not every TV can be connected to a laptop or PC video card.
How to connect TV to PC via HDMI or DisplayPort:
- We insert the plug into the TV on one side and into the video output on the PC on the other side (video card, laptop port).
- On the remote control, call up the technical menu by pressing the Input key (a similar action can be performed through the TV settings).
- We select the HDMI interface or DisplayPort as the main signal source.
- The equipment takes a few seconds to accept the connection, after which the PC screen switches to the TV screen.
Sometimes it may take longer to sync. It depends on the TV firmware and computer video card. If the picture is not displayed correctly, you should adjust the settings on your PC.
Debugging an image on a PC:
- Call the context menu by right-clicking on the desktop.
- Select “Display Options”.
- In the “Multiple Displays” section we set the standard resolution of the TV.
Here, in the additional parameters, you can adjust the screen refresh rate and set other presets. If the TV is not detected as a second monitor, then you need to click on the “Detect” button.
DVI/VGA
Ports have long lost their relevance, and you can find them on old equipment. The VGA interface transmits only an analog signal, while the DVI port can also work with digital broadcasting . The capabilities of the latter are indicated by the corresponding prefix:
- DVI-I – universal option;
- DVI-D – digital broadcast only;
- DVI-A – analog only.
If your TV has a DVI port and your computer has a VGA port, or vice versa, you can use an adapter.
Important! Here it is necessary to clarify that only the video signal is transmitted in this way. To transmit audio, you must additionally connect another 3.5 mm minijack cable.
Connecting TV to PC via DVI/VGA:
- We insert the video plugs into the appropriate interfaces.
- Connect the audio cable to the Audio-In port.
- In the TV menu, set DVI or VGA (sometimes D-Sub) as the signal source.
If necessary, set up the image on your PC according to the instructions above.
Sound problems
When connecting a TV as a monitor, sound may sometimes not be played. Here you also need to perform a number of actions on your personal computer.
Sound settings:
- Right-click on the speaker icon at the bottom of the interface.
- Find the item “Playback Devices”.
- In addition to PC speakers, the list presented should include a TV model.
- Select TV with the right mouse button and click on “Set as default”.
- Save the changes by clicking on the OK button.
How to connect TV to PC via DVI or VGA connectors
An HDMI cable is the best option for using a TV instead of a monitor. Version 2.0 and higher even transmits 4K format. But not all equipment is equipped with this modern connector. Or you may not have a suitable adapter at home.
In these situations, you can use one of the interfaces: DVI or VGA. In practice, a desktop computer or laptop must be equipped with one of them. The wire is connected to the corresponding connector on the TV.
Most often, the adapter will have a standard connector with a 3.5 plug. This is a classic input for a computer audio system. Cords of this type are sold in almost all household and computer equipment stores.
Connection step by step
You can turn a TV into a computer monitor using DVI-DVI or VGA-VGA cables. To do this, you must follow the following connection diagram:
- Insert the cables into the appropriate connectors on the TV and PC.
- Insert the plug into the audio input on the TV. It is designated Audio-In.
- Turn on the computer and TV. Go to the parameters (settings) of the TV and select the signal source - VGA, DVI, depending on the selected method. You can quickly navigate through the Input button.
Important! To use the TV screen as a computer monitor, it is important to expand the desktop. The expansion algorithm depends on the type of operating system.
Setting up desktop extension for different OS
To use your TV as a monitor, you must complete all settings. These include correct connection, screen settings described above, and setting desktop extension parameters. It is carried out depending on the operating system as follows:
- Windows XP. You need to right-click on the free space on your desktop. Select “Properties” in the window that opens. Find the "Options" tab. And set the highest resolution.
- Windows 7. Also right-click on the desktop and select “Screen extension” from the open menu. Set the parameter to maximum.
In a number of operating systems, you can go to the control panel and find screen controls. And put all the necessary data there.
Basic ways to connect the set-top box to a monitor
Now let's talk about ways to connect TV set-top boxes to your computer screen.
First, it’s worth considering some details. Some models of modern displays are equipped with speakers, but these remain in the minority. If you have an old monitor or a new model without speakers, you will need a speaker connection.
How to connect a VGA and DVI monitor to a DVB-T2 set-top box
The DVB-T2 set-top box is an interesting option for turning your monitor into a TV. This device has all the necessary connectors, and the connection will be very simple.
Initially, the DVB-T digital set-top box was not intended for connection to computer displays and served only for connection to televisions. However, the set-top box has an HDMI connector, as well as an input for an audio system, which made it an excellent option for adapting to monitors. Older displays do not have an HDMI input. But in this case, you can use an HDMI-VGA or HDMI-DVI adapter.
The method of connecting the set-top box depends on the type of monitor. If you want to turn an old tube display into a TV, you will most likely need an AV to VGA converter. This is justified by the fact that some old computer screens have a SCART connector. And modern digital TV set-top boxes are not suitable for it. You can buy an adapter at any electrical store.
As for modern monitors, you just need to choose the right cable, preferably HDMI or DVI. And to connect the speakers to the console you will need ordinary “tulips”.
Be sure to consider the length of the connection cable. Many people ignore this point, but it is quite important. After all, the quality of the signal depends on the length of the cable.
- VGA – no more than three meters.
- HDMI – no more than five meters.
- DVI – no more than ten meters.
Having chosen the correct cable and purchased the necessary adapters, we connect the monitor to the TV tuner.
Checking connection compatibility
After all connections have been made, simply turn on the computer display, and then the HDMI set-top box. If the process of loading the TV gadget appeared on the screen, and then the Smart TV interface opened, then everything worked out for you.
If the computer display is active but there is no image, or an error window appears, carefully check that the cables are connected correctly. If the error persists, try connecting the set-top box to a TV or other monitor. Since the problem may lie in a faulty cable.
Wireless connection via Wi-Fi
You can turn a TV into a computer monitor without wires if your equipment has a Wi-Fi module. It is included in Smart TVs and most laptops as standard. To connect, you will need a home router with a wireless network to which both devices can connect. It is through it that the equipment is synchronized.
Pairing can be done using two technologies: Miracast or Intel WiDi. They do not require a router if the laptop runs on an Intel processor version 3 or older. You also need to check whether the computer has built-in Wi-Fi and a graphics chipset from the manufacturer. Laptops automatically support WiDi.
Important! To use a TV instead of a monitor wirelessly, your laptop must be running Windows 7 or higher. You will also need to install the Intel Wireless Display utility on it.
Laptops most often have Windows 8.1 or higher. They automatically support Miracast type connection. For them, you only need to check whether Smart TV supports it. Otherwise, the TV will need an adapter - a special flash drive installed in the USB connector.
Diagram for connecting devices via Wi-Fi
To connect your TV as a monitor to your computer via a wireless network, you need to:
- Go to the TV menu and activate synchronization via Miracast/WiDi. By default, the option is already enabled on smart TVs. For example, on Samsung equipment it is called “Screen Mirroring”.
- To connect via WiDi, you need to install the Intel Wirelles Display application on your PC. It installs quickly. When finished, you need to find the “Wireless Monitor” key.
- Pass the security check - enter the code on your laptop, which will appear on the TV screen.
After these simple steps, the computer monitor will appear on the TV screen.
Important! To use Mirakas technology on a PC, you need to open the Charms panel in Windows 8.1. To do this, hover your mouse over the lower right corner. Select the “Devices” subsection, then “Projector” and “Add a wireless display”. If there is no command, the TV does not support Miracast and an adapter is needed.
Connection methods
Conventionally, they can be divided into 2 categories:
- wired, that is, using a cable;
- wireless – via local network, Wi-Fi or via an adapter.
Each method has its own advantages and disadvantages. You should start by studying the connectors and interfaces on the equipment and only then make a choice.
HDMI or DisplayPort
HDMI was specifically designed for consumer electronics, so it is more common than others. Game consoles, media players, home theaters and other devices are connected through this interface. It is good because it transmits clear sound and high-quality images at the same time.
HDMI for connecting TV to computer.
Algorithm for connecting TV to a computer via HDMI:
- One end of the cable is inserted into the computer port, the other into the TV.
- On the remote control, press “Input” (or “Source”) and select the signal source “HDMI”.
- The display may begin to flicker at first, but will then display the image from the PC.
DisplayPort, developed by VESA, was originally created to connect equipment with a computer. Roughly speaking, this is an updated version of HDMI, providing better quality and data transfer speed. But, oddly enough, today this port is not found so often, despite its advantages.
DVI and VGA
PCs and TVs will definitely have these interfaces, at least one of them. The difference between them is that DVI is a more modern version of VGA. The port is located on the back of the computer case - on the video card.
DVI cable.
Sometimes you want to connect equipment via a VGA connector, but it is occupied by the monitor. In such a situation, a DVI to VGA adapter will come in handy. It is worth considering here that the interface is capable of transmitting only a video signal, that is, a picture. To get sound, you will have to buy an additional audio cable, each end of which has a 3.5 mm plug.
How to connect:
- The cord is inserted into the port of the computer and TV.
- Similarly, insert the 3.5 mm audio cable into the “Audio-In” interface.
- On the remote control, press “Input” and select DVI or VGA (depending on the signal source).
The disadvantage of both methods is the screw connection of the connectors. If you accidentally touch the cord with your foot, you can damage both the TV and the PC video card.
Via Wi-Fi
TV panels with Smart TV have a hardware module used to connect to the Internet, wirelessly. To synchronize, you will need a router to which both devices are connected.
There are 2 interesting technologies available: Miracast and WiDi. They do not require network equipment, the main thing is that the PC has built-in Wi-Fi, a video card from Intel and a chipset from the same company older than the 3rd generation. All laptops currently produced support WiDi.
Connection:
- In the TV menu, enable Miracast or WiDi synchronization (if available). Usually the option is active by default.
- If the WiDi option is selected, then install the “Intel Wireless Display” program on the PC.
- After installation, select “Wireless Monitor”.
- A code is entered on the PC, which will be displayed on the TV screen.
With Miracast it's a little different. The PC must run an OS no younger than Windows 8.1. Open the Charms panel, in the lower right corner click on “Devices” - “Projector” - “Add a wireless display”. If the command is inactive, it means the TV does not support Miracast. The solution is to connect an adapter.
Via LAN
To use this method, you need to download and configure a DLNA server. There is enough suitable software on the network, for example, “Home Media Server”.
Connect a LAN cable to the TV and set up the server:
- Open the program, go to “Settings” - “Devices”.
- Press "Search".
- Once the scan is complete, the available devices will be highlighted.
- Select a TV and confirm the connection.
- Go to “Settings” – “Media resources”.
- Click “Add” and indicate those folders that will be visible to the TV.
- At the bottom of the window, you can select several hard drives at once, allowing access to them.
- Press “Ok” to start scanning.
- Open the media server by clicking on the “Launch” button from the main window.
The setup is complete. Now select the “LAN” signal source from the remote control - an explorer with folders will appear on the screen.
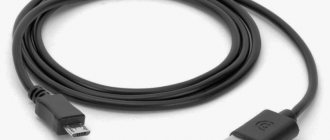
LAN cable.
How to use a home local network
You can use the TV as a monitor by connecting it via a local network. To do this, you will need to install and configure a DLNA server on your PC. There are quite a lot of similar applications available for free on the Internet, for example “Home Media Server”. Let's look at the connection using its example.
DLNA connections are also supported by Smart-TVs. To create a shared network you will need:
- Launch software, for example, “Home Media Server”.
- Go to settings and find the “Devices” item. Click on “Search” there.
- Wait for the search to complete and select from the list of TV devices.
- Go to settings again and enable media service.
- Find the “Add” button, specify the hard drive packs that are allowed to be accessed from the TV. You can immediately move the “My Computer” folder there, where all local files are contained.
- Click on the save “OK” button. Scanning will begin. After that, launch the media server again and click on the “Launch” button in the main menu.
After synchronization, all folders open for access will be displayed on the TV screen.
Important! Before starting the process, you need to connect an Internet cable (LAN) to the TV. Then, go to the menu through Source or Input. And you can switch files using the TV remote control.
How to customize screen display
All options for using a TV as a computer monitor and methods of connecting equipment were discussed above. The last thing left is that not all users like to watch movies on two displays at the same time. To do this, you need to configure the display of screens via your computer:
- Right-click on an empty space on the desktop.
- Go to settings and select screen display.
- You can install: only on a PC, only on TV, expanding space (the TV will be a continuation of the PC), duplicating screens.
The optimal option is considered to be only on TV for viewing various content.
Important! Remember that a TV will not be a complete replacement for a computer monitor. It doesn't have the display capabilities of most editors and video editing programs. Therefore, it is recommended to switch screens only when you need to view photos, videos or clips.
Found a mistake? Select it and press ctrl+enter
- 60