What are drivers for and why update them?
The software helps the system identify devices connected to the computer for the correct operation of the PC or laptop. Updating Windows 7 drivers is necessary to improve performance, fix bugs, and ensure security.
Attention! Outdated software can lead to critical failures.
Developers systematically check based on feedback to eliminate device malfunctions. Outdated programs are unstable and not optimized for the needs of constantly updated software that uses computer hardware resources.
Second manual installation method
If for some reason using the above method seems difficult to some users, then it is possible to use a more simplified management of drivers for a sound card and other devices.
To do this, you need to correctly follow a couple of simple steps.
First you need to launch the Run window, which allows you to access all the functions of the Windows operating system by entering the name of the desired function.
You can find this item either in the same Start menu, or, which is much faster and easier, by pressing the Ctrl-R key combination.
Next, you need to enter “hdwwiz” - without quotes, which will allow us to access the “Hardware Installation” function:
In the window that appears, click the “Next” button and thereby go to the point of selecting the driver installation method.
We are interested in the second method called “Installing equipment manually selected from the list”:
Now you need to select the line “Show all devices” - as you might guess, displaying all connected elements, or select the necessary category to display, for example, only audio devices responsible for sound, or a video card.
After this, you need to click “Next”, and then select “Install from disk.”
As a result, as in the method described above, we indicate the storage location of the audio driver, and after installation is complete, we reboot the computer.
Using third party programs
Using third-party software, you can automate the process of installing new components. Recommended use:
- DriverPack Solution;
- Driver Booster;
- Driver Genius.
DriverPack Solution
DriverPack Solution is a free program for updating drivers in Windows 7. It is an application that falls into the category of professional software. Developed by Arthur Kuzyakov for the Microsoft platform. Has a maximum resource for an advanced search for the latest software versions. Possibilities:
- Using alternative driver packs.
- Automatic software updates.
- Replenishment of the database for installing new versions.
- Uninstall and reinstall function.
Driver Booster
Driver Booster is a shareware application for installing driver updates from the developer IObit. Divided into free and professional versions. Utility features:
- Fixing problems in the operating system.
- Improved performance in games and graphics editors.
- Driver database of three million items.
- Automatically search for the latest versions to update.
Installing the driver in Windows 7
Let's look at how to force install a driver in Windows 7 the Defender AV-W2035 webcam as an example . There is a driver downloaded from the Internet AV-W2035_VISTA.zip , which we successfully unpacked into the folder C:/AW-0350-MIC-VISTA . First, we need to look at where our file with the *.inf . To do this, you need to enable the display of file extensions in Windows folder properties so that file names are written with their extensions. Or use the very useful Total Commander or a similar file manager. After looking through the folders (you can use the file search), we found the file snpstd2.inf
You should remember the entire path to this file so that later it will be easier to find it in Explorer . We connect the camera to the computer and wait for Windows to complete all its operations to detect new hardware.
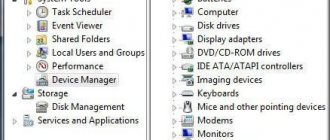
Open Device Manager (Start -> Control Panel -> Device Manager)
USB camera without installed drivers is immediately visible Right-click on the camera and select Update drivers...
In the window that opens, click Search for driver on this computer
and then select Select a driver from the list of already installed drivers and the Next
A window will open with a list of equipment categories. In order not to waste time or rack your brains, just point to the first line Show all devices and click Next
In the next window we will see a list of available drivers in the system (if any). But since we know that we have a folder with the driver, without selecting anything from the list, we click on the Install from disk button...
Click the Browse button...
and using Explorer we look for our file with the *.inf , select it with the mouse and follow the Open
and, of course, the OK
Now our driver will appear in the window with a list of available drivers (if the driver is not suitable for the equipment, the system will generate an error).
Here you should pay attention to the checkbox Only compatible devices . The fact is that if the connected equipment has not been tested for compatibility with the installed version of Windows, then a driver for it will not be found, despite the fact that it may be completely working. Therefore, in some cases, this checkbox should be unchecked and the driver search repeated again.
So, after the file with the driver is found, select our driver in the list with the mouse and click Next
The driver installation will begin.
A Windows warning may appear indicating that the driver you are installing is not digitally signed or has not been tested for compatibility. If you are sure that the driver was taken from a reliable source and is exactly intended for the equipment being installed, then you should absolutely not be afraid of such a warning, but should agree to further install the driver. When the installation is complete, the system will display a completion window.
You can verify successful driver installation in Device Manager , where the connected device will no longer have a question mark, and its name will change to the correct one created by the manufacturer. In our case with the camera, this will be a device that appears called USB PC Camera (SN9C103)
The installation is complete, you can safely start using your new equipment!
How to install a printer driver from an archive (3 methods)
When working with driver distributions, many manufacturers offer installation programs for download, which are not compiled in the form of an executable file (*exe format), but are packaged through a special archiver program and have a *zip extension. The installation process is not fundamentally different, but has a few additional nuances. In this article we will tell you how to correctly start the installation process from an archive file.
Special instructions:
Before we begin, let’s discuss a few points that are mandatory:
- disconnect the data cable from the printing device and do not connect it until described in this step-by-step guide;
- The step-by-step guide is universal and suitable for any operating system of the Windows family (XP, Vista, 7, 8, 8.1, 10).
After the archive with the driver package has been downloaded from the Internet, you need to unpack it. There are several means for this. First of all, this is a built-in Windows archiving tool (but it is only suitable for *zip archives). You can also download shareware programs from third-party developers from official websites - WinRAR or 7ZIP. You can find out about installing a free archiver in our article.
An important point - after unzipping, you need to go to the folder where the extracted files are located and see if there is an executable file there that starts the installation automatically. They usually contain the name "Install" or "Setup". If you see this, just run it and it will configure the computer itself. But if yours looks like this (there is no file to start the installation, then you need to install the driver manually (we’ll talk about this below)):
Configuring the driver manually
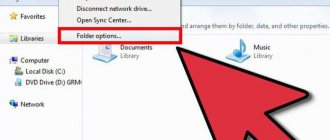
So, we did not find any automatically installed files and accordingly act according to these step-by-step instructions. We need to go to the Start menu - Control Panel. Inside we find the links “Hardware and Sound”, and then “Devices and Printers”. Inside the window that opens, in the upper right corner we find the option to add a new printing device.
A window will open where the system itself will search for new printing devices (but we remember that at the beginning of the instructions we disconnected the data cable, so we understand that nothing will be found). You can immediately interrupt this process by clicking the “The printer you need is not listed” link.
The process of installing drivers from disk
Of course, for such an important system element as a driver, there are several installation options.
The simplest and most basic way is using a driver disk. After purchasing a computer, you should have several disks left - from the motherboard and from the video card (if you have one), at a minimum.
But it is not uncommon for disks with important software to be lost or damaged. And some computers don’t even have a disk drive. What to do in such a situation?
A program for installing drivers and subsequent updates.
DriverHub is a driver manager designed to install and update software from a wide range of computer devices. The program is completely free, suitable for computers running Windows 7 and higher (32 and 64 bit).
Working with the program is very simple. It is enough to install and run the program in a standard way. In the main application window, click on the “Find Now” button.
Next, the program will scan the system, collect information about it and about the devices installed on the computer. This usually takes 15-30 seconds.
After scanning, the program will display a list of drivers that can be installed/updated.
Next, all you have to do is tick the required drivers and click on the “Install” button. DriverHub will automatically download drivers from its online storage and then automatically install them.
As you can see, installing software using DriverHub takes much less time and effort. Among other things, using the utility will avoid the risk of installing drivers that are not suitable for the system/device, are infected with viruses, or contain potentially unwanted software (this is a common occurrence when downloading drivers from unverified sources).
If you find an error, please select a piece of text and press Ctrl+Enter.
The process of installing drivers from the Internet
In a similar way, you can install drivers via the Internet. The difference will be that the installer will not be launched from the disk, but taken from the Internet. For this:
- We write the brand and model of your motherboard in a search engine and go to the official website.
- We look for the drivers tab there and go into it.
- Download the software for your operating system and open the file.
- Next, the program will identify missing drivers and offer to update them.
- Left click on the downloaded archive.
- In the open window, find and double-click the installation file. It may be called "setup.exe" or "install.exe".
- The installer should then appear. Read the information and click on the “Next” button. The installation process is simple, read the instructions and follow the recommended steps. Once the installation is complete, restart your PC.
Note!
A similar method can be used not only with the motherboard, but also with absolutely any other device. On the Internet, as a rule, you can find drivers for any components and external devices.
Automatic installation and update of drivers using special applications
Sometimes there are cases when it is necessary to install a large number of drivers at once - sound card, video card, network card, etc.
This happens especially often immediately after installing the operating system.
In order to avoid having to install for each device separately, applications have been developed to simplify and also speed up this process.
One such application is a utility called DriverPack Solution , which is quite well known to Russian-speaking users.
Once launched, the application will immediately display devices that require driver installation.
Advice! If you have free time, do not be lazy to download the offline version of DriverPack Solution and copy it to a flash card. If you reinstall Windows, this will allow you to quickly install the necessary drivers even without an Internet connection!
How to use this utility? Quite simple. When we launch it, we will see the message “Found drivers for updating and installation” - but this is not what is needed.
Scroll down and select “Expert Mode”:
After this, we will be taken to a window where all found components will be displayed.
Then you can automatically install/update all drivers by clicking on the appropriate button, or you can do this for each device separately.
As you can see, everything is quite simple. Well, in the end, as usual, we reboot the PC.
Carambis Driver Updater
Most users of this utility after the first use were left with a very good first impression.
You can purchase an annual subscription for 635 rubles.
The low cost will pleasantly surprise you, and you will also be pleased by the fact that the license can be used on two computers at once.
This is something you rarely see among other paid programs.
The developer, in addition to the ordered program, provides the opportunity to use three more utilities from Karambis for a whole month for free: a cleaner, a program for automatically searching for updates for all programs, and a photo editor.
This way you can test each of the applications, excellent inexpensive analogues to popular paid programs.
The utility will help solve the problem with the video card driver if Windows' automatic search did not help fix the problem, this is especially true when games have consistently poor graphics quality.
If the operating system installed on a PC or laptop begins to work unstable (constant freezes, errors), the manufacturers of this utility offer another solution - the Carambis Cleaner program.
It will fix any problems that have arisen and improve performance several times.
An excellent example is the Carambis Cleaner utility - it was created by the best developers who specialize in programs to improve the performance and update of all system components.
Features and features of the application:
- Fast program optimization;
- Convenient user interface;
- Built-in task scheduler;
- Quick troubleshooting.
The utility is paid. It can be purchased on the manufacturer’s official website for only 130 rubles (the cost of a monthly subscription).
The program is aimed at working with Windows operating systems; it allows you to quickly identify all their shortcomings and delete system files that have not been used for a long time.
When the system needs scanning, the program will notify you about it.
The user can perform optimization using special keys on the main toolbar of the program.
Nvidia GeForce Experience The free GeForce Experience utility allows you to install drivers for your video card, as well as update them as new versions become available.
Its use is very simple.
After installing the program, it will check for the latest version of the program and offer to install it, all you have to do is agree and wait a couple of minutes, to do this, go to the “Drivers” tab and click the “Download driver” button:
This will complete the driver installation.
How to install drivers on Windows with an active Internet connection
If the computer on which you want to install drivers is already connected to the Internet, then the procedure will be very simple.
Open the DriverPack Solution website and download the DriverPack Online utility. She herself will find the necessary drivers on the Internet, download them and install them on your .
Temporarily disable your antivirus so that it does not interfere, and run the downloaded file. In the running program, click on “Expert Mode” - the inscription at the bottom of the window.
Open the “Software” tab and uncheck the boxes next to unnecessary applications. If you do not do this, DriverPack Online will install Yandex Browser, Opera and other programs that you may not need along with the drivers.
Go to the "Drivers" tab and click on "Install All".
Wait for the installation to complete and restart your computer. After rebooting, all necessary drivers should be installed.
Manual method of installing drivers on a computer.
The process of standard software installation in Windows can be divided into three stages:
- Collection of technical information about the device and operating system.
- Search for suitable software online.
- Driver installation.
At each of these stages, there is a possibility of difficulties arising, including malfunction or complete failure of the operating system. But this can be avoided if you carefully follow further instructions. Let's look at each of the stages of installing/reinstalling drivers.
1. Collection of information. If you try to enter a query like “Download a driver for a webcam” into a search engine, the search results will display thousands of sites, each of which will contain the same number of links to download software. Our task is to find a driver suitable for the existing device and the operating system installed on the computer. And to do this you need to narrow the search, and here it is enough to clarify the device model and version of Windows.
To accurately determine the device model, follow these steps (you can skip it if information about the device can be obtained from its documentation):
Launch the Device Manager system application. To do this, call the context menu above the “My Computer” or “This Computer” icon, click on the “Properties” item, and then on the “Device Manager” item.
Next, from the list of devices installed on the computer provided by the program, you need to find the one for which you need to install/reinstall the software.
For example, you need to install a driver for a sound card. In the Device Manager list, audio cards are usually placed in the “Audio inputs and outputs” or “Sound, game and video devices” section.
Device names may have a yellow exclamation or question mark in front of them. This is one confirmation that the driver is faulty. Another reason for this is the presence of “Unknown devices” in the list. This means that the system cannot even determine the name of the device.
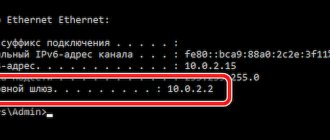
In any case, double-click on the device name (even if it is displayed as “unknown”). In the small window that opens, open the “Information” tab. In the “Property” block, select “Equipment ID” (or “Equipment ID”). In the "Value" section, highlight and copy the top line:
In our example, this line looks like “ACPIVEN_INT&DEV_33A0”. For you, this line may consist of more or, conversely, fewer characters. Be that as it may, this set of characters allows you to determine the name, model and other information about the device. To get all the data, open any search engine.
2. Search for drivers. Paste the previously copied string as a search query. The search engine will have to return a list of pages on the network where you can familiarize yourself with the device and then download the driver for it.
Any such site usually offers to download several versions of drivers for the same device. They are also divided into operating systems and bit depth (x86 or x64). And here we need to determine the version and bitness of Windows installed on our computer. This is quite easy to do. Call up the context menu above the “This PC” icon again and click on “Properties”. In the window that opens, all the necessary information will be available:
We will need information from the “Windows Edition” block, as well as “System Type”. In the example above, we have Windows 10 64-bit OS. Next, all that remains is to find a driver on one of the sites that would be suitable not only for the device itself, but also for the system. Knowing the device identification number, version and bitness of Windows, this will not be difficult to do.
3. Driver installation. Drivers downloaded from the Internet can be a self-installing program or an archive (regular or self-extracting without an installer). In the first case, the user simply needs to run the executable file and follow the on-screen instructions. The driver will install automatically, and then you may need to restart your computer.
In the case of archives without an installer, everything is a little more complicated. They usually contain the main driver files that need to be registered on the system. But it's actually not very difficult:
- Open the driver properties window from Device Manager by clicking on the device name a couple of times.
- Click the Driver tab, then click the Update Driver button.
A window with the following contents will appear on the screen:
First, try to automatically search for drivers by clicking on the appropriate item in this window. However, in most cases this results in a message like this:
It's okay - the system just doesn't look for drivers in user folders, but does it exclusively in system directories. A manual search for drivers was provided specifically for this purpose. Launch it by clicking on the item “Search for drivers on this computer.”
In the next window, in the “Browse for drivers on this computer” section, click the “Browse” button and specify the folder where the unpacked driver files were saved.
Click on the “Next” button to complete the installation. Next, you may need to restart the computer, after which the device will have to be detected by the system. Now let's look at the process of installing the driver automatically, for which we will use the modern DriverHub utility.
What are the drivers?
There is no clear boundary for dividing drivers, but they can still be divided into several groups:
- The first group is the system component driver. Simply put, the most important. For example, a driver for the normal operation of the processor or other important elements. It is better not to experiment with such drivers and not touch them;
- the second is drivers for cards. First of all – drivers for video cards, sound cards and some others. They cannot be classified in the first category, because some system units do not have a video card, a sound card, or any other card. As a rule, these are simple, office computers;
- third - external device drivers - Drivers for any gadgets that are additionally connected to the computer and do not affect its operation in any way, but only expand its capabilities. For example, a printer driver.