Processor and motherboard operation
Before you figure out how to properly install the processor on the motherboard, it is worth understanding the task of these two components.
In order not to go into technical details, it is best to express it figuratively. For example, the motherboard is the nervous system of the PC. Thanks to the huge number of microcircuits, each component receives the required amount of electrical current. Thus, all elements will start working.
The processor in this case plays the role of the brain. This is a computing chip that is responsible for the results of any task in the system. It is also one of the main components that will help you launch the OS and work with any program. But, of course, for this you will need a RAM module, a hard drive and a power supply.
Processor Installation
How to install a processor on a motherboard with your own hands? It is enough to understand its configuration. The chip must be installed in a slot on the board called a socket. As technology advances inexorably, this type of connector is constantly changing.
Intel and AMD have a huge number of sockets that are suitable for certain generations of processors. Each chip has a certain number of legs with special placement. It is installed in the socket and should fit perfectly into the connector. Typically, the surface of the chip is covered with thermal paste, and a cooler with a radiator is installed on top.
The cooling system is also important in the system, and without it the computer will not work correctly. Installing it is part of the chip installation process. It is important to do everything necessary carefully and correctly.
How to correctly install or change the processor on the motherboard
Section: Computer assembly | 707
Almost every PC user sooner or later has to face the need to replace the processor on the motherboard. This situation occurs when it is necessary to replace thermal paste due to strong heating, when upgrading a computer, or when a processor malfunctions. Of course, with a large number of PC repair shops, changing components is not a problem. But let's figure out whether it is necessary to contact strangers.
Basic Concepts
First of all, you need to understand what and where is located inside the computer. Turn off the PC, including from the network, disconnect all wires and remove the cover of the system unit. The largest chip you see in front of you is the motherboard. It is the connecting link between all devices and an integral part of the computer.
Next, in the illustration you see a cooling system consisting of a radiator and a fan, collectively called a cooler. Actually, under this system the processor is located.
In the cooling system, the radiator plays a passive role, transferring heat from the processor to the environment through thermal conductivity. A thin layer of thermal paste is applied between the processor and the heatsink to improve the functioning of the heatsink. The fan plays an active role, further increasing the heat outflow.
The role of a PC cooler is difficult to overestimate. The processor heats up during operation, and if it overheats, the computer will shut down. If such a protective reaction does not work, the processor will simply burn out.
Let's move directly to the processor (or CPU - central processing unit). This is actually the main part of the computer, its “brain”. No matter what brand or performance device you're using, you'll see a lot of little "legs" on one side of the processor. This surface helps the processor sit securely on the motherboard. The connector on the board that the processor fits into is called a socket.
The socket matters when you purchase a new processor. This parameter differs for different devices, and when updating computer components, you need to monitor the compatibility of the devices. You can find out more about the motherboard socket in the technical description for the device or on the manufacturer’s website.
Perhaps this is all you need to know from theory, so let’s move on to practice.
Installing and replacing the processor
Prepare everything you need to replace the processor: - a Phillips screwdriver to “open” the system unit; — a flat-head screwdriver, if the cooler is mounted on levers; — a clean rag to remove old thermal paste; — thermal paste, although sometimes the manufacturer already applies it to a new cooler.
After you have turned off the computer, you need to remove the cooler. Place the motherboard facing you and disconnect the fan from the power supply. There are 2 options for fan mounting - 4 latches or 2 levers.
In the first case, each latch must be turned in the direction opposite to where the arrow is pointing and slightly pulled up until a characteristic click is heard. In the second case, pry up the fastener using a flat-head screwdriver and move it as shown in the picture.
After this, remove the cooler. It may take some effort, but without fanaticism. Now you have a great chance to clean the system of accumulated dust and dirt.
So, we have a processor inserted into the socket and additionally secured with a small lever. Pull the lever aside and remove the old processor.
If you replace the processor with a new one, the old device will no longer be needed. If you need to change the thermal paste or you are installing a new radiator, we will continue to work with the existing processor. You need to remove any remaining dried thermal paste from it. Just wipe them off with a rag; if the paste is too dry, use a rag soaked in alcohol. Do the same with the surface of the radiator that is in contact with the processor.
After removing the thermal paste, insert the processor into the socket. To determine how to do this correctly, take a close look at the back of the device. On one of the corners you will notice an empty triangle; there is a similar one on the socket. This is the key to prevent incorrect installation. However, there is another sign. The processor must fit into the socket firmly and without any effort; if you have to press, you are doing something wrong. If everything works, secure the processor with the lever.
The next step is to apply new thermal paste. As mentioned above, this layer is necessary to ensure that air does not get between the cooler and the processor and heat transfer is not impaired, so do not neglect this point. Usually, the thermal paste comes with a special spatula for application; sometimes the thermal paste is packaged in a syringe and used to apply it to the processor, or you can use any means at hand. Spread the thermal paste evenly over the outer surface of the processor. Do not apply a thick layer, the heatsink is very tightly adjacent to the processor, and excess thermal paste will come out.
Compare your result with the illustration:
So, the processor is installed, thermal paste has been applied, all that remains is to return the cooler to its place. We proceed in the reverse order - place the cooler on the processor, lower and turn the latches. Ready!
As you can see, there is nothing supernatural about replacing the processor. Therefore, you can easily carry out such an operation at home, without spending a lot of time and effort.
First step
How to install a processor on a motherboard? This is not difficult to do, but you need to be careful. The most important thing is to choose the right chip format. The user will have to carefully understand all possible options and study the necessary information.
What you should pay attention to? Typically, when assembling a PC, a user selects a processor and a video card, and then selects a motherboard. When choosing a chip, you should pay attention not only to the number of cores and operating frequency, but also to the socket. The most popular from Intel is Socket 1151.
How to install a processor on a motherboard? After identifying the socket, you need to select the same one on the system platform. If the system is based on 1151, then you need to select the appropriate connector on the board.
General knowledge
In my opinion, the first step is to understand a few general concepts that you need to know in principle. The motherboard is designed for a specific series of central processor and you need to check compatibility before purchasing.
The main compatibility characteristic is the supported component socket. A socket is a connector on the board into which the processor is connected. This information can be obtained from the technical characteristics of the components.
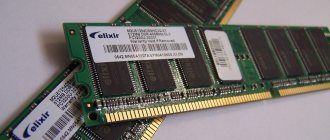
As a rule, this fact is important. You may be asking: how to match the processor to the motherboard, video card and RAM? My answer: Each board model supports a specific series of processors and, in most cases, one type of RAM. If your CPU fits the board, it will also fit the memory installed on it. On modern platforms, the RAM standard is DDR4.
Video cards are connected to a PCI-Express slot, which is found in almost all board models, with the exception of cheap office solutions.
We'll look at how to find out all the supported motherboard interfaces below.
Above is the current socket for AMD , which is labeled AM4.
For example, if you have a computer based on an AMD processor. Let's take the AMD FX 6300 as an example. The socket of this CPU is AM3+. This means that all processors that were released for this socket will fit here and will fit your board and accordingly you can buy a more powerful AMD FX 8320 here.
Second step
If you install a chip in a new motherboard, you need to place the board on a special foam mat. It is usually available bundled with the platform. This way you can protect yourself from static electricity.
Now we need to look at the motherboard. The largest rectangular connector is the socket for installing the chip. There is a special clamp next to it that needs to be lifted. If we are talking about an Intel system, you also need to remove the metal processor cover that protects the chip legs. There is also an option with a plastic plug.
Once you have freed up space to install the processor, you can remove it from the box.
Third step
How to install a processor on a motherboard? If we are talking about AMD, then you need to know one thing: the chip comes straight with thermal paste. On the one hand, this is good, since you don’t have to apply it to the surface of the processor yourself; on the other hand, you need to be careful not to lubricate it when installing the component.
With Intel chips things are different. Most new models are not presented with thermal paste, but it is applied to the radiator or included in the kit.
To install the chip correctly, you need to consider the processor legs and socket. Depending on the location of the grooves, you will need to install a chip. It is also worth paying attention to the triangle in the corner. It serves as a guide for correct installation of the processor.
Without using any serious force, you need to position the chip in the socket so that each leg fits into the holes. Afterwards it will be necessary to check the correct installation, but under no circumstances should you use force. At the end of the process, it will be enough to lower the lock lever or close the metal cover.
Installing a processor in socket AM4
What do we need?
Let's first decide what we need:
- Motherboard with socket AM4. This group includes motherboards based on the A350, B350, X370, A450, B450, X470 chipsets, as well as others that will appear in the future.
- A processor compatible with this socket, such as a first or second generation AMD Ryzen processor.
- CPU cooler . We use the cooler supplied with the processor.
- A tube of thermal paste.
- Curly screwdriver.
Usually the cooler already has thermal paste applied, but if stored in a warehouse for a long time, it can dry out or be applied unevenly, so it is better to apply your own thermal paste.
Preparing the AM4 socket
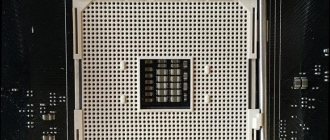
Rotate the motherboard so that the rear panel connectors for USB, audio, network and other components are located at the top left. The motherboard socket looks like this:
The MSI B450 Tomahawk board uses only one latch to secure the processor. It is located at the bottom of the socket. Gently press on it, move it down a little and lift it up:
Preparing the processor
Remove the processor from the packaging, make sure that everything is in order and all contact pins are intact:
There is a golden corner on the case of AMD processors; there is also a dot opposite this corner. This corner is needed so that you can correctly orient the processor to install it in the socket.
Everything is ready, then the actual installation of the Ryzen processor will be performed.
Installing a Ryzen processor in a socket
Rotate the processor so that the golden corner is aligned with the top left corner of the motherboard socket, then carefully lower the processor into the socket:
The processor should lower into the socket itself, without force. If the processor does not install, then you are doing something wrong. Once the processor is installed, lower the latch.
The installation of the Ryzen processor in the AM4 socket is complete. All that remains is to install the cooler on AM4, then everything is simpler.
Applying thermal paste to the processor
The next step is to apply thermal paste to the processor. To do this, squeeze a little thermal paste onto the surface of the processor and distribute it in a thin, even layer over the entire surface of the processor using a special spatula or any piece of plastic.
Installing a cooler on a Ryzen processor
The cooler can be installed in several ways, depending on the structure:
- using clamping bolts;
- using a special latch.
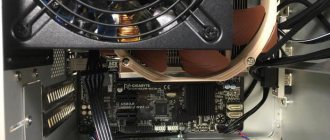
The MSI B450 Tomahawk motherboard has a latch-mounted cooler. Install the cooler onto the processor so that the hooks of the latches installed on the board coincide with the hooks of the latch on the cooler, then lower the latch lever.
The cooler that comes with the Ryzen 2600X processor does not have a latch mechanism. It will need to be installed using bolts, so the latch fasteners on the board need to be unscrewed:
Next, install the cooler so that the bolt holes in the cooler heatsink housing match the holes on the motherboard.
Gently tighten the cooler with the bolts, making one or two turns for each bolt in turn - in order to press everything evenly. There is no need to clamp it very hard; it is enough for the heat dissipating surface of the cooler to fit tightly to the surface of the processor.
Cooler power connection
Next, insert the three-pin cooler power connector into a special connector on the motherboard. In our case - on the B450 Tomahawk motherboard - it is located to the right of the processor socket and is signed as CPU_FAN:
Processor power connection
Depending on the motherboard model, the processor can be powered using a 4-, 6-, or 8-pin connector. Connect the corresponding power supply wire to the processor power connector on the motherboard:
Cooler installation
When the user figures out how to install an Intel processor on the motherboard, he will have to deal with the chip cooler. There will be nothing complicated if it is a proprietary cooling system (CO). But there is a difference in installing an Intel and AMD cooler.
The Intel CO has 4 legs that fit perfectly into the four holes on the system platform. When installing a fan, you need to arrange everything so that the power is easier to connect to the connector. It is important that the wire does not hang down or cling to other elements. You need to place the cooler so that the legs fit into the holes and fix them.
AMD has a different mount. And if the question is how to install the processor on the motherboard, then you will have to figure out how to install the cooler. In the center of the radiator there is a bar in which there is a hole. There is a special lever on top of the system that will help secure it to the board.
To install the cooler correctly, you need to carefully place it on the chip so that the lever remains on top. Then you need to insert the lower and upper parts into the grooves, and then fix the structure.
Installation steps
Installing a processor on a motherboard involves several steps:
- determining the type of CPU used and possible replacement options;
- selecting and purchasing the desired processor;
- choosing a motherboard (MB), if there is a need for a more radical change in the “stuffing” of the PC;
- choosing a cooling system for a new processor;
- actually installing the CPU and connecting the cooling system.
In the event that the MP is not changed, you also need to know how to remove the processor from the computer motherboard in order to free up space in the socket for a new one.
Processor selection
The choice of processor for a computer is made based on the user's needs for system speed. However, if everything were that simple, then replacing the CPU would not pose much of a problem. Currently, there are several types of processors (so-called generations or families) that often differ not only in speed, but also in design. And this is within the same manufacturer. And, although there are now only two major manufacturers of PC processors - Intel and AMD, each of them has several families of chips, often radically different from each other.
If there is no need to replace the MP, to select a processor you should know which processors are supported by the available motherboard. As a rule, this directly depends on the type of socket used in it. A socket is a connector for connecting a processor. For example, motherboards with an LGA1151 socket only support processors manufactured in a design that matches the LGA1151 standard socket.
In addition, even within the same socket, CPUs can differ in electrical parameters. Therefore, it is imperative to know which types of CPUs can be supported by the MP.
This can be found in the MP instructions. If there is none, you can contact the manufacturer’s support service and download instructions from the Internet.
Choosing a motherboard
In the event that all CPUs supported by the MP do not meet the necessary software requirements, the motherboard is also changed along with the processor. This process is called "platform switching".
Important! Changing a platform is essentially purchasing a new PC, since a number of devices (for example, RAM) may be incompatible with the new platform, and these devices will also have to be changed.
If you select a motherboard, it must fully match the type of CPU used, both in terms of the socket type and its electrical parameters (similar voltage levels, distribution of pins on contact pads, etc.)
In addition, the format of the motherboard must be suitable for the type of case used, the number of connected external devices must be no less than what the user has, the number of fan connectors must also be appropriate, etc.
Cooling selection
The cooling system (CO) for the new CPU must meet the following requirements:
- Mechanical compatibility with the type of CPU and MP used.
- The heat dissipated by the CO should be no less (or better even 10-20% more) than the maximum power generated by the CPU at its maximum speed.
- The dimensions of the CO must be such that it fits in the housing.
- The power connector for the active part of the CO (fan) must be compatible with the corresponding connectors on the MP.
Assembly
The sequence of assembling a PC when installing a new processor on it is as follows:
- It is necessary to disconnect the motherboard from all external devices and power connectors and remove it from the PC case. You can, of course, make a replacement without going through this procedure, but it will be somewhat inconvenient.
- Remove the cooling system of the old CPU by disconnecting the cooler clip and removing it from the surface of the CPU.
- It is necessary to open the socket using a special lever located on it.
- Remove the processor from the socket and place the new CPU in it.
- Close the socket using the lever.
- Install the CO and connect it.
- Install the MP into the case, and after connecting it to external devices, you should connect it to the power circuits.
After completing these steps, the PC with the new processor is ready to use.
Installing a cooling system on the processor
Installing a CO may have a number of nuances that should definitely be considered.
The contact between the CPU cover and the base of the CO heatsink must be very tight to promote good heat dissipation from the CPU. This is achieved with the help of a special composition - the so-called. thermal paste, which is applied in a thin layer to the processor cover using a special spatula. If such a tool is not available, apply thermal paste with a regular knife. Excess thermal paste that gets on the socket or motherboard should be removed with a napkin.
Next, the heatsink is installed on the CPU. This must be done by immediately orienting it correctly to attach the clip. If you make a mistake at this stage and perform the installation incorrectly, you will have to remove the CO again and reapply thermal paste.
After this, the CO is secured with a clip attached to the socket or MP.
The final stage of connecting the CO is connecting its connector to the power circuit. Most often it is indicated on the MP with the inscription “CPU_FAN”.
Chip replacement
Some users have to change the processor to a more powerful one. But to do this you will have to remove the outdated chip from the motherboard. To do this, you need to disconnect the cooling system from the power supply, then remove it and get to the processor.
In principle, this process is no different from installing components. You need to do everything in reverse order. The main thing to remember is that you should not use force or sharply pull on the cooler or processor. Otherwise, components on the motherboard may be damaged.
How to install a processor.
- We lift up the metal handle that secures the processor, as shown in the photo.
- Then we find a key (small triangle) on the processor, and also find the same triangle on the socket.
- We place the processor on the socket so that these keys match.
- You will feel how all the legs of the processor fall into place and it sits down easily.
- After this, we lower the small metal lever and snap it into place.
- Now apply thermal paste. We apply a little to the center of the processor so that when installing the radiator on top, it does not spread onto the motherboard.
- The processor is installed, now let's talk about installing a cooling system on the processor.
Replacing thermal paste
In this case, you will have to change the thermal paste. For some, this procedure may be difficult. But the matter is actually simple, since it does not require additional resources or special knowledge.
In general, changing thermal paste is necessary in any situation, since it is recommended to do this a couple of times a year. Therefore, the following information will be useful for all PC users.
So, to replace you need a cotton pad and alcohol. This way you can remove the old layer of thermal paste. Now you can start applying the protective layer. To do this, squeeze a small amount of thermal paste into the middle of the metal processor cover. Usually an apple seed is enough to cover the entire surface.
To spread the thermal paste, you need to use a special spatula or an unnecessary credit card. Also, some users advise using a syringe to distribute the protective layer.


![Error [Steam API dll is missing]](https://rec-ip.ru/wp-content/uploads/oshibka-steam-api-dll-otsutstvuet-330x140.jpg)