As optical disks become a thing of the past, fewer and fewer computer models, especially laptops, come with a built-in CD-ROM drive. Users who are used to installing Windows from a DVD may be confused by the lack of a drive, but in fact, preparing to install a system from a flash drive is almost no different from preparing to install from an optical disc. Let's see how to configure the BIOS to boot your computer from a flash drive or other storage device connected via USB.
Login to BIOS
Here we will not dwell on what a BIOS is and what it is needed for, this is a topic for a separate article, but we will immediately move on to how to get into it. It must be said right away that the login method may differ in different PC models, but the general principle is similar. All you need to do is hold down one key when you turn on the computer. Which one you can see immediately after switching on, when the manufacturer’s logo appears on the screen. Typically the information is displayed at the bottom of the screen as a message like “ Press Del to run Setup ”, “ Del: BIOS ” or something similar. In the example given, to enter the BIOS you need to hold down the DEL .
The situation with laptops is a little different. F2 key is most often used to enter the BIOS ; in Acer it is F1 , F2 or Ctrl + Alt + Esc ; in HP you need to hold down F10 or Esc . Some laptop models, for example, Sony VAIO, have a special ASSIST . A few words should be said about entering the interface of the new version of BIOS UEFI directly from the interface of a running Windows 10. To do this, you need to restart the computer while holding down the Shift Troubleshooting ” > “ Advanced Built-in settings ” in the boot environment menu UEFI Software > Reboot . In Windows 8.1, UEFI login is similar, only the sequence of options in the WinPE environment menu is different: “ Diagnostics ” > “ Advanced options ” > “ UEFI Firmware Settings ” > “ Reboot ”.
Activate/deactivate a parameter
To enable fast boot:
- Turn on/restart your PC.
- Go to bios.
- Go to the "Boot" tab.
- For “Fast boot” (sometimes you may see “Quick boot” instead), select “Enabled” (instead of the currently “Disabled”) value.
- Press F10 to save the settings and exit the BIOS.
Attention! In different BIOS versions, fast boot may have different names. These include: "quick boot", "fast boot", "SuperBoot", "Intel Rapid BIOS Boot", "Quick Booting" or "Quick Power On Self-Test".
In some BIOS versions, the path to the “fast boot” parameter may be different:
To disable the “Fast boot” or “Quick boot” option, you need to do the same as to enable it. Only now the parameter of the same name needs to be set to “Disabled” instead of “Enabled”.
BIOS management
Keys are used to navigate through BIOS sections and settings, with the exception of the latest UEFI BIOS , which are distinguished by the presence of a graphical interface and mouse support. The arrow keys are used to navigate through sections and individual settings, Enter is used to select a specific setting, Esc is used to exit the current settings section and the BIOS itself, and F10 is used to exit the BIOS while saving the changed settings. As a rule, a list of control keys is given in the BIOS itself, on the right or below, and by pressing F1 you can open the built-in help. F9 key in most BIOS models is used to reset settings to factory settings.
What is legacy USB support
The Legacy USB Support function is used to activate or deactivate support for USB devices at the BIOS level. For example, if mouse or keyboard appears next to the function name, this means that only the mouse or keyboard works.
The function can take the following values (depending on the BIOS model, not all options may be available):
- disabled – disable the function, activate the operation of all USB devices;
- enabled – activation of the keyboard and mouse operating via the usb interface at the BIOS level;
- AUTO – deactivates the operation of the keyboard and mouse using the PS/2 protocol if devices of the same type are connected to the computer’s USB ports;
- BIOS (sometimes only BIOS) – implementation of the functioning of USB devices at the level of the computer motherboard;
- OS – implementation of the functioning of USB devices using the operating system;
- Keyboard – allows only the USB keyboard to be enabled using the BIOS;
- Mouse – you can only use a mouse;
- ALL DEVICE – allows the inclusion of all devices connected to the USB ports;
- No mice – turns on all USB devices, but the mouse remains inoperative;
The item is located in the “ Advanced ” department. Navigation through the BIOS menu is realized using the arrow buttons, the “ Enter ” button to confirm your choice and the “ ESC ” key to exit the menu. To enter the BIOS when starting the PC, you need to have time to press the ESC , F2 or DEL before the operating system starts.
Setting up the BIOS to boot from a USB drive
As already mentioned, setting up the BIOS to boot from a flash drive is almost no different from setting up to boot from a CD or DVD. The only difference is the choice of option in the corresponding section. Let's look at boot settings using the example of the two most common types of BIOS - AMI and Award.
AMI BIOS
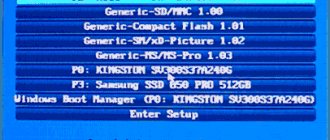
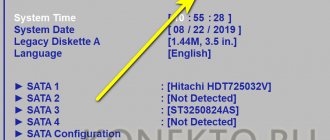
By connecting a USB flash drive to your computer and entering the AMI BIOS, you will find yourself in the “ Main ” section. Right arrow key, select the “ Boot ” section in the main menu and press enter to enter it. Here, first of all, you need to select the “ Hard Disk Drives ” subsection and press enter. You will see a list of devices with the names 1st Drive, 2nd Drive , etc. The number 1 in the first name just means that this is the first device from which the boot is performed.
The hard drive will be indicated to the left of it, but you need to replace it with a flash drive. To do this, highlight 1st Drive , press Enter and select the connected flash drive in the menu that opens. Press Enter and Esc to return to the previous menu. Now go to the “ Boot Device Priority ” subsection. There will be a similar list of items ( 1st Boot , 2nd Boot ), give preference to the first one, press Enter and also indicate the flash drive in the menu that opens. Save the settings by pressing F10 to start booting from the flash drive.
Award BIOS
In Award type BIOS, the setup procedure is very similar. Once you get into the BIOS, go to the “ Advanced BIOS Features ” section and select the “ Hard Boot Disk Priority ” subsection. Having entered it, select a pre-connected flash drive from the available devices and move it to the top of the list by pressing the “ + ” sign. Then go back to the previous menu and this time select the “ First Boot Device ” option. USB-CDROM or USB-HDD from the menu list that opens . Everything is ready, you can save the settings by pressing F10 and reboot.
How to enable legacy usb support
If you need to enable this settings item in the BIOS menu , you need to launch it, then enter the “ Advanced ” section and, using the arrow buttons, find the required menu item so that it is highlighted.
What are the arguments in favor of phablets according to Samsung?
Then press Enter and use the arrows to select the “ Enabled ” value, then confirm your choice by pressing “ Enter ” again. The choice of whether or not to enable an item depends solely on the user and his preferences. If you need to achieve maximum functionality that devices running via a USB interface are capable of, you should enable this item.
But it should be borne in mind that in this case, until the operating system starts working, these types of devices will not be available for use. When using outdated versions of operating systems such as DOS or Windows 95, activation of this settings item is mandatory.
Booting from a flash drive via Boot Menu
Many BIOS models have a special function Boot Menu , which allows you to set the computer to boot from external devices without changing the settings of the BIOS itself. It is convenient primarily because the Boot Menu boot settings are not saved, so it is ideal for one-time booting of a PC from an external drive, be it a flash drive or an optical disk. You can get to the Boot Menu in the same way as in the BIOS, by pressing the corresponding key when turning on the PC, only the key will be different. It all depends on the motherboard model.
In Asus it is F8 or Esc , in Lenovo, Dell, Toshiba and Acer it is F12 , in Samsung it is Esc , in HP to enter the quick boot menu you need to press F9 or Esc and then F9 . In general, the button to enter the Boot Menu is indicated on the initialization screen when you turn on the PC, next to the information about the BIOS entry button. As for working with the Boot Menu, everything is very simple. Having connected the flash drive to the PC in advance, boot into the Boot Menu, select the flash drive using the arrow keys and press enter. Immediately after this, the download will begin from the selected media.
Purpose of "Quick Boot"/"Fast Boot" in BIOS
From the name of this parameter it already becomes clear that it is associated with speeding up the computer boot. But how is the PC startup time reduced?
The "Quick Boot" or "Fast Boot" option makes booting faster by skipping the POST screen. POST (Power-On Self-Test) is a self-test of the PC hardware that runs when turned on.
More than one and a half dozen tests are carried out at a time, and in case of any problems, a corresponding notification is displayed on the screen. When POST is disabled, some BIOS reduce the number of tests performed, and some even disable self-testing.
Please note that the BIOS has a “Quiet Boot” , which disables the display of unnecessary information, such as the motherboard manufacturer’s logo, when booting the PC. It does not affect the startup speed of the device in any way. Don't confuse these options.
Booting from a USB flash drive to UEFI
Like the classic BIOS, UEFI is a low-level program, but it is more convenient and secure. In particular, UEFI has a graphical interface, supports the mouse, changing localization and installing special software. Logging into UEFI is carried out in the same way as in the BIOS, that is, by pressing special keys when turning on the PC or from the Windows 8.1 and 10 interface, as shown in the “Entering BIOS” section. Once in UEFI, you need to go to the “Advanced Mode” section, find the “Boot Option #1” option there and select a drive previously connected to the computer from its drop-down list. Modern versions of UEFI have a separate Boot Menu where you can select a boot disk.
Tip: Do not select devices whose name begins with “UEFI”; currently many USB drives do not support UEFI mode.
How to enable USB ports in BIOS: detailed instructions
If the USB ports on your PC are not working, and Windows settings and driver updates do not help, the controller may have been disabled in the BIOS. In this case, you will need to go to the configuration menu and turn everything back on.
There are many different BIOS versions with their own interfaces and subtleties of operation. Also, your computer may be running a more modern complex - UEFI, which supports a full-fledged graphical interface. This article discusses the distributions that are most often installed on motherboards.
Entering BIOS settings
To start changing the configuration, you need to go to the corresponding menu. It can be opened when the personal computer is turned on - before Windows starts loading from the hard drive.
Turn on your PC. In case it is already running: reboot. Wait for the speaker to beep: a short, single beep indicates that all internal components necessary for the computer to function have been detected.
Now you need to press the hotkey to call the configuration. This must be done before changing the screen. If you didn’t have time and Windows started loading, reboot. The keys depend on the model of the installed motherboard and the BIOS firmware version. You can find it in the user manual that came with the motherboard, on the manufacturer’s official website, or look at it on the screen of your PC when it boots:
If you don't know the board model, that's okay. Just try pressing the following keys: Tab, Delete, Esc, F1, F2, F8, F10, F11, F12. One of them will definitely do.
You don't have to try just 1 option at a time. You can quickly press all the buttons from the list without any problems. One of them will come up and launch the BIOS settings, and the rest will be ignored.
Entering the BIOS/UEFI settings of the latest PCs
Many modern computers boot up so quickly that you won't be able to access the keystrokes when you turn them on. This is also true for laptops. Therefore, the latest versions of Windows OS have acquired a new launch feature. Let's show it using Windows 8.1 as an example.
- Swipe your mouse from top to bottom or bottom to top along the right edge of the screen and click “Options” in the window that appears.
- Click on “Change computer settings”
- Click Update & Recovery.
- Next: “Recovery.”
- Under Special Boot Options, click Restart Now.
Your computer or laptop will reboot into setup mode. After restarting your PC, you will also be able to choose the option to start from a USB drive or DVD.
Menu navigation
Almost all BIOS versions do not have a graphical interface. This means that you will have to work only using the keyboard, like in the Windows console. Navigation is carried out using the up-down and right-left arrows. To open any section, use the Enter key to go back - “Escape”. A small reminder of the keys used is always shown on the screen.
The UEFI firmware package is installed on the most expensive and powerful motherboards. It supports more drivers and can work with a mouse. Its interface will be familiar to users of Windows and other modern operating systems.
Each version has its own interface and sets of options. Even the names of the same parameters may differ. The following article describes several popular BIOS releases.
AMI BIOS
A very common option that can be found on many modern computers. The main menu is divided into 2 parts: a list of categories and various actions, such as exit or save. You will be working on the left side.
You need to go to the section called “Integrated Peripherals”. There is no Russian version of the interface, so all commands are only in English. Use the Down arrow to highlight this item and press Enter.
Here you need to enable (Enabled) 4 options:
- USB EHCI controller – main controller. If the motherboard has version 3.0 ports, this item will be divided into 2 parts: “Controller” and “Controller 2.0”;
- USB Keyboard Support – support for keyboards;
- USB Mouse Support – mouse support;
- Legacy USB storage detect – works with external data storage: flash drives, disk drives, smartphones and digital cameras.
In some older versions there are only 2 items “USB controller” and “Legacy USB storage support”.
When you're done with the settings, press the F10 key to save your changes and restart your computer.
Phoenix AwardBIOS
Another popular version that can often be found on modern laptops. It does not have a main page like AMI, but is equipped with convenient thematic bookmarks at the top. You can move between sections using the left and right arrows, and between items using the up and down arrows.
Go to the "Advanced" section using the "Right" arrow. In it, find the “USB configuration” category. All items in this section must be set to “Enabled”. In some versions, the “USB configuration” category may be in the “Peripherals” tab and not in the “Advanced” tab.
To exit the menu, press F10 and confirm exit.
AMI BIOS for Asus
Version of AMI used on Asus laptops. Externally it is very similar to Phoenix - a similar bookmarks bar. USB settings are located in the "Advanced" section. Go there, enable all options and exit using the F10 button.
UEFI
Contrary to popular belief, UEFI is not part of the BIOS. It can rather be called a more advanced, but less popular competitor. There are a large number of different versions, each with their own interfaces. However, here the controls are similar to the usual Windows, so you can easily find the options you need.
Windows Settings
If at the BIOS level all ports and controllers are enabled, but the USB ports still do not work, there may be a problem in the settings of your Windows system.
First, try simply disconnecting and reconnecting the device. This will check if the drivers are correct. If there's something wrong with them, Windows will try to reinstall them.
If nothing happens when you reconnect, try enabling the controller in the Windows registry. To do this you need to do the following:
- Call the “Run” dialog using Win + R (or through “Start”: in XP and 7 by left-clicking on it, and in 8 and 10 versions by right-clicking).
- Type regedit and click OK.
- Go to "HKEY_LOCAL_MACHINE\SYSTEM\CurrentControlSet\Services\USBSTOR".
- Double-click on the “Start” entry to open the editing window.
- Change the value to "3". With any other parameter value, the USB ports will not work.
- Click OK and close the editor.
Video: how to configure any BIOS to boot from a USB flash drive
Good publicity
ustanovkaos.ru
Typical problems when setting up the BIOS to boot from a flash drive
It cannot be said that problems with entering the BIOS and setting it up for subsequent booting from external media are a particularly common occurrence, however, sometimes you have to deal with them. Let's look at the most typical of them.
Fast startup enabled
If, when you turn on your PC, you press the keys to enter the BIOS, but Windows still loads, most likely you have Fast Startup enabled. If this function is active, when the PC is turned off, the hybrid hibernation mode is activated, while a “cold” start of the computer is required to enter the BIOS. There are three solutions to this problem:
- Turn off the computer while holding down the Shift key.
- Use reboot instead of shutdown.
- Disable fast start. Go to the power options and follow the chain of settings shown in the screenshots below.
Secure Boot enabled
Secure Boot, a built-in BIOS UEFI function designed to prevent unauthorized software from launching when the computer is turned on, can prevent booting from a flash drive. The procedure for disabling this feature may differ on different motherboard models. In regular BIOSes, the setting is most often located in the Boot > Security or System Configuration ; in UEFI it can be found in the Boot section. To disable it, in the OS Type menu you need to select the Other OS item; in a regular BIOS, the function is disabled by setting it to Disabled .
Flash drive is not visible in BIOS
There may be several reasons for this problem. Here are two main ones:
- The port to which the drive is connected is faulty.
- The USB controller is disabled in the BIOS. An unlikely scenario, but one that should be ruled out. Look for the setting responsible for enabling/disabling USB ports in the Advanced or Integrated Peripherals , if this is an Award BIOS. The name of the setting may vary, but as a rule, the word “ USB ” is always present in it. The value of this setting should be Enabled .
As you can see, there is nothing fundamentally complicated about setting up the BIOS to boot a computer from a flash drive. Difficulties may arise only at the stage of searching for the necessary parameters, since ordinary users rarely have to deal with the basic input/output system.
Should I enable fast boot?
Since POST is generally important for the computer, it is reasonable to answer the question of whether it is worth disabling it in order to speed up the computer boot.
In most cases, there is no point in constantly diagnosing the condition, since people have been working on the same PC configuration for years. For this reason, if the components have not been changed recently and everything works without failures, “Quick Boot”/“Fast Boot” can be enabled. Owners of new computers or individual components (especially the power supply), as well as in case of periodic failures and errors, are not recommended to do this.
Enabling Fast Boot in BIOS
Users who are confident in their actions can enable PC fast start very quickly, just by changing the value of the corresponding parameter. Let's look at how this can be done.
- When you turn on/reboot your PC, go to the BIOS.
In Award it will be located in another BIOS tab - “Advanced BIOS Features”.
In some cases, the parameter may be located in other tabs and have an alternative name:
With UEFI things are a little different:
MSI: “Settings” > “Advanced” > “Windows OS Configuration” > “Enabled”;
Gigabyte: “BIOS Features” > “Fast Boot” > “Enabled”.
For other UEFIs, for example, ASRock, the location of the parameter will be similar to the examples above.
- Press F10 to save settings and exit BIOS. Confirm exit by selecting “Y” (“Yes”).
Now you know what the “Quick Boot”/“Fast Boot” parameter is. Be careful when turning it off and take into account the fact that it can be turned on at any time in exactly the same way by changing the value back to “Disabled”. This must be done when updating the PC hardware or when unexplained errors occur in the operation of even a time-tested configuration.
Thank the author and share the article on social networks.