Author: Andrey Fedorov
Last updated September 23, 2019
The pointer arrow will help the program clarify which object is being referred to
- 1 Why do you need to replace the cursor?
- 2 Types of cursors for a computer mouse
- 3 Packages of ready-made cursors - a detailed overview
- 4 Basics of choosing cursors by extension cur, ani, inf
- 5 Manual installation of downloaded cursors
- 6 Using a third-party utility to install cursors
Why do you need to replace the cursor?
Typically, replacing the mouse pointer is just an aesthetic need for the user. They use cursors of different designs only to change its appearance, that is, in order to make their activities on the PC more interesting.
The developers do not recommend using too bright desktop cursors
However, if a person is processing or recording a video in which he shows or explains something to his viewers, of course, there is still a need to use a pronounced indicator. It allows the audience to clearly see the information that the creator wants to show.
In addition to the standard arrow indicator, there is also a digital and text version
Typically, the mouse cursor in any operating system is white or black. However, it tends to change in some applications and games. This only happens if the third-party software allows for this in the settings.
How to change the mouse cursor through Windows 10 settings
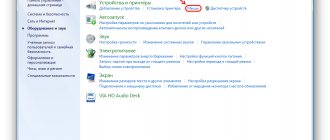
The first method involves changing the mouse cursor through a new menu called Settings that appeared in Windows 10. To open the Settings menu, press the Windows-i key combination or use the button in the Start menu.
After that, open the "Accessibility" section.
And go to the “Cursor and Mouse Pointer Size” subsection. In earlier versions of Windows 10, such a section may not exist. In this case, the necessary settings will be located in the “Accessibility – Mouse” subsection.
In the "Cursor and Mouse Pointer Size" subsection, you will find several mouse pointer options. In order to change the current pointer to a new one, simply select one of the options offered here. The settings are saved automatically.
Unfortunately, this method of changing the cursor provides very few options and its only advantage is its simplicity. If you need more settings, then use the second method, which is described below.
Types of cursors for a computer mouse
Cursors usually differ in appearance and size. But whether they change functionality remains a question. Of course, the more interesting the pointer on your desktop looks, the more attention it attracts. Let's look at how this feature of operating systems is divided into types.
In input mode, the cursor type changes
By shape
The differences between cursors are obvious. If the standard option looks like a small arrow, then the designer options take on more expressive outlines. Sometimes they can overlap some data on the monitor.
The pointer may change depending on the operating mode of the computer
There are volumetric and designer mouse pointers. They appear in the form of various images: hearts, buttons, drawings.
According to the operating principle
The mouse pointer functions as standard, but may have some other properties. With the help of special tracking cursors, the user is able to visualize the desired object when creating a video. The uniqueness lies in the fact that the click area is colored in shade.
The “default” cursor appears from the moment the OS is installed on the PC
Installation of such devices for operation is carried out either using standard Windows tools or using a specially loaded installer.
Hyperlinks are indicated on a computer using an electronic index finger
Ready-made cursor packages - a detailed overview
Developers regularly prepare new collections of cursors. They usually have a special theme and are intended for specific purposes. Some users purchase such tools to decorate their desktop theme.
Crossing is used to make the cursor visible on the graphic selection.
Metro X Cursor Set
This package is a set of animated mouse pointers that are compatible with any operating system, starting from the seventh version of Windows. The products have an interesting design and look good in any design theme and color. These sets also include cursors for Mac OS. Features of pointers:
- clear visibility;
- confident, free-flowing work;
- work on many operating systems;
- suitable for games and applications.
The cursor transforms into a drag-and-drop form immediately after issuing the appropriate command
Rainbow Cursors
These “mini-helpers” for the desktop have universal rainbow colors. In total, the set contains up to 15 types of pointers. They can be easily installed on computers with updated versions of Windows. They are intended to create contrast in the work theme template. Cursor Features:
- bright shade;
- accuracy of work;
- convenient location;
- lack of tails.
When a question mark appears next to the cursor, the computer is waiting for help to open
NOTE!
The control cursor on the desktop was originally intended to be a vertical arrow. They made it inclined only after they noticed that the expansion of the computer screen of those times did not allow the pointer to be fully displayed.
Basics of choosing cursors by extension cur, ani, inf
When downloading a ready-made file with a set of system mouse cursors, the user may be faced with several options for their extensions.
The forbidden cursor will not allow you to drop an object into the wrong folder when dragging
Therefore, it is advisable to understand which formats are what.
- ".cur" pointers. Traditional format for pointers. Such sets are installed for a standard working operating system. Cursors with this extension come in different colors and different shapes.
- ".ani" pointers. Animated pointer symbols. These options are suitable for Windows 7, 8, 10. Cursors of this format will revive any desktop theme.
- ".inf" pointers. Such kits are designed for automatic installation. Suitable for almost every OS version. Sometimes they may require the installation of a third-party support application.
In some programs, the mouse is used as a source of many actions.
Knowing about existing extensions, the user will not have questions about installing pointers to his version of Windows.
Manual installation of downloaded cursors
After downloading the files with a set of original cursors, I can’t wait to try this update. First of all, let's look at how to place pointers on the OS without the help of special programs, manually.
To select a piece of text, you need to drag the cursor from one border to another
What we do in Windows 10
Windows 10 is considered one of the most alternative and “fastest” versions of the OS. However, some may find it difficult to install the accessory package. Therefore, we recommend that you read the instructions.
- Open the download package, where we find a cursor with the extension “inf” in the list. Click on the file with the right mouse button. In the context menu that appears, click “Install”.
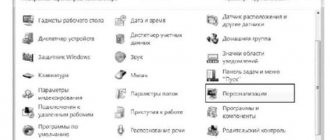
- We confirm the action and give permission to use computer data. The theme installs in seconds. To check its operation and set the cursor of interest, you need to go to “Settings”, then to “Personalization” of the PC.
- Click on the “Themes” tab and move to the “Mouse Cursor” item.
- In the window that appears, select the installed theme from the list. Then click the “Apply” and “OK” button.
If the driver does not work correctly, the cursor may not work correctly.
If the mouse pointer “freezes” or is ahead of the action, you should check the fullness of the RAM
Volumetric indexes are not appropriate when the classic working theme is installed
If you set the cursor too narrow, it may not cope with some tasks
Depending on the operating mode of the OS, the cursor tends to change automatically.
As a result, the mouse pointer will be immediately displayed without the need to restart the PC. Please note that for each individual action the cursor will change.
How to install on Windows 8
Setting up the operation of new cursors will be slightly different in Windows 8, so installation instructions on other OSes are useless here.
- Open the “Control Panel”, find the item with the graphic image “Mouse”.
- In the window that opens, go to the “Index” tab and select any topic as the main one.
- You can also use the Browse button to help you select other available pointers on your computer. Suitable for those who saved them separately in a specially designated folder.
- Open any of the folders that contain the corresponding topic, find the “inf” format file. Call the context menu with the right mouse button and click on the “Install” button.
- Go to the cursor settings window, call up the drop-down menu in which you find the newly installed package and click the “Apply” button. Then close the window and enjoy the new pointer.
You can create cursor highlighting yourself in special programs or download a ready-made set
Many cursors can be used in games and various editors.
The installation procedure is completely simple, the main thing is that before you start installing a new cursor theme, you need to correctly unzip it from the collection.
Downloading a cursor theme in Windows 7
Installing pointers in Windows 7 is almost the same as in previous cases. However, depending on the installed theme, additional questions may arise. So, how to install a cursor in this OS.
- Open the familiar “Control Panel”. It usually has a rolled shape. Therefore, in the “View” menu (at the top of the window), select “Small Icons”.
- Click the “Mouse” section and open the “Pointers” tab.
- Here we also check the boxes next to “Enable pointer shadow” and “Allow themes to change mouse pointers.” If you plan to leave this type of cursor forever, do not check the second checkbox.
- Click the “Apply” and “OK” buttons alternately.
When preparing the index yourself, it becomes the author's.
Here the user can save the selected topic.
To do this, click the “Save As” button. Give an individual name for the scheme and click the “OK” button.
Configuring basic mouse settings
In Windows 7 or later, click Start, type Control Panel, and click the link.
In the upper right corner of the Control Panel window, expand the View drop-down menu and change the mode to Large Icons for easier navigation, then double-click Mouse.
Mouse buttons
The Mouse Buttons tab offers three options, and they're pretty self-explanatory.
“Swap button assignments” – assigns the execution of basic functions using the right button – useful if you use the mouse with your left hand.
“Double-click speed” parameter – adjusts the interval between clicks to ensure double-clicking on all Windows files and folders. If you're having trouble opening files and folders, try slowing down your double-click speed
The Sticky Mouse Button option allows you to use the click-and-drag feature without holding down the mouse button. Most users don't want this turned on, but it can be very useful if your finger or hand is tired or you're having trouble holding down a button while dragging.
Mouse pointers
The Pointers tab allows you to change the appearance of the mouse pointer and the accompanying contextual cursors. Various collections of pointers and cursors are available in the Layout drop-down - this is what most people need: you can switch to a black or white pointer for better contrast in windows, or make the cursor larger or smaller to suit your perception.
In the Setup list, you can change individual pointers and cursors within a diagram. Highlight the pointer or context tool, click the Browse button, and then select an alternative image from the default folder or another folder if you've downloaded cool images you want to use.
Pointer Options
The Pointer Options tab allows you to control various settings regarding the on-screen pointer.
The Pointer Speed option under the Move category is probably the most commonly used setting. Moving the slider left or right makes the cursor move slower or faster relative to the physical movement of your mouse.
The option Enable increased pointer accuracy deserves special attention. When this option is enabled, Windows accelerates the pointer for faster mouse movements, allowing you to use the mouse in less physical space. This is a useful option - especially if you have a large monitor - but turning this option off can be useful for designers and gamers who want more control between hand and mouse movements.
The Home Position in Dialog Box option allows you to automatically move the pointer to the default dialog button when a new window appears. Many people prefer to leave this option enabled as it eliminates the need for additional mouse manipulation. However, other people don't like it when the pointer "willlessly" moves across the monitor.
The options in the Visibility group make the pointer more visible on the screen. The "Show mouse trail" option leaves a fingerprint of the pointer as you move, making tracking easier for those with vision problems or on a small screen. The Hide pointer while typing option is self-explanatory and preferred by most people who type frequently. The last option allows you to press the Ctrl button at any time to highlight the pointer location. This is convenient if you have any difficulties with visual perception.
Mouse wheel
The Wheel tab is a tool for controlling scrolling options using the mouse wheel. The options in the Vertical Scrolling group let you control what happens when you roll your mouse wheel while scrolling through long pages. By default, when you scroll the mouse wheel, "clicking" scrolls through three lines of text. You can change this value here or set it to scroll the entire screen at once.
The options under Horizontal Scrolling control what happens when you move the scroll wheel from side to side (assuming your mouse supports it). By default, moving the scroll wheel to the side moves the page horizontally by three characters. You can configure this value here.
Hardware
On the “Hardware” tab, you can view the technical properties of the mouse connected to your computer. This is only necessary if you are troubleshooting your equipment.
Using a third-party utility to install cursors
Professional users believe that it is easier to deal with the introduction of pointers into the system using system applications. In addition, this method is multifunctional.
Convenient tool CursorFX 2.1.1 and working with it
From the moment you install it on your PC, the application will allow you to replace existing standard pointers in just a few clicks. Let's look at the step-by-step instructions.
- Launch the installer application from the “Downloads” folder. We are waiting for it to be installed. Select the option you like from the catalog. We use effects if necessary. Then click on the “Apply” button.
- After this, the program immediately launches the selected pointer format. The user can immediately close the program and continue to use ready-made changes.
When you scroll the mouse wheel, the cursor changes to a magnifying glass
Using a unique code, you can install many cursors on the site.
The program allows you to select the cursor shade, size variations and transparency.
ON A NOTE!
Please note that most cursors do not work in all applications. For example, when typing in Word, they appear as a thin line. Therefore, there is no need to try to configure them.
RealWorld Cursor Editor 2012
A free editor designed to install and correct existing mouse pointers. In this service, the user can easily select the effect that accompanies the click action. The software also provides for the creation of custom animated and static cursors. You can select multiple images to transform them into a single image. Let's look at how the application works in practice.
- Launch the editor and configure the interface language. In our case, “Russian”. This is done in the block on the left.
- Click the “Create” button, then click on the “Create new” item.
- The user is presented with a list of tools and a canvas in which it is easy to draw the desired version of the mouse pointer using graphics and some successful filters.
The mouse pointer cannot be mechanically repositioned
Transformation of cursors is allowed only within one topic.
After the cursor has been created, it is advisable to save it in a separate folder, after which you can connect the cursor to the screen through it using any of the methods described above. Correct installation depends on the type of operating system.
Dear readers, if you have used other versions of the software or know alternative ways to replace the standard cursor, write about it in the comments. Our team welcomes your messages, so we will contact you promptly.
Share Tweet Email Pin
Alternative Actions
You can replace the mouse cursor manually by first downloading the icon files you like from the web. And you can do this with the support of special utilities.
Manual replacement
To begin with, it is useful to know that a set of cursors is contained in the C:\Windows\Cursors folder as a list of icons. In it you can create a separate directory for yourself.
Replacing the cursor on a computer running Windows OS up to version 10 begins with downloading the package selected on the Internet and unzipping it (if necessary).
As a result, you should have a file with the .ini extension available. This is where your future cursor theme is contained.
Next, you need to place the (still old) mouse cursor on it and right-click to call up the context menu. In it, activate the “Install” command line.
After this, the new theme will be pre-installed.
Some cursor packages contain a file called "install.inf" in the archive. The actions with it are similar to those just indicated.
To activate the installed theme, you need to go from the “Control Panel” through “Hardware and Sound” to the “Mouse” and click on it.
If you cannot find the package you are looking for in this way, then there is a workaround.
In this case, in the “Mouse” section of the “Control Panel”, select any of the available pointers and activate “Browse”.
And click on the desired file.
You can do this with each type of index, selecting it separately and specifying your own file for it.
After this, save the created diagram with the “Save As” command. In addition, by unchecking the “Allow themes to change...” checkbox, you can ensure that they remain unchanged when changing the theme.
This completes the steps for manually replacing cursors.
Application of programs
Utilities designed to replace cursor pointers can also act as a set of tools for constructing new types or correcting existing ones with the ability to give them the desired effects. Here the possibilities for imagination open up.
CursorFX
The program with support for the Russian interface can be implemented on any Windows up to version 10.
Download link - https://www.stardock.com/products/cursorfx/.
After installing it, twelve themes are available, which can be supplemented by changing colors, casting shadows, filling them with effects and animation.
The paid version provides additional styles.
To install the cursor you like, edit or newly created, just activate the “Apply” button in the viewing dialog. And return to the original by pressing Ctrl+Shift+C.
RealWorld Cursor Editor 2012
This utility is very rich in resources for creating layered 3D cursors. Essentially, it is a graphics editor that works with raster images.
Supports over forty languages, free.
Even from the picture below you can see the variety of tools used in it:
Download link - https://www.rw-designer.com/cursor-maker.