A home computer, like any other technical device, has its own characteristics and operating parameters. They determine its purpose and allow flexible configuration of individual elements and the system as a whole. Every experienced user should know the general characteristics of his computer in order to use it correctly.
In our new article we will tell you how to view the characteristics of a computer on Windows 7 and 10, and also consider several convenient programs for this.
Why do you need to know technical information about a PC?
Any game or program running on a PC consumes computer system resources. In some cases, the computer may not cope with its task due to inconsistencies in the technical characteristics of the software and/or hardware. For this reason, you may observe slow operation of programs and the operating system, “brakes” and “crashes” in games, long video rendering, and unsatisfactory performance of other operations. Knowing information about a computer allows you to use it for its intended purpose and correctly configure and upgrade it.
AIDA64 Extreme Edition free download
AIDA64 Extreme is a useful utility for quickly and accurately checking the software and hardware of a computer, as well as its operating system, providing a detailed report on the processes carried out and the presence of possible failures, errors and malfunctions. It has a clear Russian-language interface.
How is PC information presented?
Since a computer is a complex computing system, its characteristics depend on the components installed in the system unit and the operating system.
Therefore, the general characteristics of a PC are represented by technical information of its components:
- Central processor : manufacturer, model, clock frequency (in MHz or GHz), number of cores and computing threads (may not be indicated in the labeling), presence and size of 3rd level cache L
For example: AMD Ryzen 5 2600X 3.6GHz/16MB – AMD processor model Ryzen 5 2600X with a base frequency of 3.6GHz per core and 16MB L3 cache.
- Motherboard: manufacturer, model, CPU socket, chipset type, number of expansion slots and RAM, form factor, BIOS/UEFI version (may not be indicated in the labeling).
For example: Asus Rog Maximus X Hero (s1151, Intel Z370, PCI-Ex16) – motherboard from Asus Maximus X Hero model with s1151 socket, Intel Z370 chipset and PCI-E x16 slots for video cards.
- RAM: manufacturer, memory standard, clock frequency (effective), module memory capacity.
For example: Kingston DDR4-2400 4096MB PC4-19200 HyperX Fury Black - a module from Kingston of the DDR4 standard with an operating frequency of 2400 MHz and a memory capacity of 4096MB (4GB).
- Video card: manufacturer, PCI-Express port standard, board model, type and operating frequency of the graphics processor, volume and frequency of video memory, memory bus bandwidth, monitor connection interface.
For example: Palit PCI-Ex GeForce GTX 1060 Jetstream 6GB GDDR5 (192bit) (1506/8000) (DVI, HDMI, 3 x DisplayPort) – video adapter from Palit GeForce GTX 1060 model with 6 gigabytes of GDDR5 video memory operating at a real frequency of 1506MHz. Information exchange between the GPU and memory occurs via a 192bit wide bus. There are DVI, HDMI, 3 x DisplayPort ports.
- Hard drive HDD : manufacturer, model, memory capacity, spindle speed with disks, cache memory size, form factor, connection interface.
For example: Western Digital Blue 1TB 7200rpm 64MB 3.5 SATA III – 3.5-inch drive from Western Digital Blue model with a speed of 7200 rpm, 64MB cache and a SATA III port.
- Solid State Drive SSD : almost the same characteristics as HDD except for the standard of ROM memory chips.
For example: Kingston SSDNow A400 240GB 2.5″ SATAIII TLC – solid state drive of the TLC standard.
- Operating system: manufacturer, generation, version, bit depth.
For example: Microsoft Windows 10 Pro - OS from Microsoft of the Windows 10 generation. Professional version.
Getting information about the processor in Device Manager
Device Manager displays information about all devices on your computer, including information about the central processing unit.
For information, follow these steps:
- Open Device Manager using one of the convenient methods described in this article.
- In the Device Manager window, click the arrow next to the “Processor” device.
The main parameters of the central processor will be displayed here: manufacturer, brand, type, clock frequency.
In this case, the Task Manager displays the number of logical processes, and not the number of CPU cores, since Hyper-Threading technology divides one core into two logical processes.
How to find out the specifications on your PC?
After a brief introduction to all the main characteristics, we can find out (and most importantly, understand) the computer’s parameters using built-in Windows tools or third-party programs.
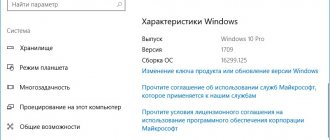
You can view the most basic information by going to “Start/Control Panel/System and Security/System” or go to “System Properties” through the “My Computer” menu. This action also applies to Windows 10.
In this window we can see only the basic parameters of the computer, including the computer name and user name, as well as the current activation code.
A more detailed description of your computer's configuration can be found in the "Device Manager" section, which is located in the "System" menu in the upper left corner. The structure and principle of displaying devices are the same for Win 7 and 10. From this menu it is clear to us that the system has a quad-core processor, two hard drives and a video card with their markings indicated.
In the “ten” everything looks similar:
The current state of the computer can be checked through the built-in Resource Monitor tool, located along the path “Start / Programs / Accessories / System Tools”. It can also be accessed through the “Task Manager”, which is called up by holding down three keys on the keyboard “Ctrl” + “Alt” + “Delete”.
Here the system displays the CPU load for each core and thread, the total amount of RAM and its percentage, the load on hard drives and SSDs, the number of partitions and the amount of free space on them.
Defining a model using OS tools
Let's consider the method using standard operating system tools.
On Windows 7
You need to right-click on the “Computer” desktop icon and select “Properties”. The window that opens will display general information about the system, including the name of the processor.
Also, if you click on “Manage” and select “Device Manager”. Find the “Processors” item in the list and perform a double clip on it. In a new window you can see detailed characteristics of your CPU.
On Windows 8 and 10
In these operating systems, all actions are similar to seven, with the exception of one point, the icon on the desktop will be called “This computer”. An example of displaying system information in Win 8:
This is how the information looks in Win 10:
If this icon is not on the desktop, you can use another method.
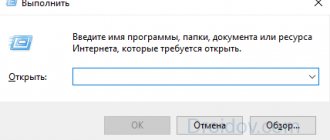
- Press the key combination Win + R.
- Enter “msinfo32” in the editor field and confirm.
- A window will appear in front of you with all the necessary data.
This method works on all versions of Windows, including XP.
We use the CPU-Z program
The CPU-Z program, well-known among a wide circle of users, provides maximum information about the PC and allows you to find out all the data about your processor, motherboard, RAM, and graphics adapter. This tool should be installed for every user who is interested in the subject of computer hardware and wants to fine-tune their system.
To start using CPU-Z:
- Go to the developer’s website https://www.cpuid.com and download the program to your PC (in English).
- Install and launch the software. After loading the data a little, several tabs with parameters appear on the screen. Let's consider only the main ones.
The first is “CPU,” which contains the basic and special characteristics of the microprocessor, including process technology, revision, maximum power consumption, voltage per chip, supported instructions, and much more.
- “Mainboard” is a menu dedicated to the motherboard. It contains information about the manufacturer and model of the board, the chipset and the multi-input/output chip. The current BIOS version is also indicated here.
- “Memory” is a tab indicating the type and total amount of installed RAM, its frequency, timings and operating mode. The operating frequency of the north bridge is also indicated.
- “SPD” - provides all possible data about each installed memory module.
- “Graphics” - brief information about the computer’s video adapter.
Advantages
- Allows you to find out about all the characteristics of the main components of your computer.
- Completely free software.
- Quick installation and easy to use.
- Works on any system, even the oldest.
- Helps monitor frequencies during overclocking.
Flaws
- There is no Russian version.
- Compressed information about the video adapter.
How to find out system settings and PC information using Windows 7
There are 6 ways to obtain system information using Windows - among them you will find simple methods for beginners and more labor-intensive methods for experienced users.
Via "Control Panel"
The easiest way to get information about Windows features and performance is through the Control Panel:
- Open "Start" - the button at the bottom left of the screen.
- Find “Computer” and right-click on it.
- Select Properties.
Right-click on "Computer"
You can open the “System” window by pressing the Win+Pause key combination.
The “System” window will open with information about the version of Windows, the processor and RAM of the PC. You will also see a performance index from 1 to 10 - the higher the value, the better the computer performs. Click on the index button to get detailed information about the performance of your hard drive, processor, RAM and graphics controller.
Computer performance information
The performance index is useful when purchasing a PC to compare different models in the store.
Video: how to open system settings
Using the System Information utility
In the Windows System Information window, you will find information about the processor, BIOS version and Windows build, check the operation of PC hardware resources - CD-ROM, motherboard, video card and others, and also check for errors in the operation of programs and drivers. To open system information:
- Open Start.
- In the search bar, start typing the query “Information about...”.
- Select "System Information".
Search via the search menu bar
- You'll see three categories: Software Environment, Components, and Hardware Resources. For the convenience of the user, each category is divided into sub-items containing key information.
Going to system information using the msinfo32 command
The System Information menu can be opened using the Run command. To do this, press the Win+R combination on your keyboard, enter “msinfo32” without quotes and press Enter.
Data is divided into categories
Video: How to view system information
https://youtube.com/watch?v=wwOEHUAXwt0
Via DirectX Diagnostic Tool
The DirectX Diagnostic Tool is designed to inform users about installed drivers and verify their functionality. To open DirectX diagnostics:
- Click Start and select Run. Or press the Win+R combination on your keyboard.
Click to open program launch window
- In the window that opens, enter “dxdiag” without quotes.
- Click OK.
Enter the dxdiag command
- Wait while the diagnostic tool updates the information.
- At the top of the window you will see the tabs “System”, “Display”, “Sound”, “Input”. Open each one and find the information you need. Information can be saved as a text file by clicking the corresponding button at the bottom of the window.
The number of tabs depends on the number of connected monitors and sound devices
Using Device Manager
It will be useful for advanced users to look at the “Device Manager,” which displays information about all PC components and drivers for them. To log into the Manager:
- Open Start.
- Select Control Panel.
- Find and open Device Manager.
Tree structure makes it easier to navigate categories
When viewing information about hardware resources, pay attention to the “Device Status” field - there you will see if there are any problems with operation.
Video: How to open Device Manager
Opening parameters via the command line
Test your computer's performance using the Command Prompt. For this:
- Click Start.
- Start typing “Command” into the search bar.
- Select "Command Prompt".
- In the window that opens, enter “winsat cpu -v” without quotes.
The command line is found in standard Windows tools
- The program will conduct testing and display the results: an assessment of system performance, the number of processor cores, memory size, cache size, and others.
Computer test results
BIOS
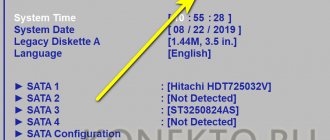
You can view system properties without logging into Windows. Some information is stored in the BIOS and is available for viewing when the computer is turned on.
BIOS is a program built into the motherboard that connects the operating system and PC hardware resources. Ensures the correct operation of the computer.
CPU information and memory test
To get information about the PC in the BIOS, press Pause break during boot and write down the parameters of interest. Then press Esc to continue starting Windows.
Checking graphics with GPU-Z
By analogy with CPU-Z, there is a program created exclusively for the graphics adapter - GPU-Z. Let's take a quick look at it.
To check the video card or integrated video adapter:
- Download the latest version of GPU-Z from the official website https://www.techpowerup.com/gpuz/.
- Install and launch the program. A familiar window with tabs appears on the screen, the first of which displays all the maximum possible information about the video card.
- The “Sensors” tab displays the current state of the device: temperature and frequency of the graphics processor, video memory frequency, cooling fan speed. Overclockers will also find it useful to display the voltage on the chip in real time.
- The “Advanced” tab is a list of video card properties. This data is unlikely to be needed by ordinary users and is a kind of technical passport of the device.
Advantages
- All the advantages of CPU-Z, but in relation to the video adapter.
Flaws
- There is no Russian language.
Taking advantage of AIDA 64
Many readers will ask us: “What is the most advanced program for viewing PC characteristics?” We answer - “AIDA 64”.
This magnificent tool is the successor to the best program of its kind in the world - “Everest” (which, by the way, has not been supported for a long time). Aida is suitable for everyone, without exception, from beginners to overclockers and computer engineers. AIDA 64 is good because it checks the entire system, takes readings from all sensors and provides information in a clear, convenient form in Russian. Two more advantages are the availability of technical support and frequent database updates.
Why don't we recommend AIDA 64 to everyone? It is paid. As of September 2020, the price of the program is 2,265 rubles, which makes it inaccessible to the majority of users. However, there is a 30-day trial license, which is enough to solve some technical problems with your computer.
Let's take a closer look at the capabilities of AIDA 64.
- Download and install the program from the official developer website https://www.aida64russia.com. We need the "AIDA64 Extreme for home" version.
- We agree to the terms of the 30-day license and proceed to the program itself. The AIDA 64 interface is divided into two parts. The left one contains a list of tabs with parameters for the operation of the computer hardware and software. On the right is their content. We are most interested in the “Computer/Summary Information” tab. Here you will find all the basic information about your PC settings.
- The “Sensors” tab is extremely useful. The temperature and voltage of all power circuits of the computer are indicated here, including the voltage along the +3.3V and +12V lines of the power supply, on the northbridge and the BIOS battery. The rotation speed of the CPU and GPU cooling fan is also indicated here.
- For computer engineers, craftsmen and computer hardware enthusiasts, there is a “Motherboard” tab. Here you can familiarize yourself with all the parameters of the motherboard and devices installed on it. Guided by this help, you can overclock and configure the system with maximum accuracy.
- The “Operating system” item provides relevant data about the software part of the PC and its individual components.
Trying to work with the universal Speccy
Despite the undeniable advantages of AIDA 64, there are still several useful products that can gain popular recognition. Among these, the “Speccy” monitor from the famous creator of “CCleaner” stands out.
Speccy displays detailed information about the computer, its components and installed drivers. The volume of data is far from the Aida described above, but it is quite enough for the average user. With the help of Specky, you can properly configure your system and, if necessary, improve it.
The main advantage of Speccy is the availability of a free license.
To use Speccy:
- Download and install the free version of the software from the website https://www.ccleaner.com/speccy.
- Having launched the program, we will immediately see basic information about the computer, indicating the temperature of the CPU, GPU, chipset and hard drives.
- In the “Operating System” tab, you have access to all the information about the current OS version, the location of components and other system files.
- Next are the parameter tabs for specific nodes and devices. Using the example of the “Central processor” item, it is clear that the report is quite informative and is inferior to the paid AIDA 64 only in the absence of special data.
- Separately, we note the good implementation of displaying ROM parameters and the SMART report. In terms of the quality of information perception, Speccy looks no worse than its paid competitor.
Advantages
- Quite a substantial amount of PC data provided, sufficient for the vast majority of experienced users.
- Pleasant interface and translation into Russian.
- Compatible with almost all systems, regardless of their generation.
- There is a free license.
Flaws
- This software is of little use for professional craftsmen and highly specialized tasks.
- There is no information about installed programs.
- There are no stress tests like in Hades.