Hello, friends! I would like to dedicate this article to the contacts that are stored in each user’s Google account. Many people have heard that they exist, but only a few know how to use them, where to look for them, and how to set them up so that after a sudden breakdown of your smartphone they can all be restored.
I'll tell you how I found out about them. My phone worked great and I didn’t plan to change it, but one fine day it just turned off and that’s it, no reaction at all, no matter what buttons I pressed. Of course, I took it to a repair shop and ran out to buy myself a new smartphone. I was upset about the contacts - how can I put them all back together now? There were a lot of necessary people, friends, acquaintances there. So, I logged into my Google account (to use the Play Store) and lo and behold, almost all of my contacts in the phone book were restored!
So let’s, so that everything is just as perfect for you, we’ll figure out what contacts are in a Google account, where they are, how you can view them, how to save phone contacts in a Google account, perform automatic synchronization, restore the necessary records or delete them. First, we will do everything using a computer, and then from an Android phone.
How to view the list
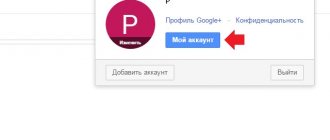
If the question arises: where are they located, then open a browser on your computer and go to the Google search page. In the upper right corner you will need to go to your profile. If you are logged in, then click on the avatar and make sure that the profile you need is at the very top (this is if, as in the example, several accounts are connected at once).
Then click on the button with nine squares, at the end of the list, select “More” and click on the “Contacts” item.
The next page will open your available contact list. There will be a main menu on the left; you can hide it by clicking on the three horizontal stripes at the top. In the middle, the following information is shown for each entry: name, email, phone number, job title. At the top of the list are contacts that are important to you and have been marked with an asterisk. Then they go alphabetically.
The “Similar contacts” tab will show those for which the same name or number is indicated; here they can be combined into one.
If you open the “Other Contacts” tab, you will see a list of users to whom you have previously sent emails.
View contacts in Google account
The vast majority of Google services are cross-platform, that is, available for use on various operating systems - both desktop and mobile. Among these is “Contacts”, which can be opened both through a browser on a computer and on a mobile device. Let's consider both options.
Option 1: Browser on PC
As we said above, “Contacts” is one of many Google services, and on a computer you can open it for viewing as easily as any website.
Note: Before you begin following the instructions below, please log in to your Google account. The following article will help you do this.
Read more: How to log into your Google account on PC
- Go to Google's start page in your browser, or open any of the company's web services other than YouTube (such as search). Click on the “Google Apps” button located to the left of your profile photo and made in the form of a square of nine dots.
Find “Contacts” in the list that opens and click on this icon with the left mouse button (LMB) to go to the page that interests us. You can also access it using the direct link provided below.
Go to Google Contacts page
- Actually, the first thing you will see in front of you will be the list of contacts saved in your Google account. The first tab of the side menu displays only those entries that are saved in your phone's address book.
Information about them is divided into several categories: name, email, phone number, position and company, groups. It is not necessary that all of them be filled in, and the order of these columns can be changed through the menu called up by clicking on the three vertical dots on the right.
Each contact can be added to favorites (star), edited (pencil); print, export, hide or delete (three dot menu). To select multiple records, you need to check the checkbox that appears to the right of the user name (after hovering the cursor).
- The next tab in the side menu is “Who do you frequently communicate with,” and its name speaks for itself. This section contains not only contacts from your phone's address book, but also those with whom you corresponded via Gmail email.
- The “Similar Contacts” tab will show duplicate entries, if any are found, of course.
- In the “Groups” section you can “Create a group” with contacts, just click on the item of the same name, give it a name, “Save”, and then add users.
- If you expand the More drop-down list, you will see several additional sections. The first one is “Other contacts”.
It will list the users (and companies) you've communicated with via email (including those who emailed you but didn't receive a response), as well as those with whom you've worked on documents from Google Virtual Office. .
Information about them will be divided into columns in the same way as address book entries from the first tab. Working with and editing them is carried out according to the same algorithm - move the cursor over the required contact, select the desired action and perform it. The only difference is that these entries cannot be changed, but from here they can be saved to the main “Contacts” section, which also means the ability to edit basic information.
- To add a “New Contact”, click on the corresponding button above the list of tabs, enter the necessary information in the window that appears, and then “Save” it.
How to add a new entry
To add a new contact, click on the round pink “Create” button at the bottom right.
Next, fill in all the necessary user information. To see all available fields to fill out, click “More”. Then click “Save”.
A window like this will open with the newly created data, click on the cross to close it.
After you add a new entry to your account, it will automatically appear in the phone book on your smartphone. This is provided that synchronization of contacts with Google account on the device is enabled (we will talk about it below).
All added entries can be divided into groups. Expand the corresponding item in the menu on the left. In the example, there is only one, and three users are added to it - the number in brackets. If you want to add a new one, click “Create a group”.
Come up with a name for it and click “OK”.
To add a user to a group, hover over the user and click on the three vertical dots, this is the “More” button. From the drop-down list, click on the name of the desired group.
There are two more buttons here: “Add a note” - the entry will appear at the very beginning of the list, “Edit” - a window will open for changing the contact.
After selecting a group, a check mark will appear opposite it, and in the list on the left, the number of users included in it will increase.
If you hover your mouse over the name of the group, buttons will appear using which you can edit the name or delete it. When you select any of them, a list of users who are included in it will open. To remove a person, click on the dots next to him and uncheck the box next to the group name.
View Google Contacts
There are two ways to view the phone book with all saved numbers on an Android smartphone :
- Through the call log on the “Contacts” tab.
- Through the Contacts application, preinstalled on any version of Android.
The interface in both cases looks the same - it is a list of names in alphabetical order and a search bar for navigation. The list displays all subscribers whose data you have saved on your smartphone or SIM card, including those who were added from other sources.
If synchronization of contacts is enabled in your account settings, the latter will also be in this list. You can edit them through the Google Contacts web application.
The Google Contacts web app is typically used to view your contacts on your computer, but you can do it on your mobile device as well. It opens through any browser. All that is required is your Google account login and password.
View contacts on iOS
For Google contacts to appear in your phone book on iOS, you need to connect your account to the device and enable synchronization.
For this:
- Open iOS settings.
- Go to the "Accounts and Passwords" section.
- Click "Add Account" and select Google.
- Log in to the account where your contacts are stored.
- Turn on Contacts syncing and click Save.
Now your subscribers' data from the Google storage is available in the Contacts application on iOS.
How to delete
If you are interested in how to remove an unnecessary entry from the list, open it. Then find the unnecessary entry, click on the three dots opposite it and select “Delete” from the list.
By the way, if all unnecessary users are in one group, you can delete it along with the entries. Then you won't have to delete each person individually.
Confirm the action by clicking “Delete”.
How to recover deleted
Now let's figure out what to do if the user deleted contacts in his Google account, how to restore everything he needs? To do this, click on the “More” menu – “Cancel changes”.
Please note here that you can restore records if you deleted or merged them, imported or synchronized them. Moreover, no more than 30 days should have passed from the moment you did this.
Select the appropriate item with a marker and click “Confirm”. After this, some records will be restored.
How to save phone contacts in your account
To copy contacts from your phone to your Google account, you need to use import/export. How can I transfer contacts this way? First you need to export them to a file from your phone, and then import it into your Google account.
- Find Import/Export Contacts on your device. On Lenovo, you need to open “Contacts”, and then go to the “Settings” section at the bottom.
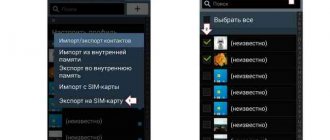
If you have a Samsung, then the required item is located along the path: “Menu” - “Contacts” - three dots in the upper right corner - “Manage contacts”.
- Next, select “Export to storage device.”
- Remember where the file will be saved and what it will be called. Click "OK".
- Use File Explorer on your phone to find the file. It can be built-in, or you can use a third-party application, for example, ES Explorer.
- Long press on the file to open an additional menu. Select “Send” or “Transfer” in it.
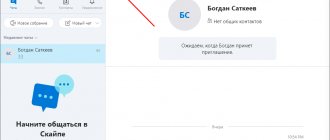
- You can add the file to Google Drive, and then you will need to log in from your computer and save it from there. I'll send it via Skype. Only this should be a person you trust, for example, sister, mother, husband, since this is your personal data.
After sending, go to your Skype and download it from the dialogue to whom you previously sent it.
- All downloaded files are located in the Downloads folder on your computer. So open it and transfer the contacts file to your desktop.
We exported all contacts from the phone to a file and transferred it to the computer.
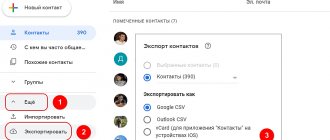
- Now you need to upload your contacts to your Google account. Go into it, select “More” - “Import”. A window will open where you click on “Import from a CSV or vCard file.”
- Since we are considering a new version, and it does not currently support this function, we will be prompted to go “To the old version”. Select the appropriate item.
- Then in the menu on the left again click on the “Import...” button.
- Click on the “Select file” button.
- Find it through Explorer, in the example it is on the desktop, select it and click “Open”.
- When its name appears in the window, you can click on the “Import” button.
- After this, the total number of contacts will increase. If this does not happen, you need to refresh the browser page by clicking on the circular arrow to the left of the address bar. Also, all these records will be automatically added to the “Imported” group.
- Go to the new interface and, if there are no more contacts, also refresh the browser page. After this, a message may appear that similar contacts have been found, click on this button.
- Here you can merge identical entries. Click on the appropriate button. To apply this action to all users in the list, select Merge All at the top.
- Now your contacts in your Google profile are the same as on your phone. And if, for example, you lose a device, then with the help of synchronization (which we will talk about in the next paragraph) everything can be restored.
By the way, using the described import/export procedure, you can transfer Google contacts from one account to another.
How to find Google contacts
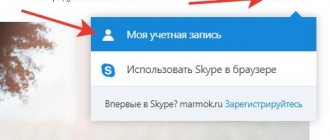
We go to the main page of the well-known Google site. In the upper right corner, near the avatar, there is a menu button. Click on it and select “Contacts” from the drop-down menu.
Immediately after this, a page with your personal contacts will open.
If you need to find the data of people who are in Circles, then in the menu on the left you need to click on “Circles” - a menu will drop down, you will only have to select the group in which the necessary contacts are located.
Synchronizing contacts
In order to synchronize contacts, you must enable this function on your smartphone. How to do this depends on your device.
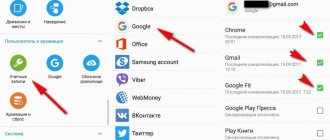
On Lenovo, go to “Settings”, then go to the “System” tab and in the “Accounts” section select “Google”.
Next, click on your email address.
At the very bottom of the list there will be two items with the name we need. To enable synchronization, place a green bird in front of each one.
For those users who use Samsung, in “Settings”, select “Cloud and accounts”. Next from the list, click “Google”.
Here you need to move the slider opposite the desired items to the “on” position.
Another option for enabling synchronization is to open the “Manage Contacts” window, as I described above. In it you need to select the “Synchronization” item.
Next, next to the connected Google account, make sure that the slider is in the “On” position.
Please note that if you synchronize contacts, they will appear on your phone from your account, but not vice versa. All records that are on the smartphone will not be added to Google contacts. The same applies to adding a new user. Create it in Google Contacts and it will appear on your phone. Create a user contact on your phone - it will not be added to your Google profile.
How to view contacts from your phone
To view all entries in your account from your phone, go to your browser and go to: https://myaccount.google.com.
Next, either register in the desired account, or click on the avatar and make sure that the profile you need is selected.
Click on the “Google Services” button, click “More” and select “Contacts”.
The appearance of the page will be the same as if you visited it through a browser on a computer, so everything that I described above can be applied here. The “Main Menu” opens by clicking on the three horizontal bars at the top left.
This is how the article turned out. Let's summarize what we've discussed a little. To the question: where are contacts stored in a Google account, how to view them and add a new one, we answered. We figured out how to create groups, delete and restore deleted contacts. To transfer contacts from your phone to a Google account or from one account to another, you need to use the import/export function. If you need to restore your phone contacts through your Google account, you need to enable synchronization on your device. If you have any questions, ask them in the comments.
How to Recover Contacts from Google Contacts
Detailed video instructions (7 ways to restore contacts):
After the next update of the smartphone or after installing any application (which has access to the address book), contacts saved in Google Contacts may simply disappear from the phone. Fortunately, this can be fixed.
Make sure contacts are definitely deleted and not hidden
First of all, you should check whether the settings of the application responsible for the address book have changed:
- Open the application that you use to manage your contacts. Find its menu (usually three vertical dots) or settings. You can also do this through Finder by entering the word “Contacts”
- Check to see if there is a “Contacts to display” item, “Contacts display” or something like that.
- If there is such an item, then make sure that the application displays all possible contacts (and not just from Whatsapp or Skype).
- If nothing similar is found in the settings, proceed to restoring contacts through Google services (next chapter).
Recovering entries in Google Contacts from the Recycle Bin
Since Google Contacts is a cloud storage, it has the function of restoring previously deleted data. However, there is a limitation - the Trash stores contacts that were deleted from the address book no more than 30 days ago.
In the case where the deletion occurred accidentally (for example, a program was installed that did this, or the wrong synchronization settings were selected), this period is quite enough.
Sequence of actions when restoring contacts:
- Go to your Gmail inbox.
- In the upper right corner, click on “Google Apps” (the dotted icon located next to your avatar).
- Select "Contacts". The service will open in a new tab.
- In the menu on the right, find the “Cancel changes” option. By default, it can be hidden, so click on the “More” line - a list will open with the functions of import, export, print and restore.
- Click on "Revert Changes" and select how many days or hours you want to roll back the address book state. If none of the proposed options suits you, simply select “Custom option” and indicate the required number of days (no more than 30).
- Confirm the changes and check if the contacts are restored.
Good to know: Recovering Gmail contacts
You can return lost contacts in the Gmail email service in the same way - since all Google services are interconnected, restoring Google Contacts will also affect email.
Recovering Google contacts on a new phone
If you buy a new smartphone running Android or accidentally damage the address book on your device, restoring contacts from Google Contacts will be much easier:
- Open your smartphone’s settings and find the “Account” or “Accounts and Backup” item there (depending on the Android version).
- Select a linked Google account or add it if this is a new phone.
- Go to the “Account Synchronization” section.
- Mark what you would like to synchronize - update data from all available services, or just contacts.
- Click on the three vertical dots in the upper right corner of the screen and select “Sync” there.
- After this, the information on the phone will begin updating; As a result, all addresses from Google Contacts saved in the cloud will appear in the address book.
Recovering contacts from a VCF file
The second way to restore Google contacts on a smartphone is from a backup copy. If you know in advance that the address book will be cleared, you can create a file with all the necessary information:
- Launch the Contacts app on your device.
- In the slide-out menu, find the item “Manage contacts” - and then “Import/export contacts”.
- In the menu that opens, you are interested in the “Export” section.
- Select “Memory card”. Save the backup locally by clicking “Export to VCF file.”
Tip: To make things easier, you can enable automatic mode to save address book backups to Google Drive. For this:
- Go to your smartphone settings,
- Find the "System" section
- Select "Backup"
- Turn on the "Upload to Google Drive" switch.
Now backups will be automatically saved in cloud storage without your intervention.
Video instruction:
Accordingly, you can restore contacts from a saved VCF file as follows:
- Go to “Contacts” and select “Manage Contacts” from the menu.
- Go to the “Import/export contacts” – “Import” section. Specify where to import the contacts file from: memory card or device memory.
- Now you need to select the file from which you want to copy contacts.
- Start the process by clicking “Import” and wait for the system message about the successful operation.