Often, users of the Windows 7 operating system are faced with the problem of adjusting screen brightness . To fix this problem, we will look at all the available ways to adjust display brightness in Windows 7 . Adjusting the screen backlight is a fairly simple process that even a novice user can handle. After familiarizing yourself with the material, you will be able to independently adjust the brightness of your laptop or desktop computer.
Adjusting brightness using standard Windows 7 tools
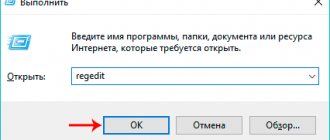
To set the brightness of a laptop or all-in-one PC using standard 7 tools, the first step is to go to Control Panel . You can go to the Control Panel through the Start or type control Run
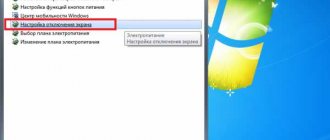
After launching the Control Panel , you need to go to the “ System and Security ” section.
Next, go to the “ Power supply ” section.
You can now increase or decrease the screen backlight.
To do this, set the “ Screen Brightness ” slider to a position that matches your monitor backlight preferences.
You can also go to the power plan and set the brightness at which the laptop will operate on battery power or mains power.
Setting screen timeout
How to restart Windows 7 - step-by-step instructions
Windows 10 users have the opportunity to independently set the time after which the image on the monitor will go dark. This need is due to personal wishes. The process of completing the task is divided into several points:
- Go to the Start menu by clicking on the icon located in the lower left corner of the taskbar.
- Tap on the “Settings” line to launch the operating system accessibility settings window.
- In the menu that opens, go to the “System” tab.
- Another window will open in which the user will need to familiarize himself with the information presented in the parameters column on the left.
- Find the line “Power and sleep mode” and tap on it with the left button of the manipulator.
- In the central part of the window there are two lines responsible for setting the screen timeout: “Turn off when on battery power” and “Turn off when on mains power.” Here the user will have to expand one of the lines and select the time he needs from the list. There are many options, ranging from one minute to five hours. You can also set the value to “Never”.
Note! In the same window, you can adjust the time the computer goes into sleep mode in the same way: either from the network, or from the battery, if we are talking about a laptop.
Control Panel window on Windows 10
Changing screen lighting settings using the video card driver
Another interesting way to change the display lighting is to adjust it using the video card driver . For our example, we will consider a driver from Nvidia . To open the video card driver settings, you need to right-click on an empty space on the Desktop. A context menu should appear.
In this menu, select the “ NVIDIA Control Panel ” item (it may be different for another video card), after which the video card driver settings panel will open.
Now in this panel you need to go to the “ Video\Adjust color settings for video ” menu.
In the color adjustment menu, you need to go to the column “ 2. How to make color settings ” and select the “ With NVIDIA settings ” switch. By selecting these options, you will be able to adjust four properties, including display brightness . To increase or decrease the brightness of the display, drag the slider towards plus or minus and you will see how the screen backlight changes.
Such programs that regulate screen lighting using the video adapter driver are also available from video card manufacturers Intel and AMD .
Also on the Internet you can find many programs that adjust the display backlight. All such programs work by accessing the video adapter driver. That is, in essence, they do what you can do in the control panel of the video card (in our case Nvidia). The most interesting of all such programs is F.lux . Its main feature is automatic adjustment of the display backlight , which depends on the time of day.
How to disable screen dimming on Windows 7
For laptop computers, long-term battery life is very important. It is the image that consumes most of the energy. Therefore, turning off the display is one of the most requested functions. It can be done in several ways.
1 You can reduce the screen brightness to the minimum level. There is a key combination for this. Pay attention to the “Fn” button, which is located in the lower left corner of the keyboard. The second button depends on the model of computer you are using. It will definitely be placed among the row of buttons – “F1” – “F12”, which are located at the top of the keyboard. Open the instructions for your computer and find the required key or use the “poke method”. After pressing this key, the screen will turn on again.
2 You can also just wait for the monitor to go out on its own. To avoid waiting too long, set the parameters to a convenient time after which the monitor should turn off. Remember that it will only turn off if you do not perform any actions on the computer for a set amount of time.
3 For example, in Windows 7 you need to click on the button with the image of a battery, which is located on the bottom taskbar. Then select the “Settings options” option, in the window that opens – “Setting screen off”. Set the appropriate options and save the changes.
4 For impatient and lazy people, there is another remedy - slam the computer lid. After closing the lid, the screen will immediately stop illuminating everything around and after a certain time will go out on its own if you first set the appropriate settings.
5 In “Settings”, select the “Power and Lid” option, then “Close the Lid”. For the “On Battery” and “On Mains” options, select the “Not Required” setting. Save your changes. Now, when you close the computer lid, the monitor will turn off automatically. The method will not affect the operation of the computer in any way and will not harm the system.
6 For Mac OS, there is another key combination to quickly turn off the monitor - “Ctrl” + “Shift” + “Eject”. You can also put this function in one of the corners of the screen. If necessary, simply hover over a function and the screen will go dark automatically.
7 If you plan to use an additional screen for your computer, the built-in one must be turned off. Click on the “Device Manager” option, then on “Monitors”. Right-click on the screen name and select the “Turn off” option. If this happens, you won't be able to use your computer's display until you turn it on again. This technique is not recommended to be used too often.
8 Many people set the display to turn off automatically. But if you read information or watch videos, you will have to constantly take action so that the system does not turn off the screen. To avoid such a situation, special programs have been developed. They allow you to turn off the display if necessary. One of these utilities is Dark – Turn Off Monitor. After installing it, a shortcut will appear on your desktop, double-clicking on it will turn off the monitor. Pressing any button will turn it on again.
Experts recommend carefully studying the instructions for your computer. Having found out the purpose of the function keys, you can immediately set everything correctly and not do anything unnecessary.
>How to remove screen fading on Windows 10
How to Set Windows 10 Screen Timeout
In the Windows 10 operating system, the wait period before turning off the monitor to save power is usually 10 minutes. In addition, when the monitor turns off, the computer locks. Further work is possible only after entering the password for the user login used.
And if on PCs used as workstations in large companies and in production this is a necessary measure due to security requirements, then on ordinary home computers there is no need for this. Moreover, this mechanism becomes very inconvenient: I went into the kitchen for coffee and the operating system was blocked.
An example of adjusting the laptop backlight using the Fn key
For example, we will use a Lenovo s110 netbook with the Windows 7 operating system.
It uses the Fn modifier key in combination with the ← and → cursor keys to adjust the backlight. To increase the backlight of the Lenovo s110 laptop, you must use the Fn+ → key combination. To lower the backlight you need to use the combination Fn+ ←.
As you raise or lower the backlight, you will see how the value of the graphic indicator changes.
Hotkey Features program is responsible for this indicator .
As you can see, increasing or decreasing the lighting settings of a laptop screen using the “ Fn ” key is quite simple. You can use this example on other laptops, since the principles of using modifier keys are the same.
In particular, on SAMSUNG NP350 , the keyboard shortcuts are:
- to increase brightness - Fn+ F3;
- to decrease - Fn+ F2.
How to remove screen fading on Windows 10
» Windows 10 » How to remove screen fading on Windows 10
In the Windows 10 operating system, the wait period before turning off the monitor to save power is usually 10 minutes. In addition, when the monitor turns off, the computer locks. Further work is possible only after entering the password for the user login used.
And if on PCs used as workstations in large companies and in production this is a necessary measure due to security requirements, then on ordinary home computers there is no need for this. Moreover, this mechanism becomes very inconvenient: I went into the kitchen for coffee and the operating system was blocked.
Manually adjusting the monitor backlight
For desktop computer users, screen lighting settings can be adjusted on the display itself. For example, we will use the LG Flatron W1943SS . To adjust the lighting, you need to go to its menu. To do this, press the MENU key on the monitor control panel.
After this, press the AUTO/SET key. A brightness adjustment window should open where you can change it.
I would also like to note that the monitor settings do not depend on what OS or driver is installed. They are regulated exclusively in the monitor. Each monitor from a different manufacturer has its own manual settings. You can find out the details of adjusting the screen lighting parameters of a particular monitor in the manual, which is included with the sale or can be downloaded in electronic form on the manufacturer’s website.
Using hotkeys
Progressive users are well aware of the usefulness, and in some cases, the necessity, of hotkeys. At a minimum, in this situation, this is the simplest answer to the question of how to turn down the brightness on a laptop of absolutely any model.
First of all, find the Fn key. It is located at the bottom left, next to the Win button. Remember, since the keyboard on laptops is often smaller than on a PC, and all the keys do not fit on it. In addition, laptops have additional functions, which is why the Fn key is necessary. If you hold it down, some buttons change their purpose. Now you will understand everything with a clear example.
So, you hold down Fn, now find the key with the sun on it. There are always two of them side by side, to reduce and increase brightness. They are often placed on the top panel, where there is a series of numbers with the prefix F (F1, F2, F3...). While holding down Fn, click on the sun icon and the brightness will increase or decrease, depending on which key you press.
Now you know how to turn down the brightness on a laptop.
Disabling the lock screen in windows 7
Almost every user performs certain work at the computer and stores files that he wishes to hide from prying eyes. This is ideal for office workers and parents with small children. To limit unauthorized people's access to accounts, Windows 7 developers proposed using a lock screen - despite its simplicity, it acts as a fairly serious barrier against unauthorized access.
But what about people who are the only users of a particular computer, and the lock screen constantly turning on during minimal system downtime takes up a significant amount of time?
In addition, it appears every time you turn on the computer, even if there is no password set, which takes away precious time during which the user would have already booted up.
Disabling display of the lock screen in Windows 7
There are several ways to customize the display of the lock screen, depending on how it was activated on the system.
Method 1: Disable the screensaver in "Personalization"
If after a certain amount of time the system has been idle, the screen saver turns on on the computer, and when you exit it, you are asked to enter a password for further work - this is your case.
Method 2: Disable the screen saver when you turn on your computer
This is a global setting, it is valid for the entire system, so it can only be configured once.
After the completed operations, the lock screen will appear only in two cases - when manually activated by a combination of the “Win” and “L” buttons or through the Start menu, as well as when switching from the interface of one user to another.
Disabling the lock screen is ideal for single computer users who want to save time when turning on the computer and exiting the screensaver.
We are glad that we were able to help you solve the problem.
Poll: did this article help you?
How to disable screen timeout using third-party software
I think it’s not worth going into too much detail about why the “Sleep mode” function is needed, or turning off the screen after a certain period of time (timeout from English - timeout). It is clear that if the smartphone is constantly in active mode, then the battery charge will begin to tend to zero too quickly.
In this case, the problem can be easily solved using special utilities.
Hold Screen On Demo
This program will not let the screen go dark while you are looking at it. Using the front camera, Hold Screen ON captures your gaze and prevents your smartphone from falling asleep. When you stop looking at the screen, it fades and, accordingly, resource consumption stops.
It is possible to bind the operation of the utility to a specific application, and then the phone screen will not go dark, identifying your eyes in this application, however, if your camera works in another application, the program will have to wait until it is free.
Owners of the Samsung Galaxy S3 use this function without installing the utility, since this model has it by default, and if you have a simpler device, then you just need to download Hold Screen ON:
KeepScreen (now free)
Another good application that does a great job of disabling timeout. Unlike the previous one, Keep Screen
controls the position of the device using the built-in gyroscope. Therefore, when you hold your gadget in your hands, the utility, taking into account its angle of inclination relative to the horizontal axis, will prevent the screen from going dark.
In addition, there is also the ability to block the screen from turning off on your Android device for selected applications. To do this, after specifying the desired program, click " Start/stop service"
“, and on the phone, in the screen darkening sensor (see the first screenshot), set the interval to 30 seconds.
Keep Screen takes care of your smartphone’s resources and works in the background; to do this, click “ On”
", and after that "
Save and restart app
".
Important! If you turn off (lock) the device using the power button while the program is running, then after thirty seconds the screen will turn on and will not go off. Therefore, before locking the gadget with the power button, you need to close the application or simply return to the main desktop.
We have nothing more to add on today’s topic, and, of course, you can judge how useful the information presented was. Good luck!
How to saddle without turning off the screen in Windows 10?
After installing Windows 10, you may find something not entirely pleasant - after some short time, the system turns off the monitor. But not all monitors immediately return to working condition.
This was personally inconvenient for me and I had to disable this automatic screen turning off in Windows 10, if this is also interesting to you, then this note is for you.
But why does the system turn off the screen? This is all done in order to save money, because the monitor in standby mode consumes much less than if it were working.
Therefore, it makes sense not to even disable this behavior, but simply change the interval after which the monitor should turn off.
Let's look at how to do this - right-click on the Start icon and select Power Options
:
Then click on the item that is responsible for setting up your power supply scheme:
And the opportunity will become available to either change the time or even prohibit turning off the monitor; to do this, select the appropriate value in the menu:
After that, do not forget to save the changes, and then click on the cross =)
But I’ll give you some advice: if you leave the computer often, I don’t recommend setting the time so that the monitor turns off, for example, every two minutes. That is, if it turns off or on often, then I don’t think that’s good. But if you have a CRT monitor, that is, an old, big one, then I advise you to very wisely turn it off after a while - the fact is that they consume a lot of electricity, and if your computer works for a long time and you sometimes go away for a long time - then let the monitor go off at this time. Otherwise, a CRT monitor can take at least 80 watts.
Turn off adaptive brightness in Windows 10
You need to open the power settings, to do this, right-click on the “Start” menu and select “Power Options”
Next to the current scheme, click “Configure power supply scheme”
And then go to “Change advanced power settings”
Next, open the “Screen” subsection and in the “Enable adaptive brightness control” item, set the switches to the “Off” position for mains power and battery power:
Also, the brightness itself can change when connected to the network or when powered by a battery and the charge decreases to the designated level. The screenshot shows that the value is set in reduced brightness mode - 50%. We put 100% everywhere.