09/04/2019 windows | for beginners | programs
The instructions describe several ways to remove the password when logging into Windows 10 when you turn on the computer, as well as separately when exiting sleep mode. This can be done not only using the account settings in the control panel, but also using the registry editor, power settings (in order to disable the password request when leaving sleep), or free programs to enable automatic login, or you can simply remove the password user - all these options are detailed below.
In order to follow the steps below and enable automatic sign-in in Windows 10, your account must have administrator rights (usually the default on home computers). At the end of the article there is also a video instruction that clearly shows the first of the described methods. See also: How to set a password on Windows 10, How to reset your Windows 10 password (if you forgot it).
- How to remove the login password (disable the password request) in the account settings
- Automatically enter Windows 10 password using Registry Editor
- Disable password when resuming Windows 10
- Login to Windows 10 without a password using Autologon from Microsoft Sysinternals
- How to remove Windows 10 user password completely
- Video instruction
- Additional Information
Disable the password prompt when logging in in User Accounts Settings
The first way to remove the password prompt when logging into Windows 10 is very simple and does not differ from how it was done in the previous version of the OS. You will need to follow a few simple steps.
- If your system logs in using a PIN rather than a password, first disable them using both parts of this instruction: How to disable the PIN prompt and remove the PIN in Windows 10.
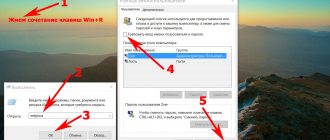
- Press the Windows keys + R (where Windows is the OS logo key) and type netplwiz or control userpasswords2 then click OK. Both commands will cause the same Account Settings window to appear.
- To enable automatic login to Windows 10 without entering a password, select the user for whom you want to remove the password prompt and uncheck o. If there is no such mark, the solution is described here: What to do if there is no Require username and password entry in Windows 10.
- Click “Ok” or “Apply”, after which you will need to enter the current password and its confirmation for the selected user (which can be changed by simply entering a different login). Attention: If you are using a Microsoft account and the method does not work, try again, but in the top field, instead of your username, enter the linked email address (E-mail).
Also, according to some reviews, if disabling the password does not work immediately, try doing it twice: disable the request, apply it, enable it, apply it, disable it again.
If it is not in the window, go to Settings – Accounts – Sign-in options and check if there is an option “Require sign-in with Windows Hello for a Microsoft account.” If so, disable it and go back to the automatic login settings. If not, run Command Prompt as an administrator (how to do this) and enter the command (pressing Enter after it):
reg add "HKLM\SOFTWARE\Microsoft\Windows NT\CurrentVersion\PasswordLess\Device" /v DevicePasswordLessBuildVersion /t REG_DWORD /d 0
After running the command, close the Command Prompt and restart your computer. Then repeat the steps above - the option to disable the password request should appear. Also, the “Require username and password” option will not be available if your computer is currently connected to a domain. However, it is possible to disable the password prompt using the Registry Editor, although this method is less secure than the one just described.
How to remove login password using Windows 10 Registry Editor
There is another way to do the above - use the registry editor for this, but keep in mind that in this case your password will be stored in clear text as one of the Windows registry values, so anyone can view it. Note: below we will also consider a similar method, but with password encryption (using Sysinternals Autologon).
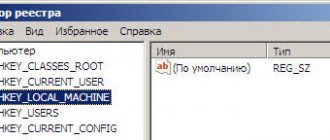
To get started, launch the Windows 10 Registry Editor by pressing the Windows + R keys, typing regedit and pressing Enter.
Go to the registry key
HKEY_LOCAL_MACHINE\Software\Microsoft\Windows NT\CurrentVersion\Winlogon
To enable automatic sign-in for a domain, Microsoft account, or local Windows 10 account, follow these steps:
- Change the AutoAdminLogon value (double click on this value on the right) to 1.
- Change the DefaultDomainName value to the domain name or local computer name (can be found in the “This Computer” properties). If this value does not exist, you can create it (Right mouse button - Create - String parameter).
- If necessary, change DefaultUserName to a different login, or leave the current user.
- Create a string parameter DefaultPassword and specify the account password as the value.
After this, you can close the registry editor and restart the computer - logging in under the selected user should occur without prompting for a login and password.
Using the Dism++ utility
An excellent utility for competent maintenance of the “tens”. There is cleaning, editing the boot, restoring the bootloader, and even removing built-in Windows 10 applications. In addition to all this splendor, the program also has its own method for resetting the login password. The main condition that you cannot do without is that the program must be recorded on a bootable USB flash drive. How to do this has long been described both on other sites and on this resource. In the finished version, the boot disk should contain an unpacked archive with the program. Then everything is as always: after the drive is connected, we reboot and boot from it. Next is the familiar key combination “Shift+F10” and indicating the location of the program’s executable file, for example, “D:\dism\dism++x64.exe”. After this, a standard license agreement will appear, which we accept. The upper part of the program window is divided into the left “Windows Setup” and the right, which is exactly what we need. Namely, we need the “Accounts” subsection.
A couple of clicks and you're done. The required “account” will be edited and the password will be reset.
How to disable the password when waking from sleep mode
You may also need to remove the Windows 10 password prompt when your computer or laptop wakes up. For this, the system provides a separate setting, which is located in (click on the notification icon) All settings - Accounts - Login options. This same option can be changed using the Registry Editor or Local Group Policy Editor, as will be shown next.
In the “Login required” section (some computers or laptops may not have such a section), set “Never” and after that, when you wake up from sleep, the computer will not ask for your password again.
There is another way to disable the password request in this scenario - use the “Power Options” item in the Control Panel. To do this, opposite the scheme currently used, click “Configure power supply scheme”, and in the next window - “Change additional power settings”.
In the advanced settings window, click on “Change settings that are currently unavailable”, and then change the “Require password on wakeup” value to “No”. Apply the settings you have made. Not on all systems you will find such an item in the power settings; if it is missing, skip this step.
How to enable automatic login in Windows 10 using Autologon for Windows
Another simple way to disable entering a password when logging into Windows 10, and to do it automatically, is the free Autologon for Windows program, which was previously available on the official Microsoft Sysinternals website, and now only on third-party sites (but it’s easy to find the utility on the Internet).
If for some reason the methods to disable the login password described above did not work for you, you can safely try this option; in any case, there will definitely not be anything malicious in it and most likely it will work. All that is required after launching the program is to agree to the terms of use, and then enter the current login and password (and the domain, if you are working in a domain, for a home user it is usually not necessary; the program can automatically substitute the computer name) and click the Enable button.
You will see information that automatic login is enabled, as well as a message that the login information is encrypted in the registry (i.e., this is essentially the second method of this guide, but more secure). Done - the next time you reboot or turn on your computer or laptop, you won’t need to enter a password.
In the future, if you need to re-enable the Windows 10 password request, run Autologon again and click the “Disable” button to disable automatic login.
Video proof of the successful operation of automatic login version 1803
You might also be interested in:
- There is no driver for the Windows 10 network - what to do? Causes and solutions
- The computer disconnects from the Internet on its own
- Windows was unable to automatically detect this network's proxy settings
- The best free programs for Windows 10 (Office suites, Photo editors, Video editors)
- Free programs for Windows 10 (PC cleaning and optimization, antiviruses, email programs)
- How to create a bootable USB flash drive for Windows 10 rufus
- What services can be disabled in Windows 7 for better performance?
How to completely remove a Windows 10 user password (remove password)
If you use a local account on your computer (see How to remove a Microsoft Windows 10 account and use a local account), then you can completely remove (remove) the password for your user, then you will not have to enter it, even if you lock the computer with keys Win+L. To do this, follow these steps.
There are several ways to do this, one of them and probably the easiest is using the command line:
- Run Command Prompt as an administrator (to do this, you can start typing “Command Prompt” in the search bar on the taskbar, and when you find the item you need, right-click on it and select the “Run as administrator” menu item).
- At the command prompt, use the following commands in order, pressing Enter after each one.
- net user (as a result of executing this command, you will see a list of users, including hidden system users, under the names under which they appear in the system. Remember the spelling of your user name).
- net user username ""
(if the username consists of more than one word, also put it in quotes).
After executing the last command, the user's password will be removed and there will be no need to enter it to log into Windows 10.
Video instruction
Through another account
If another account with administrative rights appears on the computer, you can delete the current password without even remembering it. The only negative is that access to protected data will be lost (if it was used). Let's consider this method to remove a password from a computer:
- Run Command Prompt as administrator.
- Enter the command:
net user Administrator /active:yes
- Log out of your current session and log into your newly activated local profile.
- Right-click on the “Start” button and select the “Computer Management” line.
- Next, go to the section: “Computer Management” - “Local Users” - “Users” - right-click on the name of the profile to be changed and edit the password.
- After familiarizing yourself with the risks, continue changing the password on your laptop or PC. For the new access code, leave the field values empty.