When do you need to reset Windows 7 settings?
There are several common reasons for this need:
- serious failure of the system. Sometimes Windows Seven completely fails due to a virus infection of the PC or an error. In this situation, you can restore the functionality of the OS by resetting it. It is not necessary to reinstall Windows 7 from a bootable USB flash drive or CD;
- personal desire of the user. Many people incorrectly change system settings, after which the stability of its operation is disrupted. In this case, the most effective way to restore the functioning of Windows 7 is to reset its parameters;
- removing unnecessary information. Sometimes it’s easier to reset the current operating system settings than to reinstall it again;
- computer sale. Before selling a device, the user usually performs a number of steps to improve PC performance. Resetting operating system settings is no exception.
Appearance of the Windows seven operating system
Note! The process of resetting Windows seven settings can be performed in different ways.
What does it mean to roll back settings on Windows 7?
How to reset Windows 10 to factory settings
This process is a return of the operating system to factory settings. Such a rollback is performed in the shortest possible time while preserving some system information. In this case, the user can independently choose the method of restoring the original parameters.
Restore Windows 7 settings to factory level through a system tool
Cancel all user system settings
Thanks to this feature, the PC user will be able to undo his own changes. This circumstance is especially relevant if the changes made have a negative impact on the functioning of a particular software or system tool.
Freeing some files
Relevant in case of introduction of malware. If the user launched a virus on his PC by downloading programs from the Internet, and it cannot be removed using an antivirus.
Note! To uninstall this software, you can restore the system using a special tool, i.e., reset the changes, return Windows 7 to the state when it functioned normally.
How to reset Windows 7 to factory settings
How to reset an iPhone to factory settings
The standard way to complete the task involves following the following algorithm:
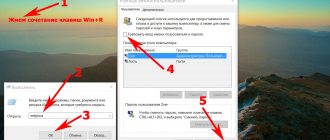
- Go to the “Control Panel” of the laptop by clicking on the “Start” icon. Here you can configure the PC operation parameters and enable some functions.
- In the “System and Security” section, click on the “Backup of computer data” subsection.
- An archiving window will be displayed, in which the user needs to tap on the last line “Restore system parameters”.
- In the next window, click on “Advanced recovery methods”.
- In the selection menu, click LMB on the line “Return the PC to the state specified by the manufacturer.” The reset process will begin. In this case, the computer may be rebooted multiple times.
Note! Once the reset is complete, the files that were uninstalled will appear in a separately created folder on your desktop.
Control panel on OS Windows 7
How to reset Windows 7 to factory settings if there is no quick reset
How to reset Android to factory settings - rollback and recovery
This means that in the action selection window there is no line to return the PC to its original state. In this situation, it is recommended to roll back the system to the state in which it functioned normally. To do this, the user will need to create a restore point in a special window, and must specify the rollback date.
To launch the window for restoring the operating system, you need to go to the “Start” menu and go to the “System” folder. Here you need to tap on the “System Restore” tool. Next, the user will have to follow the instructions of the assistant.
System Restore
System recovery is not a rollback to the previous operating system, but to the last restore point. Points can be created manually, but by default they are created automatically. They are needed so that if an unsolvable error occurs in the system, you can roll back all processes and computer settings to the moment when this error did not exist. To use the point, follow these steps:
- Launch your computer's Control Panel.
Opening the control panel
- Go to the "Recovery" section. Find it using the search bar.
Go to the “Recovery” section
- Run the recovery program.
Click the “Run System Restore” button
- If you have several points, then you can select the one recommended by the system, or any other, by proceeding to manually selecting a point.
Select a recommended or other restore point
- Wait until the system performs an automatic recovery. Once the process is complete, you will receive a notification that the system has been restored successfully. Done, now all the settings and parameters of the computer correspond to the properties that it had at the time the restore point was created.
We go through the process of rolling back to a restore point
Video: Applying restore points
Via command line
If your computer does not boot in normal mode, you can put it into safe mode with command line support, and then run the rstrui.exe command at the command prompt. Executing this command will start the recovery process, and all other actions will be the same as the normal recovery described above.
Run the command rstrui.exe to start the recovery
How to clean Windows 7 to its original state through the troubleshooting window
To complete the task, you can use a simple algorithm of actions:
- Restart your computer using the standard method through the Start menu.
- Before starting the operating system, you must press the “F8” button several times to enter the recovery tool window.
- After performing the above manipulations, the “Additional download options” window will appear. Here the user will need to click on the “Troubleshooting” line, moving to the desired items by clicking on the “Up” and “Down” arrows.
- The “System Recovery Options” window will open, in which you need to tap on the “System Restore” line.
- In the next window that appears, you need to click on “Reset the system to the parameters specified by the manufacturer.” This is a rollback of the operating system to the factory level.
Windows 7 Advanced Boot Options Window
For your information! In the recovery window there are two options for performing the procedure: either the built-in reset system or a proprietary one. The latter is intended for restoring settings for laptops, and the first for desktop computers.
Rollback before 30 days have passed
There are several ways to restore a previous version of an installed system from the Windows.old folder. First try the standard method and system recovery, but if they do not suit you, then use the second option - through a third-party program.
Standard method
- Open PC settings.
Open computer settings
- Go to the "Update and Security" block.
Open the “Update and Security” section
- Select the “Recovery” subsection. Go to the “Recovery” subsection
- This subsection should contain the “Return to...” item. The version you can revert to is the same as the one you installed previously. Click on the “Start” button and follow the instructions that appear on the screen.
Click the “Start” button to start rolling back to the previous OS
Through recovery
- While at the “Login” step, when you need to select an account, hold down the Shift key on your keyboard and select “Reboot”.
Hold down the Shift key and go to reboot
- The recovery menu will open, select “Diagnostics”. Go to the “Diagnostics” section
- Proceed to select advanced options. Let's move on to additional parameters
- Select the “Return to previous build” block.
Select the “Return to previous build” function
- Select the suggested option - rollback to the previous installed system.
Choosing where to roll back
- Enter a password if you have one.
Enter the password
- Read the warning and confirm the action.
Confirm the start of the rollback
- Wait for the process to complete; it can last from ten minutes to several hours, depending on the performance of the computer and how many files need to be restored.
We wait until the previous version of the OS is installed
Using a third party program
This method is worth switching to if you have a Windows.old folder with files from the previous system, but the “Return to...” section is not displayed in the computer settings. This happens sometimes, so you can follow these steps to use the files in the folder:
- The third-party program is an image of the official application from Microsoft - Rollback Utility. Download this image, which weighs about 200 MB, from the official Microsoft website, and then write it to any free flash drive. You can do this using the built-in functions of Windows 10: right-click on the image, select “Mount” and indicate on which media you want to burn the image.
Select “Mount” to begin the mounting process
- Turn off the computer without removing the flash drive from the port, start the power-on process and as soon as the first signs of power-up appear on the screen, press the Delete button on the keyboard to go to the BIOS settings. The key may differ, which one it will be in your case, depending on the motherboard model. But when the system boots, lines will appear indicating the key to start the BIOS.
Press the Delete key to enter the BIOS
- While in the BIOS, go to the Boot section or “Download” in the Russian version.
Go to the Boot menu
- Place the flash drive with the recorded image first in the boot queue. This must be done so that when the computer turns on, it starts loading not from the hard drive, but from your flash drive. If you have a newer BIOS version - UEFI, then in the first place you need to put a flash drive whose name begins with UEFI: “Media name”.
We put the medium first
- Save the changes made to the BIOS and exit it; booting from the flash drive will begin automatically.
Save the settings and exit the BIOS
- When the program loads from the flash drive, go to Automated Repair mode.
Select Automated Repair mode
- Two systems will appear in the window: active and old. Select the one you want to roll back to and click on the Roll Back button. Instructions will appear on the screen, follow them.
Select the system to which the rollback will be performed
Reset using distribution
If the user still has a bootable flash drive or CD on which there is an ISO image of Windows seven, then he can use this rollback method. This procedure implies compliance with the following algorithm:
- Insert the boot drive into the USB connector on the PC or into the DVD drive if it is a disc.
- When starting Windows 7, press the “Delete” key several times to enter the BIOS.
- In the BIOS you need to switch to the section responsible for loading connected devices. Much here depends on the specific BIOS version of the computer's motherboard, so the interface may vary.
- Select your flash drive or CD from the list of boot devices and restart your PC.
- After the restart, the user will see the standard Windows 7 operating system installer window. There is a special button responsible for recovery. It is located in the lower left corner of the menu. You will need to click on this line with the left button of the manipulator.
- After performing the previous steps, the same reset window will appear. The principle of rolling back an operating system based on it has already been discussed in the last section of the article. Here the user also needs to follow the recommendations presented.
Windows 7 OS installer
Note! You can create a bootable USB flash drive with Windows Seven yourself in the shortest possible time by downloading an ISO image of the system from the Internet. It is important that the drive is fully formatted and has at least 8 GB of memory.
Problems using the distribution
Experienced specialists highlight a number of shortcomings that PC users make when installing Windows 7 from a USB drive, as well as when restoring it:
- using pirated versions of the operating system. This circumstance allows you to save some money, but does not protect you from possible problems in the future. For example, in the operation of unofficial OSs, failures and errors are often observed, which force regular system recovery. Also, using pirated copies of Windows OS is a violation of the law;
- skipping the step of saving the “Recovery” section. Saving this partition allows you to quickly restore the operation of the operating system in the future, as well as create a bootable ISO image from the factory Windows seven. More details about completing the task will be discussed below;
- incorrect choice of recovery method. In the “Recovery System” window, the user will have to tap on the required line depending on the type of problem: either completely restore the system’s functionality by rolling back its settings, or restore the startup of OS Windows. These are two different functions and should not be confused. The second method is used when the user is unable to load Windows seven, i.e. the operating system cannot start.
System Restore window interface on Windows 7
Important! During the recovery process, you need to remove the USB drive with the ISO image from the connector, otherwise, after rebooting, the laptop will begin installing the operating system automatically, and the reset procedure will be interrupted.
Clean Installation of Windows Using Advanced Recovery Options
In the "Recovery" section, in the "Advanced recovery options" setting, click on the link "Learn how to start over with a clean installation of Windows."
In the window asking “Did you want to switch apps?” that tries to open Windows Defender Security Center, click on the “Yes” button.
Next, the Windows Defender Security Center window will open.
Here the user is asked to start with a clean installation and update of Windows. Personal files and some Windows settings will be retained, but most applications will be removed, including Microsoft Office, third-party antivirus software, and desktop applications that came pre-installed on your computer. Only applications included in the standard distribution of the operating system will remain on the PC; Windows will be updated to the latest version.
Deleted programs will have to be reinstalled after a clean installation of Windows. Microsoft recommends making a backup copy of important data so as not to lose the necessary information. Save the licenses and keys you will need to activate the software after installing your applications again.
Click on the “Get Started” button.
Agree to launch Windows Defender Security Center. In the “Start Again” window, click on the “Next” button.
The "Your apps will be removed" window shows the apps that will need to be reinstalled. Click on the "Next" button.
In the “Let’s get started” window, click on the “Get Started” button.
Next, computer recovery will begin. The process of installing a clean Windows 10 will take some time. During recovery, your computer will restart several times.
After some time, a clean, reinstalled Windows will load on your computer’s desktop.
The previous version of the operating system will be saved on drive “C” in the Windows.old folder, which can be removed from the computer so that it does not take up unnecessary disk space.
Errors when rolling back to the original state
When resetting Windows 7 to factory settings, a message may be displayed that the reset failed and therefore no changes were made. There are several reasons for this alert to appear:
- A pirated version of the system is installed on the PC. The main errors that can occur when using unlicensed operating systems have already been described above, and this is one of them;
- before completing the task, the user did not save the “Recovery” section;
- the compression function is active on the PC, designed to reduce the volume of the disk on which all pre-installed software of the Windows 7 Professional operating system is stored;
- incorrect choice of recovery method. For example, if the user decided to reset the settings of the seven to the factory level, but at the same time set the system to roll back to a working state;
- PC virus infection. Many viruses are created to block standard functions, tools and modes of Windows operating systems. Therefore, before carrying out the task, it is recommended to check your laptop or desktop computer for virus threats in order to avoid problems in the future.
Licensed antivirus to protect PCs on Windows 7
Note! Not all methods are suitable for resetting Windows 7 to factory level. For example, it may turn out that recovery is possible through a system tool by running it on the PC desktop using the command line. However, you will not be able to reset the settings through the troubleshooting window.
How to reset Windows
IT ExpertHow to do itYour own admin
Sergey Gritsachuk | 03.12.2013
In what cases is it necessary to reset Windows settings?
How to reset Windows using built-in tools
How to reset Windows using third-party software
In what cases is it necessary to reset all settings and data?
The most common situation is the sale of a computer: transferring the device with all your personal data (and they will inevitably be stored in the system) to the new owner is extremely imprudent. And the buyer is not always ready to take a computer with someone else’s settings.
Resetting the system to its factory state may be necessary due to incorrect installation of drivers and software, as well as if the operating system is damaged by viruses. A similar situation occasionally arises when updating the OS and its components.
Sometimes the need to reset settings is dictated by the slowdown of the PC caused by numerous installations and removal of software. In this case, it is easier to return to the factory configuration than to try to clean out garbage from the system directories and registry.
How to reset Windows using built-in tools
Laptops and branded desktops are supplied with a backup (service) partition on the hard drive, which contains all the information necessary to reset the Windows state (system image, drivers and factory software).
First of all, on external drives (on USB flash drives, CDs or external HDDs) you need to save all personal information: those that are in your directories, and necessarily those that may be located in system folders (for example, “My Documents” ). Don't forget to look in the directories where information is downloaded from the Internet, rewrite passwords and other authentication data. Be sure to back up your email and chat history, and import settings from your programs (like browser bookmarks). It's a good idea to download the latest copies of your software and installation files for drivers and utilities (like video/audio codecs). If you absolutely don’t have time for all this, make at least a backup of all disks using any backup utility, in particular Acronis True Image.
If you have a laptop, then you need to restart it and press a certain key combination (check in the user manual or on the manufacturer’s website). So, in ASUS models it is F9, and in Acer it is Alt + F10, etc. Then a menu will appear from which the system reset procedure will begin. As a rule, the process is automated and does not require active user participation.
It is much worse if the service partition is destroyed (this is done to expand the available disk space) or it was not there to begin with. In such a situation, the easiest way is to reinstall the OS from scratch, followed by installing all the necessary software. However, there are other ways.
Starting with Windows XP OS, you can return to the earlier configuration by clicking “Start” and sequentially selecting “All Programs” - “Accessories” - “System Tools” - “System Restore”. In the window that appears, you must specify the earliest “return point” - then the system will restore all the necessary changes to the configuration.
In the same way, you can roll back to the factory configuration in versions of Windows Vista/7. Alas, such a method will not clear all user data - they will have to be removed manually, and the result is not guaranteed (it may end up being reinstalled).
For Windows 8, the algorithm is different: you need to sequentially select the “Settings” and “Change computer settings” elements (with the mouse - move the pointer to the upper right corner of the screen, then down and click the same items in order).
Next, go to the “Update and Recovery”, “Recovery” items and in the “Remove all data and reinstall Windows” section, click the “Start” button.
It is noteworthy that the G8 now has two recovery options: Reset (Delete all data and reinstall Windows) and Refresh (Restore your PC without deleting files). The first will completely reset the computer without saving information, and the second will “refresh” the system without losing data (recommended if system performance has decreased).
How to reset Windows using third-party software
Unfortunately, I know nothing about the existence of a utility capable of returning the OS to its original state. The only available option requires creating an image of the system partition as a backup copy (this should be taken care of before starting the PC for the first time, immediately after purchase). Having it in hand, it is not difficult to return the system to its original state (with all drivers and settings) from any moment, even if it has stopped functioning altogether (from the boot disk). Any program, paid or free, that can create images of the system disk is suitable for creating an archive. You can also use the built-in OS mechanisms if Windows 7 or 8 is installed.
conclusions
When purchasing a laptop with a pre-installed OS, take care to save the service partition: without it, it is impossible to roll back the system to its original state. If this is not the case, be sure to make a disk image and save a copy in a safe place (just not on the same drive - if it fails, everything will be lost). Then, if necessary, you can reset your computer in a matter of minutes - this is very important if you need to quickly continue working.
Windows news
Magazine: IT-Expert Magazine [No. 12/2013], Magazine subscription