Initial letter in Word - what is it?
To make the article more beautiful, you can decorate it with a drop cap. To do this, highlight the first letter of the word and give it a special look. At the same time, it stands out in size and style .
This method of writing was actively used in ancient books. Often the image of this letter was a complex and beautiful design. Nowadays this technique is practically not used in books. However, when formatting an article using Word, it is not difficult to make a drop cap in order to attract more attention with beautiful letters.
Drop cap settings
So, we figured out how to make a drop cap in Word, but there is a chance that in the end you will not get the result that was originally intended. In this case, you can manually adjust the drop cap, which will be discussed now.
- Open the drop cap menu and select Options.
- A window will appear asking you to specify all the necessary display settings.
- In the “Position” column, you can choose where the drop cap will be displayed; this has already been discussed earlier.
- In the Options column, you can change the font if you want it to be different from the main text.
- You can also change the line height and distance from the text by changing the values in the corresponding input fields.
Once you have entered all the required values, click OK. And the initial letter is placed the way you intended it.
Greetings, dear readers! Today we’ll look at how to create a page design effect - a drop cap.
Initial letter
is a text design technique that represents an enlarged first letter. It is usually used in printed publications, in books, when the first letter of an article, story or chapter is designed in a special way and such design may contain images of plants, animals and other objects.
Drop caps are used to draw the reader's attention to the beginning of the text. Creating a drop cap on html pages
it won't be difficult. Next, we'll look at how to do this.
Initial letter in text
The easiest way is to simply enlarge the first letter of the text and highlight it with color. a pseudo element for this
, which can be used to determine the style of the first character in the element's text. For example:
When the night dew and mountain wind refreshed my burning head and my thoughts returned to normal order, I realized that chasing after lost happiness was useless and reckless. What else do I need? - see her? - For what? Isn't it all over between us? One bitter farewell kiss will not enrich my memories, and after it it will only be more difficult for us to part.
Result:
You can use the CSS float property to make text wrap around the first letter. To do this, change the styles as follows:
Result:
Initial letter picture
To use some exclusive font when designing a drop cap or to use some effects, you can use a left-aligned picture as the first letter.
An example of creating a drop cap using a drawing:
When the night dew and mountain wind refreshed my burning head and my thoughts returned to normal order, I realized that chasing after lost happiness was useless and reckless. What else do I need? - see her? - For what? Isn't it all over between us? One bitter farewell kiss will not enrich my memories, and after it it will only be more difficult for us to part.
Result:
But this method has a big disadvantage: if the initial letter on the site is used quite often, then you will have to prepare many drawings of different letters, and in this case, editing the text becomes more difficult, because instead of the usual change of the first letter, you will have to insert a new drawing.
That's all. Now you can easily create a drop cap
on their websites. See you again!
When formatting an article, you must not forget about the initial cap. After all, it gives the article a new amazing look and immediately catches the reader’s eye. This gives its own unique style to the material. Let's look at how to create and edit a drop cap in indesign: change the size, color, make padding and indents. We will also consider how to increase the distance between the text and the initial letter if it overlaps with the text below, because this happens when the initial letter starts with the letters D, Ш, Ц.
Creation
In Word 2010, 2013, 2020, it is possible to create a drop cap in the form of a symbol written in a font that is much larger than the rest of the text. In order to start creating, you must already have at least a small paragraph typed in the editor. The first letter must be highlighted .
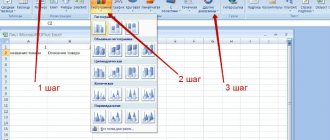
In the “ Insert ” menu, you need to pay attention to the “ Text ” button group. It includes the Drop Cap .
After clicking the button, an additional menu . It offers the opportunity to choose from the following options:
- " No ". In this case, nothing will be done.
- " In the text ". This line specifies the way in which the image will be positioned within the text. It will be inside the article.
- " On the field ". With this selection, the drop cap will be located to the left of the text field.
When selecting parameters, the user will open a settings window where the most suitable parameters can be set.
When setting up the view, you can make the following selections:
- Indicate whether it should be “ On the field ” or “ In the text ”.
- The user is given the opportunity to select any font style from those available on the computer.
- Allows you to adjust the height of the symbol . In this case, you need to specify the number of lines corresponding to its height. By default, this parameter is considered to be three.
- You can specify the distance from the text field that should be set. By default this value is zero.
How to put a paragraph in Microsoft Word
You can adjust these parameters not only when creating a drop cap in Word, but also later.
Insert “On the field”
When you choose this arrangement for the drop cap, you will be able to see how the text flows around it from the bottom and right side. It is located inside the article text field.
To insert it this way, you need to do the following:
- In the article, the first character .
- Open the “ Insert ” menu, then click on the appropriate button.
- In the additional menu, select “ On the field ”.
If necessary, you can adjust the settings later.
Instead of an afterword
A very affordable way to transform the visual display of a text array, without resorting to complex add-ons and inserting additional objects.
When formatting an article, you must not forget about the initial cap. After all, it gives the article a new amazing look and immediately catches the reader’s eye. This gives its own unique style to the material. Let's look at how to create and edit a drop cap in indesign: change the size, color, make padding and indents. We will also consider how to increase the distance between the text and the initial letter if it overlaps with the text below, because this happens when the initial letter starts with the letters D, Ш, Ц.
Letter design
When a drop cap has been added to Word, you may need to adjust its appearance. To do this, you can select the “ Options ” line in the additional menu.
Changing position
To make adjustments, you can adjust the distance between this object and the rest of the paragraph. To do this, specify the distance between the object and the text array. Visually it looks as if it is being moved to the left of the rest.
For a drop cap, you can prefer the option when it is located outside the text (“On the field”), or inside the rectangle of the text field (“In the text”).
Font style and size
In Word, it is possible to make a drop cap in any of the available fonts . If additional variety is required, you can install the required font.
The size that is used can be set in a number of lines corresponding to the height of the object.
For more complex settings, you can use Word tools for working with fonts .
Making a drop cap
Having figured out what it is and how it looks in the program, you can proceed directly to how to make a drop cap in Word. So, we have a text that is divided into chapters. The user is faced with the task of highlighting the first letter of the new chapter, that is, making a drop cap. For this:
- Place the cursor in front of the word from the first letter of which you want to make a drop cap.
- On the toolbar, go to the Insert tab.
- In the “Text” tool area, click the “Drop Cap” button.
- In the additional menu that appears, select the type of drop cap that suits you.
How to make beautiful letters
In order to choose the appropriate style, you can try using different design options . To do this, you can try different font styles, font heights, distance from the text array, and layout options. If necessary, you can install additional fonts.
Deleting a page in Word
It should be noted that it is possible to adjust the appearance and location not only using the mentioned menu. When this object is installed, it is located in a frame. If you right-click inside it, a context menu , which will consist of two parts:
- At the top there will be buttons and drop-down lists .
- Next there will be a menu .
In this case, you will be able to use the following design options:
- There is a drop-down list for selecting the type of font and its size .
- There are buttons to increase or decrease the value.
- It is possible to use one of the styles available in Word.
- The menu has a line “ Font ”, when selected, a standard dialog for selecting it is called up.
- There are options to change the writing style , letter color or background.
- It is possible to specify the alignment method . This is useful if the frame size or shape has been changed.
When you click on the border of an object, additional options are provided:
- This way it is possible to move the image , and it will move along with the paragraph.
- You can change the size or change the proportions.
To change the appearance, you can select the first letter and use the font tools. In addition to the methods of adjusting the appearance that were mentioned here, you can use changing font settings . By clicking on this button, you can get the following options:
- Make the capital letter animated .
- Specify the color for the outline .
- Make it cast a shadow .
- Make an object glow .
This way you can use additional ways to change the appearance of an object.
How to make a drop cap in Word
So, let's start creating a unique creative style for your Word document. The text can be anything, from congratulations on your anniversary to your own literary masterpiece. The main thing is that it looks appropriate (a drop cap is clearly not suitable for business documents):
Note!
For the function of adding a drop cap to become active, you must first write at least one word in the document!
Design of the Initial Letter
And now the fun part - we start experimenting with fonts and colors of the initial letter. To do this, you can select a capital letter by holding down the left mouse button (or holding down the Shift key with the left or right arrows to select the letter) and then right-click on it. A menu with functions will open, in which we set all the parameters of interest, and then admire what happened!
How to remove from text
To do this, you can use the standard menu. Having selected an object , click on the corresponding button. In the menu that appears, select the top line ( “No” ). After this, the initial letter of the text will have the same format as the rest of it.
Documents in doc and docx format - how to open them
to delete an object . In this case, you need to click on the frame. Then press Delete key . As a result, the object will be deleted along with the capital letter. After that you will need to dial it. As a result, it will have the same format as the rest of the text.
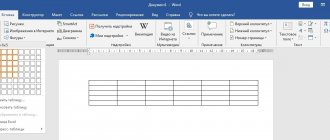
Text Borders in Word
By default, working with text in Word is carried out on a white sheet of paper. If you wish, you can add borders to this sheet.
To do this, go to the Design tab and click the Page Borders button.
Text Borders in Word
In the window that appears, select the required settings and click OK.