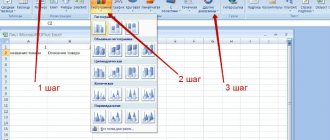
How to Insert a Background in a PowerPoint 2020 Presentation
If you use PowerPoint 2020, then in order to make a picture as the background of your presentation, you need to right-click on the slide in the left part of the window and select “Background Format” from the menu that opens.
You will then see a Format Background menu on the right side of the PowerPoint window, where you can customize your background image. Here you need to select the “Picture or Texture” option and click on the “File” button in order to select a picture that should become the background of the presentation. This way you will set a background image for one selected slide, but if you want to use this background for all other slides in the presentation, then click on the “Apply to all” button.
Also, there are several settings available here that allow you to change the appearance and location of the image in the background of the presentation. For example, you can set the background transparency value, and also place the image with an offset.
There are three tabs at the top of the Background Format menu. If you go to the last tab, you will have access to even more settings that you can add to the background image. In particular, here you can change the sharpness, brightness, contrast, saturation and temperature of the image.
As in the previous case, the settings apply only to the current slide of the presentation.
In order to apply them to all slides, you need to click on the corresponding button at the bottom of the menu.
Please note that if you want to remove the previously installed background, then you need to open this menu again and select the “Solid Fill” option.
Types of solutions
The main difficulty is the lack of a full-fledged button for working with the background. It is not possible to find the "background" button on the tabs. The solution to the issue lies in the context menus or in the intricacies of operation.
Sample
The simplest option for making a picture the background of a PowerPoint presentation is the template tool. When creating, you can pre-set the background of the presentation that is used in it. To do this you will need:
- In the open PowerPoint window, select "File».
- Among the proposed actions, select “ Create ”.
- A list of basic templates appears , which already contain presets for the presentation background. You need to choose the one you like and continue working with it.
If you don’t find what you need among the proposed options, you can use an Internet search . This will launch a kind of browser that will help in searching for patterns among those contained on the network. For the convenience of users, a filter by category . Alas, it is difficult to specify search criteria.
If difficulties arise (poor text visibility or other design difficulties), it can be changed.
change the selected template later. To do this, just open the “ Design ” tab, where you can view and change the general presentation template.
Basic Addition
If there is nothing you like in the template, you can insert the background yourself. In versions of Power Point 2010 and higher, this option is hidden in the context menu. It is called as follows:
- In an open presentation, right-click on any free space .
- A context menu will appear in which you select the “ Background Format ” item.
- This brings up the following parameter window:
Working with slides in PowerPoint
From there you can make settings for the background image. The specified menu is the main one when working with this presentation component. It contains the following options:
- solid color . It is a kind of screen fill;
- gradient fill . A type of solid fill with a beautiful flowing color effect;
- pattern or texture . Allows you to independently select the desired image and place it;
- pattern fill . Helps to choose a pattern and pave the sheet with it.
The " apply to all " button will set its background image to all presentation slides. The " Restore background " button will reset this setting (remove all changes made).
You can also call the same menu through the “Design” tab .
The method is relevant for any version of Office.
Setting the background image and settings
pattern or texture item in the menu discussed earlier; the window takes on the following form:
Background customization options are:
- File . Selecting an image stored on your computer to set it as a background. This is done through a conductor. The user is only required to prepare the image in advance.
- In the Internet . Similarly, with the template, it opens a “mini-browser” where you can take the finished image.
- Clipboard . Helps you paste the last copied image.
“ Transparency ” deserves special mention. Changing the position of the slider changes the degree of transparency. The background image will either be solid or slightly dull. The example shows 2 images with different degrees of background transparency.
Fill
Selecting the “ Fill ” item opens the following options:
“ Solid Fill ” has only 1 option – transparency. Gradient has much more settings:
Can be configured:
- Selecting a predefined gradient . It is a set of options that can be set manually.
- Color . Changes the color that the gradient tends to.
- Gradient type . Several options that help change the light and dark areas on the slide.
- Dots . Allows you to customize the type of color change.
- Transparency and brightness . Set the appropriate parameters.
Slide themes and layouts and how they apply to your presentation
Insert a picture onto the background from the templates
PowerPoint of any software version has ready-made templates, or, as they are more accurately called, textures.
In order to make a picture as a background in a PowerPoint presentation from these options, you need to do the following:
First, after opening PowerPoint, select the “View” tab. Here you will find a group called “Sample Mode” and in it you need to select the “Slide Mode” item.
After the presentation template is selected, right-click on the first slide in a reduced view in the left line. Click the “Background Format” item in the dialog box that opens.
The formatting window opens in front of you again and among the items open “Fill”. Here we should already put Fr. Your presentation page background will immediately change to the default texture.
In order to install a ready-made image offered by the presentation, select in the “Texture” item, through the arrow, what you need.
How to Make a Transparent Picture Background in PowerPoint
Many tools offer you to make the background of an image transparent. For example PhotoShop, or Pixlr Editor . But not everyone can use these tools, since many of them are paid.
But such a tool as PowerPoint is known to everyone, since it is included in the Word package and is installed by default. But not everyone knows that it can be used for this purpose.
Options for removing backgrounds in PowerPoint
Removing the background from an uploaded image
Often a situation arises when there is an image in jpeg format with an opaque background. But to perform any work, you need this particular picture without a background, saved in png format.
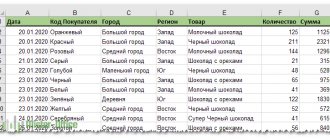
Uploading an image
Create a blank slide and upload an image. Of course, the easiest way to remove the background from a drawing is on a white background with sharp, specific outlines. That's why I chose a two-color pattern. To understand where the background is, a colored rectangle was placed under the drawing.
Preparing to remove the background
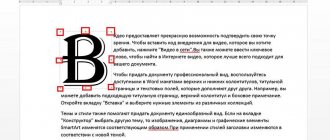
Go to the option – Picture format – Remove background.
The drawing itself must be highlighted
As soon as we click on the option – Remove background, the picture turns crimson. Please note that the drawing will be highlighted twice - with two frames: the first one limits the drawing itself.
The second frame is for highlighting the field - removing the background. If you need to remove the entire background, you need to combine both frames.
Selecting background areas
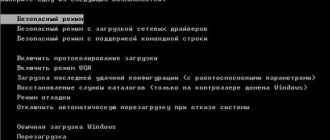
Let's pay attention to the four “buttons” of the editor. They are signed and clear.
Select the button – Mark areas for deletion. A pencil appears and leaves a “minus” mark. We carefully mark all areas for removal. Note the isolated areas. That is, areas cannot be skipped. Everything must be marked.
Now we mark the areas that should be left. To do this, use the button – Mark areas for saving. with a “plus” appears .
We also mark conservation areas very carefully. Including isolated ones.
We check everything carefully and click on the button - Save changes . The background is removed.
Saving an image
Now all that remains is to correctly save the finished image. Move the mouse to it and right-click. In the context menu that opens, select the option – Save as picture.
Check the image format - it must be saved in png format .
Remove the background from an image created in PowerPoint.
In this case, everything is very simple. You create some kind of drawing, move the mouse cursor to it and right-click. In the context menu, select – Save as picture. That is, we repeat the last step of the previous work.
As always, I offer you my newsletter – “Tools to help a beginning blogger.” By subscribing to which you will receive all the latest information about blog settings
Well, good luck with your work! If you have any questions or suggestions, write in the comments. If the information was useful to you, share it with your friends on social networks