ASUS, a well-known manufacturer of computer components, tries to release stable BIOS versions for its motherboards that have all the necessary functions.
However, from time to time new features are added to motherboards or bugs are discovered. In this situation, updating the BIOS may allow the user to install additional hardware or improve the stability of the PC.
How to update the BIOS on an Asus motherboard
BIOS and BIOS/UEFI
BIOS is a program stored on a special chip in the PC. The BIOS initializes the central processor, video card and other devices when the computer is turned on, transferring control to the operating system bootloader.
Today there are two types of BIOS - “regular” (old) BIOS and BIOS/UEFI. The vast majority of modern motherboards carry on board BIOS/UEFI - an improved data exchange system between PC components, expanding its functionality and speeding up startup.
Regular BIOS
BIOS version American Megatrends, Inc.
BIOS/UEFI
BIOS UEFI on ASUS motherboard
Reference! Modern PCs with a UEFI chip more often require a BIOS update to correct its shortcomings and protect against viruses due to the greater openness of this interface.
The process of modifying BIOS/UEFI on ASUS boards is usually the same for all boards from this manufacturer, however, each board may have its own, slightly different interface.
In what cases is BIOS modification required?
BIOS modification
Until recently, updating the BIOS was a rather difficult and unsafe undertaking. The update process was sometimes interrupted, resulting in a non-functional PC for the user.
It was only possible to return the board to operation after an unsuccessful flashing using a BIOS programmer in a service workshop.
Today, board vendors have greatly simplified this process by introducing additional checks and minimizing the risk of BIOS modification errors.
However, due to the possible risks, it makes sense to modify the BIOS only if it is really necessary to improve system stability, resolve issues of incompatibility of PC components, or open up new board capabilities.
Modifying the BIOS without a specific purpose will not improve the functioning of your PC or speed it up.
Updated BIOS
Reference! Information about changes in new BIOS revisions for a specific board model can be found on the website of its manufacturer.
We recommend reading:
Xakep #257. Pivoting
- Contents of the issue
- Subscription to "Hacker"
Yesterday, Kaspersky Lab experts said that Asus had become a victim of the ShadowHammer malicious campaign. Unknown attackers compromised the manufacturer, managed to gain a foothold in the network and began distributing backdoors through the ASUS Live Update tool pre-installed on Asus devices. The conclusions of Kaspersky Lab analysts were confirmed by their colleagues from Symantec.
Experts warned that the attack took place between June and November 2018 (that is, hackers controlled ASUS Live Update for about six months) and in total could have sunk more than a million devices around the world, although the initial target of the attackers was a relatively small pool of users. The attackers “identified” their victims by a list of MAC addresses embedded in the compromised utility (researchers discovered more than 600 such hashes).
At the same time, Asus representatives remained silent. In addition, it turned out that initially the manufacturer completely denied the fact that its servers had been compromised, tried to force Kaspersky Lab employees to sign a non-disclosure agreement, and then practically stopped maintaining contact with specialists.
Since the incident became known to the whole world yesterday, Asus representatives were forced to issue an official press release, which turned out to be somewhat strange. Thus, the company announced the release of ASUS Live Update version 3.6.8, which contains fixes (that is, closing the “hole” through which hackers delivered backdoors to user machines). However, it is not entirely clear whether the update removes all traces of the presence of the infected version from the system. It is also unclear whether installing version 3.6.8 is enough for all victims, or whether it’s time for users who were on the attackers’ list of targets to drop everything and at least reinstall the OS.
To prevent similar incidents in the future, the utility’s security mechanisms have been improved, and end-to-end encryption has also appeared. In addition, Asus claims that it has updated and improved the entire architecture with which end users “communicate” with the company’s servers.
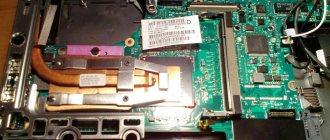
The document also states that the attack that occurred was not that large-scale: the attackers were allegedly interested in a very small and specific group of users, and the malicious code penetrated an extremely small number of devices. Moreover, the manufacturer claims that only laptop owners were affected. Representatives of Asus do not give any specific figures, although the company, unlike researchers, has access to all the necessary logs, and the company learned about the problem two months ago.
Finally, it is worth noting that Kaspersky Lab is not mentioned at all in the Asus press release. Instead, the document is accompanied by a link to a FireEye report that outlines the activities of APT groups that are in no way related to this incident.
Unfortunately, this is not the first time Asus has been caught with lax security measures. Thus, the US Federal Trade Commission has already sued Asus, and in 2020 the parties reached an agreement according to which independent auditors will regularly check the company’s security over the next 20 years. However, then we were talking only about the division developing home routers.
What to do before updating
Security measures when modifying BIOS/UEFI:
- It is important to protect your PC from power outage during the BIOS update process, because... this may cause it to fail. It is highly undesirable to update while repairing a local power line or during a lightning storm.
- When updating the BIOS, it is advisable to connect the PC to an uninterruptible power supply (UPS) to avoid power surges or power outages. When updating the BIOS of a laptop, you should fully charge its battery, and connect the laptop itself to a 220V power source.
We connect the PC to an uninterruptible power supply (UPS) to avoid power surges
- When flashing the BIOS, all its settings will be deleted, so before flashing it is recommended to record additional changes made by the user in the BIOS.
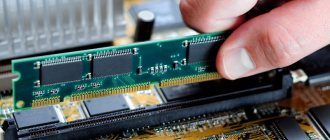
- The USB flash drive with the BIOS file must be connected to the USB ports located directly on the PC motherboard, and not (for example) to the ports on its front panel. This will increase the likelihood of normal reading and writing of the firmware.
The USB flash drive with the BIOS file must be connected to the USB ports located on the PC motherboard
- It is advisable to use a USB drive with a capacity of no more than 2 GB, because... The BIOS often does not “see” larger flash drives. The drive must be formatted to the FAT32 file system format, and its volume label cleared, because. Some BIOS versions do not read it.
- Downloading a modified version of the BIOS should only be done on the motherboard manufacturer’s website and only in the category of its specific model. This will avoid BIOS installation errors and downloading a virus-infected file.
Creating a Backup
To prevent problems during the update, you need to play it safe and save the current firmware so that in case of problems you can roll back:
- Download the Universal BIOS Backup ToolKit application . Be sure to run the program with administrator rights .
- Now the program should find out the Bios version by clicking the Read . After determining the necessary information, select Backup and in the window that opens, specify the path to save the copy.
- When the message “ Save BIOS finished ” appears, we can assume that everything was successful and the backup copy was created. This is the file that should be used for recovery.
The best online services for checking your microphone and webcam
Downloading BIOS from ASUS website
Before downloading the BIOS, you need to find out its current version on your PC in order to download a newer update (which has a higher number than the current version).
Step 1. Press “Win+R”.
Press “Win+R”
Step 2: Type the command “msinfo32” and press Enter.
We write the command “msinfo32” and press Enter
Step 3. View the BIOS version on the PC board (in the example it is version 2003).
We look at the BIOS version on the PC board in “System Information”
Step 4. Go to: https://www.asus.com/ru/support/, enter the name of your motherboard model in the search bar and click on its name in the list.
Go to the address, enter the name of your motherboard model in the search bar and select its name
Step 5. Click “Drivers and Utilities” and select the OS version.
Click "Drivers and Utilities"
Selecting the OS version
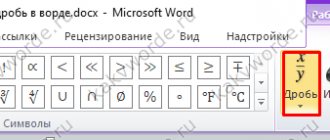
Step 6. Select the “BIOS” category and click on its new available version (in this case it is version 2104). Click "Global" to download.
Click “Global” to download
Note! You can find the file you downloaded to your PC by clicking Settings and selecting Downloads in your browser.
Find the file downloaded to your PC by clicking “Settings” and selecting “Downloads” in the browser
Step 7. Unpack the downloaded file from the archive by double-clicking on it with the mouse and dragging it from the archive window to any suitable folder.
Unpack the downloaded file from the archive
Determining the current version
You can find out the BIOS version in Windows 7, 8 or 10 operating systems as follows:
- Run dialog box through the Start menu or by pressing the Win + R . Then enter msinfo32 .
- A window called " System Information " will open. BIOS Version item contains information about the manufacturer of the motherboard and data about the firmware with the release date. Using this data, you should find the model of the installed motherboard on the manufacturer’s official website and look at the latest BIOS versions available for it. If the version matches the one installed on the computer (PC), then updating the BIOS of the ASUS motherboard is not required.
Preparing a USB Flash Drive
Step 1. Insert the USB drive into the USB port of the motherboard.
Insert the USB drive into the USB port of the motherboard
Important! Formatting a USB storage device will erase all data on it. If there is important data on the drive, you must copy it to another medium in advance.
Step 2: Click the mouse to open the “Computer” folder on the main PC screen.
Open “My Computer”
Step 3. Right-click on the USB drive and select “Format” with the left mouse button.
Right-click on the USB drive and select “Format”
Step 4. In the “File system” item, select “FAT32”, erase the disk name in the “Volume Label” and click “Start”.
Click “Start”
Step 5. Copy the extracted BIOS file to a USB drive.
Copy the unpacked BIOS file to a USB drive
Reference! You can create a backup copy of the BIOS you are updating so that you can restore it if the BIOS modification fails.
To do this, you need to format two USB drives at once, repeating the steps in this section for each of them.
Flashing BIOS using ASUS EZ Flash
Step 1. Insert one (or two, if a copy of the BIOS is required) USB drive into the USB port.
Insert the USB drive into the USB port of the motherboard
Step 2. Restart the PC and press Del, Esc, F2 (or F1+Fn) on the keyboard to enter the BIOS.
Reference! The key to enter the BIOS can be found in the PC boot menu or in its operating instructions.
Step 3. In ASUS BIOS Utility, press F7 to enter advanced mode.
In ASUS BIOS Utility, press F7 to enter advanced mode
Note! At the top of the BIOS screen you can also see its version.
Step 4. Go to the “Service” item.
Go to the “Service” item
Step 5. Open the ASUS EZ Flash 2 (or Flash 3) firmware utility.
Open the ASUS EZ Flash 2 firmware utility
Step 6. Click on the left side of the utility window on the empty USB drive. Press the F2 key to create a BIOS backup copy on disk (you can skip this step).
Press the F2 key to create a BIOS backup copy on disk
Step 7. Click on the left side of the window on the USB drive with the BIOS file. On the right side of the “Folder Information” window is information about the firmware file.
Click on the left in the window on the USB drive with the BIOS file
Step 8. Click on the firmware file.
Click on the firmware file
Step 9. When asked about reading the file, answer “OK”.
When asked about reading the file, answer “OK”
Step 10. After 10-20 seconds, the utility will prompt you to apply the BIOS update. Click "OK".
Click “OK”
The BIOS update process will begin, usually taking about 2 minutes.
Important! Do not interrupt the BIOS update until the process is completed!
BIOS update process
Step 11. Click “OK” after the update process is completed.
Click “OK” after the update process is completed
Reference! If the BIOS modification fails for some reason, insert a USB drive with a spare copy of the BIOS into the USB port and follow Steps 2-11 (except Step 6) to restore it.
Firmware from Windows
You can also flash ASUS BIOS firmware from Windows.
To do this, use special programs that can be downloaded for free. Connecting a second monitor to a computer
ASUS WinFlash
In the ASUS WinFlash update utility, follow these steps:
- Download and open the application.
- Select “ Next ” and in the next window you will have to choose how to download the update. In the first case, the program itself will search for the driver on the manufacturer’s website. In the second, you will need to specify the path to the pre-downloaded firmware file. The file must be on a portable storage device .
- After selecting the flash drive, you need to select the “ Update ” button and the program will begin flashing the Asus BIOS firmware. The update will continue for some time, it is advisable not to interact with the PC during this time.
- Exit key will become active ; you need to select it, after which the PC will reboot. After turning it on, you need to check the BIOS version.
ASUSUpdate
In ASUSUpdate you need to do the following:
- Open the application and select the “ Check BIOS Information ” function. After pressing the “ Next ” button, information about the BIOS will appear.
- To save a backup copy, use the “ Save current BIOS to file ” action.
- To update, you need to use a task from the list called “ Update BIOS from file ”. In the window that appears, specify the previously downloaded update files and click “ OK ”.
- After installation, you must agree to restart your computer and complete the installation.
Flashing BIOS using ASUS Easy Flash
Step 1. Restart the PC and press Del, Esc, F2 (or F1+Fn) on the keyboard to enter the BIOS.
Reboot the PC and press Del, Esc, F2 (or F1+Fn) on the keyboard to enter the BIOS
Step 2. Use the keyboard arrows to navigate to the “Advanced” item, select “Start Easy Flash” and press Enter on the keyboard.
Go to “Advanced”, select “Start Easy Flash” and press Enter
Step 3. Select the USB drive in the left window using the arrows and press Enter.
Select the USB drive and press Enter
Step 4. Use the arrow to move to the right window, select the BIOS update file and press Enter.
Select the BIOS update file and press Enter
Step 5. Select Yes with the arrows and press Enter.
Select Yes and press Enter
The BIOS modification process will begin.
BIOS modification process
After modifying the BIOS/UEFI, reboot the PC and go to the BIOS menu again to make sure that the update has been applied, as well as make the necessary settings.
The BIOS update procedure is now complete.