How to configure the Tenda Wireless N150 and N300 router (N3, W316R, W308R, N304, W150D, W368R, W268R)
Chinese Tenda wireless routers and ADSL modems today are budget, economy-class devices. These routers are designed according to the principle of reasonable sufficiency. If in Russian, then “cheap and cheerful.” Therefore, there is no need to expect record speeds and hurricane performance from them. Inexpensive chips and small amounts of RAM will not allow you to support a large load. Yes, this is not their path. These are home dwellers, and they live in the apartments of unassuming users who need a router to connect a smartphone or laptop via WiFi, and from a computer connected via cable, users crawl the Internet, read news, visit social networks and sometimes download music and movies via torrents .
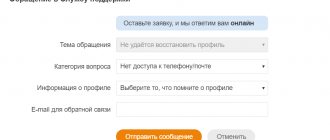
The IP address of a Tenda router of any model (N3, W316R, W368R, etc.) on the local network is 192.168.0.1, the access login is admin , the standard password is admin . The start page of the web interface looks like this:
In terms of basic setup, Tenda routers are probably the simplest. All you need to configure your Internet connection is to select the desired method and enter the required data. By the way, by default the wireless module is already enabled and the security standard is set to WPA2-PSK AES&TKIP encryption . So to set up a WiFi network, you just need to specify the password for the WiFi wireless network at the bottom of the window in the Wireless Password .
I will give examples for the most popular Russian telecom operators.
What router models does Tenda produce?
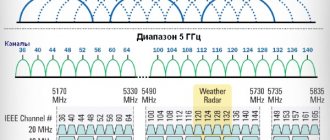
On the manufacturer’s official website, routers are located in the “Routers” tab and in the ADSL/VDSL/GPON section. The routers contain 4 new generation devices of the AC line with gigabyte WAN and LAN ports, which provide data transfer speeds of up to 1300 MB/s. They operate in two bands - 2.4 and 5 GHz.
Four router models in the “Routers” section on the Tenda website support two frequency bands
The second mentioned section contains routers that operate using old ADSL technology (models D151, D301, D305) and via a GPON connection (model G103).
Tenda routers support different connection technologies: ADSL, GPON and others
In hardware stores you can also find outdated models, for example, Tenda N3, N300, F300, AC9, AP4, and others. Their transfer speed is already lower - up to 300 MB/s. In addition, they do not support all types of connections. But the plus is that they are cheaper.
The Tenda N300 router is white and has two antennas
Video: review of the Tenda F3 N300 router
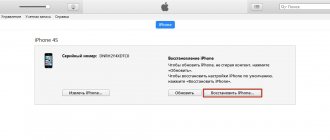
Setting up PPPoE on a Tenda router for Rostelecom, TTK and Dom.RU
In the Access Method , check the ADSL Dial-up :
It’s strange why the Chinese engineers of Tenda called the PPPoE connection that way?! I’m afraid they won’t be able to answer this themselves. Oh well, it's not that important.
Access Account field, enter the login to connect to the operator’s network, and in the Access Password , respectively, the password. This data is issued upon connection, along with the service agreement.
Video tutorial on setting up a Tenda router for Rostelecom using the N3 model as an example:
TENDA AC18
The model supports the 6th generation of the 802.11ac standard. This is one of the best Wi-Fi routers released by Tenda. The device guarantees signal speed. It has a lot of useful functions. Thanks to this, the user will be able to enjoy online games and comfortably watch streaming videos in resolutions up to 4K.
Overview of key benefits:
1. A dual-core processor and 250 megabytes of RAM are responsible for performance. The router is dual-band (2.4/5 gigahertz): in total, this allows you to transfer almost two gigabits of data per second via Wi-Fi. Over a wire, it is capable of transmitting a thousand gigabits of information in an instant. 2. Thanks to powerful antennas and signal amplification technology, the network coverage area is over 500 square meters. At the same time, there is no significant reduction in speed, even if many devices are connected, and there are no “dead” zones either.
3. AC18 supports Iptv for watching TV, VPN for remote network access, WPS - a button to activate security settings with one click.
Setting up VPN L2TP on Tenda for Beeline:
This is the most difficult option, because it essentially implies two connections - Dynamic IP plus an L2TP VPN tunnel. To configure the Tenda router for Beeline, check the L2TP in the Access Method :
In the L2TP Server address , enter the Beeline server address - tp.internet.beeline.ru. In the Username , enter your login (in the case of Beeline, this is usually your personal account number), and in the Password , enter the password given to you upon concluding the agreement.
Well, then everything is simple. Make sure that the Address Mode list is set to Dynamic. We don't touch anything else here. At the very bottom of the window, in the “Wireless Password” field, enter the password that will be used to connect to your home wireless Wi-Fi network. Click OK.
Video instructions on how to set up a Tenda router to connect to Beeline:
Example 2:
Security Settings
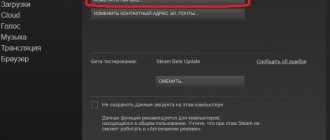
To make your Internet surfing not only comfortable, but also safe, pay attention to the “Security Settings” tab. If you uncheck the “Enable” column in the “WEB Remote Control” sub-item, no one except you will be able to access the router settings.
In addition, it is recommended to change the standard password in the corresponding subsection. The classic “admin” is universal for almost all routers, therefore it is known to everyone. Change it to your own option and protect your router.
How to set up WiFi (Wi-Fi) on Tenda routers:
The wireless Wi-Fi network on Tenda routers can be configured separately through advanced settings. To do this, log in via 192.168.0.1 admin/admin web configurator and click on the Advanced Settings in the upper right corner:
We get into the advanced parameters of the router. In the menu at the top, select Wireless Setting -> Wireless Basic Settings :
Here you can use the Working Mode to change the operating mode from Access Point (AP) to repeater mode (WDS Network Bridge).
Supported Wi-Fi module standards are selected in the Network Mode . Although, by default the most optimal option is set - 11 b/g/n mixed. In the Primary SSID , you can change the name of the wireless network to your own. The wireless channel used can be selected in the Channel , or left in the automatic “AutoSelect” mode, as in the figure.
In 99 cases out of 100, we do not recommend touching the remaining parameters at all. Click OK.
Let's go to the next section - Wireless Security :
In the Select SSID , select the previously created Wi-Fi network. Security Mode parameter is set to WPA2-PSK with an encryption mode of either AES or TKIP&AES . In the Key you can change the WiFi password. You can use any combination of Latin letters and numbers, but not shorter than 8 characters. Click OK to apply the configuration settings.
Setting up an Internet connection (WAN)
Check if you have connected the Internet to the router in the WAN port. This could be a cable from your Internet provider, or from a modem. I showed how to connect in the photo above.
The most important setting. We need to set the parameters so that the router can connect to the Internet. Otherwise, we will have a WI-FI network, but without access to the Internet.
Important! You need to know what type of Internet connection your Internet provider uses (Dynamic IP, Static IP, PPPoE, L2TP, PPTP). And the corresponding parameters that depend on the specific type of connection: login, password, server address. It would also be good to clarify whether there is a binding by MAC address.
If your provider uses the Dynamic IP (DHCP) connection type without binding to a MAC address, then the Internet through the router should work without configuration, since the DHCP connection type is the default.
If the provider binds by MAC address, then you can clone it in the settings on the “MAC Address Cloning” tab. Or call your provider and ask for a new MAC address. And dictate the router address.
You can immediately go to the section with setting up a Wi-Fi network.
Setting up PPPoE on Tenda N301
We do this:
- In the settings, you need to go to the “WAN connection setup” tab.
- In the drop-down menu "
- Specify the login and password that your Internet provider gives you.
- Address mode: Dynamic.
- Check if the “Connect automatically” option is selected.
Click Ok to save the settings.
If you have set all the parameters correctly, the router should connect to the Internet.
Setting up PPTP or L2TP
- Open the “WAN connection setup” tab.
- Select the connection type “PPTP/Russia PPTP”, or L2TP (depending on what type of connection your provider uses).
- Set "Server Address".
- Specify your login and password.
- Ok to save the settings.
It is important to understand! If you previously used a high-speed connection on your computer to connect to the Internet, you no longer need to do this. Now the router will do this. We have just configured this connection. The main thing is to do it right.
When the Internet is working through the router, you can proceed to setting up the Wi-Fi network.