Method 1: Installation Media Creation Tool
This is an official utility that will allow you to immediately create an installation image on the media. It may also be called “Microsoft Media Creation Tool”. This method is suitable for installation on an already licensed version 7, 8.1 or another 10 (if you want to change the bit depth). That is, you will, as it were, update the current OS to a new version. Therefore, when entering the license key, you can simply skip this step, and the system will be activated automatically from the old version of the OS. This method uses recording an ISO image from the “Professional” or “Home” version.
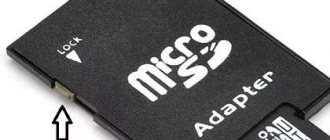
NOTE! You will need a flash drive with at least 8 GB in size. Also remember that all data will be deleted from it.
- Go to the official Win10 download page.
- Click “Download tools now”. We drop it anywhere, since the file is not large.
- Next, we launch this program. Wait while the application performs its preparation functions. We accept the agreement.
- Select the second option to create a bootable USB flash drive for Windows 10.
- Now you need to accept the default settings. Or you can change them by unchecking the bottom checkbox. For example, we change the language and bit depth. You can install: 64, 32, or install both versions at once.
- In the next step, we just need to select “USB device”. Once again, make sure that there is enough space on the flash drive, and remember that everything will be deleted from it.
- Now all that remains is to select the disk that will be turned into boot.
That's it, the process should begin immediately! At the very end you should see that the flash drive is ready for use. The installer works well with UEFI and Legacy (CSM). You can also use the same flash drive to restore the OS.
How to properly format and prepare a drive to create a bootable USB flash drive for Windows 10
To create a bootable flash drive, you will need a USB drive with a capacity of at least 8 GB, an image file and a working computer.
Even if the image weighs less than 4 GB (some stripped-down builds can be about 3 GB in size), its writing to a 4 GB flash drive was successful, installation and system recovery will be accompanied by unsolvable errors.
To correctly write all files to the drive, you must first format it:
- Open “This PC” and right-click on the flash drive icon to open the context menu. In it, select the “Format” item.
Using the context menu, select “Format”
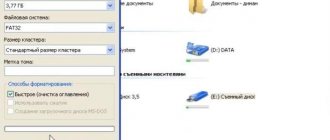
- In the formatting wizard that opens, change the settings:
- “File system” - FAT32 (default);
- “Distribution unit size” - “Standard cluster size”;
- “Volume label” - you can choose any name for your flash drive;
- “Quick (cleaning table of contents)” - check the box.
- Click the “Start” button to start the formatting process. Using quick formatting when preparing a boot disk
After the formatting process is completed (usually it lasts a few seconds), the flash drive is ready to write boot files.
Video: how to format a flash drive in Windows 10
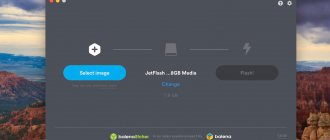
Method 2: UltraISO
- Download and install the program from the website. After launching the program, you will be asked to enter a license key, but you can also use the trial version.
- First, highlight the ISO image that you previously downloaded. After that, at the very top, click on “Boot” and then on writing the image to the hard drive.
- All you have to do is select a hard drive or flash drive in the “Disk Drive” line and click “Record”.
Completing the installation
At this point, the installation stage can be considered complete, all that remains is to make the final settings:
If the previous time you did not activate Windows, but clicked “Do it later,” repeat this action.
Region selection
Internet connection
A window should appear asking you to connect to the Internet, you can click no and go to the next step, or you can click “yes” and immediately select a wifi connection, if available.
Setting up your account settings
- If, as I said at the beginning of the article, you have saved your Microsoft account information, then when you connect to the Internet, simply log in using your password or login.
- If you do not have a Microsoft account, click on the “create account” button and fill out the required fields.
Save this data, they are used to log into Windows and will come in handy more than once.
We create a Microsoft account - this data will subsequently be used when logging in.
Method 3: Rufus
This is an excellent program that will allow you to create a bootable USB flash drive for Windows 7, 8 or 10 anywhere. Moreover, the application allows you to download the image if you do not have one yet. Downloading occurs from the official Microsoft server.
- We go to the website and download the program. After installation, or if you downloaded the portable version, just launch the program.
Using your ISO
- First, we indicate the device - that is, the flash drive to which the files will be downloaded. Next, click “Select” and select the ISO image that you downloaded earlier. Specify the disk type: GPT or MBR just below. After this, click “Start”.
Download ISO
But as I said at the very beginning, there is an opportunity to download an ISO file. For this:
- Select “Download” instead of “Select”.
- Now, in order, we first indicate the version of Windows, but since we need 10, we select it. Next is “Release” - it’s better to choose the newest one. Then “Edition”, which will have a “PRO” version. It remains to clarify the language and architecture.
NOTE! If you check the “Download using browser” checkbox, the file will be downloaded from the browser that is installed by default on the system. At the very end, you will need to save the image file to disk in order to use it further.
- At the very end, click “Download”.
Creating a Windows 10 image
It is worth creating an image of Windows when the user has just installed the system, all the necessary drivers and programs for work or entertainment, and configured the OS for himself.
Custom settings include:
- disabling unnecessary processes, services, Windows components;
- clearing the list of startup programs;
- destruction of pre-installed applications imposed by Microsoft;
- disabling multi-level tracking of user activity.
It is necessary to configure the OS so that the memory and speed of the PC, as well as Internet traffic and communication channel bandwidth, are not spent on things that the user simply does not need.
Creating a Windows 10 image using the OS Backup Wizard
The Windows backup tool has been known since the days of the “seven”:
- Click "Start" and enter the word "reserve" in the search bar of the Windows 10 main menu. Launch the backup tool.
Run Windows Backup and Restore
- Go to Windows 10 backup.
Follow the link to get started with the wizard
- Enter the OS image builder.
Click the "Create a system image" button to begin creating a Windows image
- Select an internal or removable drive (flash drive, memory card or network storage) to save the image of drive C with Windows 10.
Select the drive and folder where the C drive image will be placed
- Select the partition to be saved in the image. This can be either the system partition C or a partition with another version of Windows installed, for example, on the adjacent drive D. The Backup Wizard supports archiving a data disk without running versions of Windows on it.
You can also select a non-system partition for archiving.
- Click the archive button. The action may take several hours if the partition contains hundreds of gigabytes.
Using the wizard, you can save not only the disk partition with the OS, but also a troubleshooting tool for starting it.
Video: how to create a Windows 10 image using the Backup Wizard and restore the system using it
Creating a Windows 10 Image Using the Media Creation Tool
Download the Windows 10 update/installation program - Media Creation Tool - from the Microsoft website. Its difference from other tools is that it downloads a licensed image of Windows 10 from the Microsoft website, and does not use, like most third-party Windows installers, ready-made images and archive folders with the copy of Windows you need.
- Launch Windows 10 Media Creation Tool and select the option to burn an installation flash drive.
Select the option to burn an installation flash drive
- Accept the terms of the official agreement with Microsoft to use the program.
Agree to the terms of the program license agreement
- The Windows 10 image will begin downloading. Wait until it finishes.
Media Creation Tool will download the “tens” image from the Microsoft server
- Wait until the resulting Windows 10 image is scanned. If any errors are found, the ISO file will be downloaded again.
Media Creation Tool verifies the resulting Windows 10 image
- Wait until the Windows 10 image is written to the USB flash drive.
Do not remove the flash drive until recording is complete
- After finishing writing data to the flash drive, wait until the temporary data is deleted. Now you can remove the flash drive.
It’s more rational to load the system image onto a flash drive and then use it on all PCs that are within your reach and meet the “ten” requirements.
Creating a Windows 10 image using ImgBurn
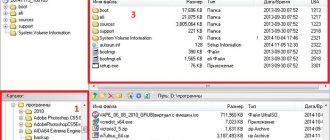
The ImgBurn application is much simpler than its counterparts. All program settings are limited to one main window. ImgBurn copies a Windows 10 image recorded using other applications to a USB flash drive:
- Start creating an image of the file structure of the Windows 10 installation flash drive.
Select to copy files and folders of the flash drive to an ISO file
- Click on the folder icon and select the source flash drive from which the Windows 10 system will be copied into the image, then give the command “Advanced settings” - “Boot disk”.
ImgBurn allows you to perform all actions in one window
- Using the Extract Boot Image tool, save the .ima file from the flash drive to any location on your disk, then specify the path to it. Without the IMA file, the copied Windows 10 image will not be bootable and will not be fully usable for burning other Windows 10 installation media.
- Click the "Copy folders to image" button at the bottom left of the application window.
All actions may take up to an hour. This depends on the speed of the PC and the condition of the hard drive to which the copy being created is transferred. The disadvantage of ImgBurn is that the system image size increases to 20 GB. This is comparable to the size of the C partition required to install Windows 10.
Video: How to copy Windows to an image using IMGBurn
Method 4: Without programs
The method is only suitable if the motherboard where you will be installing has support for EFI fast boot, without installation support for HDD and SDD drives. Or if you are doing a full installation with partitions wiped, then the hard drive is completely new.
- First of all, you need to prepare and format your flash drive in FAT32, since UEFI only works with this file system. Just right-click on the flash drive and select “Format”. Next, select FAT-32.
NOTE! Some new flash drives and hard drives cannot be formatted to FAT 32. Then use the methods I have presented below.
- You need to open the image so that all files are visible. This can also be done using a special program. But in the “top ten” itself, this can be done in the usual way: right-click and select “Connect”. Also, in other versions of Windows, some archivers allow you to do this.
- Next, we simply transfer all the contents to your flash drive.
Hurray, now the bootable USB flash drive is ready. Let me remind you that the UEFI boot system is supported by almost all modern motherboards. But still, I would have learned about this in advance from the documentation.
Creating a bootable Windows 10 USB flash drive without using additional programs
Windows OS has a full range of programs for creating a bootable USB flash drive. The only drawback is the lack of a high-quality interface: all actions require user participation, while in third-party utilities one click on a button is enough to get the result.
Through copying files
The easiest way to create a bootable USB flash drive is to copy the contents of the image to a USB drive. However, the quality of the information generated can be a problem. A flash drive is not always perceived by the computer as bootable due to some metadata that is recorded along with the files. Some other errors are also possible.
- Open the folder with the Windows image. Right-click on it and click “Connect”. This command will mount a virtual DVD drive and load the files from the image into it.
Using the “Connect” item we mount the image into a virtual drive
- Open the virtual drive, select all the files with the mouse or the Ctrl + A key combination, right-click on one of the files and select “Copy” in the context menu.
Select all files to copy
- Go to the section of the formatted flash drive, right-click on an empty space in the window and select “Paste”. You can also use the hotkey combination Ctrl + V.
The “Insert” item in the context menu transfers files to a flash drive
- We wait until the files are written to the flash drive (the time depends on the amount of data and the drive itself), after which the device can be called bootable.
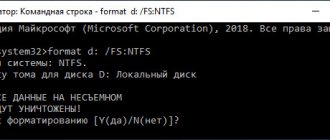
Using the Command Line
Creating a bootable USB flash drive using the Command Line is a very labor-intensive process that requires the user’s attention:
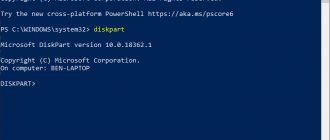
- Open the Command Line tool. To do this, press the Win + R key combination, enter the CMD command and click “OK”.
Launch Command Prompt using the Run window
- Enter the command diskpart and press Enter. This command launched a utility for working with disk partitions.
Launch the program for working with disks
- Enter the list disk command to display a list of connected disks. Based on the size of the partition, we determine which ID the flash drive has in order to work with it.
In the list of files we find the flash drive
- We write a command to work with a specific disk: select disk 1, where 1 is the ID of the flash drive (in your case the number may be different).
The select disk command allows you to work with one disk
- Enter the clean command to quickly format the flash drive. If you have formatted in advance using the method described above, then proceed to the next step in the instructions.
- Enter the create partition primary command to create a primary partition.
Using the create partition primary command, we create a primary partition on the drive
- Using the following commands, select the created partition and make it active:
- select partition 1;
- active.
Use the select partition and active commands to make the partition active
- We format the newly created section. Enter the command format fs=FAT32 and wait for the process to complete.
We format the partition after creation with the command format fs=FAT32
- Next, use the assign letter=T command to assign a name to the section. You can choose any letter, but you should not take one that is used by another section. It is important to remember the name as it will be used below.
The assign letter=(letter) command assigns a name to the section
- This completes the work with the diskpart utility, so we finish its work with the exit command.
This completes the preparatory work for creating a bootable flash drive. All that remains is to copy the data from the mounted image to the drive using the Command Line. Enter two commands:
- bootsect /nt60 T:, where the letter T is the name of the partition you created on the flash drive;
- xcopy G:\*.* T:\ /E /F /H, where the letter G is the virtual drive on which the Windows image is mounted, T is the name of the flash drive section, and the remaining letters are the command attributes.
The second command will start the copying process. Be sure to wait until the procedure is completed; it may take some time. The completion of copying will be indicated by the line “Copied files: …”.
We wait until all files are copied to the flash drive.
Video: how to create a bootable USB flash drive using the Command Line
Method 5: WinSetupFromUSB and multiboot flash drive
One of the best programs for creating bootable disks and flash drives. Because in addition to one image, you can create different ones. A particularly useful thing for system administrators when you need to have several boot images on one flash drive: Windows 7, XP, 8, 10, as well as Linux.
- The program can be downloaded from here – www.winsetupfromusb.com.
- If you are creating a boot disk from scratch, then you must set the formatting options. To do this, click on the “Auto Format it with FBinst” checkbox. Next you need to select two types:
- FAT32 – for UEFI on GPT disk.
- NTFS - for Legacy.
- Below, select the image from the corresponding “Add to USB Disk” item. Since we need to make a Windows 10 installation flash drive, we indicate the second line. Now, you need to select your previously downloaded ISO image.
- Click "GO".
As I said earlier, you can make multiple download files. If you need to add another image to this bootable USB flash drive (for example, Windows 7 or Linux). Then we do all the same steps, but exclude the formatting step.
Burn Windows 10 bootable disc from ISO
Starting with Windows 7, you can burn an ISO image to a DVD without using third-party software, and I'll show you this method first. Then I will give examples of recording using specialized programs for burning discs.
Note: one of the common mistakes of novice users is that they burn the ISO image to disk as a regular file, i.e. the result is a CD that contains some kind of file with an ISO extension. It’s wrong to do this: if you need a Windows 10 boot disk, then you need to write exactly the contents of the disk image - “unpack” the ISO image onto a DVD disc.
To burn the downloaded ISO, in Windows 7, 8.1 and Windows 10 with the built-in disk image burner, you can right-click on the ISO file and select “Burn disk image”.
A simple utility will open in which you can specify the drive (if you have several) and click “Burn”.
After this, all you have to do is wait for the disk image to be written. At the end of the process, you will receive a Windows 10 boot disk ready to use (an easy way to boot from such a disk is described in the article How to enter the Boot Menu on a computer or laptop).
Method 6: Windows USB/DVD Download Tool
Another official program, although at one time it was created to quickly create a bootable disk or flash drive specifically in Windows 7. But it can also be used for Win10.
- The program can be downloaded from here.
- Choosing an image.
- You need to press the USB button to write Windows 10 to a flash drive.
- Select your flash drive or hard drive.
- We are waiting for the process to finish.
Downloading the distribution
After the release of Windows 10, Microsoft abandoned the development of new versions of the operating system. Instead, a new assembly of components is released every six months. It is available to users in the form of updates or a ready-to-install distribution.
Open the section on the official Microsoft software download page. Click the button shown in the screenshot.
We agree to download the installation media creation tool to your computer. The number in the file name indicates the distribution version number. Today, the current version is 1809 or October 2020 Update.
Minor installation details
Now you know how to make a bootable USB flash drive with Windows 10. But when installing the OS, some nuances may arise and you need to be prepared for them in advance. Therefore, I advise you to read my advice.
- During installation, simply reboot or turn on the computer (laptop). It is better to use the BOOT Menu or boot menu. Different BIOS versions use different buttons to start. Most often this is: F11, F12, Esc or F. We look at your model in the table below.
- By the way, the installation can be done not through the BIOS, but in the installed Windows. True, the version should be either 7 or XP. To do this, simply open the flash drive and click on “setup.exe”. In other versions, everything is done through the BIOS.
- It happens that when you boot into the BOOT MENU you see two boot disk partitions. For a GPT disk, you need to select one labeled UEFI or EFI. If you are installing on an MBR disk, then unmarked.
Burn a Windows 10 image to disk using other applications
There are almost a dozen programs that allow you to burn a USB flash drive with Windows 10 - these are UltraISO, Daemon Tools, Alcohol and Nero applications, CDBurnerXP (works not only with Windows XP), Astroburn, etc.
Burning a Windows 10 installation flash drive using the Media Creation Tool
Unlike downloading a Windows 10 build from torrent trackers and using third-party programs, Media Creation Tool stores the downloaded image in the user's temporary files on drive C. Once it is written, MCT will delete these files before restarting the computer.
The image will be saved only on a flash drive. You can get it from there in several ways:
- extract using ImgBurn or similar programs (together with an IMA loader);
- copy it from a flash drive and reuse it when burning other installation flash drives and disks with Windows 10 (if it was copied as an ISO, and not in the form of folders with files).
From the above it follows that downloading an ISO file and burning a Windows 10 installation flash drive in the Media Creation Tool are inseparable. To burn the image to media, use the instructions described above.
Video: How to create a bootable USB flash drive with Windows 10 in Media Creation Tool
Using the built-in wizard for burning a Windows 10 image to DVD
ISO files opened in Windows without the help of any third-party utilities have a “Burn disc image” command in the context menu of Windows Vista/7/8/8.1/10/10.1.
Select "Burn disc image" in the context menu of the image file
Select your DVD drive, insert the DVD, and click the Burn button. If you are not sure about the image, it was taken from an unknown source, for example, use a rewritable DVD-RW and the “Check disc after burning” function.
Use the Check Disk feature if the ISO image is questionable
The burning wizard will create a boot record that allows your PC to jump straight into Windows 10 setup when starting from the CD.
To write a Windows 10 image to a flash drive or external SSD/HDD drive, you need a virtual (mounted using the program) DVD drive. This is a section of a hard drive or flash drive (or the flash drive itself) that has the functions of a DVD. This technology was previously used in games that did not want to work without a disk: clone loaders were transferred to partition D or E, working like a real DVD drive.
When burning an ISO image, carelessly or in a hurry, you can make serious mistakes that will disrupt the installation in the middle of the process. Problems can also arise in an already installed OS. For example, errors like 0x1234567, “Windows needs file 12345.dll, click search button,” “Application X crashed,” etc., jeopardizing the user experience. If such an image was recorded on a disposable disc (DVD-R), then the media becomes useless, because it will no longer be possible to erase the faulty copy of Windows and write a new one.
The Wizard for burning ISO images to disk allows you not only to create a Windows installation disk, but also to make any program packaged in ISO format self-launch.
Burning an installation flash drive using Ultra ISO
UltraISO is a popular tool for burning installation flash drives. Compared to the Windows Image Burner, it does not require virtual DVDs, like any third-party program. Before burning a Windows 10 image, transfer the most valuable files from the flash drive.
- Download, install (if the version is not portable) and run UltraISO. Give the command “File” - “Open” and select the previously downloaded Windows 10 ISO image.
Select an ISO image that you already have
- The contents of the ISO will be unpacked as a list of Windows 10 build files and folders. Give the command “Boot” - “Burn hard disk image”.
Select "Burn hard disk image"
- Specify your flash drive as the disk and click the start recording button, confirm the action.
UltraISO asks for confirmation, because all data from the media will be erased
The UltraISO application, like its analogues, records data for up to several tens of minutes. The Windows 10 image is quite large (from 3 GB, not counting the auxiliary files of the bootloader itself, which are also written there), and the writing speed depends on the speed characteristics of the flash drive, the wear of its memory and the version of the USB hardware interface.
The use of a USB 3.1 interface in the PC, the flash drive’s support for its bandwidth and the excellent condition of the media will speed up recording as much as possible.
Video: how to create a bootable USB flash drive with Windows 10 using UltraISO
Burning Windows 10 to a USB flash drive using Daemon Tools
Download and install this application, insert the flash drive into the USB port. Daemon Tools will display the free space and total memory on the flash drive.
- Select the Windows 10 ISO image (browse button).
Daemon Tools has reduced all necessary settings to a minimum
- Check the option to rewrite MBR boot header. This will allow the PC to immediately launch the Windows 10 Setupper without using the ancient method of launching from the MS-DOS command line and additional add-ons for third-party DOS loaders.
- Select formatting to NTFS - the most progressive format for any disk. Assign a name to the flash drive and click the “Start” button.
Preparing a flash drive and recording a Windows 10 image will generally take the same amount of time as copying takes in the vast majority of Daemon Tools analogues.
Burn Windows 10 to DVD using Alcohol 120%
The Alcohol 120% program, unfortunately, cannot work directly with flash drives. The recording will be indirect: Windows 10 files will be sent from the image to a partition marked as a virtual CD, and then copied to a flash drive, like the user’s personal files to any media.
- Download, install (you will need to restart your PC to install drivers that support virtual DVD drives) and run Alcohol 120%. Open the Disk Burner.
Select the disk image burner in Alcohol 120%
- Select the Windows 10 image and pre-mounted virtual DVD drive.
The drive must be either real or imaginary (device image on PC disk)
- Confirm that you want to start burning the image to disk. If this is a partition on a PC disk, its contents can simply be copied to a flash drive.
Confirm that the image has been mounted and written to disk
- Make sure the desired real (or virtual) drive is checked and click the start recording button.
Press the start recording button for Alcohol 120% to start recording
The Windows 10 image will be burned. Burning images of other versions of Windows based on an ISO image, for example 7, is no different from burning a Windows 10 image.
Alcohol 120% will report the completion of burning the Windows 10 image to disk
After finishing recording, insert the USB flash drive and copy to it all the files that are in the PC disk partition with the virtual drive. If your drive is real and the disc has been inserted, the Windows 10 image will be written to it immediately. Restart your PC and begin installing Windows 10.
Video: how to work with Windows images in Alcohol 120% (using Windows 7 as an example)
Using Alcohol 52% to burn Windows 10 to disk
The difference between Alcohol 52% and Alcohol 120% is the lack of functionality for recording real DVDs. Using this program, you can burn the image to a virtual DVD, from where you can still copy Windows 10 files to a flash drive or external HDD/SSD drive.
- Download, install (you may need to restart Windows) and run Alcohol 52%.
Click on the “Create Images” button
- Click on the "Create Images" link and select the virtual DVD drive, enter the drive name and specify the location of the Windows 10 ISO image.
Select the disk, image and name of the distribution to be created
- Click the "Start" button. The image will be written to a virtual disk.
After this, you can copy the resulting files to a flash drive. Alcohol 52% also created a boot record: without it, the external drive would not have allowed the PC to start from it.
Working with Windows 10 disks and flash drives in Astroburn
Working with the Astroburn Lite application is similar to working with its analogues:
- Download and launch Astroburn Lite, give the command “Image” - “Browse Disk” and add the Windows 10 ISO image.
Paste the location of the Windows 10 ISO file into the search bar
- Press the disk/flash drive cleanup button.
All data from the flash drive or disk will be deleted, so copy it in advance
- Close the notification that the disk/flash drive was successfully erased. It will appear 10 seconds after formatting the flash drive or 30–40 seconds after cleaning the DVD.
Close the notification about erasing files from the media
- Click the button to start burning the Windows 10 image to media. This may take from 15 minutes to an hour. The time depends on the speed of burning the disc (or writing files to a flash drive) and the parameters of the DVD drive and the disk itself (or the USB interface and the flash drive itself).
After clicking the start recording button, the Windows 10 image will begin copying to the media.
- Once the image has been recorded, Astroburn will notify you that it was successful.
The Windows 10 image was successfully copied to a disk or flash drive
You can now reinstall Windows 10 from burned media.
Burning a Windows 10 USB flash drive in the Nero application
Nero Burning ROM is an old product, popular even before the advent of Windows Vista, like Alcohol brand applications. Despite the fact that many people prefer to use flash drives, some prefer DVD CDs (including double-sided ones). Do the following:
- Download, install the Nero software package and launch the Nero Burning ROM application. Give the command “Recorder” - “Record image”.
Proceed to select the Windows 10 image to burn to Nero
- Select the Windows 10 image and speed 8x, o and “Finalize disc” (end burning the disc), click the “Burn” button.
Select the Windows 10 image and speed 8x, about and “Finalize disc” (finish burning the disc), click the “Burn” button
- Wait for the Windows 10 disc to finish burning.
Wait until the Windows 10 image is copied to the disk
- Close the Windows 10 recording report window.
View the Windows 10 DVD burning report
The Windows 10 disk is ready to install Windows 10 on your PC.
Video: how to create an image in Nero Burning ROM
Burn Windows 10 to a USB flash drive with CDBurnerXP
Despite its outdated name, CDBurnerXP also works with Windows 10 images:
- Download, install and launch CDBurnerXP. Select a tool to burn ISO images to disk.
Choose to burn the ISO image to disk
- Select the drive, image file, writing speed and option to check data after burning.
Select the drive, image file, writing speed, option to check data after burning and click “Burn disc”
- Click the "Burn Disc" button. Recording time is determined by the drive settings and disk speed and can take up to 40 minutes.
After finishing recording, proceed to setting the “tens”.
Content:
- What kind of flash drive do you need?
- Preparing to create a bootable USB flash drive
- Creating a bootable Windows 10 USB flash drive using official software
- Creating a bootable USB flash drive without using third-party software
- Creating a bootable USB flash drive using the UltraISO utility
Software developers have also caught on to new trends, so at the moment the easiest way to install Windows 10 is from a flash drive. This is due to the high installation speed, ease of use, and ease of creating a bootable USB flash drive.
Today we’ll tell you how you can quickly create a bootable USB flash drive with which you can install the necessary Windows 10.