Screenshot in OS Windows 10 from the keyboard method No. 1
Using the built-in capabilities of the OS greatly simplifies the process of saving pictures from the monitor, since there is no need to install additional programs. To take a screenshot, use a combination of function keys on the keyboard. The process will be as follows:
- Find the PrtSc and Ctrl buttons on the keyboard;
- Press them simultaneously (the operation saves the graphic object to the clipboard);
- Open the Paint or Word application;
- Press the key combination (while in the application) Ctrl + V on the keyboard (transfer data from the clipboard to the application);
- Go to the "File" menu;
- Find “Save as” in the list;
- Determine the image format and select the path for storage on disk.
Using the key combination PrtSc and Ctrl, take a snapshot of the entire screen, including the Start panel and tray. If you want to save data only from the active window (the area where important information is located), press Alt instead of Ctrl. In the future picture there will be no area with Start.
How to take a screenshot on a laptop
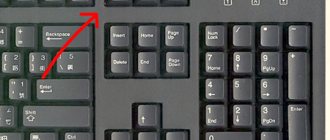
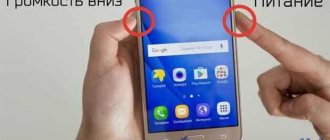
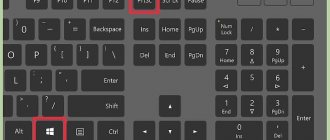
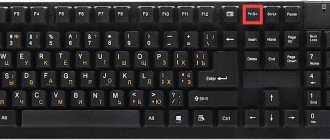
In principle, a laptop or a computer does not matter, nor does the model: Acer, Asus, Lenovo, Toshiba, and so on. Everywhere, and in all versions of Windows operating systems, you can take a screenshot using the “Print Screen” key. Don’t be upset if you don’t have a print screen on your laptop, it’s just called differently – PrtSc and you can find this button in the upper right corner. For a clear example, I give you 2 photos with keyboards with an arrow pointing to the button you need.
After you pressed the PrtSc , the screenshot was taken, but is still stored in the clipboard. If you reboot your laptop, the buffer will be consumed and your snapshot will be lost.
Screenshot in OS Windows 10 from the keyboard method No. 2
The first method is good when the resulting file needs a little modification - removing unnecessary things, adding signatures, etc. But there are times when you just need to save a screenshot of the screen without modifications. Then it is more convenient to use the key combination Win (graphically indicated by Windows windows) and PrtSc. Pressing them simultaneously will automatically save a screenshot of the monitor in the “Screenshots” service folder. It is located in the Quick Access menu in the Pictures folder. The resulting file can be edited in any graphic editor.
Built-in Windows Tools
The good thing about the Windows operating system is that developers try to make life as easy as possible for users and allow them to perform various actions using built-in tools without downloading separate programs. It doesn’t matter whether it’s a laptop or a desktop computer, and regardless of the device manufacturer, you can take a screenshot of a page in two ways: through the buttons on the keyboard or using a special application that is already in the system.
Keyboard screenshot
The first option that comes to the user’s mind when he needs to take a screenshot on a laptop or PC is to use a special key on the keyboard. It is called Prt Scr. If we are talking about a desktop PC, then you can get a print screen by simply clicking on the button indicated above. If the user has a desktop device in his hands, then he will need to press the key combination - Prt Scr and Fn . This option works on all versions of the operating system from Windows 7 to Windows 10.
Important! The image that the user took is saved to the clipboard, that is, it cannot be immediately found in the device’s memory. First you need to select a place where to insert the image. There can be several options: a World document, a Paint bitmap, an email.
The last option assumes that the user needs to open the browser, enter the mail and select the creation of a new letter, after which he must press “paste” in the work field or hold down the “Ctrl + V” key combination. If you add an image to a letter in this way, it cannot be extracted, since it will not be sent to the recipient in the form of an attachment. He will simply see it, but will not be able to somehow edit or save the original file.
The second option is to save the image in a text document or bitmap. In general, the principle of operation is the same. You should open the appropriate application - MS Word or Paint, create a new document and press “Ctrl + V”, and then save it in any convenient place on your device. The disadvantage of this method is that it requires a large number of steps and takes some time.
To simplify the task, in Windows 10 and earlier versions of the OS there is a key combination - “Win + Prt Scr”. After clicking it, the picture is automatically saved to the “Screenshots” folder at the address “This PC – Pictures”. Depending on the operating system, the location of the folder varies slightly, but you can find it in the system-provided folder with documents, photos, videos on the same local drive where the OS itself is installed.
Important! If you take a screenshot on a laptop this way, it will automatically be saved with PNG resolution. Then you can edit the picture - trim off the excess, compress it, or save it in a new format using photo editors. Even the simplest built-in Paint is suitable for this.
Another way to take a screenshot of the screen on a laptop, but at the same time capture only the open application, and not the entire screen, is to use the “Fn+Alt+Prt Scr” combination. Next, you need to save the image in the same way as described in the first case - in Word, letter or bitmap.
You can take a screenshot on a laptop without using a keyboard using the on-screen keyboard, the only caveat is that you will be able to capture the entire screen, and the area can be selected later in the image editor. The on-screen keyboard is located in the Start menu - All Programs - Accessibility. The disadvantage of this method is that even if the keyboard is reduced to its minimum size, it will still take up some area on the screen.
Scissors utility
What should you do if you need to take a screenshot on your laptop or computer, but for some reason it doesn’t work with the buttons, or the picture is not saved? In this case, the Windows 8 developers have provided another tool that allows you to take a picture not only of the entire screen, but also of a selected area. The tool is called “scissors” and is located in “Start-All Programs-Accessories”.
A small window will appear on the screen containing tips. All the user needs to do is select the selection type. This can be a rectangular or oval area, or arbitrary, then you can simply circle the required piece of any size. After selecting an area, the utility will automatically send it to the folder previously specified by the user, and if the save location has not been configured before, then when you close the utility, a window will appear asking you what format to save the file in and where to do it.
Screen area screen in OS Windows 10 from the keyboard method No. 3
The operating system from 2020 allows you to take a picture of any part of the screen. To do this, use the simultaneous pressing of the Win keys (Start button) + S + Shift from the keyboard (it is important to press the keys simultaneously, and not in a row). When a cross appears on the monitor, you need to use it to mark the boundaries of the area to be saved. The file has been created. All that remains is to paste it into Paint or another application by pressing Ctrl+V.
The Print Screen button doesn't work; I can't take a screenshot.
It happens that you need to save a copy of the screen to your computer's hard drive. This task can be completed without installing additional software on your computer. Windows operating systems already provide this functionality.
To create a copy of the screen, you must press the Print Screen button. Then paste a copy of the screen into any software product to process the image. If additional software is not installed, the image can be inserted into Paint or Word for further saving in the desired location.
In modern Windows operating systems, when you click the Print Screen button, screenshots are saved automatically. The images can be found in the following location: click on the “This PC” shortcut. In the left menu, select “Images” and go to the “Screenshots” folder. Or in the OneDrive folder > images > screenshots, with an active account and the OneDrive service enabled.
In Windows 10, there are more and more cases when the Print Screen key and the key combinations Win + Print Screen, CTRL + Print Screen, ALT + Print Screen, Win + Shift + S (with selection of the desired area) do not work. What is the reason? How can this problem be corrected? Let's figure it out.
One of the common problems lies in the running software. For example, some photo, video and game programs block buttons. As a result, the screenshot cannot be taken. In this case, try taking a screenshot after loading Windows 10 before launching programs. If it's really a software issue, then use third-party programs to capture the screen. This could be "Lightshot" to help you make a copy.
Make sure the keyboard is working properly. You can check it by connecting it to another device or using any online service to test the keyboard.
If the button does not respond in the online service, then the problems clearly lie in the information input device.
If the key presses are recorded, then proceed to the next step.
Check whether programs that block pressing the Print Screen button and their combinations are enabled. Often, video and photo processing programs block this tool in order to protect the interface of their programs from copying. If such programs are running, try exiting them.
OneDrive services may be disabled in your operating system.
On your computer, in the Start menu, find OneDrive and launch it. In the tray, right-click on the OneDrive icon. Go to the Options tab. In it, check the box “Automatically launch OneDrive when you log into your computer.” The problem should be fixed.
If none of the above helped, then restart your computer 
Using the Snipping Tool
The operating system has a built-in Snipping app. With its help, you can not only take a screenshot, but also edit it and save it in the desired format. Do this:
- Enter the query “scissors” into the Windows search bar and open the application;
- Select “Create” in the top menu;
- Designate conservation boundaries;
- Go to the "File" menu to save the file.
The Snipping Tool app is linked to the new Paint 3D (last button on the toolbar). If you need to make major edits to a graphic document, it is worth using.
Download and install Lightshot
Now let's look at the download and installation. As soon as you click on the download button, a download window should open. Save it to your desktop so it will be easier to find.
In the Google Chrome browser, saving looks like this
Click once with the left mouse button on the download file. A window will appear, click on Run.
And then click OK.
We accept the terms of the license agreement. Further.
We are waiting for it to install. On an average computer, loading can take up to 40 seconds.
On the next slide, it is very important to remove unnecessary checkmarks. So as not to install a lot of advertising software on your computer. Repeat after me.
The installation is now complete. Let's move on.
Using third party utilities
You can find many software tools for taking screenshots online.
But Shotnes and Lightshot are considered the simplest. It is better to download them from the official websites https://shotnes.com and https://app.prntscr.com/ru. Installation of utilities will be standard. It will take a few seconds. After installation, the laptop does not need to be rebooted; all software functions will be available. To take a screenshot using Shotnes, do this:
- Open the utility;
- Click on the button with the camera on the toolbar below;
- Select the boundaries of the area;
- Edit the file and save.
The presented software products are good because they have the function of automatically sending an object to the cloud, to a website, etc.
The utilities also allow you to perform simple file editing: changing colors, labels, arrows, etc. Both programs have a Russian-language interface. The choice of method for saving an exact copy of the screen or its area depends on both the purpose of the screenshot and the further actions with it. When seriously editing files, it is better to choose powerful graphic editors with a large list of capabilities, and save the image itself using built-in OS tools. But if the requirements for the screen are minimal, it is not rational to clog up the free space of your hard drive by installing unnecessary programs.
How to take a screenshot of the screen on a laptop using programs.
On the Internet you can find a huge number of programs for creating screenshots. Unlike standard Windows tools, they have more powerful functionality and allow you not only to take pictures, but also to immediately edit them, and often upload them to the authors’ servers to share them with friends and acquaintances.
Now we will look at just a couple of the most popular programs and the features of working with them.
Lightshot
The first and most popular and convenient program for screenshots is “Lightshot”, from the creators of the no less popular image hosting prnt.sc.
After downloading and installing the program, it will automatically be added to startup and its icon will appear in your tray.
Now she is always ready for “battle”, and to create a screen, you just need to press the “Prt Sc” key, and then select the required area by pressing the left mouse button.
You have selected an area of the screen, what to do next?
Let's look at the basic Lightshot settings.
- Cancel taking a screenshot.
- Save the photo to your laptop.
- Copy the resulting image for subsequent pasting into the same “Paint”.
- Upload your screenshot to the prnt.sc server and receive a short link to it, which you can immediately share with someone.
- Drawing panel, thanks to which you can make any notes.
This is how you can easily take pictures using the Lightshot program.
Snagit
“Snagit” is a fairly powerful software package that allows you not only to take screenshots, but also to immediately edit them and even shoot video from the screen of your laptop, but first things first.
After downloading and installing the program, its icon will appear in your tray and this means that when you press the “Prt Sc” key, you can select the area to create a screenshot.
To take a screenshot, click on the button under number one, to record a video in the highlighted area – number two.
By clicking on the camera icon, you will be taken to the built-in graphic editor, where you can edit your screenshot and then save it to the location you need.
It is worth noting that there are still a huge number of programs for creating screenshots, and the most popular today are:
- WinSnapr;
- PicPick;
- KSnapshot;
- Monosnap;
You can use any method that is most convenient for you, but if you need to create many good quality screenshots, it is better to use specialized programs.
Creating a “beautiful” screenshot: with arrows, captions, uneven edge trimming, etc.
Screenshot to screenshot - discord. It is much clearer to understand what you wanted to show on the screen when there is some kind of arrow on it, something needs to be underlined, signed, etc.
To do this, you need to additionally edit the screen. If you use a special built-in editor in one of the programs for creating screenshots, then this operation is not so routine; many typical tasks are performed literally in 1-2 mouse clicks!
Here I want to show with an example how you can make a “beautiful” screen with arrows, captions, and edge trimming.
All actions step by step:
I will use FastStone .
Link to description and download of the program:
1) After starting the program, select the area that we will screen. Then we select it, FastStone, by default, the picture should be opened in its “simple” editor (note: which has everything you need).
Capturing an area in FastStone
2) Next, click the “Drawing” button - Draw (if you have the English version, like me; it is installed by default).
Draw button
3) The drawing window that opens has everything you need:
- — the letter “A” allows you to insert various inscriptions on your screen. Convenient if you need to sign something;
- — “a circle with the number 1” will help you number each step or element of the screen. Required when you need to show step by step what to open or click on;
- - mega useful element! The “Arrows” button allows you to add various arrows to the screenshot (by the way, the color, shape of the arrows, thickness, etc. parameters can be easily changed and set to your taste);
- — “Pencil” element. Used for drawing an arbitrary area, lines, etc. Personally, I rarely use it, but in general, in some cases, it is an irreplaceable thing;
- — selecting an area into a rectangle. By the way, there is also an “ovals” selection tool on the toolbar;
- — filling a certain area with color;
- - it’s also a mega convenient thing! This tab contains typical standard elements: error, mouse cursor, advice, tooltip, etc. For example, on the preview of this article there is a question mark - made using this tool...
Drawing Tools - FastStone
Note! If you drew something unnecessary: just press the hot keys Ctrl+Z - and your last drawn element will be deleted.
4) And, lastly, to make jagged edges on the picture: click the Edge button - then adjust the “crop” size, and click “OK”. Then you can see what happens (example in the screenshot below: where to click, and how to get a trim :)).
5) All that remains is to save the resulting “beautiful” screen. Once you get the hang of it, it will take a couple of minutes to do everything...
Save results