Changing the MAC address using the Technitium MAC Address Changer program
Changing MAC using Technitium MAC Address Changer is a simple, fast and reliable way to change the MAC address of the Wi-Fi (Ethernet) network card of a laptop or computer .
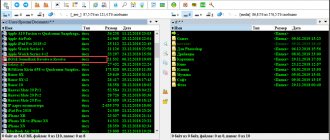
Interface of the Technitium MAC Address Changer program
To get started you need. Install the program from the downloaded distribution.
The program interface is in English. It is convenient to work in the program - the GUI is clear and simple. We only need two buttons to change the MAC ADDRESS. Other settings can be left unchanged.
Instructions for Technitium MAC Address Changer. Program version v.6
- Let's launch the program. At the top of the program we find the adapter whose MAC address needs to be changed. Place the cursor on it.
- Click the “Random MAC Address” button to generate a random MAC address.
- Next, click “Change Now!” The MAC address will change when the network adapter is restarted. There is usually no need to restart the computer. To return the original MAC address (set by the manufacturer), you must click the “Restore Original” button. This way you can change the MAC address and then quickly change it back.
How to change MAC address on Windows?
The method is the same for all versions of Windows, including Windows 10. It involves changing the MAC through Device Manager.
- Press Win + R. In the Run , type devmgmt.msc and press Enter .
- Device Manager will open. In the device tree, in the Network adapters , find your adapter.
- Right-click on the adapter name and select properties.
- Go to the Advanced and in the Property , select Network Address .
- Enter the address you need in the field that appears (you just need to enter 16 numbers and letters without colons: AA66330022EE).
Click OK. The adapter's MAC address will be changed until the next Windows reinstall.
How to change MAC addresses via Windows Device Manager and Driver?
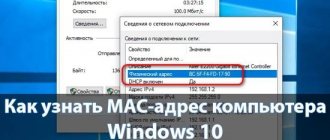
Appearance of the interface when changing MAC through Windows Device Manager
The next method is to change the MAC address of the network adapter using the driver interface using the Qualcomm Atheros wireless network adapter as an example.
Instructions
- Go to My Computer -> Device Manager -> Network Adapters -> Qualcomm Atheros Wireless Network Adapter.
- Right-click -> Properties -> Advanced -> Network Address. By default, there is no value field, so we enter ours - this is our future MAC address. You need to enter the necessary letters and numbers without spaces and hyphens (the letters are naturally English), a total of 12 characters (6-byte number). It is better to start the input (the first byte) with two digits 02 - this way there is a chance that the MAC will be saved without errors.
- Click OK and restart the computer (or turn the adapter on and off).
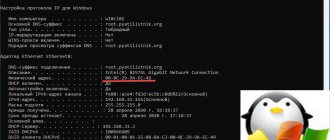
- We check whether the MAC has changed using the ipconfig /all command from the cmd console. You can find out the MAC address in other ways.
Appearance of the Windows command line interpreter after ipconfig /all
Changing the MAC Address in Windows Using Device Manager
Note: the first two digits of the specified
MAC address do not need to start with 0, but should end with 2, 6, A or E. Otherwise, the change may not work on some network cards.
To get started, launch the Windows 7 or Windows 8 (8.1) Device Manager. A quick way to do this is to press the Win+R keys on your keyboard and type devmgmt.msc
, then press the Enter key.
In Device Manager, open the “Network Adapters” section, right-click on the network card or Wi-Fi adapter whose MAC address you want to change and click “Properties”.
In the adapter properties window, select the “Advanced” tab and find the “Network Address” item and set its value. For the changes to take effect, you must either restart the computer or disable and enable the network adapter. The MAC address consists of 12 hexadecimal digits and must be specified without using colons or other punctuation marks.
Note: not all devices can do the above; for some of them, the “Network Address” item will not be on the “Advanced” tab.
In this case, you should use other methods. To check whether the changes have taken effect, you can use the ipconfig / all command (for more details, see the article about how to find out the MAC address).
How to change MAC address through Windows registry
Launching Windows Registry Editor
Any edit to the registry is a risk. There is a high risk that “something”, “somewhere” will go wrong. Therefore, be careful and careful when working with the Windows registry.
Instructions
- Launch the Windows registry editor – regedit with administrator rights. You can do this by searching for regedit, right-clicking, selecting run as administrator.
- We are looking for the registry key at the address - HKEY_LOCAL_MACHINE\SYSTEM\CurrentControlSet\Control\Class\{4D36E972-E325-11CE-BFC1-08002bE10318}\[the desired network adapter]. To eliminate errors when searching for the required adapter, you can use identification by ID: log in first in the properties of the adapter through devices My Computer -> Device Manager -> Network adapters -> Wireless network adapter -> Information -> Hardware ID, and then compare the ID in the registry - the DeviceInstanceID value.
- We change the OriginalNetworkAddress registry key to the required one (as in the previous case, it is better to give the first byte the value 02)
Editing MAC via Windows Registry
This is all the instructions for changing the MAC address for a laptop or computer.
How to change the MAC address of a computer on Windows XP
Changing your computer's MAC to Windows XP is quite simple. To do this, you need to open the Start menu and go to Control Panel.
In the Control Panel you need to open the “Network Connections” section.
Next, you need to right-click on the local network connection icon and select “Properties”.
After this, a window with local network connection settings will open in front of you. Here you need to click on the “Configure” button.
Next, a window with the properties of the network adapter will open. Here you need to go to the “Advanced” tab, select the “Network Address” property and specify the value of the network address.
After this, you need to close all open windows by clicking on the “Ok” button. This completes the process of changing the poppy address.
How to change mac address in MacOS
Changing MAC addresses in macOS Catalina and Mojave 2020 is definitely as easy as in Windows. First, you must use a terminal (similar to the command line in Windows) to actually change the MAC address. Secondly, you need to manually determine the technical name of the adapter before you can change the settings.
First, let's find out the current MAC address of your Mac. You can do this in one of two ways: through System Preferences or through the Terminal. Open System Preferences , click Network, then click Advanced . Make sure to select the appropriate interface first (WiFi, Ethernet, etc.).
Click on the Hardware and you will see the first line with the MAC address. We will need it for the command from the terminal.
Next, press the Command + Space keys simultaneously, type “ Terminal ,” and then press “Enter.”
Site material
How to change the MAC address of the adapter
To do this, I will also offer you two ways.
In the network card settings
We follow the familiar path to the “Network Control Center”, click on the connection and in the window click “Properties”
You can also get there through “Network and Sharing Center -> Change adapter settings”
Next, we find the card whose MAC address needs to be changed. I have several connections in the screenshot, but I only need one, because... the rest are disabled:
Right-click on it and select “Properties”. In the next window, click “Customize” under the card name:
Now go to the “Advanced” tab and look for “Network Address” or “Physical Address” in the list (the options “Locally Administered MAC Address”, “Network Address” and “Locally Administered Address” are also possible), put the switch on the input field and insert the required MAC address there.
To return everything back, just put it as it was.
Using special programs
Useful if the settings of your network card do not have the necessary parameters.
Technitium MAC Address Changer
In the main program window, select the network card:
In the “Change MAC Address” window, enter a new MAC address, or click “Random MAC Address” to set a set of random numbers. To apply the parameters, use the “Change Now!” button.
macshift
The simplest program is called "macshift".
Works from the command line and does not require installation. To change the MAC address, run the utility with the following parameters:
macshift -i "Connection name" 00112233AABB
where the numbers are “Connection name” - look in the “Network connections” window. Mine is called “Realtek”, you may have “Local Area Connection”:
Ryll MAC Changer
Since working on the command line is not very convenient, there is another program “Ryll MAC Changer” with a graphical interface, but it requires installation.
The only program window looks simple:
Here we select the network card, write a new MAC address for it and click “Update MAC”. For the changes to take effect, you must either restart the computer or go to “Network Center -> Change adapter settings”, right-click on the connection and select “Disable”, then “Enable” again. The “Reset Default MAC” button in the program will help you return the old MAC.
On Wi-Fi adapters in Windows 7/8/10, the address may not change in any way. In this case, the second character should be 2, 6, A or E. For example: 12:ff:ff:ff:ff:ff will do.
Using programs
In some cases (for example, for wireless Wi-Fi adapters), your specified method for changing the MAC address may not work in Windows 10. This is due to the fact that the “Network Address” property is simply missing on the “Advanced” tab and the user cannot specify own value and change the MAC address. In such cases, you can use specialized programs to make changes.
One of the most popular programs for solving this problem is Technitium MAC Address Changer (link). The upper part of the window of this program displays a list of all network cards, their current MAC addresses, status, as well as connection speed and data transfer speed.
In order to change the MAC address, you need to select the network card (for example, a wireless adapter), specify the new MAC address at the bottom of the window and click on the “Change Now” button. You can also use the “Random MAC-address” button, which will automatically generate a random address and insert it into the required field.
If you use Technitium MAC Address Changer, the changes are applied immediately and no restart is required.
You can also use other similar programs to change the MAC address on a Windows 10 computer. For example: SMAC MAC Address Changer (website) or Win 7 MAC Address Changer (website).
System registry
It is a little more difficult and longer to change the adapter address with option 2 - in the system registry. Like Device Manager, there are several ways to open it. For example, by entering the command “regedit” in a window called via Win+R.
The registry editor will open, which contains all the parameters of the installed OS. You must work carefully and carefully. You need to make a tweak (as they call changing the registry) in the HKEY_LOCAL_MACHINE\SYSTEM\CurrentControlSet\Control\Class\{4D36E972-E325-11CE-BFC1-08002bE10318} branch.
All devices that the OS found during installation are listed here. Their real names, addresses, drivers and other information. The combination of numbers at the end is responsible for the network devices in the system.
There is no point in thinking that you will have different numbers and will not find the section you need. The OS developers thought about this.
You need to sequentially check folders 0000, 0001... 0003. The “DriverDesc” parameter will indicate the real name of the network card.
Having found the section you need, go to the NetworkAddress parameter.
The value specified in it replaces the hardware address of the device. Sometimes a parameter is missing, but it can be created. When prompted by the registry for the type, specify “string”. By specifying its value, we change the MAC address of the computer.
After this, you need to reboot the network adapter.
How to change MAC address via command line or PowerShell
Having learned how to change the MAC address using the Registry Editor, we can speed up this change using the reg in the Command Prompt or PowerShell. If you need to repeatedly switch between different MAC addresses on your Windows computer, the Command Prompt is the way to go and the commands can be saved in a script file and run to speed up the procedure. Open Command Prompt or PowerShell as an administrator, depending on which application you prefer to use.
In my example, I want to change the physical address value from 000C299AAAAA to 000C299BBBBB .
To execute the command you must know the folder number from the container {4D36E972-E325-11CE-BFC1-08002BE10318}, in my example it is 0001.
Enter the following command either in cmd or in PowerShell, do not forget to enter your MAC_address.
reg add HKEY_LOCAL_MACHINE\SYSTEM\CurrentControlSet\Control\Class\{4D36E972-E325-11CE-BFC1-08002BE10318}\0001 /v NetworkAddress /d 000C299BBBBB /f
As a result, the command worked perfectly, by turning off and on the network interface, I can already observe the new physical address and, best of all, it does everything in a matter of seconds, in my opinion, this is the most convenient method to change the MAC address in Windows.
This is how easy it is to change the MAC address of a network card in Windows 7, Windows 8.1, Windows 10.