Last updated - May 16, 2020 at 2:27 pm
Replacing a video card in a desktop computer may be necessary if the old video adapter fails, or if it is necessary to replace an outdated and slow video accelerator with a newer and more powerful model.
If you have never done this, then you may have problems removing, installing and connecting your video card. Below I will detail the step-by-step steps so that you can replace the video card yourself. There's nothing complicated about it. All you need is accuracy and attentiveness.
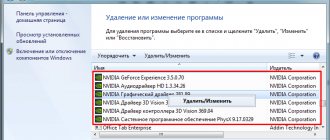
Removing the driver from the old video card
If you are changing a video card from one manufacturer, for example NVIDIA, then it is not necessary to specifically remove the video driver, since during the installation of a new one, the installer will automatically remove the old components and replace them with updated ones.
If you are changing an NVIDIA video card to an AMD graphics accelerator or vice versa, then it is advisable to force the removal of drivers using the operating system or special software. This will be more correct and will help avoid mistakes in the future.
How to choose a new video card for your computer
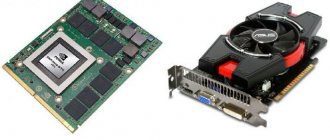
Quite a difficult task, especially in our time, when prices for video cards are rising almost every day. Therefore, you will have to maneuver between the budget and the basic requirements for the card. If the computer is intended to be used as a browser on the Internet, for work or simple games, then you can take a closer look at cheap cards from the lower segment. For example, GeForce GT 710, 210, 730 from Nvidia or HD 6450, R5, R7 from AMD.
GeForce 710 is one of the most affordable video cards, and there are absolutely silent modifications with passive cooling
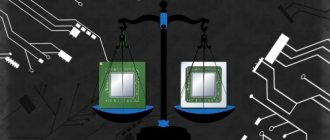
You can play relatively new games more or less comfortably on cards costing from 8-10 thousand rubles. Here you can name such models as the GTX 1050 from Nvidia and the RX 560 from AMD. Well, top-end video cards start with a price tag from 50,000 to infinity. GTX 1080, 1070, 2080 for Nvidia and RX Vega 56, 64 for AMD. In general, the simplest and most effective advice on how to choose a video card is to clearly set the boundaries of the requirements and correlate them with the budget.
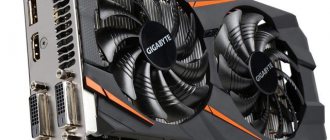
Removing the video card from the computer
Before removing the video adapter, be sure to turn off the power to the computer system unit. Turn off the power supply (if there is a button
) and preferably, remove the power cable from it.
Designations on the button: stick - on, circle - off.
All operations to replace components in a computer must be carried out only when the power is completely disconnected.
To prevent static electricity from killing the internal components of your computer, you need to reset it (ground it). Normally this is done using an antistatic wrist strap.
, but in the absence of it, you can simply touch some metal volumetric object, for example a central heating radiator. They are usually grounded and touching it will reset the static. This is especially true in winter, when the air is drier.
On all modern desktop PCs, in order to remove the video card, you need to open access to the left side of the computer case
(if you look at it from the front side). There are a great many computer cases now, and I don’t know which one you have, so you’ll have to figure it out yourself how to open it.
After you open the case, you find the video card. This will be the largest expansion card, which is installed perpendicular to the system
(motherboard) board.
Please note if your 3D card comes with an additional cable
from the power supply. There can be either one or two. They can have a connector of six
or eight
contacts that are inserted into the video card. Carefully remove it by pressing the latch
connector.
Next, unscrew the fastening screw connecting the card to the back wall of the computer case.
Now we take the video card by the cooling system or its end parts and begin to carefully remove it. It is better not to touch various elements on the board to avoid problems with statics.
When removing the video adapter, pay attention to the latch that holds the video card in the PCI-E 16x expansion slot. There are several types of fasteners. You need to press it out to freely remove the graphics card. See how to do this in the image below.
How to connect a new video card to a computer
The card is not difficult to install, connect or configure. In fact, what was written about extraction also applies here, only the process is performed in reverse order. We’ll talk about setting up and installing drivers separately.
Installing a new video card
Inserting a new board couldn't be easier. Even easier than pulling it out. We simply install it in the slot so that the key on the front part snaps into place, and the back panel with connectors and a metal strip rests against the niche. The folded part should remain on top. The screw that comes with the kit must be screwed into it. In theory, the installation of the video card on the computer is complete - you can start the PC.
But after the video card is inserted into the computer, you need to read the adapter specification and study the instructions. Some video cards require additional power that the PCI bus cannot provide. Typically, such models have a separate connector and a cable for additional connection is included. These are gaming or professional adapters with a high level of performance.
How to install drivers on a video card
There is nothing complicated about this either. Usually a driver disc is included in the package. But even in this case, it is better to immediately go to the manufacturer’s official website and download the latest versions of drivers.
Downloading drivers from the official AMD website is very easy
This will save time and eliminate incompatibility issues. As for the installation process itself, the driver package is now supplied in a convenient form in the form of an installer, which can be launched with just a double click.
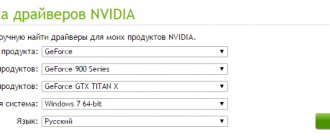
Finding drivers from Nvidia shouldn't cause any problems either.
Then the installation wizard will automatically guide the user through all the steps, giving the opportunity to select paths and components. In general, after the video card is installed on the computer, it will be detected by the system and will offer to install drivers.
How to enable the built-in video card on your computer
All the operations described above in the section about disabling the card will work here too - with the only difference that now you need to turn everything on. That is, when working on a discrete card, you need to select the second adapter in the device manager and activate it. If the drivers were also removed, then the video adapter may not be on the list - although this happens extremely rarely. In any case, it is better to install the drivers again. But there is one caveat. Modern systems allow you to use both video cards as needed. That is, at low loads the work is taken over by the built-in, and, as a rule, more energy-efficient card. As soon as more resources begin to be required, a discrete one comes into play, and there is not much need to change anything in this duo: what is the point of disabling the built-in card if it doesn’t work anyway, when a more powerful one is turned on? On the other hand, for less resource-intensive tasks, on the contrary, it saves energy.
Video card installation process
Carefully install the new video card in the same slot from which you removed the old one.
After installing the card in its slot, the latch will automatically lock the video card. All you have to do is screw it to the case and insert additional power (if any).
It is absolutely necessary to connect additional power, otherwise the video drive will not start.
If your old video card did not have additional power, then the power supply may not have the necessary wires. This is also a reason to think about replacing your power supply, since all modern power supplies always have enough such connectors. If you purchased a boxed video card in a box or Retail, then the kit usually includes special adapters.
I showed them in the pictures above. Usually this is an adapter from 2 MOLEX connectors to a universal 6-8PIN. Use it by connecting it to the power supply. The main thing is that it has enough power to work with the new card.
The video card was installed and connected. Now you can close the system unit case and connect the disconnected wires.
When everything is connected, we start the computer. If the boot menu appears on the screen, then you have done everything correctly and now the last step left is installing the drivers.
Removing the video card
Before opening the case, be sure to disconnect the device from the power supply. On the back of the power supply, press the power button and unplug the cable from the outlet. Remove the side housing cover from one side. The second side will not be needed, since only the back of the motherboard is there.
After opening the lid, you need to find the device you need. The graphics card mount is usually located at the bottom of the motherboard in a horizontal position. PCI x16 video card port. If you have an ATX motherboard, then you can build a computer with two video cards instead of one, which will give an increase in power.
To remove, you only need one simple tool - a screwdriver or hex wrench, depending on the mounting bolt. Due to its heavy weight, the video card must be supported not only by the connector, but also by a side mount. Find the correct bolt on the back of the case and unscrew it.
Now gently pull the video card towards you. If it does not budge, check the connector for the presence of retaining plates. By moving them slightly with one hand, you can remove the video card from the computer with the other.
If your processor has a built-in graphics core, then you can use your personal computer without a third-party video card. However, the power and performance will be much lower.
Cleaning the video card
You can clean the cooling system and board manually or send the equipment to a specialized service. If you decide to do this yourself, then prepare dry wipes, an air compressor, and brushes. It is also recommended to change the thermal paste and lubricate the cooler. To do this, it is necessary to remove the upper protection, if any, and the cooling system.
After completing all the work, install the video card back, connect it in the “Device Manager” of the Windows operating system and check its functionality. Usually, after preventative cleaning of dust and lubrication of the cooler, the performance of PC components improves slightly. Now you know how to remove the video card from your computer and clean it yourself.