“Create partitioning on the disk”
PS All operations were carried out on a flash drive - but the HDD partitioning process is no different.
So: we bought a new hard drive that we want to use in our Mac.
First, we need to decide: 1. What we are going to install: Windows or OS X 2. Which system we will use it with: Windows, OS X or both systems. Partitioning the disk:
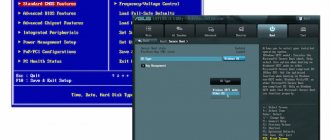
1. Select the disk:
2. Go to the “Disk Partition” tab:
The figure shows: 1. Section diagram. When marking, select one section, then (but before applying the actions) you can also add/remove sections. 2. Editing a section. We created a section and here we change the information. 3. Partitions on the disk. 4. Edit buttons. I'll tell you more about this below.
So, to partition a disk you need to: 1. Create partitions. In the list (in Figure 1) select Partitions: 1. 2. Click Options (in Figure 4) and select the appropriate partition scheme:
GUID partition scheme - if we use a disk with OS X. MBR partition scheme - if we use a disk with Windows and Mac (but not for installing Mac!) or for installing Windows. We choose carefully; in the future, without re-partitioning (and, as a result, erasing all data), it will be IMPOSSIBLE to change the partition!
Have you chosen? Then let's move on. Now we need to create an additional one. sections (if, of course, necessary). Please note that if the disk will be used with OS X, but in the future you will have to install Windows on it, you need to leave ONE partition. In other situations, if necessary, we create sections and change their size using the mouse by simply dragging the lower right corner.
After creating partitions, they need to be formatted. If you use the partition to install Windows, format it in FAT; if for Mac data or Mac installation - HFS+; if Windows (+Mac) data is FAT (but files larger than 4 GB cannot be stored, for this you need to format it in NTFS via Windows or by installing Paragon NTFS (paid, available on inmac.org)). Next, set a name for the section (optional).
And the last thing: click the apply button and wait for the sections to be created. All! Sections have been created. You can install OS X, Windows, or fill the disk with data.
Download macOS
Find the appropriate download link in the update instructions for each version of macOS:
- macOS Catalina,
- macOS Mojave or
- macOS High Sierra
The installers for each of these versions of macOS are downloaded directly into your Applications folder as an application named macOS Catalina Installation, macOS Mojave Installation, or macOS High Sierra Installation. If the installer starts immediately after downloading, exit it without continuing with the installation. Important! To get the correct installer, download from a Mac running macOS Sierra 10.12.5 or later or El Capitan 10.11.6. Enterprise administrators should download from Apple's website rather than from a software update server located on their local network.
- OS X El Capitan
The El Capitan installer downloads in disk image format. On an El Capitan-compatible Mac , open the disk image and run the installer named InstallMacOSX.pkg from it. An application named “OS X El Capitan Installation” will be installed in your Applications folder. The bootable installer is created from this application, and not from a disk image or .pkg installer.
“Roll out the disk image to Flash”
This instruction is suitable for .dmg images, but for some reason it does not work with .iso images. Why do we need this? For example, to install OS X Lion/Mountain Lion from a flash drive. What we need: 1. Disk image. 2. Flash drive with image memory size + 1-2 GB. 3. Disk utility. How to roll out a disk: 1. Take the image, drag it to the list of disk images (in the case of rolling out an OS X image, we need the disk image Install ESD.dmg, located along the path “/Contents/SharedSupport” of the installer file (you can view it by right-clicking the mouse - >Show package contents)). 2. Choose an image. Go to the “Restore” tab. 3. In the “Source” field, don’t touch anything - our image is there; in the “Destination” field, drag our disk (or disk partition) from the list of disks.
4. Click “Restore”. We will be asked for permission to erase the partition, click “Erase”, we will be asked for permission (you need to specify the user password). And the image will begin copying to disk. That's all)
Compatible with macOS Mojave
Your Mac must have at least 2 GB of memory and 12.5 GB of free disk space, or up to 18.5 GB of free space if upgrading from OS X Yosemite or earlier.
macOS Mojave can be installed:
- MacBooks released in early 2020 or later.
- MacBook Air released in mid-2012 or later.
- MacBook Pros released in mid-2012 or later.
- Mac minis released in late 2012 or later.
- iMacs released in late 2012 or later.
- iMac Pro (all models).
- Mac Pros released in late 2013, mid-2010, and 2012 with a Metal-enabled graphics card.
“Checking the disk and restoring rights”
Everything here is as simple as two fingers: select a section in the list and go to the “First Aid” tab:
Everything is simple here: 1. Check access rights; in case of an error, the Utility will tell you, then we need button 2. 2. Restore access rights.
We restore violated file rights on the disk. 3. Disk check. In case of errors, click on the “Fix disk” button. I recommend restoring rights in the case of Kernel Panic and after editing kexts in one way or another. OSX Support Macintosh
Subscribe to question
add answer
WE RECOMMEND READING
Sale on Steam: hundreds of games are now free or on sale with discounts of up to 90% A bug in iOS 13.5.1 drains the battery. How to check if this problem has affected you Yota launched Upgrading Windows 10 with PowerToys The latest update left Xiaomi owners without communication How to transfer your music to Spotify from other services
PREVIOUS ARTICLES TODAY
Apple China App Store
Possible problems when checking or restoring disks that do not include shutdown
While scanning or repairing certain volumes that are not bootable and cannot be unmounted, Disk Utility may become unresponsive without displaying any error messages, or may pause the computer for a few seconds.
If when trying to check
volume that is not bootable, Disk Utility for some reason cannot disconnect it (for example, due to the presence of open files on the disk), the scan will begin and soon stop without warning. In the “Console” utility (located in the “/Programs/Utilities/” folder), you can see an entry similar to the one below.
Verifying volume “Storage” The disk “Storage” could not be unmounted Could not unmount disk for verification, attempting live verify
When trying to restore
disk that cannot be disconnected, recovery will begin but will soon stop. Disk Utility will display the following message: “Disk recovery failed. Failed to unmount the drive."
In the “Console” utility (located in the “/Programs/Utilities/” folder), you can see an entry similar to the one below.
Verify and Repair disk "Storage." The disk “Storage” could not be unmounted. Could not unmount disk for verification. Repairing disk failed with error. Could not unmount disk.
In rare cases, the computer may not respond for several seconds.
If you can't identify files open on the drive you want to scan or repair, restart your computer and reconnect the drive, or boot from the Mac OS X installation DVD or recovery CD.
Method #3. Using Install Disk Creator
Download this easy-to-use free utility from its website.
It is assumed that before starting to work with the utility, you have downloaded macOS Mojave from the App Store and connected the flash drive to the USB connector.
The entire process of the software tool is fully automated. You only need to determine in the top field of the utility window which flash drive will become bootable. Then click the “Create Installer” button.
You will be asked to confirm formatting, click “Erase disk”.
Next you need to enter a password. It will take some time to create the boot drive.
With a bootable USB flash drive, you can install the system. The only condition is that your computer model is compatible with macOS Mojave.
Safe mode
Why is it needed: safe mode allows you to eliminate problems that arise during normal loading of OS X. When the system starts, the integrity of the drive will be checked and only the most necessary system components will be launched. If third-party applications caused startup errors, the system will boot without problems.
We use this mode when OS X crashes and freezes when loading. If the Mac boots into it, we begin to disable the automatic loading of applications that launch along with the system.
How to get there: hold down Shift (⇧) .
Part 4. How to Fix Recovery Mode Not Working
Restoring from a time machine backup
Step aerobics 1
Once you hear the startup tone, restart your Mac and click on the option.
Step aerobics 2
, Attach the time machine disk. This process may take some time and please wait patiently.
Step aerobics 3
You may see connected Time Machine drives fail.
Step aerobics 4
Then you can select the recovery drive to boot your Mac.
Get help online
Step aerobics 1
When startup music starts playing, restart your Mac as soon as possible and click Options > Command + R.
Step aerobics 2
. Hold the "Command" and "R" key combination until a photo of the globe and a progress bar appear.
Step aerobics 3
. Select the right Wi-Fi to connect your Mac to the Internet.
Step aerobics 4
, Take a break and then complete the Internet Recovery startup process.
Utility disk
Step aerobics 1
. Restart your Mac when you hear startup music playing, and then click "Option".
Step aerobics 2
. Connect the bootable installation disk to your Mac and select it from the pop-up window.
Step aerobics 3
Then you can see the Mac itself reboot, which means you have fixed it successfully.
Reinstall MacOS
If others still work but this feature doesn't work, make sure you've already backed up your important data, then reinstall Mac OS X.
Installing Mac OS on iMac
Current as of 10/02/2020
| Works | Price | Term | Guarantee | |
| Installing Mac OS on iMac | 1500 rub. | 30 minutes | 90 days | More details |
| iMac Diagnostics - Free! | 0 rub. | 90 days | More details | |
| iMac Repair | More details | |||
| What is the iMac's screen resolution? | More details | |||
| How to take a screenshot on iMac | More details | |||
| One drive on my iMac has disappeared. What to do? | 30 minutes | 90 days | More details | |
| How to Format a Drive on an iMac | 30 minutes | 90 days | More details | |
| iMac 5K RAM | 20 minutes | 90 days | More details | |
| Installing Windows on iMac | 20 minutes | 90 days | More details | |
| Installing windows 7 on iMac | More details | |||
| Installing Windows 10 on iMac | More details | |||
| Install windows on imac from a flash drive | More details | |||
| How to remove the iMac stand | More details | |||
| How to recover your iMac password | More details | |||
| Smart Error on iMac | More details | |||
| What does the pfm006 imac error code mean? | More details | |||
| Sync iMac and iPhone | More details | |||
| How the iMac network card works, common faults | More details | |||
| Connectors and interface available on iMac | More details | |||
| Why the keyboard doesn't work on iMac and what to do about it | More details | |||
| How to update your iMac | More details | |||
| Why does my iMac turn off on startup? | 20 minutes | 90 days | More details |
They've known us for 12 years
We only repair Apple. Never closed, tens of thousands of users know us
Your own spare parts warehouse
No need to wait! Large warehouse, current spare parts in stock, quality control
We repair for services
Service centers trust us. Our experience and reputation speak for themselves.
Against knee-jerk service
For quality! Correctly, professionally and using technology can only be done in the SC.
Prices without stars
Everything is transparent and honest with us. Ask anyone: MACPLUS TEAM
Expert advice: How to choose the right service?
Never needed electronics repair before?
Don't know where to start? First of all, don’t worry! Signs of good and quality service are immediately visible. We have prepared instructions for those who are looking for a workshop or service center for Apple repair
Real, honest and transparent prices on the site
Real deadlines and a guarantee are respect for you
Reputation of Apple professionals and several years of experience
Read the checklist for choosing an Apple service
Part 1: What is Disk Utility on Mac?
First, we must know what is Disk Utility on Mac.
Disk Utility is a built-in application where you manage disks, add and manage RAID volumes and disk sets.
It performs many useful operations such as formatting, deleting and managing internal and external storage devices.
Disk Utility also lets you create a disk of image files that you can move to another computer, archive, or backup.
Disk Utility can also fix and diagnose disk problems and damaged volumes.
How to save data from a Mac that won't load macOS
If you don't care about the data stored on your hard drive, then feel free to skip this step and move on to the next step.
If you do not use the most useful Time Machine feature, then before reinstalling macOS you need to take care of transferring data from the disk. Developers from Cupertino have come up with a special External Disk Mode (), with which you can access data stored on the Mac hard drive for copying it to another Mac. The disadvantage of this method is obvious - the need for a second Mac and a Thunderbolt cable.
To activate External Disk Mode you must:
1
. Connect both Macs using a Thunderbolt cable.
2
. Turn off the problem Mac and turn on the working Mac.
3
.
T
button pressed and hold it until the Thunderbolt icon appears on the display on a blue background, which indicates that the Mac has successfully launched in external drive mode.
On a working computer, Finder should have an external hard drive, from which we will copy important data. After completing the procedure, safely remove the disk and turn off the computer by long pressing the power button.