The main reason for the slow operation of a smartphone or tablet is the lack of RAM. It is impossible to solve the problem by replacing it with a larger RAM module like on a computer. The only solution is to increase RAM on Android using software.
There is only one way to increase the RAM capacity on an Android phone - create a swap file in the internal memory of the device or on a memory card.
The principle of operation is the same as when creating a paging file in the Windows operating system. To avoid problems with a lack of RAM, a special place is organized in the drive to store information that is not used by the OS for some time. As soon as any application whose data is uploaded to swap is launched, it is re-unloaded into the smartphone’s RAM.
general information
It's no secret that just a few years ago, 4 gigabytes of internal memory and 512 MB of RAM were quite enough to solve average problems. And devices with 8 GB of ROM and 1 gigabyte of RAM storage were then classified as flagship ones. However, today such parameters are very rare, which is explained by the increase in user requests. After all, even the most affordable smartphones have at least 16 gigabytes of internal storage, and more advanced ones have 32-64 GB. Of course, you can find models with smaller volumes on the market, but there is simply no point in buying them.
When trying to find a middle ground between the ratio of ROM and RAM memory, you must be guided by the following criteria:
- 1 GB of RAM and 8 GB of internal storage is enough for picky smartphone owners who do not need hundreds of applications, widgets or music files. It is problematic to find such a volume in modern devices. Most likely, it is present in older collapsible models, which are equipped with an additional slot for memory expansion.
- 2\16 GB is an excellent ratio for those users who are going to buy a new smartphone in the near future. This amount of memory is enough to solve simple problems, but if the device is used for a long time, it will not be enough.
- 3\32 GB is the most popular option, which is enough for long and productive operation of the smartphone.
- 4\64 GB - this amount of memory is present in flagship-level models. If given 4 gigabytes of RAM and 64 GB of ROM memory, the smartphone can be used without the need for replacement for several years.
The most advanced smartphones are also sold on the market, with RAM storage capacity of 6 or 8 gigabytes of memory, and an internal storage capacity of more than 128 gigabytes. Naturally, this is more than enough for comfortable operation of the device.
When choosing a mobile phone, you don’t need to think that 8 gigabytes of physical memory is a good amount and will be enough for long-term operation of the device. After all, after installing several applications or games, the smartphone will issue an alert about low memory and begin to seriously slow down.
Is it possible to increase the RAM on your phone?
This question often worries users who have little or no understanding of the primitive workings of the device. You can increase the RAM. Further in the article we will present methods by which the amount of RAM will increase significantly.
Question to the expert
What happens if there is not enough RAM on the device?
A lack of RAM will primarily lead to a slowdown in the overall performance of the device. All applications and primitive actions will begin to slow down. Since the gadget does not have time to process the entire flow of information.
What is the difference between RAM and internal memory?
RAM is built into the phone itself and is responsible for standard actions, when the internal memory is intended for downloading various applications and storing data.
Why increase the amount of RAM?
Since its lack leads to a decrease in performance and lags of the phone, an increase will lead to an increase in the speed of information processing. The phone will stop ringing.
Do I need to increase the internal memory?
Yes. The user will have more space to download their files and data. Cluttering the internal memory is just as bad for the device as it is for the RAM.
Basic expansion methods
The problem of low system memory often worries owners of Android devices. This is explained by the fact that during prolonged use of the gadget, it becomes clogged with various software garbage, cache files and other content. But if you know how to expand memory on Android, you can solve the problem and continue to comfortably use your smartphone or tablet.
Currently, two methods of memory expansion are used:
| Method | Description |
| Physical. | Involves the use of removable microSD memory cards. The maximum allowable amount of external memory depends on the technical characteristics of the devices, but most modern models easily work with 128 GB flash drives. |
| Program. | This option requires removing all unnecessary programs and files, as well as performing a few simple steps to expand the memory capacity of the internal storage. |
As you know, smartphones running Android OS have three types of memory: RAM, internal and external. The purpose of RAM memory is to temporarily store information from running services or software. And if the owner of a personal computer can increase this parameter by purchasing another stick of RAM, then such manipulation will not be possible with a mobile device.
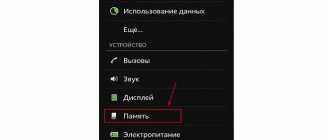
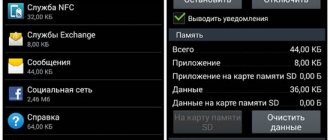
Increasing RAM on Android means cleaning the RAM storage from unnecessary garbage. This will improve the performance of the gadget. The amount of available memory is displayed in the settings.
Internal storage is designed to store personal content, including photos, videos, music and software. To expand the internal memory on Android, you just need to buy a tiny external microSD card and then install it in your smartphone. Fortunately, most models support this function, so there will be no problems installing a flash drive.
But if the smartphone does not have an additional slot, you will have to expand it programmatically, following certain instructions. If you follow them, the task will be completed quickly and will give the desired result.
Moving unnecessary applications from internal to external memory card
You can transfer applications through the Android application manager. The convenience is that you free up internal memory without uninstalling unnecessary applications.
By transferring applications, you will save a couple of hundred megabytes of free space. Since the cache is also transferred along with the application, the savings are significant.
In general, starting with the Android Marshmallow version, everything has become simpler. It is enough to format the memory card as internal storage through the settings. You don’t need to do anything else; the Android OS will automatically determine which applications to store on the memory card.
Advice . Install the FolderMount application - an “extender” of the phone’s internal memory. It also works on Android 4.2.1 and higher, while analogues do not support multi-user mode. The application requires root to run.
Built-in functions
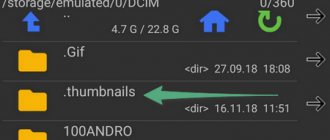
When trying to understand how to increase system memory on an Android device, you should first pay attention to the built-in expansion functions. One of them is to remove unnecessary content that accumulates as programs and system services operate. To complete the procedure, you need to locate such files, select them and delete them. It is better to do this through a special explorer application, for example, File Manager.
A good way to increase available memory is to uninstall unnecessary applications. This is done in the smartphone settings, in the “Applications” section. Unfortunately, not all programs can be removed, since some of them are system ones. But if you get root rights, the problem will be solved without any problems.
There is another systemic method that involves moving software from internal storage to external storage. To perform this manipulation, you need to open the properties of the installed program and find the “move to SD card” button.
Transferring applications using additional software
App2SD
It is recommended to use AppMgrIII (App2SD) as a program that will help increase internal memory for installing applications.
To transfer utilities to a flash card using this program, you must:
- Install AppMgrIII.
- Enter it.
- In the “Moved” tab, select the utilities that need to be moved.
- Click on the folder icon at the top.
- In the window that opens, click on the red arrow.
- The utility details window will open.
- Now you can move it to your SD card.
One of the advantages of the program is hints about compatibility with external memory. It will not allow you to move those utilities that behave incorrectly after the transfer.
Link2SD
Link2SD utility is complex but effective for expanding internal memory on Android. To work with it you need root rights.
To get started, you need to create an area on the ext3\ext4 SD card to emulate phone memory:
- Enable Recovery mode. Press the volume and power buttons together.
- Select Advanced mode.
- Click on Partition SD Card.
- Create an ext3 system. Give the size 1 Gigabyte. A Swap file and page file are set to zero size.
- Reboot your smartphone. Now the map size will be reduced by the volume specified by the user. You can move utilities from your phone memory there.
- The transfer can be done by normal means. Or using the “Create Link” button. The smartphone will be sure that the program is on the device itself after such a transfer.
In addition to helping with moving, the utility can clear the cache, delete unnecessary data, create shortcuts and place them on the desktop.
And the paid version of the program marked “Plus” removes annoying ads and automatically cleans the memory.
Clearing cache files
An equally effective method of expanding internal storage memory is to clear cache files that are accumulated by applications. The word “cache” doesn’t mean anything to many, but in essence it is a special virtual resource that stores some information and configurations that ensure quick opening of web pages or downloaded files. When using a smartphone for a long time, the volume of cache files can reach several gigabytes. To clean up software junk, you need to open the application menu and find the corresponding item.
In addition, the smartphone’s memory stores files that cannot be found through a regular explorer. They accumulate pointlessly for months, reducing system performance and causing various malfunctions. To perform a deep memory cleaning, you need to install a special file manager, for example, ES Explorer. Such utilities provide access to all hidden resources and also have built-in garbage cleaning tools.
To clear your smartphone's memory using special programs, you must follow these instructions:
- First you need to run the downloaded utility.
- Then you need to find the folder with software junk or use a special function to quickly search for applications with different extensions.
- After selecting unnecessary content, all that remains is to click on the “delete” button.
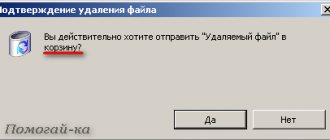
It is important to remember that some utilities are not able to completely delete files; instead, they move them to the Recycle Bin. Therefore, for deep cleaning, you need to additionally look at the contents of this folder.
Increase Android memory using a MicroSD memory card. Root methods up to Android 5.1
Before you start increasing Android memory, it is recommended that you read the article about internal Android partitions to understand how everything works. Also, for everything to work out, you need to have Root rights installed.
- What is Root
- Root your Android
Dividing a memory card into a partition. Method 1 (CWM)
If you do not have CWM recovery installed or if suddenly you do not have the Partition SD Card function in your recovery, then go to the second option!
- Reboot Android into Recovery Mode
- Go to the Advanced section
- Select Partition SD Card
- Select the volume of the EXT partition on the card (for applications)
- Select the volume of the Swap partition (select 0)
- Wait until the partitions are created
- Return to the main menu and click on reboot - Reboot System Now
- After loading Android, you can return all the files that you saved to your computer back to the memory card
Go to the article section increase Android memory using Link2SD
Dividing the memory card into sections. Method 2 (via PC)
Place the memory card in a card reader or other device, the main condition is that the device is not detected as MTP.
- Connect the card reader in which the memory card is already inserted to the computer
- Download and install the MiniTool Partition Wizard Home program
- Launch the MiniTool Partition Wizard Home application
- Right click the mouse to select the memory card
- Select an item in the Create menu
- In the menu that opens, set the following parameters:
- Create As: Primary
- File System: Fat32
Next, in the Size And Location field, change the size of the partition (this section will be for files, the one in gray will be for applications)
and then confirm the actions
7. Now on the new unallocated area of the memory card Select the item in the Create menu 8. In the menu that opens, set the following parameters:
- Create As: Primary
- File System: Ext2 or Ext3 or Ext4 (preferably Ext3)
Click OK again and agree to the warning
9. Confirm the action by clicking on the Apply button (top left) 10. Close the MiniTool Partition Wizard Home program 11. Return files to the card previously saved on the computer 12. Return the memory card back to Android
Increase Android Memory Using Link2SD
- Download the application from the Link2SD app store
- Open the newly installed Link2SD application
- In the application settings, select remount paths
- From the list of available installed applications, select the one you need and transfer it
That's all! Read more articles and instructions in the Articles and Android Hacks section. Stay with the Android +1 site, it will be even more interesting!
Installing external media
If there is still not enough space for installing programs, downloading music, videos or games, and the built-in methods for expanding storage, deep cleaning and other manipulations do not give good results, all you have to do is buy a memory card. But before you do this, you need to consider a few important points:
- Is the device equipped with a slot for microSD memory cards? To do this, you need to inquire about the technical characteristics of the model on the manufacturer’s website or simply inspect the device for the presence of such a connector.
- What is the maximum capacity of memory cards supported. Detailed information can be obtained on the Internet and on the website of the gadget manufacturer.
Having done this, you can start looking for a suitable external drive. After installing the flash card, it must be configured correctly. The latest versions of the Android operating system provide the ability to use external media as the main storage.
In addition, some smartphone models support OTG technology, which allows for the free connection of conventional computer flash drives. To make sure that this function is available, you need to carefully examine the characteristics of the smartphone or try connecting a drive to it using a special adapter.
Install the SWAP application
If your device is compatible, you should download, install and run the ROEHSOFT RAM-EXPANDER (SWAP) application. Give this application root rights, and then select the language you need (available in English, German and French).
Use the slider to select the amount of space you want to reserve for the SWAP partition. Click on "Optimal" to automatically adjust the settings for best performance, plus the "Auto Start" option should also be activated. The last thing you need to do is click on the “Swap Activation” icon to complete the process.
Click on “Optimal value”, and before clicking on “Swap Activation”, make sure that you have “Autorun” enabled
Increasing the amount of RAM
As already mentioned, it is impossible to expand RAM on a smartphone using the same method as on a computer. After all, you cannot install an additional bracket in a mobile device. The only way to solve the problem is to use software methods. In any case, it is important to understand that you cannot make 4 gigabytes of RAM out of two, but it is quite possible to free up occupied space.
First of all, you need to perform a simple procedure to “freeze” applications that are not in use. After all, if you remove the program from background processes, this will significantly reduce the consumption of RAM resources, which will have a positive effect on the performance of the device. This procedure can be done using special programs and utilities that are available in the official Google Play store. However, when installing third-party tools, there are several nuances to consider:
- It will not be possible to free up more RAM memory using such utilities. Moreover, they themselves take up a lot of space on the smartphone and also consume RAM. To optimize the system, some tools spend a lot of resources, which only aggravates the problem of lack of RAM.
- For the application to work properly, you need to configure it, selecting programs that cannot be touched. Otherwise, the utility may arbitrarily “freeze” important software, which will negatively affect the operation of the device.
- It is not recommended to install several tools at once; this will only make the problem worse.
Among the most common managers for cleaning RAM are the following programs: CCleaner, DU Speed Booster, CLEANit, Droid Optomizer, etc. All these utilities work on a similar principle, and the only way they differ is the interface and size.
To improve the performance of your Android device, you can try the option of creating a swap file. It resembles the same virtual file found in computers. In simple words, a certain part of the external drive is used to expand RAM resources.
You can partition external storage only after obtaining root rights. But you will also have to install a special utility, for example, SWAPit RAM EXPANDER.
Uninstalling programs
As we said above, in some cases it will be better to simply delete the applications.
Then they will definitely not be able to create a load on the system. But some programs cannot be removed. They are called system ones. These include a standard flashlight, programs from Microsoft, and the like. Of course, some of them are really better not to delete. But there are also those that you can completely do without.
For example, every Android phone/tablet has the Gmail application. If you don't use Google email, you don't need it, but you can't just delete it.
So, there are two ways to remove uninstallable applications:
- Obtaining superuser rights, which make it possible to delete absolutely everything that is on the device and perform other operations with it all.
- Using special programs to remove applications on Android.
Superuser rights are also called root rights. To obtain them, the easiest way is to use special programs. For example, there is KingRoot. This is one of the most popular applications for obtaining root rights. To use it, do this:
- download KingRoot from the official website of this program and install it;
- launch the application;
- if all is well, the “Try to root” button will become available, click on it;
- wait until the device is granted superuser rights.
Rice. 2. Using KingRoot on a smartphone
If you were unable to complete the above instructions, try using the same KingRoot, but on a computer. To do this, follow a number of simple steps:
Rice. 3. Search for connected devices in KingRoot on your computer
- When the device is found, a window will appear on it asking you to allow USB debugging. Click "OK" to complete this action. Without it, it will be impossible to perform all further operations.
Rice. 4. Allow USB debugging on your phone
- Now, in the program on your computer, press the “ROOT” button to give the connected device root rights.
Rice. 5. Button for assigning root rights to the connected device
- Some devices will require a reboot. If this is the case in your case, a notification will appear on it. Click "OK" to reboot. If not, continue to the next step.
- At the end, the “Finish” button will appear in the program window on the computer. Click on it to complete the process.
Rice. 6. Completing the assignment of root rights in KingRoot on the computer
After this, you will be able to work with superuser rights. Go to the list of applications again, open any one and there will be a “Delete” button. Click on it to delete.
In addition to KingRoot, also pay attention to the following applications that will help you complete the task of assigning root rights:
- iRoot;
- UniversalAndroot;
- Framaroot;
- Vroot;
- KingRoot;
- Kingoapp;
- Towelroot;
- Root Genius;
- WeakSauce.
Most of them help you complete the task in one click.
Just. Is not it?
It's even easier to install special programs that allow you to remove other applications. For example, there is Super Cleaner. The application was created in 2020 by the Hawk App Studio development team. To use it, do the following:
- Download the application on Google Play (here is the link).
- Go to the "App Uninstall" menu.
- You will see a list of installed applications that you can remove. Those that cannot be uninstalled using the standard list of Android applications will also be displayed here.
- Click on an application to remove it from your smartphone/tablet.
Rice. 7. List of applications to remove in Super Cleaner
All such programs have the same algorithm of use - you need to go to the list of applications and click on the one you want to delete. Here is a list of other programs for uninstalling applications:
- Clean Master Lite;
- DU Speed Booster;
- CCleaner;
- Clean My Android.
Removing unnecessary programs will significantly increase the amount of available RAM. Using swap files will also help with this.
Summarizing
These were the three easiest ways to add memory. Smart programmers will say that any smartphone has some hidden area of permanent memory, which is reserved by the operating system for its needs. Theoretically, part of this volume could be unlocked. However, this is too difficult; root rights and skillful operation of the computer are required. And not all smartphones can pull off such a trick, not to mention the meager amount of this amount of memory. It's much easier to use a microSD card or a good old USB flash drive.
"Clouds"
Now there are a large number of cloud storage services that provide services completely free of charge. At least on a free basis you can count on 10-20 GB, and sometimes even more free space. In particular, it is recommended to use Google Photos as much as possible. This application provides disk space to store photos. That is, in the future you can delete these images from the memory of the smartphone itself, thereby freeing up space.
Another useful cloud service is Dropbox. Compared to its competitors, it does not provide a very large amount of memory, but you can store absolutely any files here. Another advantage of Dropbox is that the service is supported by many other applications. For example, photos can be saved here, as well as all kinds of backup copies.
The use of cloud services is relevant even on smartphones with a huge amount of their own memory. And on budget Android devices such clients need to be installed first. Now “clouds” even allow you to play video in streaming mode without downloading it to your device. This makes the service even more useful.
The limitation of all Dropbox and Yandex.Disk is the need to connect to the Internet. In conditions of limited traffic or somewhere in the forest, such services become practically useless.
Method eight: memory capacity in an Android phone - take low-quality pictures
When very high resolution of your photos is not a priority, you should consider lowering the quality in favor of space.
A photo with a resolution of 5120 x 3840 can weigh up to 8 MB, but a good 3264 x 2448 is only about 2 - 3 MB. Even four times the space savings due to quality.
Smaller photos are easier and faster to upload to the cloud; archived ones take up less space and are slower to fill up valuable phone memory.
This setting can always be reverted back to the highest quality - for example during holidays.